
Installing a remote control ceiling fan can change how you feel about comfort at home. Imagine not needing to get up just to change the fan speed or turn off the light. With a remote control fan, you gain convenience, better energy use, and even a bit of style. Many people think installation is hard, but with the right instructions, you can do it safely—even if you are not an expert. This guide walks you through each step, from choosing the right fan to wiring, mounting, and troubleshooting. Whether you’re replacing an old fan or adding a new one, you’ll find clear advice, practical tips, and answers to common questions.
Why Choose A Remote Control Ceiling Fan?
Remote control ceiling fans have become very popular in modern homes. But what makes them a smart choice? First, they offer easy control. Instead of using pull chains or wall switches, you can adjust speed, light, or direction from your bed or sofa. Some remotes even include timers or smart home integration.
Another big advantage is energy efficiency. Many fans with remotes have better motors and smart features, helping you save on electricity bills. You can also set the fan for just the right comfort, which means your air conditioner or heater works less.
Design is also a factor. Remote fans often look cleaner without long chains hanging down. For homes with high or sloped ceilings, a remote is sometimes the only practical way to control the fan.
Main Benefits
- Convenience: Adjust speed and light without getting up.
- Energy Savings: Better control helps reduce wasted power.
- Safety: No need to reach for chains, which is safer for kids and seniors.
- Modern Look: Sleek designs fit any room style.
- Smart Features: Some models work with apps or voice assistants.
Understanding Ceiling Fan Types And Remote Options
Before you start, it’s important to know the types of ceiling fans and remotes available. This helps you choose the right model and avoid problems during installation.
Fan Types
- Standard ceiling fans: The most common, usually installed with a downrod.
- Flush mount (“hugger”) fans: Installed close to the ceiling, good for rooms with low ceilings.
- Outdoor ceiling fans: Made for patios or wet areas, with weather-resistant materials.
- Smart ceiling fans: Include built-in Wi-Fi or Bluetooth for app control.
Types Of Remote Controls
- Handheld remote: The most common, works like a TV remote.
- Wall-mounted remote: Installed on the wall, combines remote with switch.
- Integrated smart remote: Works with smartphone apps or voice assistants.
Compatibility Matters
Not all ceiling fans come with remotes, but many can add a remote kit. Always check if your fan is remote-ready. Some older fans may need special kits or may not support remote controls at all. Also, make sure the remote system works with your home’s wiring and voltage.
Comparison Table: Fan Types And Remote Compatibility
| Fan Type | Best Room Height | Remote Compatibility | Typical Price Range |
|---|---|---|---|
| Standard | 8–10 ft | High | $75–$350 |
| Flush Mount | <8 ft | Medium | $60–$200 |
| Outdoor | Any | Medium | $100–$500 |
| Smart | 8–10 ft | Built-in | $150–$600 |
Tools And Materials You’ll Need
Having the right tools makes the job smoother and safer. Here’s what you’ll need for most remote control ceiling fan installations:
- Ceiling fan kit (with remote receiver and remote)
- Screwdriver set (Phillips and flathead)
- Drill (with bits, if new holes are needed)
- Wire strippers and cutters
- Voltage tester (to check if wires are “live”)
- Ladder (tall enough for your ceiling)
- Wire nuts (usually included, but extras help)
- Electrical tape
- Stud finder (for mounting to joists)
- Pencil and measuring tape
- Mounting bracket (often included with fan)
Optional But Helpful
- Work gloves: For grip and safety.
- Safety glasses: Protects eyes from dust or debris.
- Helper: Holding the fan in place is easier with two people.
Safety First: What To Know Before You Start
Working with electricity is serious. The biggest risk in ceiling fan installation is electrical shock or fire from bad wiring. Safety steps include:
- Turn off power at the breaker box, not just the wall switch.
- Double-check with a voltage tester before touching wires.
- Do not overload the ceiling box. It must be rated for fans, not just light fixtures.
- Read the manual for your specific fan, as details can vary.
- If you are not sure, hire a licensed electrician. It’s better to pay for safety.
One non-obvious tip: Many homes have ceiling boxes only rated for lights, not fans. A fan-rated box is stronger and keeps the fan from falling. If you’re unsure, look for a stamp or ask at your hardware store.

Credit: diy.stackexchange.com
Removing Your Old Fan Or Fixture
If you are replacing an existing fan or light, you need to remove it first. This step is often skipped in guides but is crucial for a safe, clean install.
- Turn off power at the breaker. Double-check with your voltage tester.
- Remove bulbs and shades from your old fixture.
- Unscrew the fixture from the ceiling. Hold it with one hand as you remove screws.
- Disconnect wires by unscrewing wire nuts. Support the fixture so it does not fall.
- Check the ceiling box. Make sure it is fan-rated. If not, replace it before moving on.
Pro tip: Take a photo of how the old wires were connected. This can help if you need to reconnect or check the wiring later.
Assembling The New Ceiling Fan
Most fans come in several parts. Assembling them before you get on the ladder saves time and reduces mistakes.
Steps To Assemble
- Lay out all parts on the floor. Check against the instruction manual.
- Attach the blades to the blade brackets. Use the screws provided.
- If using a downrod, attach it to the fan motor housing. Thread the wires through the rod.
- Install the mounting bracket (if required) onto the fan motor.
- Connect the light kit (if your fan has lights). Do not install bulbs yet.
Important insight: Many people rush this step and drop screws or mix up parts. Take your time, and use small containers for screws and hardware.

Credit: diy.stackexchange.com
Installing The Ceiling Bracket And Mounting Hardware
The ceiling bracket holds the fan and must be firmly attached to a fan-rated ceiling box. Never use a plastic or light-only box. A loose bracket can be dangerous.
How To Install
- Position the bracket over the ceiling box.
- Secure with screws: Use the hardware provided, tightening into the joist or metal box.
- Test the bracket by pulling gently. It should not move.
If your ceiling is sloped, use an angled mounting kit. This keeps the fan level and avoids wobble.
Wiring The Remote Receiver
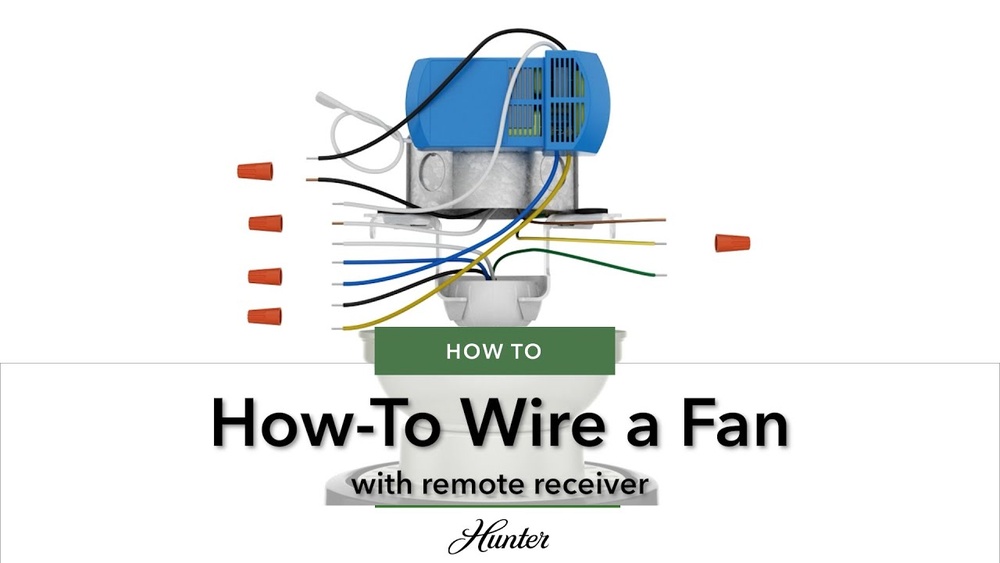
This is the step where most people get stuck. The remote receiver is a small electronic box that fits above the fan’s motor, inside the mounting bracket or ceiling box. It connects to your home’s wiring and the fan.
Typical Wiring Colors
- Black: Fan power
- Blue: Light power
- White: Neutral
- Green or bare: Ground
Common Connection Steps
- Identify wires: Use your fan’s manual and the receiver’s wiring diagram.
- Connect receiver wires:
- Black (AC in) from ceiling to black (receiver)
- White (neutral) from ceiling to white (receiver)
- Blue (light out) from receiver to blue (fan)
- Black (fan out) from receiver to black (fan)
- White (fan out) from receiver to white (fan)
- Connect ground wire to the fan and box.
- Secure with wire nuts. Wrap with electrical tape for safety.
Non-obvious tip: Some ceilings have extra wires (like red for a second switch). If you’re not using a wall switch, cap these wires safely with a wire nut.
Wiring Diagram Example
Here’s a basic wiring comparison for three common scenarios:
| Scenario | Ceiling Wires | Receiver Wires | Fan Wires |
|---|---|---|---|
| Single switch, remote only | Black, White, Ground | Black (in), White (in), Black (out), Blue (out), White (out) | Black (fan), Blue (light), White (neutral), Green (ground) |
| Dual switch (fan and light) | Black, Red, White, Ground | Black (in), Red (in), White (in), Black (out), Blue (out), White (out) | Black (fan), Blue (light), White (neutral), Green (ground) |
| No ground wire | Black, White | Black (in), White (in), Black (out), Blue (out), White (out) | Black (fan), Blue (light), White (neutral) |
Always follow your fan’s manual if wire colors differ.
Mounting The Fan To The Ceiling
With wiring done, you are ready to lift the fan into place.
- Lift the fan (ask a helper if needed) and hook it onto the bracket (many brackets have a hook or shelf for this).
- Tuck the receiver and wires into the ceiling box or bracket cavity.
- Align the fan base with the bracket and secure with screws.
- Check for tightness. The fan should not wobble or shift.
For Flush Mount Fans
Flush mount fans sit close to the ceiling. The process is similar, but you may have less space for the receiver. If space is tight, some people place the receiver in the canopy or above the ceiling box (if code allows).
Never force the wires or receiver, as pinched wires can cause shorts.
Attaching Fan Blades And Light Kit
Once the fan is mounted:
- Attach each blade using the provided screws. Tighten evenly to avoid wobble.
- Install the light kit (if your model has one). Connect wires as shown in the instructions.
- Secure the glass shades or covers.
- Insert bulbs (use recommended wattage).
Pro tip: Balance the blades by using the provided balancing kit or a coin taped to the lightest blade if there’s a wobble.
Installing And Pairing The Remote Control
Now it’s time for the remote itself. Most remotes use radio frequency (RF), which means you don’t need to point at the fan. Some remotes let you set a code or frequency to avoid interference with other remotes in your home.
Steps To Set Up
- Insert batteries into the remote.
- Set the frequency code (if your remote has DIP switches, match them to the receiver).
- Test the remote. Turn the power back on at the breaker.
- Try all functions: Fan speed, direction, light on/off, and dimming (if available).
If the fan does not respond, check the battery, frequency code, and wiring connections.
Testing And Troubleshooting
Before using the fan regularly, test all functions. Look for these issues:
- Fan does not turn on: Check power, wiring, and remote battery.
- Light does not work: Double-check bulb type and wiring.
- Fan wobbles: Balance blades or check mounting screws.
- Remote does not control fan: Reset frequency or check receiver placement.
Unusual problem: Some fans interfere with garage door openers or other remotes. Changing the frequency code usually solves this.
Troubleshooting Comparison Table
| Problem | Possible Cause | Solution |
|---|---|---|
| Fan doesn’t start | No power, loose wires, tripped breaker | Check breaker, wiring, and connections |
| Remote not working | Batteries, frequency mismatch, blocked receiver | Replace battery, reset frequency, adjust receiver |
| Light flickers | Wrong bulb, loose connection, dimmer incompatibility | Use correct bulb, tighten wires, avoid wall dimmers |
| Fan hums or buzzes | Loose hardware, unbalanced blades | Tighten screws, balance blades |
| Fan wobbles | Uneven blades, loose bracket | Balance blades, check bracket |
Final Checks And Safety Tips
Once everything works, do a last safety check:
- All screws are tight
- No wires are exposed
- The fan and light turn on/off correctly
- The fan does not wobble or make noise
If you smell burning or hear strange noises, turn off the power and check the wiring again. It’s rare, but some fans come with defective receivers or remotes. Contact the manufacturer for a replacement if needed.
One more insight: Ceiling fans should be dusted regularly. Buildup can unbalance the blades and reduce efficiency.
Upgrading Old Fans With Remote Kits
Many people want to add remote control to an older ceiling fan. This is possible for most fans that use standard wiring.
How To Upgrade
- Buy a universal remote kit. Brands like Hunter, Hampton Bay, and Westinghouse offer kits that fit most fans.
- Follow the same wiring steps as above, replacing your old fan’s wiring with the receiver in the canopy.
- Test the new remote as described earlier.
Limitations: Some very old fans or special models may not have space for a receiver. Also, remote kits may not support advanced features like reverse direction from the remote.
When To Call A Professional
While many people can install a ceiling fan themselves, there are times to call a licensed electrician:
- Your ceiling box is not fan-rated
- You do not understand the wiring
- Your ceiling is extra high or angled
- You have old or aluminum wiring
- Local codes require professional installation
Professional installation usually costs $100–$250, depending on complexity. In some cities, permits may be required for electrical work.
Energy Efficiency And Smart Fan Features
A remote control ceiling fan is not just about convenience. It can also help you save money and energy.
- Modern fans use efficient motors (like DC motors) and LED lights.
- Smart remotes can be programmed for schedules, or to turn off when you leave the room.
- Reverse mode (winter/summer) can save up to 10% on heating or cooling bills.
Example: Energy Savings
According to the U. S. Department of Energy, using a ceiling fan lets you raise your thermostat by 4°F with no loss of comfort, saving up to 15% on cooling costs. Smart fans with built-in sensors can save even more.
For more detailed energy tips, see the U.S. Department of Energy.

Credit: mikefullerelectric.com
Common Mistakes And How To Avoid Them
Even careful installers make mistakes. Here’s how to avoid the most common ones:
- Using a light-only ceiling box: Always use a fan-rated box.
- Not turning off the right breaker: Test before touching wires.
- Forcing the receiver into a small space: Never crush wires or the receiver.
- Mixing up wire colors: Follow the manual, as colors can vary.
- Skipping the balancing step: Unbalanced blades cause noise and wear.
Insider tip: Some homes have “switched neutrals” (white wires controlled by a switch). This is not standard and can cause confusion. If you see this, get help before continuing.
Maintenance Tips For A Long-lasting Fan
Your remote control fan needs simple care to last for years:
- Dust blades monthly: Prevents wobble and keeps air clean.
- Tighten screws yearly: Vibration can loosen hardware over time.
- Replace batteries in the remote every 1–2 years.
- Check for noise: Squeaks or clicks often mean loose parts.
- Lubricate if needed: Most modern fans are sealed, but some older models need oil.
If your remote is lost or broken, universal replacements are available. Always match the frequency or code to your receiver.
Frequently Asked Questions
What Should I Do If My Ceiling Fan Remote Stops Working?
Check the batteries first, as they are often the problem. If new batteries don’t fix it, check for interference from other devices or try resetting the remote and receiver code. Make sure there are no obstructions blocking the signal. If these steps fail, the receiver or remote might be faulty and need replacement.
Can I Install A Remote Control Ceiling Fan On A Sloped Ceiling?
Yes, but you will need an angled mounting kit. Many fans are designed for standard flat ceilings, but angled kits let you safely install the fan on slopes up to 45 degrees. Always check that your chosen fan supports angled installation and use the correct downrod length for best results.
Is It Safe To Use A Remote Control Fan In A Bathroom Or Outdoor Area?
Only if you choose a damp-rated or wet-rated ceiling fan. Indoor-only fans can be damaged by moisture and may become unsafe. Look for fans labeled for bathroom or outdoor use, and follow all installation guidelines for wet locations.
How Do I Balance A Ceiling Fan That Wobbles After Installation?
Start by tightening all screws on the blades and mounting bracket. Use a balancing kit (usually included with new fans) or tape a small coin to the top of the lightest blade. Move the weight around until the wobble stops. Sometimes, just cleaning dust off the blades solves the problem.
Can I Control Multiple Fans With One Remote?
Some remotes can control multiple fans, but you must set them to the same frequency code. Check your fan’s manual for details. For more advanced control, consider smart ceiling fans with app integration, allowing you to manage several fans from your smartphone.
Installing a remote control ceiling fan is a practical project with great rewards. With the right preparation and attention to safety, most homeowners can finish this job in a few hours. Remember to follow each step carefully, use the correct tools, and don’t hesitate to get help for complex wiring.
Soon you’ll be enjoying the comfort and convenience of your new fan—all at the touch of a button.