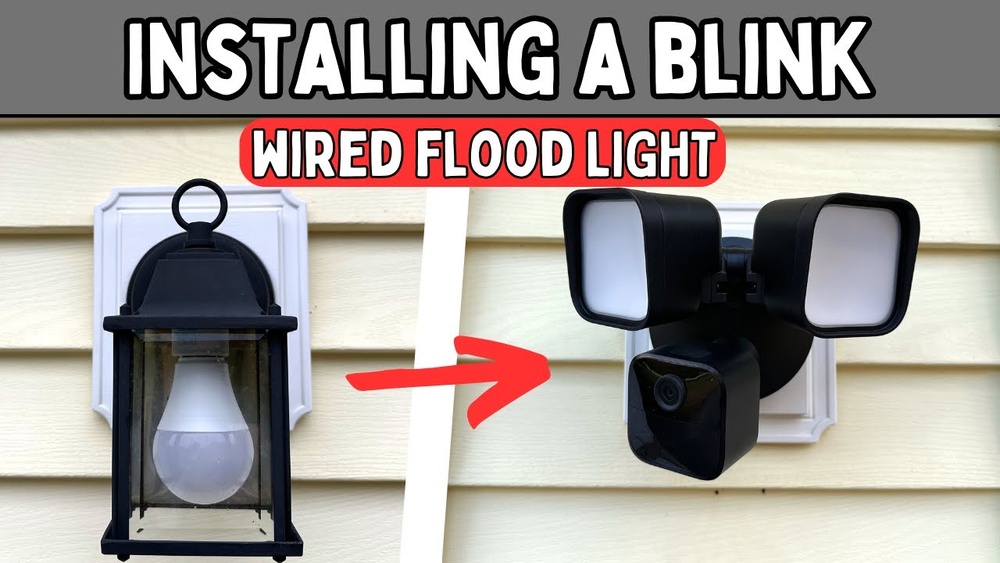
Setting up a Blink Wired Floodlight Camera can transform your home security. But for many people, the process feels complex. Wires, drilling, electrical connections, and app setup—it’s easy to feel lost. The good news is, you don’t need to be an electrician to install it. With the right guidance, a few tools, and some patience, you’ll have your Blink camera watching over your property in just a few hours.
This guide will walk you through everything—preparation, safety, mounting, wiring, app setup, and troubleshooting. Along the way, you’ll find clear explanations, real-world tips, and even a few things that the quick-start guide doesn’t mention. Whether you’re completely new to home security or upgrading from another camera, this article gives you the confidence and step-by-step instructions to finish the job smoothly.
Understanding The Blink Wired Floodlight Camera
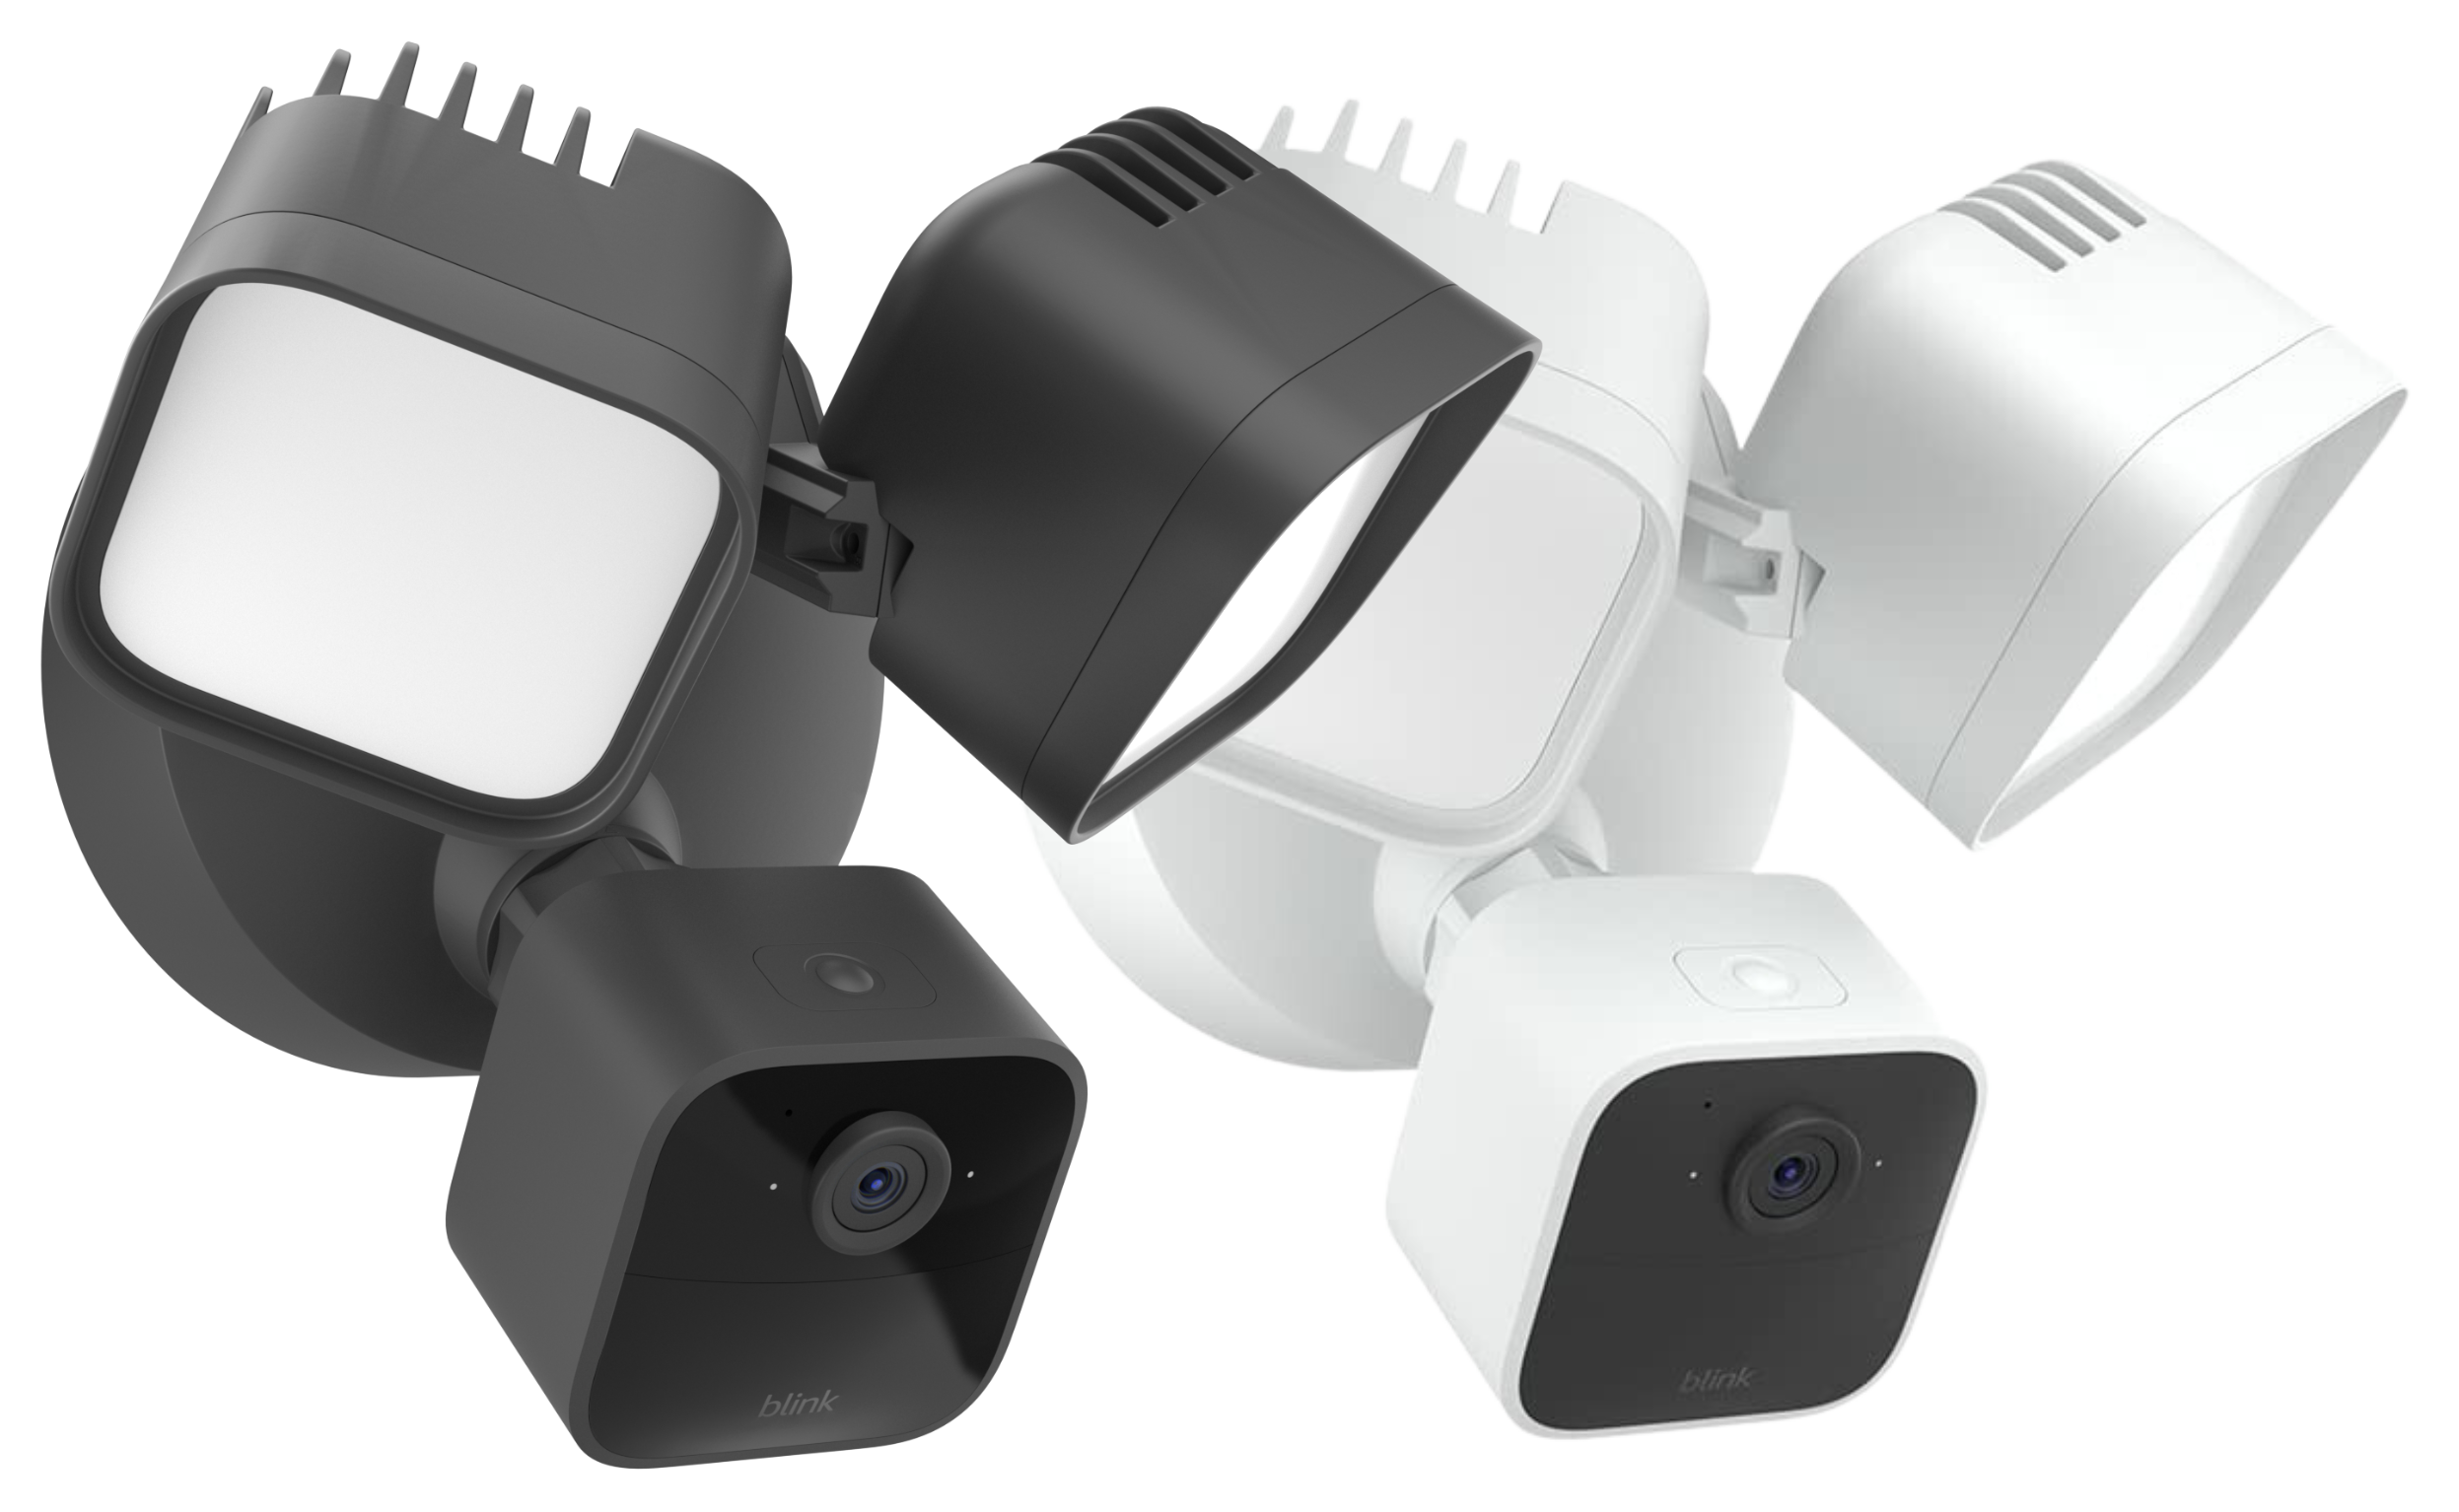
Before you start, it’s helpful to know exactly what the Blink Wired Floodlight Camera does. This device is more than just a light—it’s a smart security camera combined with powerful LED floodlights. Here’s what you can expect:
- 1080p HD video: Clear, crisp footage, day and night.
- Motion detection: The camera sends alerts when movement is detected.
- Two-way audio: You can speak and listen through the camera using your phone.
- Siren: A loud alarm can scare off intruders.
- Works with Alexa: Voice control and automation are possible.
One thing many users miss is the power requirement: this camera is wired and needs to be connected to your home’s electrical system. It is not battery-powered. This means you must have a compatible outdoor electrical box—usually where an old floodlight or porch light is installed.
Tools And Materials You’ll Need
To avoid delays, gather all the tools and materials before you begin. Here’s a practical checklist:
- Blink Wired Floodlight Camera kit (includes camera, mounting bracket, wire nuts, and screws)
- Ladder
- Screwdriver (Phillips and flathead)
- Drill (optional, for new holes)
- Voltage tester
- Wire stripper
- Electrical tape
- Pencil or marker
- Smartphone with the Blink app installed
- Safety glasses
- Work gloves
If you need to replace an old light, you may need a wrench or pliers. It’s also wise to have a friend help—especially when working on a ladder.
Safety First: Preparing For Installation
Electrical work can be dangerous if you skip safety steps. Here are important guidelines:
- Turn off power at the circuit breaker before you touch any wires.
- Test wires with a voltage tester to confirm there’s no electricity.
- Work during daylight for better visibility.
- If you’re unsure about wiring, consult a licensed electrician.
Remember, even if your old light works, the wires may still carry current. Always double-check.
Choosing The Best Location
Where you mount the camera affects both security and lighting. For most homes, common locations are:
- Above the garage door
- On the porch
- Near side entrances
- Backyard or patio
Keep these tips in mind:
- The camera should face the area you want to monitor, avoiding direct sunlight.
- Mount at a height of 8-10 feet for the best view and motion detection.
- Ensure your Wi-Fi signal is strong enough to reach the camera.
- The mounting surface should be solid (wood, brick, or concrete).
If you’re replacing an old floodlight, use the same spot. Otherwise, you may need to run new wires, which is a bigger job.
Removing Your Old Fixture
If there’s an old light, you’ll need to remove it first:
- Turn off the power at the circuit breaker.
- Use a voltage tester to confirm power is off.
- Remove the screws holding the fixture.
- Carefully pull the fixture away from the wall—wires will still be attached.
- Unscrew the wire nuts and disconnect the wires.
- Remove the old mounting bracket.
Be gentle—older wires can be brittle. Clean the area so the new bracket sits flat.
Preparing The Electrical Box
Most US homes use a round or octagonal electrical box for outdoor lights. The box must be:
- Flush with the wall.
- Firmly attached.
- Large enough to fit the camera’s wires.
If the box is loose or damaged, repair it before installing the camera. Water in the box? Dry it out and seal any leaks.
Here’s a quick comparison of electrical box types:
| Box Type | Shape | Typical Use | Compatibility |
|---|---|---|---|
| Round (4-inch) | Circular | Ceiling or wall lights | Compatible |
| Octagonal | 8-sided | Outdoor lighting | Compatible |
| Square | 4-sided | Junctions only | Not recommended |
If you have a square or odd-sized box, you might need an adapter plate.
Installing The Mounting Bracket
Now, let’s attach the camera’s mounting bracket:
- Hold the bracket against the electrical box.
- Align the screw holes and mark them, if needed.
- Attach the bracket with the included screws—tighten so it’s secure.
- The bracket should be level for the camera to sit straight.
Some homes have extra-long screws; swap them for the ones in the Blink kit to ensure a snug fit.
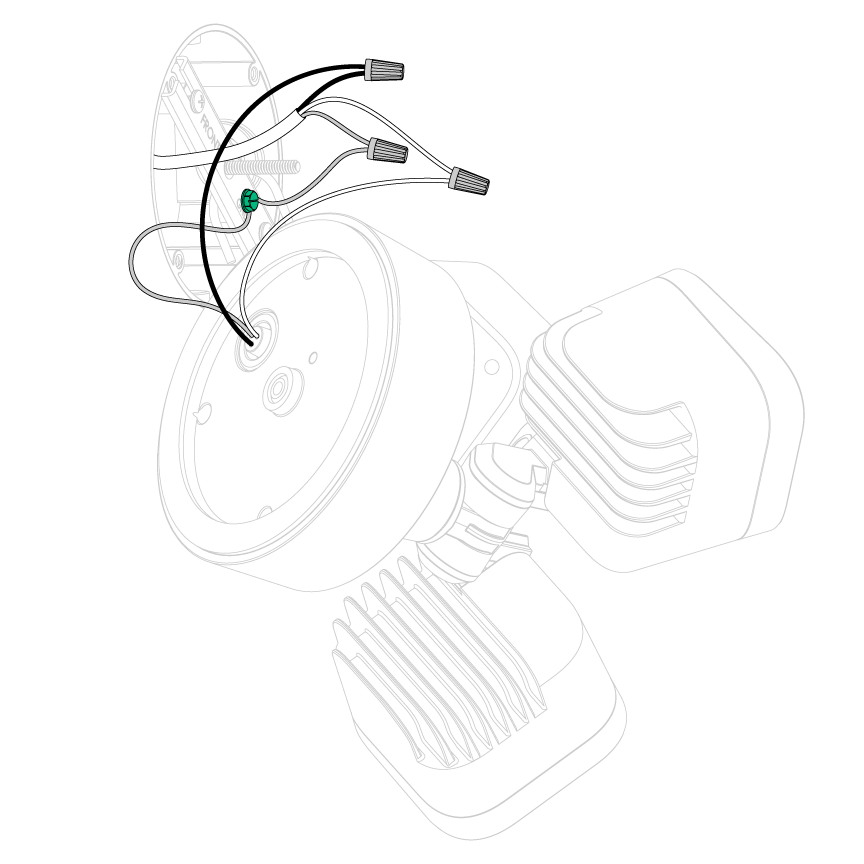
Wiring The Camera
This is the most technical step. The Blink Wired Floodlight Camera has three main wires:
- Black (hot)
- White (neutral)
- Green or bare copper (ground)
Your home’s wires are usually the same colors. If they’re different, check with an electrician.
Here’s how to connect them:
- Twist the black camera wire to the black house wire. Secure with a wire nut.
- Twist the white camera wire to the white house wire. Secure with a wire nut.
- Connect the green/bare camera wire to the ground wire in the box.
- Wrap each wire nut with a bit of electrical tape for extra security.
- Gently tuck the wires into the box.
Pro tip: Take a clear photo before disconnecting the old fixture. If you need to backtrack, you’ll know which wire goes where.
Attaching The Camera To The Bracket
Now, you’re ready to mount the camera:
- Line up the camera’s base with the bracket.
- Use the supplied screws to attach the camera.
- Make sure the camera is snug but not over-tightened.
- Adjust the camera angle and the floodlights before tightening fully.
Check that the camera faces the area you want to monitor. The floodlights should cover as much space as possible.
Sealing And Weatherproofing
Your camera is designed for outdoor use, but a tight seal keeps out water and bugs. Here’s what to do:
- Use the included foam gasket between the camera and the wall.
- Apply a small bead of silicone caulk around the top and sides (not the bottom—this lets water drain out).
- Check all screws and seals.
This step is often skipped but prevents long-term damage.
Turning The Power Back On
Go to your breaker box and flip the power back on. The camera’s lights may flash or turn on briefly. If nothing happens, double-check your wiring and connections.
Setting Up The Blink App
With the camera installed, it’s time to set up the software. The Blink app is available for iOS and Android. Here’s how to complete setup:
- Open the app and sign in or create a Blink account.
- Tap the “+” icon to add a new device.
- Scan the QR code on your camera (usually on the back or inside the box).
- Follow the prompts to connect the camera to your Wi-Fi network.
- Name your camera (e.g., “Front Door”).
- Test the live view and two-way audio.
Tip: If your Wi-Fi signal is weak, move your router closer or use a Wi-Fi extender.
Fine-tuning Camera Settings
The Blink app lets you customize how your camera works:
- Motion detection zones: Block out areas you don’t want to trigger alerts (like busy streets).
- Sensitivity: Choose how easily the camera detects movement.
- Activity alerts: Set schedules for when you want alerts (for example, only at night).
- Floodlight settings: Adjust when the light turns on and how bright it is.
- Siren: Test and set rules for the alarm.
If you’re getting too many alerts, try lowering the sensitivity or adjusting the zones.
Here’s a quick table comparing key settings and their impact:
| Feature | Benefit | Possible Issue | Advice |
|---|---|---|---|
| High sensitivity | Detects all movement | More false alerts | Lower if alerts are too frequent |
| Custom zones | Ignore busy areas | Missed events if set wrong | Test carefully |
| Max brightness | Best lighting at night | May bother neighbors | Dim if needed |
Testing Your Installation
Before you put the ladder away, make sure everything works:
- Walk through the area—does the camera record and send an alert?
- Test the floodlight at night—does it light up the space you want?
- Use the app’s live view and talk feature.
- Try the siren briefly (warn family/neighbors first).
If something isn’t right, double-check your wiring, Wi-Fi, and app settings.
Credit: support.blinkforhome.com
Connecting To Alexa And Smart Home Features
The Blink Wired Floodlight Camera works with Amazon Alexa. This means you can:
- View the camera feed on Echo Show screens.
- Arm/disarm the system with voice commands.
- Receive motion alerts on Alexa devices.
To set this up:
- Open the Alexa app.
- Go to Skills & Games, search for Blink SmartHome.
- Enable the skill and link your Blink account.
- Discover devices—your camera should appear automatically.
Now, you can say, “Alexa, show me the front door camera. ”
Common Issues And Troubleshooting
Even with careful installation, you might run into problems. Here’s how to handle common situations:
Camera Not Powering On
- Double-check the breaker is on.
- Make sure all wire connections are tight.
- Test the outlet with another device.
- If the camera still doesn’t work, contact Blink support.
Floodlights Not Turning On
- Check floodlight settings in the app.
- Ensure the camera is mounted right side up.
- Verify wiring—especially the ground wire.
Poor Video Quality
- Test your Wi-Fi speed—you need at least 2 Mbps upload.
- Move your router closer or use an extender.
- Check for obstructions (metal objects, thick walls).
Too Many Or Too Few Alerts
- Adjust motion sensitivity and activity zones in the app.
- Clean the camera lens—dust or insects can cause issues.
- Try different camera angles.
App Connection Problems
- Restart your phone and the camera.
- Reinstall the Blink app.
- Reset your Wi-Fi network.
If you’re stuck, the Blink help site and support team are responsive and helpful.
Practical Tips For A Better Experience
Some small details can make a big difference:
- Label your breaker: Mark which switch controls the camera for easy future work.
- Keep your ladder level: Uneven ground leads to accidents.
- Check weather forecasts: Install on a dry day.
- Use the right drill bit: If making new holes, match the wall type (masonry, wood, etc. ).
- Back up your settings: If you swap phones, you’ll need your Blink login.
One thing many people overlook: software updates. The Blink app occasionally releases new features or fixes. Keep both the app and camera firmware updated for the best security.
Professional Installation Vs. Diy
If you’re unsure about electrical wiring or don’t have the right tools, hiring a professional is smart. Electricians typically charge $100–$250 for installation, but you get peace of mind.
DIY is cheaper and gives you flexibility, but only if you’re comfortable and follow safety rules. For homes with old wiring, always consider expert help.
Here’s a comparison:
| Aspect | DIY Installation | Professional Installation |
|---|---|---|
| Cost | Low (tools & time only) | $100–$250 typical |
| Time | 1–2 hours (if prepared) | Usually faster |
| Safety | Depends on your skill | Very safe |
| Flexibility | Full control | Limited—need to schedule |
| Warranty | DIY may void some coverage | Often included |
Credit: support.blinkforhome.com
Maintaining Your Blink Wired Floodlight Camera
Once installed, keep your system working its best:
- Clean the lens monthly with a soft cloth.
- Check for spider webs and dust that can trigger false alerts.
- Inspect the mount after storms or high winds.
- Test the floodlights every few months.
- Review video storage and clear unwanted clips.
Most issues come from dirty lenses or loose mounts—not from the camera itself.
Security And Privacy Considerations
Smart cameras help protect your home, but they also collect data. Here’s how to stay safe:
- Use strong passwords for your Blink and Wi-Fi accounts.
- Enable two-factor authentication in the Blink app.
- Keep your software updated to avoid security holes.
- Position cameras responsibly: Don’t point at neighbors’ windows or private spaces.
For more on security best practices, check out the official FTC guide to Wi-Fi security.

Credit: www.youtube.com
Frequently Asked Questions
How Long Does It Take To Install The Blink Wired Floodlight Camera?
Most people can finish the full installation in 1–2 hours. If you’re replacing an existing light, it’s usually faster. New installations that need wiring may take longer.
Can I Install The Blink Wired Floodlight Camera Without Existing Wiring?
No, the camera needs to connect to a standard outdoor electrical box. If there’s no wiring, you’ll need to have one installed by a professional.
Does The Camera Record Video All The Time?
The Blink Wired Floodlight Camera records video when motion is detected or when you access the live view. Continuous recording is not standard, but you can adjust the length of motion clips in the app.
What Happens If My Wi-fi Goes Out?
If your Wi-Fi connection drops, the camera will not be able to send alerts or store new video in the cloud. However, the floodlight will still turn on with motion if wired correctly.
Is The Blink Wired Floodlight Camera Weatherproof?
Yes, the camera is rated for outdoor use and can handle rain, snow, and dust. Just make sure the mounting and seals are installed correctly to keep water out.
Installing the Blink Wired Floodlight Camera is one of the most effective ways to boost your home’s security. With good preparation, careful wiring, and smart use of the app, you’ll have peace of mind and a safer home. Take your time, follow the steps, and soon you’ll see why so many homeowners trust Blink for protection—day and night.