
Mounting an undermount sink can feel intimidating, especially if you’ve never tackled this type of project before. But the truth is: with the right approach, tools, and guidance, you can achieve a professional result that looks great and lasts for years. Whether you’re remodeling your kitchen, upgrading your bathroom, or simply replacing an old sink, understanding the step-by-step process is key. This article walks you through everything you need to know—from planning and preparation to installation and finishing touches. You’ll find practical advice, expert insights, and clear instructions designed for both beginners and experienced DIYers. Let’s dive in and make your undermount sink installation successful.
Understanding Undermount Sinks
Undermount sinks have become popular for their sleek look and easy cleaning. Unlike drop-in sinks, undermount sinks attach underneath the countertop, creating a seamless transition between counter and sink. This design prevents food and water from getting trapped on the edges, making it ideal for kitchens and bathrooms.
The most common materials for undermount sinks are stainless steel, porcelain, and granite composite. Each material offers unique benefits. Stainless steel is durable and easy to clean, porcelain brings a classic touch, and granite composite is resistant to scratches and stains. Newer materials, such as fireclay and copper, are also available but are less common. Fireclay offers a farmhouse style and high durability, while copper gives a warm, distinctive look but requires regular cleaning to prevent discoloration.
Why Choose An Undermount Sink?
- Aesthetic appeal: Clean lines and modern style.
- Easier cleaning: No rim to trap crumbs or water.
- Maximized counter space: Sink edge is hidden, giving you more usable area.
Another benefit is that undermount sinks allow for more creative faucet and accessory placement. Since the rim isn’t visible, you have more flexibility to position soap dispensers, sprayers, or water filters exactly where you want them.
However, undermount sinks require precise installation. If mounted incorrectly, leaks, loose fittings, or damage to your countertop can occur. Understanding these risks helps you avoid common mistakes. For example, if the sink is not properly supported, it can gradually pull away from the countertop, leading to gaps or water intrusion over time.
Typical Undermount Sink Sizes
The right sink size depends on your countertop and cabinet dimensions. Most kitchen undermount sinks are between 22–33 inches wide. Bathroom sinks tend to be smaller, usually 16–20 inches. Always measure your cutout area to ensure compatibility.
Depth is another important factor. Kitchen sinks are usually 8–10 inches deep, while bathroom sinks are typically 5–8 inches. Deeper sinks are great for large pots but may require adjustments to plumbing or cabinet height. Remember to check the sink’s width, length, and depth to avoid surprises during installation.
Tools And Materials Needed
Preparation is essential. Using the proper tools and materials will make your job easier and produce better results. Below is a detailed list to keep you organized.
Essential Tools
- Drill with bits (for mounting holes)
- Screwdriver (Phillips and flathead)
- Adjustable wrench
- Caulking gun
- Measuring tape
- Level
- Clamps
- Utility knife
- Putty knife
It’s also helpful to have a flashlight for visibility under cabinets, and a bucket to catch any water left in the pipes when disconnecting plumbing.
Required Materials
- Undermount sink
- Mounting hardware (clips/brackets)
- Silicone sealant (kitchen/bath grade)
- Epoxy adhesive (for extra strength)
- Alcohol wipes or cleaner (for prepping surfaces)
- Plumber’s putty
- Protective gloves
- Towels/rags
These items cover most installations. For some stone countertops (like granite or quartz), you may need specialized mounting kits or adhesives. Always check your manufacturer’s instructions.
If your countertop is thick or has reinforcing bars, you might need longer screws or extra-strong brackets. Some sinks include a template to help mark mounting locations—keep this handy during installation.
Credit: www.amazon.com
Preparing Your Countertop
Before you start mounting, your countertop must be ready. This is a step many beginners overlook, leading to poor results or even costly mistakes.
Checking Cutout Size
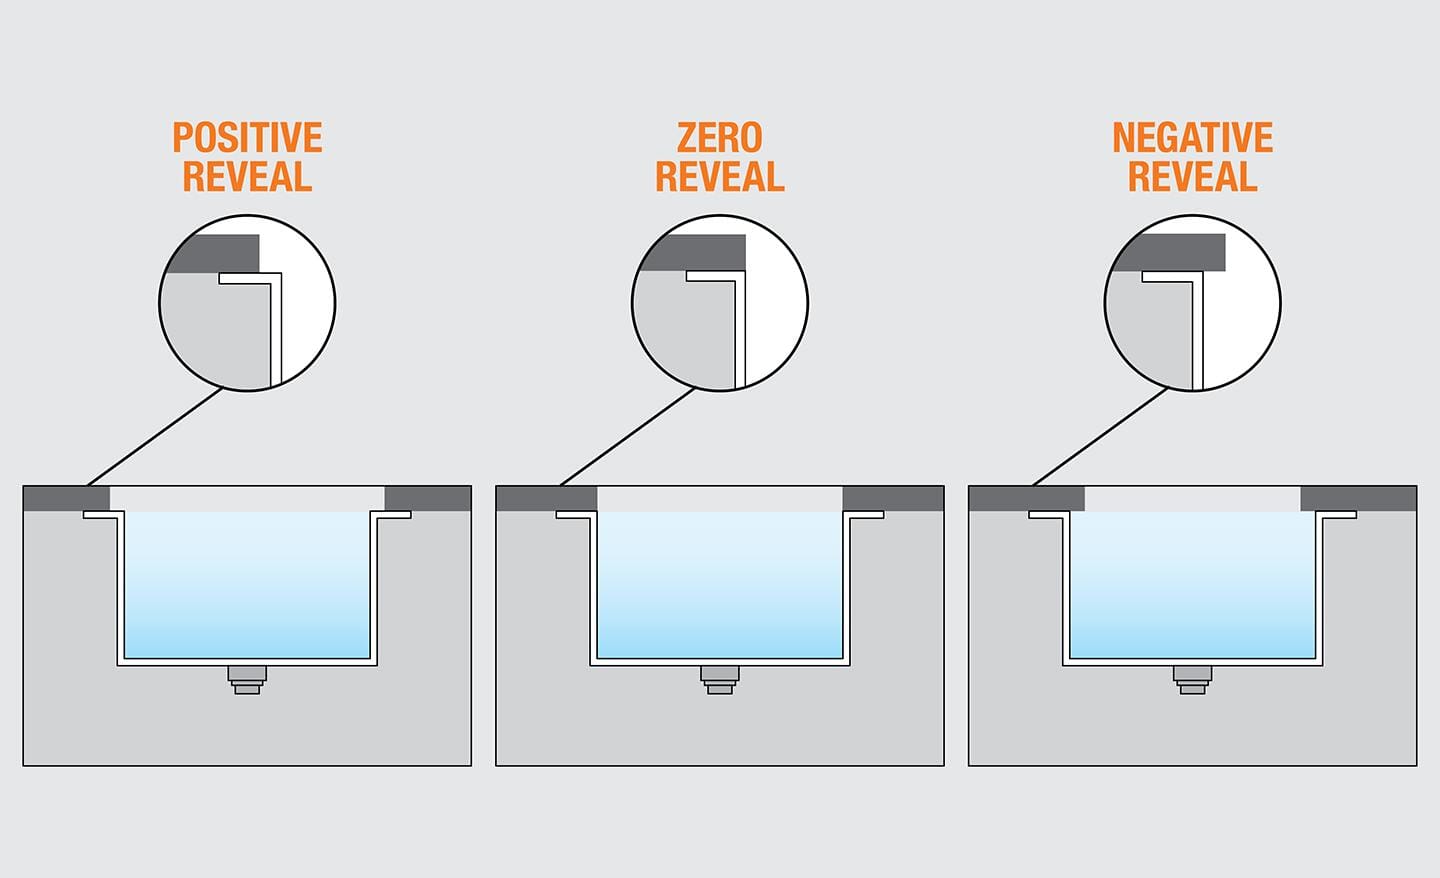
Measure the sink cutout in your countertop. The opening should match the sink’s dimensions, allowing for a small gap (typically 1/8 inch) around the sink’s perimeter for sealant. If your cutout is too small or too large, you’ll need to adjust it. For stone countertops, this usually requires a professional.
One non-obvious detail: check if the cutout edges are smooth and level. Rough or uneven edges can prevent a proper seal, and gaps can let water seep through. If you find chips or unevenness, sand carefully or consult a pro.
Cleaning The Mounting Surface
Debris, dust, and grease can weaken the adhesive. Clean the underside of your countertop with alcohol wipes or a strong cleaner. Make sure the surface is dry before proceeding.
Pay extra attention to old sealant residue if you’re replacing a sink. Scrape off any leftover material with a putty knife for a smooth, clean bond.
Inspecting Countertop Strength
Undermount sinks are heavier than drop-in models. Your countertop must be thick and strong enough to support the sink. Most manufacturers recommend a minimum thickness of 1.5 inches for stone surfaces. Weak or thin countertops may require reinforcement.
If your cabinets feel wobbly or the countertop flexes when you push on it, address this before installation. Add braces or support strips underneath to ensure stability.
Countertop Material Compatibility
| Countertop Material | Compatible with Undermount? | Special Notes |
|---|---|---|
| Granite | Yes | Requires professional cutout |
| Quartz | Yes | Needs proper sealing |
| Laminate | Rarely | Risk of water damage |
| Solid Surface | Yes | Easy to customize |
| Marble | Yes | Fragile, needs extra care |
Not all countertops are suitable for undermount sinks. Laminate counters are prone to water damage and often lack the strength needed. If you have doubts, consult a professional.
Step-by-step Mounting Process
Installing an undermount sink requires careful execution. Here’s a clear breakdown of each stage.
1. Dry-fit The Sink
Place your sink under the cutout to check alignment. Ensure the edges sit evenly with the countertop. Use your level to confirm the sink is flat. Adjust as needed—this is the time to fix any misalignment.
If your sink is not centered or sits at an angle, your faucet and accessories may not work correctly later. Take your time with this step.
2. Mark Mounting Locations
With the sink in position, use a pencil to mark where the mounting clips or brackets will attach. Most sinks need at least four clips (one for each corner). Larger sinks may require more for added stability.
Some sinks come with a paper template. Tape it to the countertop underside as a guide for faster, more accurate marking.
3. Apply Silicone Sealant
Remove the sink. Apply a continuous bead of silicone sealant around the underside of the cutout. This forms a watertight seal and cushions the sink. Don’t use too much—excess sealant can squeeze out and look messy.
If your countertop has porous stone (like marble), use a sealant made for natural stone to prevent staining.
4. Position The Sink
Lift the sink carefully and set it against the underside of the countertop. If you’re working alone, ask for help—sinks can be heavy and awkward to hold in place.
For double-bowl sinks, make sure both bowls are flush before proceeding. Uneven pressure can cause the sink to tilt while you’re securing it.
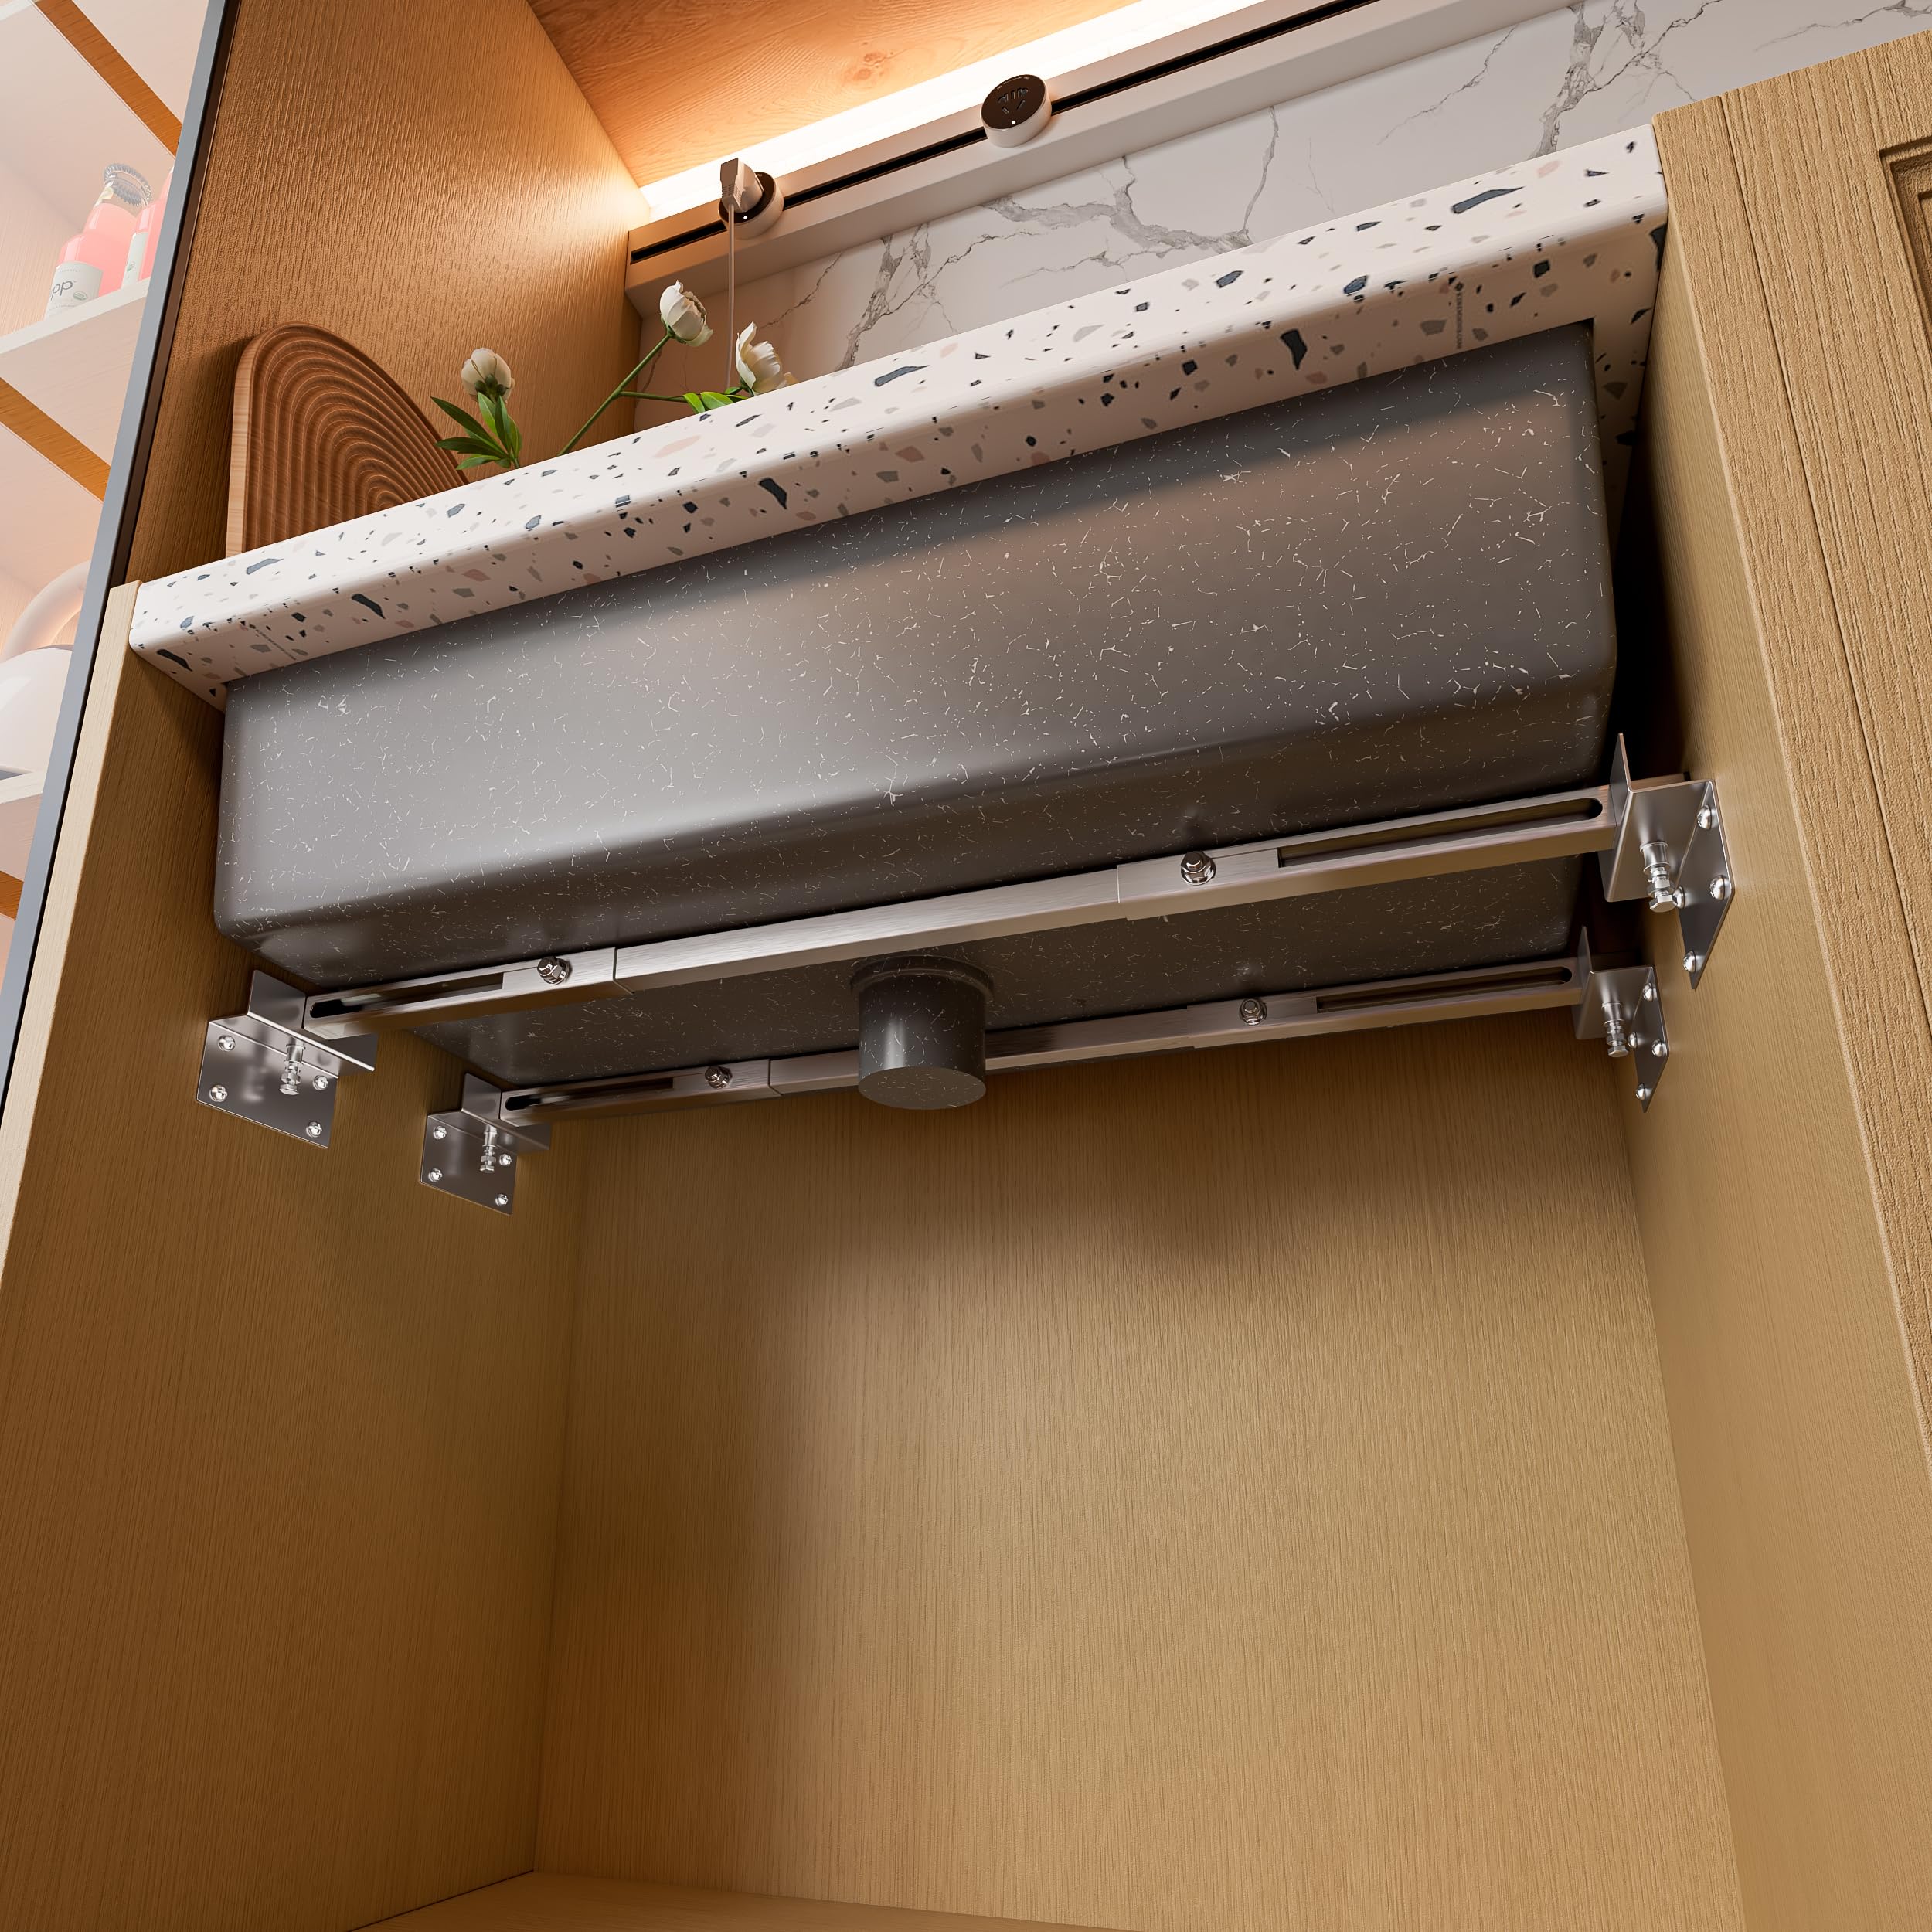
5. Secure With Clamps
Use clamps to hold the sink tightly against the countertop while you install the mounting hardware. Place towels or padding between the clamp and sink to prevent scratches.
Check the alignment from above and below before continuing. Once the clamps are tight, the sink shouldn’t move.
6. Install Mounting Clips/brackets
Attach the mounting clips or brackets as marked earlier. Tighten screws with your drill or screwdriver. Clips should be snug but not overly tight, which can crack stone surfaces.
Work in a star pattern—tighten one corner, then the opposite corner, then the sides. This keeps even pressure on the sink.
7. Remove Excess Sealant
Wipe away any excess silicone with a putty knife or rag. The seal should be neat, with no gaps or bulges.
Don’t wait too long; silicone can dry quickly and become difficult to remove.
8. Allow Adhesive To Cure
Let the silicone and epoxy set for at least 24 hours before using the sink. This ensures a strong bond and prevents leaks.
For best results, check the product label for recommended curing time. Some adhesives may require up to 48 hours for maximum strength.
9. Connect Plumbing
Once the sink is secure, reconnect your drain pipes, faucet, and any other plumbing. Use plumber’s putty on the drain to prevent leaks.
Always check for leaks before closing up the cabinet. Run water for several minutes to confirm everything is watertight.
10. Final Inspection
Check for leaks, loose fittings, and alignment. Run water through the sink and observe the underside. If you spot any issues, address them before regular use.
If you notice a small gap, add more sealant and allow it to cure. Don’t ignore even tiny leaks—they can cause major damage over time.

Credit: www.youtube.com
Practical Tips For Success
Many beginners miss small details that can make a big difference. Here are two non-obvious tips:
- Check Sink Depth: Before mounting, ensure your sink’s depth won’t interfere with cabinet drawers or plumbing. Deep sinks can clash with garbage disposals or water lines.
- Account for Countertop Overhang: Some countertops have a slight overhang. If yours does, measure carefully so the sink edge aligns with this feature.
Experience-based Advice
- Always use kitchen/bath grade silicone—cheap sealants can fail in humid environments.
- Test-fit your plumbing before mounting the sink. This avoids last-minute surprises.
- For granite and quartz, use adhesive recommended by your countertop supplier. Some adhesives work better with certain stones.
Another tip: If your sink has a sound-dampening pad or insulation, make sure it doesn’t block the mounting area or interfere with plumbing connections.
Common Mistakes To Avoid
Even experienced DIYers make errors when mounting undermount sinks. Avoid these pitfalls:
- Rushing the curing process: Using the sink before the adhesive is fully set can cause leaks.
- Improper cleaning: Failing to clean the mounting surface can weaken the bond.
- Overtightening clips: Too much force can crack your countertop.
- Ignoring manufacturer instructions: Not all sinks mount the same way. Always read the guide.
One insight many miss: countertop thickness varies. If your counter is thinner than recommended, the clips may not hold properly, resulting in sagging or leaks.
A second overlooked point: The weight of the sink increases dramatically when filled with water or dishes. Double-check that your hardware and countertop can handle this extra load.
Choosing The Right Mounting Hardware
The hardware you use affects both stability and longevity. Let’s compare popular options.
Mounting Hardware Comparison
| Hardware Type | Strength | Ease of Use | Best For |
|---|---|---|---|
| Metal Clips | High | Moderate | Stone countertops |
| Epoxy Adhesive | Very High | Easy | Granite, quartz |
| Wood Brackets | Medium | Easy | Solid surface counters |
| Plastic Clips | Low | Easy | Lightweight sinks |
Most professionals prefer metal clips for strength. Epoxy adhesive is often used with stone, providing a strong bond but requiring careful application. If you’re installing in a busy kitchen or commercial setting, it’s worth investing in higher-quality hardware for peace of mind.
Special Considerations For Granite And Quartz
Granite and quartz countertops are popular but require extra attention. Their weight and hardness mean mistakes can be costly.
Professional Vs Diy
Many installers recommend professional mounting for stone countertops. Why? Stone is heavy, and improper drilling can crack or chip the surface. If you’re confident, follow these precautions:
- Use diamond-tipped drill bits for stone.
- Drill slowly to avoid heat buildup.
- Never overtighten screws.
If your granite or quartz countertop already has a sink cutout, inspect the edges for chips or cracks. Even small flaws can expand under stress. Repair with epoxy filler before proceeding.
Reinforcement
Some granite sinks need extra support. Install support brackets beneath the sink, especially for large or deep models. For extra-wide sinks, consider adding a plywood support board glued to the base of the cabinet for added security.
How To Remove And Replace An Existing Sink
If you’re upgrading from a drop-in or old undermount sink, removal is the first step.
Steps To Remove An Old Sink
- Turn off water supply and disconnect plumbing.
- Remove mounting clips or brackets.
- Cut through old sealant with a utility knife.
- Carefully lower the sink and remove.
Inspect the cutout and clean thoroughly before installing your new undermount sink.
If your old sink was leaking, check for water damage on the cabinet walls or countertop. Dry out any wet spots and repair before installing the new sink to avoid future problems.
Undermount Vs Drop-in Sink Installation
| Feature | Undermount Sink | Drop-In Sink |
|---|---|---|
| Installation Difficulty | Moderate to High | Easy |
| Cleaning | Easy (seamless) | Moderate (rim traps debris) |
| Countertop Compatibility | Stone, solid surface | All types |
| Appearance | Modern, seamless | Traditional, visible rim |
| Leak Risk | Higher if poorly installed | Lower |
Undermount sinks demand more skill but reward you with a cleaner look and simpler maintenance. In contrast, drop-in sinks are easier to swap out but often collect grime around the rim.
Sealing And Leak Prevention
Sealant is your best defense against leaks. Here’s how to get it right:
- Use 100% silicone—not acrylic or latex.
- Apply a thin, continuous bead around the sink.
- Smooth the bead with a finger or tool for a clean finish.
- Let cure for 24–48 hours before running water.
For stone countertops, check if a special sealant is needed to prevent stains. Always read both sink and countertop manufacturer guidelines for the best match.
Test for leaks by filling the sink and checking the underside. If you see moisture, reapply sealant.
Cleaning And Maintaining Your Undermount Sink
After installation, maintenance is simple but important.
- Clean silicone edges regularly to prevent mold.
- Avoid harsh chemicals that damage sealant.
- Inspect mounting clips annually for looseness.
- If you see movement, tighten hardware or reapply adhesive.
A well-installed undermount sink can last 10–15 years with minimal maintenance. For stainless steel sinks, wipe them dry after use to prevent water spots. For granite composite, use a non-abrasive cleaner to maintain the finish.
Upgrading Faucets And Accessories
Many homeowners use sink installation as a chance to upgrade faucets or add accessories.
- Choose single-hole or multi-hole faucets based on your sink and countertop.
- Install soap dispensers or water filters at the same time.
- Make sure new holes don’t interfere with sink mounting.
If adding accessories, follow manufacturer recommendations for spacing and installation. If you’re not sure how many holes you need, buy a faucet deck plate to cover unused holes for a clean look.
Safety Precautions
Working with heavy sinks and sharp tools can be risky. Always:
- Wear protective gloves and safety goggles.
- Use a helper for lifting heavy sinks.
- Keep work area dry to prevent slips.
- Turn off water supply before disconnecting plumbing.
If you’re working under a cabinet, use a knee pad or folded towel for comfort. Take breaks to avoid fatigue, especially when lifting or holding the sink in place.
When To Call A Professional
While many DIYers succeed at undermount sink installation, some cases call for expert help:
- Stone countertops (granite, quartz, marble)
- Large or extra-deep sinks
- Unusual cutout shapes
Professional installers guarantee precision and often offer warranties. If you feel unsure, investing in expert help can save money and stress.
Environmental Considerations
Mounting an undermount sink isn’t just about style—it can affect your home’s environmental footprint. Stainless steel sinks are recyclable and often made from recycled content. Using silicone sealant creates a lasting seal, preventing leaks and water waste. If you’re looking for eco-friendly options, granite composite and solid surface sinks are durable and require fewer replacements.
When removing an old sink, recycle metal or porcelain components if possible. Choose water-efficient faucets and accessories to further reduce your impact.
Credit: www.homedepot.com
Real-world Example: Kitchen Remodel Success
A homeowner in Dallas replaced a drop-in sink with an undermount stainless steel model. The countertop was quartz, and the process took two days. Key steps included:
- Professional cutout resizing
- Careful alignment and marking
- Use of metal clips and epoxy adhesive
- Allowing a full 48-hour cure before use
Result: The kitchen gained a sleek look, easier cleaning, and no leaks after two years. This example shows that planning and patience pay off.
Another tip from this project: The homeowner test-fitted all plumbing connections before final installation. This step avoided last-minute adjustments and made the process smoother.
Frequently Asked Questions
How Long Does It Take To Mount An Undermount Sink?
Most installations take 4–8 hours, not including adhesive curing time. If you need a countertop cutout, add extra time. Allow at least a full day for adhesive to cure before using the sink.
Can I Mount An Undermount Sink On A Laminate Countertop?
It’s possible, but not recommended. Laminate counters are prone to water damage and often lack the strength needed. Stone or solid surface are better choices.
If you must use laminate, reinforce the area around the cutout and use a waterproof barrier to minimize risk.
Do I Need Special Adhesives For Granite Or Quartz?
Yes, always use adhesives recommended by your countertop supplier. Epoxy works best for granite and quartz, but check manufacturer instructions.
How Can I Prevent Leaks After Installation?
Apply a continuous bead of 100% silicone sealant around the sink edge. Let it cure fully before use and inspect regularly for gaps.
Is It Worth Hiring A Professional Installer?
If your countertop is stone or your sink is large, hiring a professional is wise. They ensure precision and prevent costly mistakes.
Mounting an undermount sink is a rewarding project that elevates your kitchen or bathroom’s style and function. With careful preparation, the right tools, and attention to detail, you can achieve a result that rivals professional installation. Remember to measure twice, clean thoroughly, and let adhesives cure fully. If you face challenges, don’t hesitate to seek expert help. Your new undermount sink will provide years of beauty and convenience—making your effort worthwhile. For more details on kitchen remodeling and sink installation, visit Home Depot.