
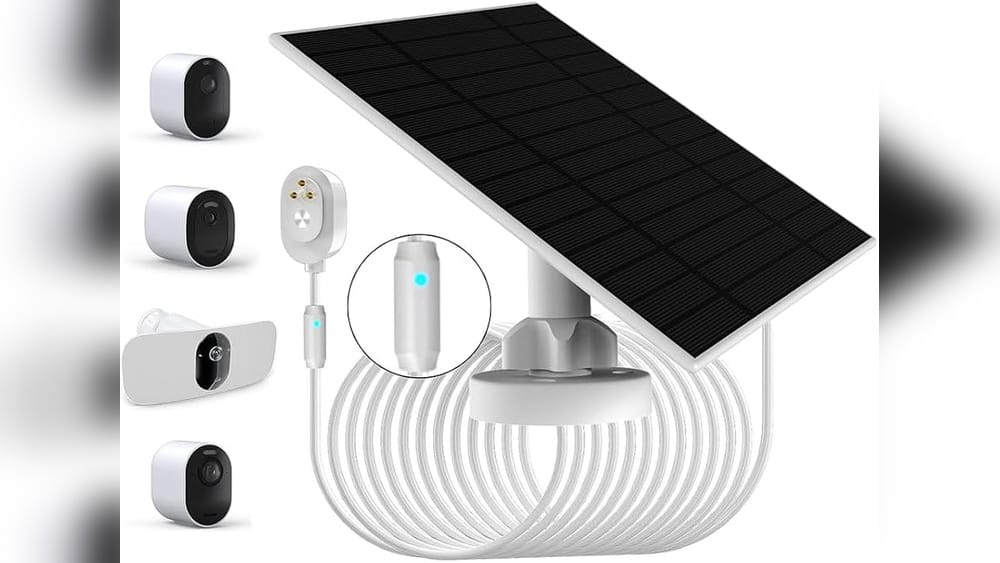
Many people want their security cameras to run without worrying about charging batteries or plugging in wires. Arlo cameras are popular, and their solar panel accessory promises easier charging. But how many cameras can the Arlo solar panel charge? Can you use one panel for several cameras, or do you need one for each? The answer is not so simple. In this article, you’ll discover how Arlo solar panels work, their charging limits, and practical advice for setting up your security system. If you’re thinking about installing Arlo cameras with solar panels, read carefully to avoid common mistakes and save money.
Understanding The Arlo Solar Panel
The Arlo solar panel is designed as a simple solution for powering your Arlo security cameras. It connects to the camera via a cable and uses sunlight to keep the camera’s battery charged. The panel is compact, weather-resistant, and easy to mount on a wall or roof. You don’t need to worry about battery swaps or running electricity outdoors.
The convenience factor here is huge, especially for people who have cameras mounted in hard-to-reach places, such as on rooftops or high fences. Instead of climbing up a ladder every few months to swap batteries, you can let the sun do the work for you.
How The Arlo Solar Panel Works
The panel converts sunlight into electricity. This energy flows through the cable and charges the camera’s battery. The panel works best in direct sunlight, but can still charge in cloudy conditions, though at a slower rate. Many users notice that even on overcast days, the panel can provide a trickle charge to keep the battery from draining completely.
- Panel size: About 8 x 7 inches
- Output: 2W, 6V, up to 400mA (maximum)
- Cable length: 6 feet (can be extended with accessories)
- Weatherproof rating: IP65
Arlo solar panels are compatible with several models, including Arlo Pro, Pro 2, Pro 3, Pro 4, Ultra, Ultra 2, and Essential series. Not every Arlo camera works with the panel, so check compatibility before buying. If you have an older or less common Arlo camera, always confirm compatibility on Arlo’s official website or in the manual.
Key Features
- Continuous charging: Keeps batteries topped up in sunny locations
- Easy installation: Mounting hardware included
- No monthly fees: You only pay for the panel
A practical tip: The panel’s small size makes it easy to fit in tight spaces, such as under eaves or beside a window. But small size also means it collects less sunlight than larger panels, so optimal placement is even more important.
Many users think the panel can charge multiple cameras, but the truth is more technical. Let’s break down the facts.
One Panel, One Camera: The Official Answer
If you check Arlo’s official documentation, the company says the solar panel is designed to charge one camera at a time. The cable connects directly to the camera’s charging port, and there are no built-in splitters or dual charging features.
This is the main limitation: you cannot plug two or more cameras into a single panel using the standard kit. The panel’s output is also low compared to home electrical outlets, so splitting power between cameras would lead to slow charging or insufficient power.
Why Only One Camera?
- Output Limitations: The panel produces about 2 watts, which is enough for a single camera under normal use. If you split this power, each camera would get only a fraction of the energy, leading to slow charging or battery drain. It’s a bit like trying to water two plants at once with one small watering can—you just don’t have enough water for both.
- Connection Type: The cable is custom-made for Arlo cameras and only fits one device at a time. Even if you found a way to split the cable, the connectors and voltage might not match, causing charging errors.
- Safety: Overloading a single panel could cause overheating or damage. In some cases, DIY solutions have led to cable failures or camera malfunctions.
Example Scenario
Suppose you have three Arlo Pro 4 cameras. If you use one solar panel for all, you would need a splitter and extra cables. But even then, the panel’s energy would be divided, and each camera would get much less power.
In most cases, the cameras would not charge properly and might run out of battery. You could end up with security gaps when you need your cameras most.
Another example: If you live in a place with long winters and little sun, even one camera might not get enough power from a single panel unless positioned perfectly. Adding more cameras to the same panel would make things worse.

Credit: www.amazon.com
Exploring Workarounds: Is Multi-camera Charging Possible?
Some users ask if they can “hack” the system and use one panel for several cameras. Let’s look at the practical options and limits.
Using Splitters Or Y-cables
You could try using a splitter cable to connect two cameras to one panel. However, this is not recommended:
- The panel’s output (2W) is not enough for two cameras.
- Both cameras might charge very slowly or not at all.
- The cable must be compatible with the Arlo charging port.
- Arlo does not support this setup; it may void your warranty.
In forums, a few tech-savvy users share DIY splitter hacks, but most report that the cameras display “charging error” or the batteries slowly drain, especially if both cameras are in use. Even if the cameras appear to charge, you might not get enough current for motion recording or nighttime operation.
Connecting Multiple Panels
A safer solution is to use one panel per camera. This method is reliable and supported by Arlo. If you have three cameras, install three panels. Each camera gets enough power, and you avoid safety risks.
Some users mount two or three panels close together on a single roof or wall, each panel feeding its own camera. This setup works well and keeps the system simple and easy to troubleshoot.
Third-party Panels
Some brands sell higher-output solar panels or panels with multiple connectors. These may claim to charge several cameras, but results vary:
- Check panel output: Look for at least 6W per camera.
- Verify cable compatibility: Not all panels work with Arlo ports.
- Test in real conditions: Solar power depends on sunlight, so results can differ based on location and weather.
Some third-party panels use USB or barrel connectors, which do not fit Arlo cameras without adapters. Always check reviews and user feedback before purchasing.
Data Table: Arlo Solar Panel Vs Third-party Multi-camera Panels
Here’s a simple comparison between standard Arlo panels and some third-party options:
| Panel Type | Output Power | Number of Cameras Supported | Warranty | Supported Models |
|---|---|---|---|---|
| Arlo Solar Panel | 2W | 1 | 1 Year | Arlo Pro, Pro 2, Pro 3, Pro 4, Ultra |
| Third-Party Panel (Generic) | 6W | Up to 2 (if split) | Varies | Depends on port compatibility |
| High-Power Panel | 12W | Up to 3 (with special adapters) | Varies | Mixed (some Arlo, some not) |
Most Arlo users stick to the original panel for reliability. If you choose third-party panels, research carefully and test before full installation. Also note, third-party panels might not have weatherproof connectors or the same build quality as Arlo’s own products.
Solar Panel Output Vs Camera Power Needs
To understand why Arlo only supports one camera per panel, let’s look at the numbers.
Typical Camera Power Consumption
Arlo cameras use about 1-2 watts when recording. In standby mode, power needs are lower. During live streaming or motion detection, power spikes.
- Standby: 0.5W
- Recording: 1.5W
- Live streaming: 2W
The solar panel’s maximum output is 2W. This matches one camera’s peak needs, but does not allow for extras.
A simple way to think about this: if your camera runs often—say, in a busy area with lots of motion events—it may need more power than the panel can give, especially during cloudy days.
Charging Efficiency
Solar panels are less efficient in cloudy weather, shade, or during winter. Charging can drop to 30–60% of normal output. If your cameras use more power than the panel provides, they will drain the battery.
Some users notice that in winter, when the sun is lower in the sky, the panel’s angle matters even more. Adding a tilt mount can boost performance.
Example Table: Camera Power Needs Vs Panel Output
| Camera Model | Average Power Use | Panel Output | Charging Success |
|---|---|---|---|
| Arlo Pro 4 | 1.5W | 2W | Yes (one camera) |
| Arlo Ultra | 2W | 2W | Yes (one camera, sunny weather) |
| Arlo Essential | 1W | 2W | Yes |
| 2 Cameras (split) | 1.5W x 2 = 3W | 2W | No (insufficient power) |
This data shows why Arlo recommends only one panel per camera.
Real-world Performance: What Users Report
User reviews and tests confirm Arlo’s guidance. Most people who try to charge two cameras with one panel find that both cameras drain faster than they charge, especially in busy locations.
Common Feedback
- One panel per camera works well: In sunny climates, the camera stays charged almost all year. Users in places like Arizona or Spain report months of zero maintenance.
- Multiple cameras per panel fails: Both cameras run low on battery, especially during cloudy days. Some users say that even with small workloads, two cameras will not stay topped up.
- Panel placement matters: Panels in shade or facing north get little sunlight. Always place panels facing south (in the Northern Hemisphere) for best results.
- Cable length issues: Longer cables reduce efficiency. Use short cables when possible.
Practical Examples
- In California, a single panel keeps an Arlo Pro 4 running for months without battery swaps.
- In Seattle, winter clouds reduce charging. The camera needs manual charging every few weeks, even with a panel.
- Attempts to charge two cameras with one panel (using splitters) usually fail unless both cameras are used rarely.
- One user in Canada mounted the panel too flat, leading to snow build-up and no charging for weeks. After tilting the panel and brushing off snow, charging improved.
Solar Panel Placement: Maximizing Efficiency
Even with one panel per camera, placement is critical. Here’s how to get the most from your solar panels:
Tips For Placement
- Face the panel south: This maximizes sunlight in the US.
- Avoid shade: Trees, walls, or roofs block sunlight. Even partial shade can cut charging by half.
- Angle the panel: Tilt at about 30–40 degrees for best results.
- Clean regularly: Dust, leaves, or snow reduce efficiency.
- Short cable runs: Longer cables lose power.
If you have no good south-facing spot, try to place the panel where it gets morning sun. East-facing panels do better than west-facing, since batteries can charge early and last through the day.
Data Table: Placement Impact On Charging
| Placement Condition | Charging Efficiency | Battery Life (Arlo Pro 4) |
|---|---|---|
| Direct sunlight, south-facing | 100% | Continuous charging |
| Partial shade, east-facing | 60% | Needs manual charging in winter |
| Heavy shade, north-facing | 30% | Frequent battery swaps |
| Dirty panel, south-facing | 80% | Occasional charging |
Proper placement can mean the difference between hands-free operation and regular battery changes. Also, avoid placing the panel behind glass—windows block some sunlight and reduce charging.

Credit: www.arlo.com
Cost Considerations: Should You Buy Multiple Panels?
The need for one panel per camera increases costs. Let’s look at whether the investment is worthwhile.
Panel Price
- Arlo Solar Panel: About $60–$80 per panel
- Third-party panels: $40–$100, depending on features
For a house with four cameras, the cost adds up quickly. However, if you value convenience and zero maintenance, the investment can make sense—especially if your cameras are in hard-to-reach spots.
Is It Worth It?
If you live in a sunny climate and use your cameras often, solar panels are cost-effective. They save time and reduce battery waste. For cloudy regions or cameras used rarely, manual charging may be cheaper.
Non-obvious Insight
Many beginners buy too few panels, thinking they can split power. This leads to camera downtime and wasted money. It’s smarter to buy the right number of panels or plan for manual charging.
A surprising tip: If you have a camera that records very few events (for example, in a low-traffic backyard), you might not need a solar panel at all. A full battery could last several months.
Mistakes To Avoid
- Buying one panel for several cameras
- Ignoring panel placement
- Using extra-long cables without checking voltage loss
Battery Life With Solar Charging
How much does a solar panel extend battery life? With proper placement, a single panel can keep a camera running for months. Here’s what users experience:
- Sunny locations: Continuous charging, almost never needs battery swap
- Cloudy locations: Battery lasts 3–6 weeks, depending on usage
- High-traffic areas: Frequent motion detection reduces battery life; may need backup charging
Charging Speed
Solar panels charge slower than wall outlets. If your camera is busy (lots of motion events), it may use battery faster than the panel can recharge.
Example
If your Arlo Pro 4 records 10 events per day, the solar panel keeps up. If it records 100 events per day, the battery may run low even with solar help.
Another tip: If you notice that your battery level drops steadily, check for false alerts (like tree branches moving) and adjust the motion sensitivity. Fewer false alarms mean longer battery life.
Compatibility: Which Arlo Cameras Work With Solar Panels?
Not every Arlo camera works with the solar panel. Here’s a quick guide:
Supported Models
- Arlo Pro
- Arlo Pro 2
- Arlo Pro 3
- Arlo Pro 4
- Arlo Ultra
- Arlo Ultra 2
- Arlo Essential
Not Supported
- Arlo Go
- Arlo Q
- Arlo Baby
Check the port and mounting requirements before buying. Some panels come with adapters for different models.
Non-obvious Insight
Some users try to connect panels to cameras without the right port. This can damage the camera and void warranty.
Another note: If your camera’s firmware is out-of-date, it may not recognize the solar panel. Update your camera to the latest version before installing the panel.
Environmental Factors: Sunlight, Weather, And Location
Solar panels depend on sunlight. Here’s how environment affects charging:
- Latitude: Northern locations get less winter sunlight.
- Season: Summer provides more hours of sunlight.
- Weather: Clouds, rain, snow reduce charging.
- Obstacles: Trees, buildings, or fences block sunlight.
Practical Guidance
Plan your panel placement based on local climate. In northern states, expect slower charging during winter. In southern states, panels work year-round.
If you live in a place with harsh winters, consider using a backup battery or a wall charger during the darkest months.
Installation Tips: Setting Up Your Arlo Solar Panel
Installing the panel is easy, but a few steps make it more effective:
- Choose a sunny spot near the camera.
- Mount the panel using included hardware.
- Connect the cable to the camera’s charging port.
- Tilt the panel for maximum sunlight.
- Test charging during sunny and cloudy days.
- Clean the panel regularly.
If you need a longer cable, buy Arlo-approved extensions to avoid voltage loss.
A useful hint: After installation, check the Arlo app for battery level changes. If the battery drops after a few days, adjust the panel’s angle or move it to a sunnier location.
Troubleshooting Common Issues
Even with careful setup, some problems can occur:
Panel Not Charging
- Check cable connections.
- Clean the panel.
- Move panel to sunnier location.
- Check for firmware updates.
Battery Draining Too Fast
- Reduce motion sensitivity.
- Limit live streaming.
- Use shorter cables.
If you still have issues, test the panel with another camera or try a wall charger to see if the problem is with the panel or the camera.
Camera Not Compatible
- Check model number.
- Use proper adapters.

Credit: us.swann.com
Comparing Solar Charging To Other Power Options
Solar panels are just one way to power Arlo cameras. Here’s how they compare to other options:
- Wall charging: Fast, reliable, but needs outdoor outlet
- Battery swaps: Cheap, but requires manual work
- Solar charging: Hands-free, but depends on sunlight
Solar panels are best for locations without easy access to power outlets. If you travel often or have mobility issues, solar panels can make your security system much more convenient.
External Resource
For more details on solar panel efficiency, visit Wikipedia.
Frequently Asked Questions
Can I Use One Arlo Solar Panel For Multiple Cameras?
No, the panel is designed for one camera at a time. The output is not enough for several cameras, and the cable only fits one device.
What Happens If I Connect Two Cameras With A Splitter?
Both cameras will charge slowly or not at all. The panel cannot provide enough power for two cameras, leading to battery drain.
Does Panel Placement Matter For Charging?
Yes. Panels in direct sunlight work best. Shade, clouds, and improper angles reduce charging speed and battery life.
Are Third-party Panels Safe For Arlo Cameras?
Some third-party panels work, but you must check power output and cable compatibility. Using unsupported panels can void your warranty.
How Often Do I Need To Clean The Solar Panel?
Clean the panel every few weeks, or after storms and pollen season. Dirt and debris block sunlight and reduce charging efficiency.
Final Thoughts
If you want reliable, hands-free charging for your Arlo cameras, the solar panel is a smart choice—when used correctly. The simple answer is: one panel per camera. Trying to charge several cameras with one panel leads to problems and wasted money. Proper placement, regular cleaning, and compatible cables maximize your setup. With this knowledge, you can build a security system that stays powered all year, without hassle. Always plan for your local climate, and remember: solar panels work best when used as designed.