
Getting your Dish remote control working with your receiver is an important step for using your satellite TV system. For many people, the process seems confusing, especially if you’re new to satellite TV or just replaced your remote. But with the right steps and a clear guide, you can activate your Dish remote quickly—even if you’re not a technical expert. This article will walk you through every part of the process, from understanding your equipment to troubleshooting common problems. You’ll also find tips, real examples, and clear answers to common questions. Whether you just bought a new Dish receiver, lost your old remote, or want to set up a replacement, this guide will help you get everything working smoothly.
Understanding Your Dish Remote And Receiver
Before you start, it helps to know the basics of your Dish remote and receiver. Dish Network provides several types of remotes. The most common are the 40.0, 50.0, 52.0, and 54.0 models. Each works with specific Dish receivers, like the Hopper, Wally, Joey, or ViP series. The pairing process is similar for most models, but small differences matter.
Dish remotes generally use infrared (IR) or radio frequency (RF) signals. IR remotes require a direct line of sight to the receiver, while RF remotes can work through walls or cabinets. Understanding which type you have makes activation easier. Most newer Dish remotes (like 52.0 and 54.0) support both RF and IR.
The receiver is the box that connects to your TV and satellite dish. It processes the signal and sends TV channels to your screen. Each receiver has a unique pairing process with the remote, and sometimes you may need to activate the remote after a reset, upgrade, or battery change.
Important Insight: Many users overlook the battery type or forget to remove the plastic tab in new remotes. Always check your remote’s batteries before starting.
When Do You Need To Activate A Dish Remote?
There are several reasons you might need to activate or pair your Dish remote:
- New Equipment: When you get a new receiver or remote from Dish Network.
- Replacement: If your original remote is lost or broken and you bought a replacement.
- After Reset: If you performed a factory reset on your receiver.
- Receiver Upgrade: When upgrading to a new model like the Hopper.
- Remote Not Responding: If the remote stops working due to interference, weak batteries, or accidental unpairing.
- Multi-TV Setups: Adding a remote to another TV in a multi-room setup.
Non-obvious tip: If your remote works partly (e.g., volume but not channel), pairing may be incomplete or set to the wrong mode.

Credit: www.amazon.com
Preparing For Activation: What You Need
To activate a Dish remote to your receiver, gather these items:
- Your Dish remote control (with working batteries)
- The Dish receiver (powered on and connected to your TV)
- The TV remote (optional, for checking HDMI/source)
- A clear view of the receiver (for IR remotes)
- The receiver’s model number (found on the front or bottom of the device)
Practical advice: Make sure your receiver is not blocked by objects. Even a stack of magazines can prevent IR signals from working.
Identifying Your Dish Remote Model
Different Dish remotes have slightly different activation steps. To find your model:
- Look at the back or bottom of the remote for a label (e.g., 54.0, 50.0, 40.0).
- Check the number of buttons and design: Newer remotes have a sleek, modern look and fewer colored buttons.
- If you have the box or manual, the model is printed there.
- Visit the official Dish website to match your remote visually.
Quick Comparison of Common Remotes:
| Remote Model | Compatible Receivers | Main Features |
|---|---|---|
| 40.0 | Hopper, Joey, Wally | IR and RF, colored buttons |
| 50.0 | Hopper 3, Joey 2/3 | RF, voice support |
| 52.0 | Hopper, Joey, Wally | IR and RF, learning mode |
| 54.0 | Hopper, Joey, Wally | RF, voice search, backlit keys |
Knowing your model ensures you follow the correct activation steps.
Step-by-step: How To Activate A Dish Remote To Receiver
The activation process can be divided into general steps. Here’s a guide that works for most Dish remotes and receivers.
1. Check Batteries And Power
- Insert fresh AAA batteries into your remote.
- Remove any plastic tab (for new remotes).
- Make sure your receiver is powered on and your TV is set to the correct input.
Insider tip: Weak batteries often cause remotes to work only part of the time. Always start with new batteries.
2. Put The Receiver In Pairing Mode
Depending on your receiver, pairing mode can be started in different ways:
- Hopper/Joey/Wally: Press the System Info button on the front panel. If no button is present, press the Menu button on your remote and use the arrow keys to select Settings > Remote Control > Pairing Wizard.
- ViP Series: Open the front panel and press the Sys Info button.
On the TV screen, you should see the System Information page. This means the receiver is ready to pair.
Tip: If you can’t find the button, check the receiver’s manual or the Dish website for your model.
3. Pair The Remote
- On the System Information screen, press and release the SAT button on your remote (some models use the Home or Options button).
- Next, press the Record button once. On most remotes, you’ll see a pairing confirmation message on the TV.
- If you’re using a 54.0 or voice remote, press and hold the Back and Guide buttons until the LED blinks, then follow the on-screen prompts.
For IR-only remotes (older models), simply point the remote at the receiver and press SAT. For RF remotes, you must be within 10 feet of the receiver.
4. Test The Remote
- Try changing channels, adjusting volume, and opening the guide.
- If everything works, you’re done.
- If some buttons don’t work, repeat the process or check for interference.
Hidden tip: If your remote controls the receiver but not your TV volume, you may need to program the TV controls separately (see below).
5. Pairing To Multiple Receivers (optional)
Some Dish remotes allow pairing to more than one receiver (for multi-room setups):
- Repeat the pairing process for each receiver.
- Label your remotes or use different remote addresses to avoid confusion.
Non-obvious insight: Using RF remotes in multi-room setups can cause interference if both receivers are close together. Change the remote address for each receiver.
Programming Your Dish Remote For Tv Control
After activating your Dish remote to the receiver, you might want to control your TV’s power and volume with the same remote. Here’s how:
- Press the Menu button on your Dish remote.
- Go to Settings > Remote Control.
- Select TV from the device list.
- Choose Pairing Wizard or TV Code entry.
- Enter your TV’s brand and follow the on-screen instructions.
- Test by pressing the Volume or Power button.
If the first code does not work, try other codes for your TV brand. Some TVs require several tries.
Practical example: If you have a Samsung TV, you may need to test 2–3 codes before finding the one that works with your model.
Troubleshooting Common Problems
Even with clear instructions, you might face some issues. Here’s how to solve the most frequent problems:
Remote Won’t Pair
- Check for dead batteries or weak signal.
- Make sure you’re within range (especially for IR remotes).
- Restart the receiver and try again.
Remote Controls Receiver But Not Tv
- Program the TV controls using the TV Code method.
- Make sure your TV is supported (some rare brands may not work).
Buttons Not Responding
- Clean the remote with a dry cloth.
- Remove obstructions between remote and receiver.
- Try pairing in a different room to avoid interference from other electronics.
Multiple Remotes Interfering
- Change the Remote Address on the receiver’s System Info page.
- Pair each remote separately.
Receiver Not Entering Pairing Mode
- Unplug the receiver for 30 seconds, plug it back in, and try again.
- Make sure you’re pressing the correct button for your receiver model.
Special Cases: Hopper, Joey, And Wally Receivers
The Hopper, Joey, and Wally are popular Dish receivers with unique features. Their remotes often use RF technology, which allows for more flexible placement. Here’s what makes them special:
- Hopper: Supports multiple remotes and advanced features like voice search.
- Joey: Works as an extension for the Hopper, usually in another room.
- Wally: Standalone receiver for single TV setups.
Pairing steps are similar, but make sure you use the correct menu on your TV for these models. For example, the Hopper uses the Home button for setup, while the Joey may require the SAT button.
Advanced tip: With the Hopper, you can pair a remote to control both the receiver and sound system (AVR) in one process.
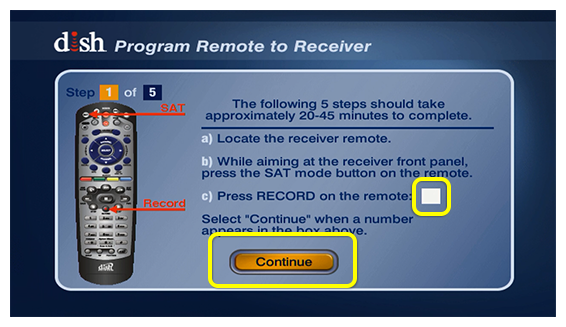
Credit: support.dish.com
Dish Remote Modes: Sat, Tv, Aux
Dish remotes have several modes—usually labeled SAT, TV, and AUX. Each mode changes what the remote controls:
- SAT: Controls the Dish receiver.
- TV: Controls your television.
- AUX: Controls another device (like a sound bar or DVD player).
To switch modes, press the corresponding button at the top of the remote. If your remote isn’t working as expected, check which mode is active.
Common mistake: Many users accidentally switch to TV or AUX mode and think the remote is broken. Always press SAT before operating the receiver.
What To Do If Activation Fails
If you’ve tried everything and the remote still won’t activate:
- Reset the remote: Remove the batteries, press every button once, wait 30 seconds, and reinsert the batteries.
- Reset the receiver: Unplug from power, wait 60 seconds, plug back in.
- Try a different remote: If possible, test with another Dish remote to see if the issue is with the remote or receiver.
- Contact support: Sometimes, hardware problems require Dish Network support. You can call their helpline or visit their official support page.
Expert insight: Don’t spend hours troubleshooting a remote that has physical damage (like water or drops). It’s often faster to order a replacement.
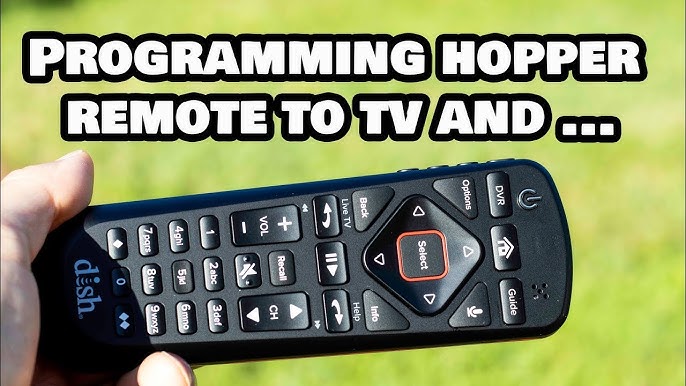
Credit: www.youtube.com
Comparison: Ir Vs Rf Dish Remotes
Understanding the difference between infrared (IR) and radio frequency (RF) remotes can help you solve problems and choose the right equipment.
| Feature | IR Remote | RF Remote |
|---|---|---|
| Signal Type | Infrared (line of sight) | Radio Frequency (no line of sight needed) |
| Range | Up to 30 feet (clear view) | Up to 200 feet (through walls) |
| Interference | Sunlight, obstacles | Wireless devices, thick walls |
| Best For | Simple setups, direct view | Multi-room, hidden receivers |
Key takeaway: For most home users, RF remotes are more flexible, but IR remotes are simple and reliable if you have a clear line of sight.
Upgrading Or Replacing Your Dish Remote
If your remote is outdated, lost, or broken, you may need a new one. Here’s what to consider:
- Compatibility: Check your receiver model before buying a new remote.
- Features: Decide if you want voice control, backlit buttons, or universal features.
- Official vs. Third-Party: Official Dish remotes guarantee compatibility, but some universal remotes can also be programmed for Dish receivers.
Buyer mistake: Many people buy remotes without checking compatibility. Always look up your receiver model first.
Tip: The Dish Network website offers a remote finder tool. You can also find step-by-step guides and support resources at DISH Network Official Support.
Tips For Better Remote Performance
After activation, keep your remote working smoothly with these tips:
- Change batteries regularly: Don’t wait for the remote to stop working.
- Keep the remote clean: Dust and dirt can block buttons.
- Avoid drops and spills: Remotes are sensitive to liquid and impact.
- Store in a safe place: Avoid sitting on or losing the remote.
- Update receiver software: New updates can improve compatibility.
Pro insight: Using rechargeable AAA batteries can save money if you use your remote heavily.
Dish Remote Activation: Real User Experiences
Hearing how others solved their Dish remote issues can offer helpful ideas. Here are two real-world examples:
Case 1: Receiver Upgrade
Sarah upgraded from a ViP receiver to a Hopper 3. Her old 40. 0 remote didn’t pair with the new receiver. She called Dish support and learned she needed a 54. 0 remote for full compatibility. After buying the correct model, she used the pairing wizard and had everything working in minutes.
Case 2: Remote Not Working After Power Outage
Mike’s Joey receiver stopped responding to his remote after a storm. He unplugged the receiver for one minute, plugged it back in, and used the System Info screen to pair the remote again. The remote worked perfectly after this reset.
Lesson: Sometimes, the problem is with the remote model or a power issue. Simple resets or upgrades can fix problems quickly.
Advanced Settings: Changing Remote Address
If you have more than one receiver, or if your neighbor’s remote interferes with yours, you can change the remote address. Here’s how:
- Press the System Info button on the receiver.
- On the System Info screen, press the SAT button on the remote.
- Press any number from 1 to 16 to set a new address (e.g., press 2 for address 2).
- Press Record to save.
- The new address appears on the System Info screen.
Non-obvious benefit: This can stop interference if you live in an apartment or use multiple receivers in one house.
Dish Remote Battery Facts And Myths
Many people believe all remote problems are caused by weak batteries. While batteries are a common issue, they’re not always the cause. Here’s what you should know:
- Standard AAA batteries last about 6-12 months with normal use.
- Rechargeable batteries may not last as long per charge but are eco-friendly.
- If the remote only works when you press very hard, the issue is usually the rubber contacts, not the batteries.
- Store spare batteries nearby for quick replacement.
Tip: Avoid mixing old and new batteries, which can cause leaks or short circuits.
Troubleshooting With The Dish Remote App
Did you know Dish offers a mobile app that can act as a remote? If your physical remote fails, the app can be a lifesaver:
- Download the DISH Anywhere app for iOS or Android.
- Connect your phone to the same Wi-Fi network as your receiver.
- Use the app’s remote control feature to change channels, open the guide, and more.
Example: If your kids lose the remote, you can still control the TV from your phone while you search for it.
Note: The app works only with supported receivers and requires Wi-Fi.
Comparing Dish Remote Activation To Other Brands
How does Dish’s activation process compare to other satellite or cable providers?
| Provider | Remote Activation Process | Typical Time Required |
|---|---|---|
| Dish Network | System Info screen + pairing buttons | 2–5 minutes |
| DirecTV | Manual code entry, sometimes automatic | 3–10 minutes |
| Xfinity | Voice prompt or code entry | 2–6 minutes |
| Roku/Streaming | Automatic with device pairing | 1–3 minutes |
Insight: Dish remotes are among the fastest to activate if you follow the pairing instructions. Other providers often require manual code entry or extra steps.
Keeping Your Dish Remote And Receiver Updated
Firmware updates for your receiver can improve remote compatibility and fix bugs. Here’s how to check for updates:
- Go to the Menu on your receiver.
- Select Settings > Updates.
- If an update is available, follow the prompts to install.
Updates usually download overnight, but you can check manually. Keeping software current reduces activation problems.
Tip: If you just activated a new remote, check for updates to ensure all features work, such as voice search or backlighting.
Safety And Maintenance Tips
To extend the life of your Dish remote:
- Store it away from water and heat sources.
- Clean with a soft cloth—never use water or chemical cleaners.
- Replace batteries as soon as the remote feels sluggish.
- If the remote gets wet, remove batteries immediately and let it dry for 24 hours before using.
Practical advice: If you have pets or young children, consider using a remote cover to protect against drops and spills.
Frequently Asked Questions
How Do I Know If My Dish Remote Is Paired?
If your remote controls all receiver functions (channels, menu, guide), it’s paired. If only some buttons work, repeat the pairing process using the System Info screen.
Can I Use A Universal Remote With My Dish Receiver?
Yes, but not all universal remotes support all Dish features. Check compatibility and look up the correct codes for your receiver and TV. Official Dish remotes are recommended for full functionality.
What Should I Do If My Dish Remote Stops Working After A Power Outage?
Unplug the receiver for 1 minute, plug it back in, and try pairing again. If the remote still doesn’t work, check the batteries and repeat the activation steps.
Can I Control More Than One Receiver With A Single Dish Remote?
Some Dish remotes can be paired with multiple receivers, but you’ll need to switch addresses or modes. For most users, it’s easier to use one remote per receiver.
Where Can I Find The Remote Code For My Tv?
Go to Menu > Settings > Remote Control on your receiver, select your TV brand, and follow the on-screen instructions. You can also check the Dish manual or their support website for TV codes.
Getting your Dish remote activated shouldn’t be stressful. With these steps, you can enjoy your satellite TV system with full control, avoid common mistakes, and get the most from your equipment. If you run into trouble, remember that support is available—and sometimes, a simple reset is all you need.