
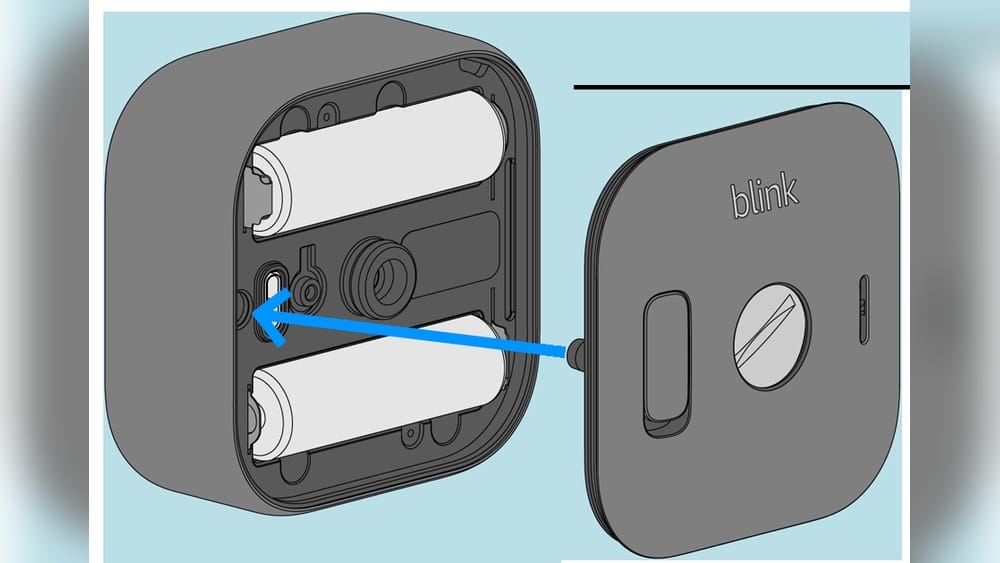
Changing the batteries in your Blink Outdoor Camera might sound simple, but it’s a task that deserves attention. When your security depends on a fully powered camera, you can’t afford mistakes. Many owners overlook small details that can lead to problems, such as lost footage or damaged devices.
Whether you’re new to Blink cameras or just want to avoid common mistakes, this guide will show you how to change the batteries safely, quickly, and without stress. You’ll also find practical tips that most beginners miss, ways to extend battery life, and troubleshooting advice if things don’t go as planned.
Understanding Your Blink Outdoor Camera
The Blink Outdoor Camera is a popular wireless security camera for homes and small businesses. Its main advantage is that it runs on batteries, so you can place it almost anywhere without worrying about electrical outlets. It uses two AA lithium batteries, which are designed to last up to two years under normal use.
However, “normal” use can mean different things depending on how often your camera records video, sends alerts, or operates in extreme temperatures. Knowing these factors helps you plan when and how to change the batteries, so your camera never goes offline at a critical moment.
Key Features And Battery System
- Wireless design: No wires, so battery power is critical.
- Weather resistance: Built for outdoor use, but temperature affects battery life.
- Two-way audio: Uses more power when active.
- Motion detection: Frequent triggers can drain batteries faster.
The camera’s battery compartment is sealed to protect it from rain and dust. This makes opening and closing the case a little different from changing batteries in a typical device.
When To Change The Batteries
Some users wait until the camera stops working before changing the batteries. This is risky. Instead, look for these signs:
- Low battery warning: The Blink app sends a notification when the battery is low.
- Video quality drops: Poor video or missed clips can mean the battery is running out.
- Slow response: If your camera takes longer to wake up or connect, power may be low.
- No LED flash: If the blue LED doesn’t light up during motion, check the battery.
It’s best to change the batteries when you get the first low-battery alert, not when the camera shuts down. This way, you avoid gaps in your security coverage.
How Often Will You Need To Change Batteries?
The answer depends on your settings and environment. Blink claims up to two years of life, but heavy use (like frequent motion alerts or live viewing) can reduce this to 6-12 months. In cold weather, battery life may drop even more.
If you use the camera in a busy area, expect to change batteries every 6-9 months.
Choosing The Right Batteries
Not all batteries work well in Blink Outdoor Cameras. Using the wrong type can cause problems, reduce performance, or even damage your camera.
Recommended Battery Types
- AA 1.5V Lithium batteries: These are the only batteries officially supported by Blink. They handle temperature changes and last much longer than alkaline or rechargeable batteries.
Some of the best brands include:
- Energizer Ultimate Lithium (L91)
- Duracell Ultra Lithium
Batteries To Avoid
- Alkaline batteries: These may be cheap but drain quickly and can leak.
- Rechargeable NiMH batteries: They have lower voltage (1.2V), so your camera may not work well or may show “low battery” soon after installation.
- Off-brand batteries: Low-quality batteries can fail early or cause errors.
Comparison Of Battery Types
Here’s a comparison of common battery types used in Blink Outdoor Cameras:
| Battery Type | Voltage | Average Life | Temperature Range | Recommended |
|---|---|---|---|---|
| AA Lithium | 1.5V | Up to 2 years | -40°F to 140°F | Yes |
| AA Alkaline | 1.5V | 3-6 months | 0°F to 130°F | No |
| AA NiMH Rechargeable | 1.2V | 1-3 months | 32°F to 122°F | No |
Non-obvious Insight
Many beginners think rechargeable batteries save money, but they often cause more trouble than they’re worth. The lower voltage leads to early “low battery” warnings and unstable performance. Stick with lithium for reliable operation.
Preparing To Change The Batteries
Before you start, gather everything you need. This will save time and help prevent mistakes.
What You’ll Need
- 2 fresh AA 1.5V lithium batteries
- Small Phillips-head screwdriver (for some models)
- Soft, clean cloth (to wipe the case and keep the camera clean)
- Sturdy ladder (if your camera is mounted high)
- Dry, safe workspace
Safety Tips
- Always use a ladder if the camera is mounted above your reach. Don’t stretch or stand on unstable surfaces.
- Avoid changing batteries during rain or high humidity. Water can get inside the camera if the compartment stays open too long.
- Wash your hands before handling new batteries. Oils or dirt can reduce battery life.
Pro Tip
Take a photo of your camera’s position before removing it. This will help you put it back at the same angle for the best view.
Step-by-step Guide: Changing Batteries In Blink Outdoor Camera
This process works for most Blink Outdoor Cameras, including the popular 2nd and 3rd generation models. If you have a different model, check the user manual for any changes.
1. Remove The Camera From Its Mount
Most Blink Outdoor Cameras use a simple clip-in or screw mount. Hold the camera firmly and slide it up and away from the mount. For screw mounts, unscrew the bottom attachment.
Tip: Hold the camera with both hands to avoid dropping it.
2. Locate And Open The Battery Compartment
The battery compartment is on the back of the camera. You’ll see a small screw holding the cover in place.
- Use a small Phillips-head screwdriver to loosen the screw.
- Turn counterclockwise until the screw is free, but don’t remove it completely (it’s designed to stay attached to the cover).
- Gently lift the cover off.
Non-Obvious Insight: The screw is often plastic and can strip if you use too much force. Turn slowly and don’t use a power tool.
3. Remove The Old Batteries
- Note the orientation of the batteries (positive and negative ends).
- Remove both old batteries and set them aside for recycling.
Important: Don’t mix old and new batteries. Replace both at the same time to avoid uneven power.
4. Insert The New Batteries
- Insert the fresh lithium AA batteries in the correct orientation. The battery compartment is marked with + and – signs.
- Make sure the batteries fit snugly.
Practical Example: If the batteries don’t slide in easily, check for dust or debris in the compartment and gently clean it out.
5. Replace The Battery Cover
- Place the cover back on the camera.
- Tighten the screw by turning clockwise until it’s snug, but don’t over-tighten.
Extra Caution: Over-tightening can crack the plastic cover or strip the threads.
6. Re-mount The Camera
- Put the camera back on its mount in the same position as before.
- If needed, adjust the angle to cover your desired area.
7. Check Camera Function
- Open the Blink app on your phone.
- Select the camera and check the live view.
- Look for a battery icon or status. It should show as “OK” or “Full.”
- Test motion detection or live view to make sure everything works.
Pro Tip: If the camera doesn’t show up in the app or gives a battery error, remove the batteries, wait 30 seconds, and try again.
Common Mistakes To Avoid
Changing batteries seems easy, but these small errors can cause big headaches:
- Using alkaline or rechargeable batteries: Your camera may not power up or will show errors.
- Forgetting the correct orientation: Inserting batteries backward can damage the contacts.
- Leaving the cover loose: Water or dust can get inside and cause a short circuit.
- Touching battery contacts with wet hands: Moisture can lead to corrosion.
- Dropping the camera: Always hold it securely, especially when working on a ladder.
Maximizing Battery Life
Even with the right batteries, your usage matters. Here’s how to make your Blink Outdoor Camera batteries last as long as possible.
Adjusting Camera Settings
- Lower motion sensitivity: High sensitivity means more recordings, which drains batteries faster.
- Shorten clip length: Set video clips to 10-15 seconds instead of the maximum.
- Reduce retrigger time: Increase the delay between recordings.
- Disable audio if not needed: Two-way audio uses extra power.
- Use scheduled arming: Only activate the camera when needed, such as at night.
Environmental Factors
- Install the camera in a shaded area: Direct sunlight can overheat the camera and batteries.
- Avoid extreme cold: If possible, mount cameras where they are sheltered from wind and snow.
- Keep the camera clean: Dirt can affect sensors and battery contacts.
Comparison Of Settings Impact On Battery Life
The following data shows how certain settings affect battery life:
| Setting | Default | Optimized | Battery Life Impact |
|---|---|---|---|
| Motion Sensitivity | 8/10 | 5/10 | +3 months |
| Clip Length | 30 sec | 10 sec | +2 months |
| Retrigger Time | 10 sec | 60 sec | +1 month |
| Audio Recording | On | Off | +1 month |
Non-obvious Insight
If your Wi-Fi signal is weak, the camera uses more power to connect. Placing your Wi-Fi router closer to the camera or using a Wi-Fi extender can help batteries last longer.
Troubleshooting Battery Issues
Sometimes, changing the batteries doesn’t fix the problem. Here’s how to handle common issues:
Camera Does Not Power On
- Check that both batteries are fresh and inserted in the correct orientation.
- Make sure the battery contacts are clean and not corroded.
- Remove batteries, wait 30 seconds, and reinsert.
- Try another set of lithium batteries.
Low Battery Warning After New Batteries
- Confirm you are using AA 1.5V lithium batteries.
- Avoid mixing brands or types.
- If the problem continues, reset the camera through the app or perform a hard reset (see your user manual).
Camera Loses Connection
- Weak Wi-Fi can cause connection drops and drain batteries quickly.
- Move your router closer or add a Wi-Fi extender.
- Make sure your Sync Module (if used) is within range.
Battery Compartment Won’t Close
- Check for debris or misaligned batteries.
- Don’t force the cover; it should close easily if everything is in place.
- Inspect the plastic screw for damage.
Table: Quick Fixes For Common Problems
| Problem | Possible Cause | Solution |
|---|---|---|
| No power | Batteries dead or wrong orientation | Check batteries, reinsert properly |
| Low battery warning | Alkaline or rechargeable batteries used | Switch to lithium batteries |
| Camera offline | Weak Wi-Fi | Move router closer, use extender |
| Battery compartment won’t close | Debris or misalignment | Clean and realign batteries |
Recycling Old Batteries
Don’t throw used batteries in the trash. Lithium batteries can be hazardous if not handled properly.
- Take old batteries to a battery recycling center or participating electronics store.
- Check your city’s waste guidelines for battery disposal.
- Never burn or crush batteries.
For more on safe battery disposal, you can visit the EPA’s battery recycling guide.
How To Tell If Your Camera Needs Service
If your Blink Outdoor Camera continues to have issues even after changing the batteries and troubleshooting, it may need professional service.
Warning Signs
- Camera feels hot or smells odd.
- Battery compartment shows signs of corrosion or water damage.
- Camera fails to power up with multiple new batteries.
Contact Blink support if you notice any of these problems. Using the camera in this state can be dangerous.

Credit: support.blinkforhome.com
Advanced Tips For Power Users
Some Blink users want even more from their cameras. Here are a few advanced tips:
- Solar Panel Accessories: Some third-party companies sell solar panels compatible with Blink cameras. These can reduce the number of battery changes, especially in sunny locations.
- Power Adapter: Blink sells a weatherproof power cable for continuous power. This is good for high-traffic areas.
- Firmware Updates: Keep your camera firmware updated. New updates often improve battery management and fix bugs.
- Test After Big Weather Changes: Extreme heat or cold can affect both batteries and seals. Check cameras after storms or heatwaves.
Frequently Asked Questions

Credit: www.youtube.com
What Kind Of Batteries Does The Blink Outdoor Camera Use?
The Blink Outdoor Camera uses two AA 1.5V lithium batteries. Do not use alkaline or rechargeable batteries, as they can cause performance problems or battery errors.
How Long Do The Batteries Last In A Blink Outdoor Camera?
Under ideal conditions, the batteries can last up to two years. However, heavy use, frequent motion detection, live viewing, or cold weather can reduce battery life to 6-12 months.
Can I Use Rechargeable Batteries In My Blink Outdoor Camera?
No, rechargeable NiMH batteries are not recommended. Their voltage is too low (1.2V), which can cause “low battery” warnings and unreliable performance.
What Should I Do If My Camera Does Not Work After Changing Batteries?
First, check that you are using the correct battery type and that they are inserted with the correct orientation. If problems continue, remove the batteries, wait 30 seconds, and try again. Make sure the battery contacts are clean. If the issue persists, consult Blink support.

Credit: www.youtube.com
How Do I Dispose Of Old Lithium Batteries Safely?
Take used lithium batteries to a battery recycling center or electronics store with a recycling program. Never put them in the regular trash, as they can cause fires or environmental harm. For more details, see the EPA’s battery recycling guide.
Changing the batteries in your Blink Outdoor Camera is a simple but important part of keeping your home secure. With the right batteries, careful handling, and a few smart adjustments, you’ll get the longest life and the best performance from your system.
Don’t wait until your camera goes offline—be proactive, follow these steps, and your Blink camera will keep watch without interruption.