
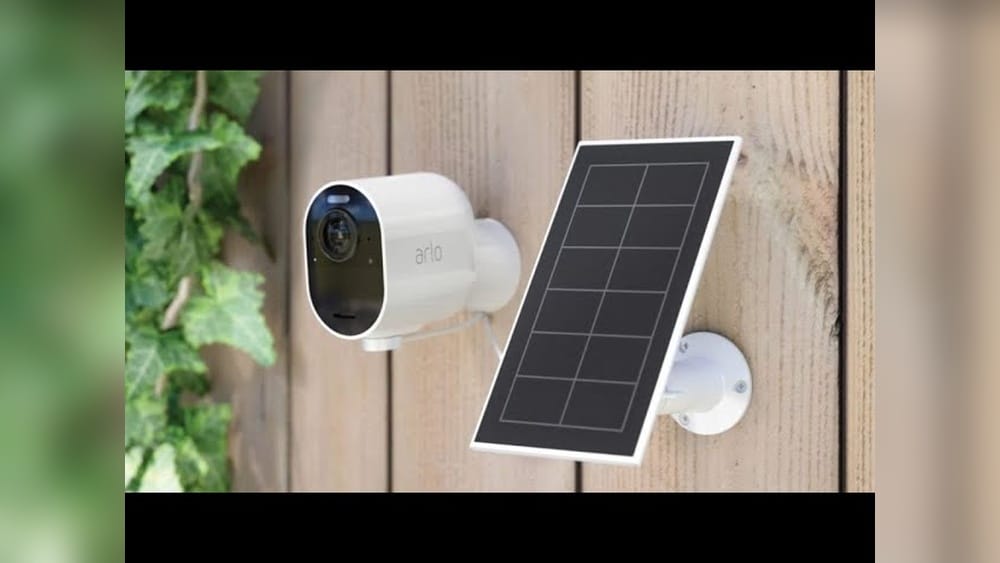
Connecting a solar panel to your Arlo camera is one of the smartest ways to keep your security system running without worrying about battery life or frequent charging. With the right setup, your camera can work day and night, capturing every moment and protecting your property.
Many homeowners and small business owners want a clean, reliable power solution but often find the technical details confusing. This guide explains everything you need to know, step by step, in clear language—even if you’re new to solar or Arlo products.
Why Use A Solar Panel With Your Arlo Camera?
Arlo cameras are popular for their wireless setup and simple installation. However, their batteries need charging, especially if you record a lot of videos or live in a busy area. Using a solar panel solves this problem by providing continuous power.
Here are the main benefits:
- Continuous power: Your camera stays charged, even during long periods of activity.
- No wires: Solar panels keep your setup wireless, so you don’t need to run cables through walls or ceilings.
- Eco-friendly: You use clean energy from the sun, which is good for the environment.
- Lower maintenance: Less time spent charging batteries means fewer interruptions and less hassle.
Many Arlo users notice that battery drains quickly in high-traffic areas. Solar panels help prevent this issue and keep your camera working all year.
Understanding Arlo Camera Models And Their Power Needs
Before connecting a solar panel, it’s important to know which Arlo camera you have. Not all models are compatible with solar charging, and some need special adapters.
Arlo makes several camera models:
- Arlo Pro and Pro 2: These support solar charging directly.
- Arlo Ultra and Ultra 2: Work with Arlo solar panels and some third-party panels.
- Arlo Essential: Some versions support solar charging but may need adapters.
- Arlo Go and Go 2: These portable models often work with solar panels, but check compatibility.
Here is a quick comparison of Arlo camera models and their solar compatibility:
| Model | Solar Compatible | Adapter Needed | Average Battery Life (Days) |
|---|---|---|---|
| Arlo Pro | Yes | No | 90 |
| Arlo Pro 2 | Yes | No | 90 |
| Arlo Ultra | Yes | Sometimes | 60 |
| Arlo Essential | Some | Yes | 45 |
| Arlo Go | Yes | Sometimes | 30 |
Tip: Always check the manual or Arlo website for your camera’s solar compatibility. Some models only work with official Arlo solar panels, while others accept third-party panels.

Credit: www.amazon.com
Choosing The Right Solar Panel For Arlo Cameras
Selecting the correct solar panel is the most important step. The wrong panel may not charge your camera properly, or might even damage it.
Here’s what you should look for:
1. Voltage And Current Rating
Arlo cameras usually require:
- Voltage: 5V (sometimes 9V for newer models)
- Current: At least 2A
If the panel provides too much voltage, it can harm the camera. Too little, and the camera won’t charge.
2. Connector Type
Most Arlo cameras use a micro-USB or magnetic charging port. Some newer models use USB-C. Check your camera’s port before buying.
3. Panel Size And Output
Solar panels come in different sizes and power levels. For Arlo, a 2-5 watt panel is usually enough. If you live in a cloudy area, consider a bigger panel.
4. Official Vs Third-party Panels
- Official Arlo panels: Designed for easy connection and reliable charging.
- Third-party panels: Often cheaper, but may need extra adapters.
Here’s a comparison of official and third-party panels:
| Type | Cost (USD) | Ease of Use | Warranty |
|---|---|---|---|
| Official Arlo Panel | 60-80 | Plug-and-play | 1 year |
| Third-Party Panel | 30-50 | Adapter required | 6 months |
5. Weather Resistance
Look for IP65 or higher rating for water and dust resistance. This keeps your panel safe during rain, snow, or dust storms.
6. Cable Length
Solar panels often come with 6-12 feet cables. Make sure the cable is long enough to reach your camera from the best sunny spot.
Non-obvious insight: Some panels allow you to extend the cable, but longer cables can reduce power slightly. Keep cables as short as possible for best efficiency.
Step-by-step Guide: Connecting Solar Panel To Arlo Camera
Connecting your solar panel is simple, but each step matters for safe and reliable operation.
Step 1: Check Compatibility
- Review your camera model and its charging port.
- Confirm that your solar panel matches the camera’s voltage and connector.
Step 2: Choose The Best Location
- Place the solar panel where it gets maximum sunlight, ideally facing south in the US.
- Avoid shade from trees, buildings, or roof overhangs.
- Clean the area for easy installation.
Practical tip: Test the spot with your phone’s flashlight app. If the spot stays bright for most of the day, it’s a good location.
Step 3: Mount The Solar Panel
- Use the included mounting bracket or screws.
- Angle the panel between 30–45 degrees for best sunlight exposure.
- Secure the panel tightly to avoid movement from wind.
Step 4: Connect The Panel To Your Camera
- Plug the cable from the panel into the camera’s charging port.
- For magnetic ports, make sure the connection snaps firmly.
- If you need an adapter, connect it before plugging into the camera.
Common mistake: Forcing the connector can damage the port. Always align carefully and avoid excess pressure.
Step 5: Test Charging
- Check the Arlo app for battery level. It should show charging status.
- If not, check the connection and sunlight exposure.
- Let the camera charge for a few hours and confirm the battery percentage increases.
Step 6: Secure Cables
- Use cable clips or zip ties to keep cables neat.
- Avoid leaving cables loose—they can be damaged or cause tripping hazards.
Step 7: Monitor Performance
- After installation, check battery levels daily for the first week.
- Watch for “Not charging” messages in the Arlo app.
- Adjust the panel’s angle if needed for better sunlight.
Non-obvious insight: Solar charging slows down in winter or cloudy weather. If your camera drains faster than it charges, reduce motion sensitivity or recording time.
Troubleshooting Common Solar Panel Issues
Even with the best setup, some problems can happen. Here are solutions to common issues:
Camera Not Charging
- Check cable connection: Make sure the connector is fully seated.
- Inspect panel for dirt: Clean the panel surface to allow more sunlight.
- Test in direct sunlight: Move the panel temporarily to a brighter spot.
Slow Charging
- Increase sunlight exposure: Adjust the angle or location.
- Reduce camera activity: Lower motion sensitivity to save battery.
- Use a higher watt panel: Upgrade to a 5W or larger panel.
Compatibility Errors
- Check voltage: Use a multimeter to test panel output.
- Check connector type: Use the correct adapter for your camera model.
- Update firmware: Sometimes Arlo cameras need a software update for solar charging.
Weather Problems
- Water in connectors: Dry the cable and seal with waterproof tape.
- Snow cover: Clear snow from panel surface regularly.
Experience-based tip: In very cold climates, batteries charge slower. It’s normal for winter charging to be less effective.
Solar Panel Placement And Optimization
The position and angle of your solar panel can change its performance dramatically. A poorly placed panel may only charge your camera a few hours per day.
Here’s how to optimize placement:
Sun Exposure
- Aim for at least 6 hours of direct sunlight daily.
- South-facing placement is best in the US. In the southern hemisphere, aim north.
Avoiding Shade
- Check for moving shadows from trees, buildings, or roof features.
- Recheck the location every few months as trees grow or seasons change.
Angle And Tilt
- Adjust the angle based on your latitude. For most US locations, 30-45 degrees works well.
- Use adjustable mounts if possible.
Cleaning And Maintenance
- Wipe the panel with a soft cloth every month.
- Remove leaves, dust, or bird droppings.
Data point: Dirty panels can lose up to 25% of their charging power.
Weather Resistance And Long-term Durability
Solar panels are made for outdoor use, but not all are equally tough. Weather resistance is important for long-term reliability.
Ip Ratings
- IP65 or higher is best for rain, snow, and dust.
- Avoid panels with lower ratings—they may fail during storms.
Material Quality
- Choose panels with tempered glass and sturdy metal frames.
- Plastic panels can crack in extreme temperatures.
Cable Protection
- Use waterproof cable covers.
- Keep connectors out of puddles or snow.
Here is a comparison of weather resistance features:
| Feature | Basic Panels | Premium Panels |
|---|---|---|
| IP Rating | IP54 | IP67 |
| Frame Material | Plastic | Aluminum |
| Connector Type | Basic USB | Waterproof Magnetic |
| Cable Cover | None | Silicone Sleeve |
Adapters And Cables: What You Need To Know
Most problems come from using the wrong adapter or cable. Here’s how to avoid mistakes:
Adapter Types
- Some cameras require a micro-USB to magnetic adapter.
- Others need USB-C.
Always buy adapters from trusted brands. Cheap adapters can cause charging errors.
Cable Length
- Longer cables lose power. Keep cables under 10 feet if possible.
- Use thicker cables for longer runs.
Waterproofing
- Use silicone sleeves or tape for outdoor connectors.
- Check for signs of rust or corrosion every few months.
Practical advisor tip: If your cable gets hot, it’s too thin or too long. Replace it with a thicker cable.
Maximizing Solar Charging Efficiency
Getting the most from your solar setup means more than just plugging in. Here’s how to boost efficiency:
Panel Maintenance
- Clean every month for best performance.
- Use gentle soap and water—no harsh chemicals.
Camera Settings
- Lower motion sensitivity if you have many false alarms.
- Reduce video quality if you record a lot.
Battery Health
- Replace batteries every 2–3 years for best charging.
- Avoid deep discharge—keep batteries above 20% whenever possible.
Seasonal Changes
- In winter, expect slower charging and shorter daylight hours.
- Move the panel to a sunnier spot if needed.
Non-obvious insight: Solar panels work best when cool. If mounted on a hot roof, power may drop by 10–15%.
Real-life Examples And Case Studies
Many users have shared their experiences with solar-powered Arlo cameras. Here are a few examples:
Example 1: Suburban Homeowner
A homeowner in Texas installed a 5W official Arlo panel to power a Pro 2 camera watching their driveway. With 7 hours of sunlight daily, their battery stayed above 90% all year. The camera recorded 30 clips per day, and they only cleaned the panel twice per year.
Example 2: Small Business Owner
A store owner in Seattle used a third-party 4W panel for an Arlo Ultra camera. During winter, the battery dropped to 60%, but in summer, it stayed full. They adjusted camera settings, reducing motion sensitivity, which helped the battery last longer during cloudy days.
Example 3: Rural Property
On a farm in Nebraska, a user mounted a solar panel on a pole, facing south. Their Arlo Go camera ran for months without manual charging. They had to replace the cable once after squirrels chewed it—a reminder to secure cables well.
Key lesson: Real-life use depends on sunlight, camera activity, and panel placement. Solar works well if you plan carefully.
Comparing Solar Power Vs Traditional Charging
Some users wonder if solar is better than plugging in. Here’s a quick comparison:
| Aspect | Solar Charging | Traditional Charging |
|---|---|---|
| Convenience | Continuous, no manual charging | Needs recharging every 1-3 months |
| Cost | One-time panel cost | Lower upfront, higher maintenance |
| Eco-friendliness | Clean energy | Uses grid power |
| Reliability | Depends on sunlight | Works anytime |
| Maintenance | Clean panel occasionally | Replace battery or recharge |
Straight-to-the-point helper tip: If your camera is hard to reach or records often, solar is usually the better choice.
Safety Precautions And Best Practices
Safety is important when installing electrical equipment outdoors.
Avoid Electrical Hazards
- Never connect panels when wet.
- Use insulated tools for mounting.
Weatherproofing
- Seal all connections with silicone or waterproof tape.
- Use weatherproof junction boxes if needed.
Ladder Safety
- When mounting panels high, use a stable ladder and work with a friend.
Secure Installation
- Tighten all screws and brackets.
- Check mounts every few months for signs of loosening.
Protect Cables From Animals
- Use cable covers or conduits.
- Keep cables away from areas where animals can chew.
Non-obvious insight: Lightning strikes are rare, but can damage panels. If you live in a high-risk area, consider surge protectors.

Credit: kb.arlo.com
Cost Analysis And Return On Investment
Solar panels cost more upfront, but save money over time by reducing battery purchases and manual charging.
Initial Costs
- Official Arlo panel: $60–$80
- Third-party panel: $30–$50
- Mounting hardware: $10–$20
Ongoing Savings
- Battery replacement: $15–$30 every 2 years
- Electricity cost: Low, but adds up for multiple cameras
Long-term Value
- Most panels last 5–10 years
- Savings increase if you have several cameras
Data point: For a typical home with 3 cameras, solar panels pay for themselves in 2–3 years.
Upgrading And Expanding Your Solar Setup
If you add more cameras or need more power, here’s how to expand:
Adding More Panels
- Use one panel per camera for best performance.
- Avoid splitting one panel between multiple cameras—it reduces charging efficiency.
Upgrading Panels
- Switch to higher wattage if battery drains quickly.
- Use premium panels for tough weather.
Combining With Ac Power
- Some users combine solar and plug-in charging for backup during cloudy weeks.
Monitoring Multiple Cameras
- Use the Arlo app to check battery and charging status for all cameras.
Friendly mentor tip: Start with one panel, monitor performance, and add more if needed.
Environmental Impact And Sustainability
Solar power reduces your carbon footprint and supports sustainable living.
Reduced Battery Waste
- Fewer battery replacements mean less landfill waste.
Clean Energy
- Using solar reduces reliance on fossil fuels.
Sustainable Materials
- Look for panels made with recycled materials.
Non-obvious insight: Solar panels themselves are recyclable. At the end of their life, contact local recycling centers.
Integrating Solar With Smart Home Systems
Solar-powered Arlo cameras can be part of your smart home.
Automation
- Set Arlo to record only when motion is detected.
- Integrate with smart lights for extra security.
Remote Monitoring
- Use Arlo app to check charging status from anywhere.
Voice Control
- Connect Arlo to Alexa or Google Assistant for hands-free operation.
Experience-based guide tip: If you use many smart devices, solar keeps your security system running during power outages.
Additional Resources And Where To Learn More
For detailed technical specs and official compatibility, visit the Arlo website or read their manuals. You can also find user reviews and setup guides on forums and tech sites.
If you want to learn more about solar technology and home energy solutions, check out Wikipedia’s Solar Panel page.
Frequently Asked Questions
What Size Solar Panel Do I Need For An Arlo Camera?
A 2–5 watt panel is enough for most Arlo cameras. If your camera records a lot or you live in a cloudy area, choose a larger panel for better performance.
Can I Use Any Solar Panel, Or Does It Have To Be Arlo Branded?
You can use third-party panels if they match the camera’s voltage and connector type. However, official Arlo panels are designed for easy installation and reliable charging.
What Happens If There Is No Sunlight For Several Days?
Your camera will use the battery during cloudy days. If the battery drains, you may need to recharge it manually. To avoid this, adjust camera settings or add a larger panel.
Is It Safe To Leave The Solar Panel Outside All Year?
Yes, as long as the panel is weatherproof (IP65 or higher) and securely mounted. Clean the panel regularly and check cables for damage.
Will Solar Charging Work During Winter?
Solar charging works in winter, but efficiency drops due to less daylight and cold temperatures. Battery may charge slower, so monitor levels and adjust camera settings if needed.
Connecting a solar panel to your Arlo camera is a smart way to enjoy reliable, eco-friendly security. With the right panel, careful installation, and regular maintenance, your camera can stay powered for years. Whether you use official panels or third-party products, following these steps helps you avoid common mistakes and maximize performance.
Solar power is not only convenient—it’s a step toward sustainable living and peace of mind.

Credit: www.amazon.com