
Setting up a Nest Outdoor Camera is one of the smartest steps you can take to protect your home. With live streaming, motion alerts, and cloud storage, the Nest Outdoor Camera gives you peace of mind whether you’re at work, on vacation, or just in another room. But while the idea of outdoor security sounds high-tech, the installation process is actually beginner-friendly if you follow the right steps. Whether you’re new to smart home devices or just want the best performance from your new camera, this guide will help you install your Nest Outdoor Camera with clear instructions, practical tips, and solutions for common issues.
Why Install A Nest Outdoor Camera?
Outdoor security cameras have become more popular as homeowners look for ways to monitor their property and deter crime. According to a 2022 survey by the National Crime Prevention Council, homes with visible security cameras are 30% less likely to be targeted by burglars. The Nest Outdoor Camera stands out for its easy integration with other smart devices, high-definition video, and weather-resistant design.
Key reasons people choose a Nest Outdoor Camera:
- Real-time alerts: Get notifications when the camera detects movement or sound.
- 24/7 live streaming: Check your property anytime from your phone or computer.
- Two-way audio: Talk to visitors or delivery people from anywhere.
- Night vision: See clearly even in low-light conditions.
- Cloud storage: Save and review video history.
What You Need Before Installation
Before you start, it’s important to gather everything you’ll need for a smooth installation. Missing tools or accessories can slow you down or lead to poor camera placement.
Essential items:
- Nest Outdoor Camera (with included mounting hardware)
- Drill (preferably cordless)
- Phillips screwdriver
- Measuring tape
- Pencil or marker
- Ladder (for high placements)
- Wi-Fi network (2.4 GHz or 5 GHz, strong signal outdoors)
- Smartphone or tablet (with Nest app installed)
- Outdoor power outlet (within 25 feet of camera location)
Optional but helpful:
- Cable clips or conduit for tidy cable management
- Weatherproof extension cord if outlet is farther away
- Silicone caulk to seal holes from weather
Common beginner mistake: Many people forget to check their Wi-Fi signal strength at the camera location. A weak signal leads to dropped video and missed alerts. Test the signal before drilling holes.
Choosing The Best Location For Your Camera
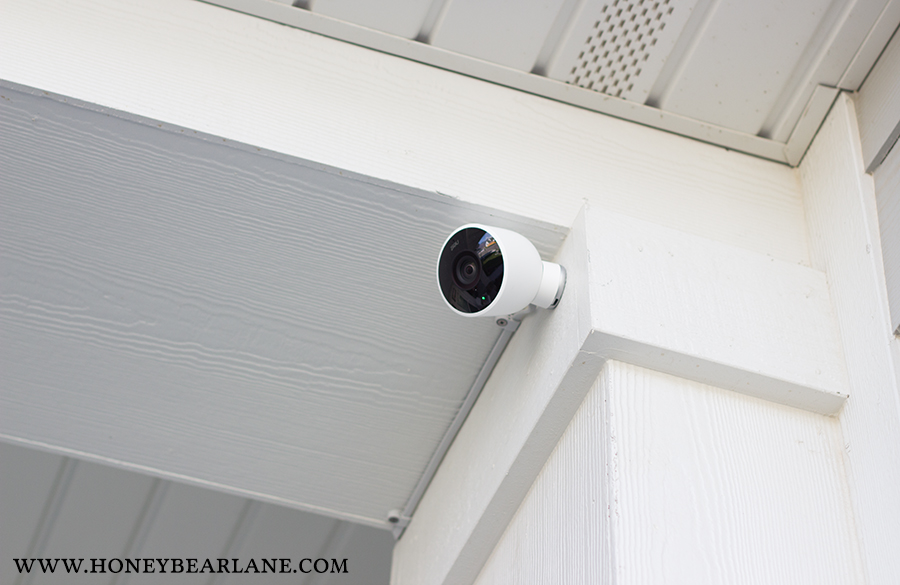
Where you place your Nest Outdoor Camera has a huge impact on its effectiveness. The right spot helps you capture important activity and keeps your camera safe from weather or tampering.
Factors To Consider
- Field of view: The camera should cover entrances, driveways, or other high-traffic areas. Avoid pointing it directly at the sun, as glare can reduce image quality.
- Mounting height: The ideal height is 7 to 9 feet above the ground. This is high enough to avoid tampering but low enough for clear facial images.
- Wi-Fi signal strength: Use your phone to test the Wi-Fi signal at your chosen spot. If you have only one or two signal bars, consider using a Wi-Fi extender.
- Power source proximity: The Nest Outdoor Camera has a 25-foot power cable. Make sure the outlet is close enough, or plan for a weatherproof extension.
- Weather protection: While the camera is weatherproof, mounting it under an eave or awning can extend its life and reduce lens cleaning.
Example Placements
- Above the garage, facing the driveway
- Over the front door, angled to capture faces and packages
- Backyard corner, covering the patio and yard gate
Pro tip: Avoid aiming the camera at neighbors’ property to respect privacy and follow local laws.
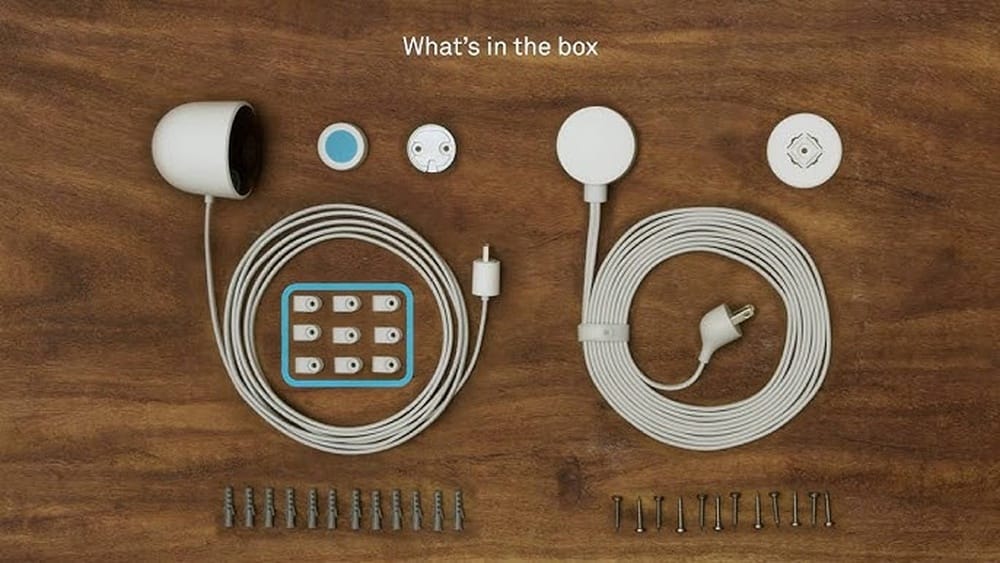
Unboxing And Understanding The Camera Parts
The Nest Outdoor Camera box includes several parts. Understanding each one helps you install smoothly without missing key steps.
Typical box contents:
- Nest Outdoor Camera unit
- Mounting magnet or wall plate
- Camera mounting screws and wall anchors
- 25-foot USB power cable
- Power adapter
- Quick start guide
- Cable clips
What each part does:
- Camera unit: The main device capturing video and audio.
- Mounting magnet/wall plate: Attaches the camera securely to your chosen surface.
- Screws/anchors: Hold the mount in place, even on brick or stucco.
- Power cable/adapter: Supplies power to the camera (Nest Outdoor Camera does not run on batteries).
- Cable clips: Secure the cable along walls for a clean look.
Non-obvious insight: The included magnetic mount allows for very easy angle adjustment, but it’s less secure against theft. If you’re worried about someone grabbing the camera, use the wall plate and screws for a more permanent installation.

Credit: www.urlaub-hund.at
Setting Up The Nest App And Connecting Your Camera
Before mounting the camera outside, it’s best to set up the camera indoors, near your router. This makes connecting to Wi-Fi and updating firmware much easier.
Steps To Set Up The Nest App
- Download the Nest app from the App Store (iOS) or Google Play (Android).
- Create or log into your Google account. Since Google owns Nest, you’ll need a Google account to use the camera.
- Plug in the camera using the USB cable and adapter. Wait for the camera’s light to turn on.
- Open the Nest app and tap the “+” to add a new device.
- Scan the QR code on the camera’s base or enter the serial number manually.
- Follow the app prompts to connect the camera to your Wi-Fi network.
- Name your camera (e.g., “Front Door” or “Driveway”).
Why set up indoors first?
- Stronger Wi-Fi means fewer connection issues.
- Easier to troubleshoot without climbing ladders.
- Lets you test video and audio quality before final installation.
If you run into setup issues:
- Double-check your Wi-Fi password.
- Make sure your phone’s Bluetooth is enabled.
- Restart your router and try again.
Mounting The Nest Outdoor Camera
Once the camera is connected and working, it’s time to install it outside. Follow these steps for a safe, secure, and weatherproof installation.
Step 1: Mark The Mounting Spot
- Hold the mounting plate or magnet against the wall in your chosen location.
- Use a pencil to mark the screw holes.
- Double-check the camera’s field of view before drilling.
Step 2: Drill Pilot Holes
- If mounting on wood, use a drill bit slightly smaller than your screws.
- For brick, stucco, or concrete, use a masonry bit and the included wall anchors.
Step 3: Attach The Mounting Plate Or Magnet
- Insert screws through the plate and into your pilot holes.
- Tighten with a screwdriver. Avoid overtightening, which can crack surfaces.
- If using the magnetic mount, simply attach it to any metal surface.
Step 4: Place The Camera
- Attach the camera to the mounting plate or magnet.
- Adjust the angle for the best view. Check the live feed on your phone to confirm.
- Make small adjustments until the camera covers the desired area.
Step 5: Run The Power Cable
- Route the cable along the wall or under siding, keeping it out of reach and out of sight.
- Use the included cable clips to secure the wire every 12–18 inches.
- Plug the cable into your outdoor outlet. If you need an extension cord, choose one rated for outdoor use.
Step 6: Weatherproof The Installation
- Use silicone caulk to seal any holes around the cable entry point.
- Make sure all connections are snug and protected from rain.
Practical tip: Leave a small drip loop in the cable before it enters the outlet or wall. This prevents water from running down the wire and into the outlet.
Comparison: Nest Outdoor Camera Vs. Other Leading Brands
To see how the Nest Outdoor Camera compares with other popular outdoor cameras, here’s a side-by-side look at key features.
| Feature | Nest Outdoor Camera | Arlo Pro 4 | Ring Stick Up Cam |
|---|---|---|---|
| Resolution | 1080p HD | 2K | 1080p HD |
| Power | Wired | Battery or Wired | Battery or Wired |
| Cloud Storage | Subscription required | Subscription required | Subscription required |
| Smart Home Integration | Google Assistant | Google Assistant, Alexa | Alexa |
| Night Vision | Yes | Yes | Yes |
| Weatherproof | Yes (IP65) | Yes (IP65) | Yes (IPX5) |
Insight: The Nest Outdoor Camera is a strong choice if you already use Google smart devices. However, if you want a battery-powered camera, Arlo or Ring may be more flexible but require recharging.
Setting Up Activity Zones And Alerts
After installation, you can fine-tune your camera’s behavior using the Nest app. This helps you avoid false alarms and get the most useful notifications.
Setting Up Activity Zones
- Open your camera’s live view in the Nest app.
- Go to settings and select “Activity Zones.”
- Draw zones over areas you want to monitor, like a gate or walkway.
- You can name zones (e.g., “Driveway” or “Back Door”).
Adjusting Alerts
- Choose which types of motion trigger notifications (people, animals, vehicles).
- Adjust sensitivity to avoid alerts from passing cars or waving trees.
- Set schedules for when alerts are active (e.g., only at night).
Non-obvious tip: If your camera faces a busy street, creating a narrow activity zone around your porch or entrance will dramatically reduce unwanted alerts.
Managing Video Storage And Privacy
Nest cameras save video to the cloud, so you can access it anytime. But understanding your storage options is important, especially for privacy and budgeting.
Nest Aware Subscription
The basic Nest Outdoor Camera saves only live video and short clips without a subscription. For full video history, you’ll need Nest Aware.
Nest Aware plans (as of 2024):
- Nest Aware: 30 days of event video history ($8/month or $80/year for all Nest cameras in your home)
- Nest Aware Plus: 60 days of event history and 10 days of continuous video ($15/month or $150/year)
Privacy And Sharing
- You control who sees your video. By default, only you can view your camera feed.
- You can share access with trusted family or housemates through the app.
- Video clips can be downloaded or shared with law enforcement if needed.
Practical advice: Regularly review your sharing settings and change your password if you suspect unauthorized access.
Troubleshooting Common Installation Issues
Even with careful planning, you might run into a few hiccups during installation. Here are the most common problems and how to solve them.
Weak Wi-fi Signal
- Try moving your router closer to the camera location.
- Install a Wi-Fi extender for outdoor coverage.
- Reduce interference by keeping the router away from microwaves or thick walls.
Power Issues
- Check that the outlet works by plugging in another device.
- Make sure the power adapter is fully inserted.
- Avoid using indoor-only extension cords outdoors.
Camera Won’t Connect
- Reset the camera by holding the reset button for 10 seconds.
- Reboot your router.
- Double-check your Wi-Fi password for typos.
Poor Video Quality
- Clean the lens with a soft cloth.
- Adjust the angle to avoid direct sunlight or headlights.
- Check your internet upload speed (Nest recommends at least 2 Mbps per camera).
False Alerts
- Refine activity zones in the app.
- Lower motion sensitivity.
- Angle the camera away from busy roads or moving tree branches.
Confidence boost: Most installation issues are easy to fix. If you get stuck, Google’s support pages and community forums offer step-by-step help.
Credit: www.gabinetedelaorden.com
Weatherproofing And Long-term Maintenance
Outdoor cameras face tough conditions. Taking a few extra steps during installation will keep your Nest Outdoor Camera working reliably for years.
Weatherproofing Tips
- Always use the included weatherproof cable.
- Seal any holes with silicone caulk.
- Avoid placing the camera where snow or rain will pile up directly on the lens.
Regular Maintenance
- Wipe the lens every few months to remove dirt, pollen, or spider webs.
- Check the cable and outlet for wear after storms or extreme weather.
- Update your Nest app and camera firmware when prompted.
Security Best Practices
- Use a unique, strong password for your Nest account.
- Enable two-factor authentication for added protection.
- Review app permissions and remove old devices you no longer use.
Real-world Example: Installing A Nest Outdoor Camera On A Brick House
Let’s walk through a real installation to highlight practical challenges and solutions.
Scenario: Maria wants to monitor her driveway and garage. Her house has a brick exterior, and the nearest outlet is 20 feet from her chosen camera location.
Steps:
- She checks Wi-Fi signal outside her garage, finding three bars—good for streaming.
- Using a ladder, she marks drill holes at 8 feet high, just under the eave.
- She drills pilot holes with a masonry bit and installs the wall anchors.
- The mounting plate is secured with screws, and the camera snaps in place.
- Maria routes the power cable along the brick with cable clips, then plugs it into the outdoor outlet.
- Using the app, she adjusts the camera angle to cover the driveway but not the street.
- She creates an activity zone for her driveway to avoid alerts from passing cars.
- After sealing the cable entry hole with silicone, Maria tests the live stream and night vision.
- She subscribes to Nest Aware for 30 days of video history.
Key lesson: Even on tough surfaces like brick, the right tools and careful planning make installation straightforward.

Credit: www.youtube.com
Cost Breakdown: What To Expect When Installing A Nest Outdoor Camera
Understanding the total cost helps you plan your security setup without surprises.
| Item | Estimated Cost | Notes |
|---|---|---|
| Nest Outdoor Camera | $180–$200 | Single camera, includes mounting kit |
| Nest Aware Subscription | $8–$15/month | Optional for video history |
| Wi-Fi Extender | $25–$50 | Optional, for weak signal areas |
| Outdoor Extension Cord | $10–$20 | If outlet is far away |
| Silicone Caulk | $5–$10 | For weatherproofing |
Insight: The main expense is the camera and, if you want video history, the Nest Aware subscription. Accessories are usually inexpensive, but budgeting for a Wi-Fi extender can be smart if your outdoor signal is weak.
Maximizing Your Nest Outdoor Camera’s Security Benefits
Once your camera is installed, there are ways to get even more value from your investment.
- Integrate with other smart devices: Connect your camera with Google Home speakers or smart lights for voice control and automation.
- Set custom schedules: Use the app to turn alerts on only when you’re away or at night.
- Download important clips: Save key events before they are deleted from the cloud.
- Check camera health regularly: Use the app to confirm the camera is online and operating as expected.
Advanced tip: Link multiple Nest cameras in the app for full property coverage and one-tap viewing.
Frequently Asked Questions
How Much Internet Bandwidth Does The Nest Outdoor Camera Use?
The camera streams video at 1080p HD, which uses about 200–400 KB per second for live viewing. With heavy use, this can add up to 60–120 GB per month. If you have a data cap, check with your internet provider.
Can The Nest Outdoor Camera Record Without A Subscription?
Yes, but only short clips of detected activity are available for a limited time. For full video history and advanced features, you’ll need a Nest Aware subscription.
Is It Possible To Install The Nest Outdoor Camera Without Drilling?
If you have a metal surface, you can use the magnetic mount. For most walls (brick, stucco, wood), drilling is the most secure method. Some users use strong outdoor adhesive mounts, but this is not recommended for long-term security.
Can I Use The Nest Outdoor Camera With Amazon Alexa?
The Nest Outdoor Camera is designed for Google Assistant integration. While some third-party workarounds exist, you’ll get the best experience using Google devices. For Alexa integration, consider Arlo or Ring cameras.
Where Can I Find More Support If I Have Installation Problems?
The official Google Nest Help Center offers in-depth guides, videos, and troubleshooting steps for all Nest products.
Bringing an outdoor camera into your security setup is a smart move for any homeowner. With the right preparation and this detailed guide, you can install your Nest Outdoor Camera confidently, enjoy 24/7 protection, and tailor alerts to fit your lifestyle.
Whether you’re a tech pro or a first-time installer, following these steps will help you get the best results from your investment.