
Setting up a security camera outside your home is one of the best ways to protect your property and give yourself peace of mind. The Arlo Essential Outdoor Camera is a popular choice because it’s wireless, easy to install, and packed with smart features. But even with its user-friendly design, installing it can feel overwhelming if you’ve never set up a security camera before. This detailed guide will walk you through every step, from unboxing to final setup, so you can get your Arlo Essential Outdoor Camera up and running smoothly—even if you’re not a tech expert.
Choosing the right spot, mounting the camera correctly, connecting to Wi-Fi, and setting up the Arlo app all matter for your camera’s performance. You’ll also learn practical tips that most beginners miss, like how to avoid false alerts and how to get the most out of battery life.
After reading this article, you’ll be confident that your property is being watched over by a camera installed the right way.
Understanding The Arlo Essential Outdoor Camera
Before you start installing, it’s helpful to know what makes the Arlo Essential Outdoor Camera stand out. This camera is designed for people who want reliable security without complicated wiring or monthly fees. It works with your Wi-Fi network, sends alerts to your phone, and records video when it detects motion.
Key features include:
- 1080p HD video for clear images
- Color night vision so you can see in the dark
- Weather-resistant design for outdoor use
- Wire-free installation (runs on a rechargeable battery)
- Two-way audio for talking to visitors
- Smart alerts for people, animals, and packages
These features make it an excellent choice for many homes. But to get the most from your investment, understanding the full installation process is crucial.
What You Need Before You Start
A smooth installation starts with good preparation. Here’s what you’ll need:
- Arlo Essential Outdoor Camera (plus any mounting hardware from the box)
- Smartphone or tablet (iOS or Android) with internet access
- Arlo app (free download from Apple App Store or Google Play)
- Wi-Fi network (2.4 GHz band is required)
- Phillips head screwdriver (for mounting)
- Drill (optional, for hard surfaces)
- Measuring tape or ruler (to ensure correct placement)
- Ladder (if mounting high up)
- Pencil (for marking holes)
It’s also smart to have your Wi-Fi password handy, since you’ll need it during setup.
Unboxing And Checking Camera Contents
When you open the Arlo Essential Outdoor Camera box, make sure you have all the parts. It’s frustrating to start installation only to find something missing. Here’s what you should find:
- Arlo Essential Outdoor Camera (main unit)
- Mounting bracket and screws
- Charging cable (USB)
- Quick Start Guide
- Security sticker (for your window)
If anything is missing, contact the seller or Arlo support before you continue.
Planning Where To Install Your Camera
Placement has a big impact on how well your camera works. Think about these factors to find the best spot:
Coverage Area
Decide what you want to watch—your front door, garage, driveway, or backyard. The Arlo Essential has a 130° field of view, so it can cover wide spaces. For entrances, aim the camera at waist to head height for clear images of faces.
Wi-fi Signal Strength
Your camera needs a strong Wi-Fi connection. Use your phone to check the signal near your chosen spot. If the signal is weak, your camera might lag or disconnect. Moving your router closer, or using a Wi-Fi extender, can help.
Sunlight And Weather
Avoid pointing the camera directly at the sun, as glare can ruin video quality. Also, make sure the spot is sheltered from heavy rain or snow, even though the camera is weather-resistant.
Height And Accessibility
Mount the camera at least 7 feet (about 2 meters) above ground. This keeps it out of easy reach from vandals but low enough for good facial recognition. Make sure you can still reach it for charging.
Power And Charging
The Arlo Essential runs on a rechargeable battery. Plan for easy access to remove and recharge the battery every few months, depending on usage.
Privacy Concerns
Position the camera so it doesn’t point into neighbors’ windows or private spaces. This helps avoid privacy complaints and follows local laws.
Example Placement Scenarios
- Front porch: Near the door, covering the entrance and steps.
- Driveway: Overlooking the cars, but not facing the street directly to avoid unwanted alerts.
- Backyard: Covering gates or fences for maximum security.
Comparing Placement Options
Choosing between several locations? Here’s a quick comparison to help you decide:
| Location | Best For | Potential Downsides |
|---|---|---|
| Front Door | Package deliveries, visitors | May capture street traffic, causing false alerts |
| Garage/Driveway | Car protection, wide coverage | Needs strong Wi-Fi signal; more open area |
| Backyard | Fence and gate monitoring | Usually less lighting; harder to reach for charging |
Charging And Powering The Camera
The Arlo Essential Outdoor Camera uses a built-in rechargeable battery. Before installation, fully charge it for the best performance.
To charge:
- Connect the included USB cable to the camera and a power source.
- Wait until the LED shows solid blue (fully charged). This can take 3-4 hours.
- Disconnect the cable.
A full battery can last 3 to 6 months depending on usage and settings. Heavy activity or frequent video recording will use more battery. To extend battery life, reduce video length, sensitivity, or the number of alerts.
Pro tip: Some beginners forget to charge before installing. It’s much easier to do this first, so you don’t have to take the camera down soon after mounting.
Downloading And Setting Up The Arlo App
The Arlo app controls everything—from setup to daily use.
Steps:
- Download the Arlo app from Apple App Store or Google Play.
- Open the app and create a free Arlo account, or log in if you already have one.
- Choose “Add Device” and select “Camera.”
- Pick “Arlo Essential” from the list.
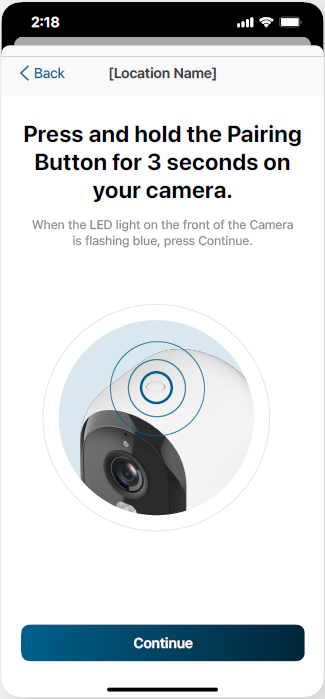
The app will guide you through pairing the camera, naming it, and connecting to Wi-Fi.
Tip: Make sure your phone is connected to the same 2.4 GHz Wi-Fi network you’ll use for the camera. The Arlo Essential does not support 5 GHz networks.
Connecting The Camera To Wi-fi
Once the app prompts you, it’s time to connect your camera to your home Wi-Fi.
Step-by-step:
- With the camera powered on, bring it close to your router during setup.
- The app will show a QR code. Hold your phone about 6 inches from the camera lens so it can scan the code. You’ll hear a chime when it’s successful.
- Wait for the LED on the camera to blink blue—this means it’s connecting.
- When the LED stays solid blue, the connection is done.
If you see an amber or red light, check your Wi-Fi password and try again. A strong Wi-Fi signal is essential for smooth video streaming and alerts.
Naming And Testing Your Camera
The app lets you give your camera a name, like “Front Porch” or “Garage. ” Naming helps you identify cameras if you install more in the future.
Next, test the camera’s video and audio. Stand in front of it, wave, and speak. Check the live feed in the app to confirm everything works. This is also a good time to check motion detection—walk by to see if you get an alert.
Insight: Beginners often skip this test, but it’s important. If the camera doesn’t work now, it’s much easier to fix before you mount it outside.
Mounting The Camera: Step-by-step
Now you’re ready to mount your camera. Follow these steps for a secure, professional installation:
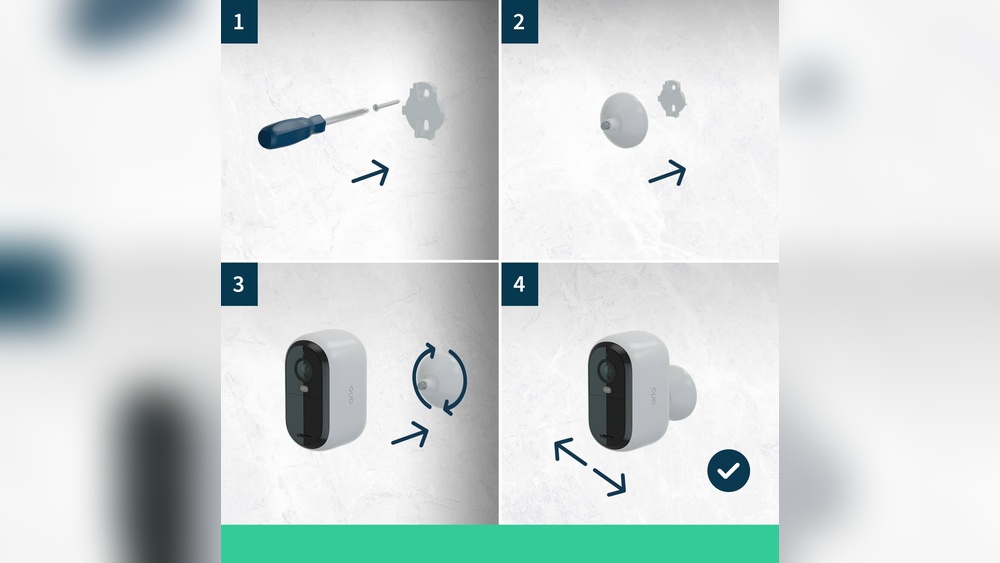
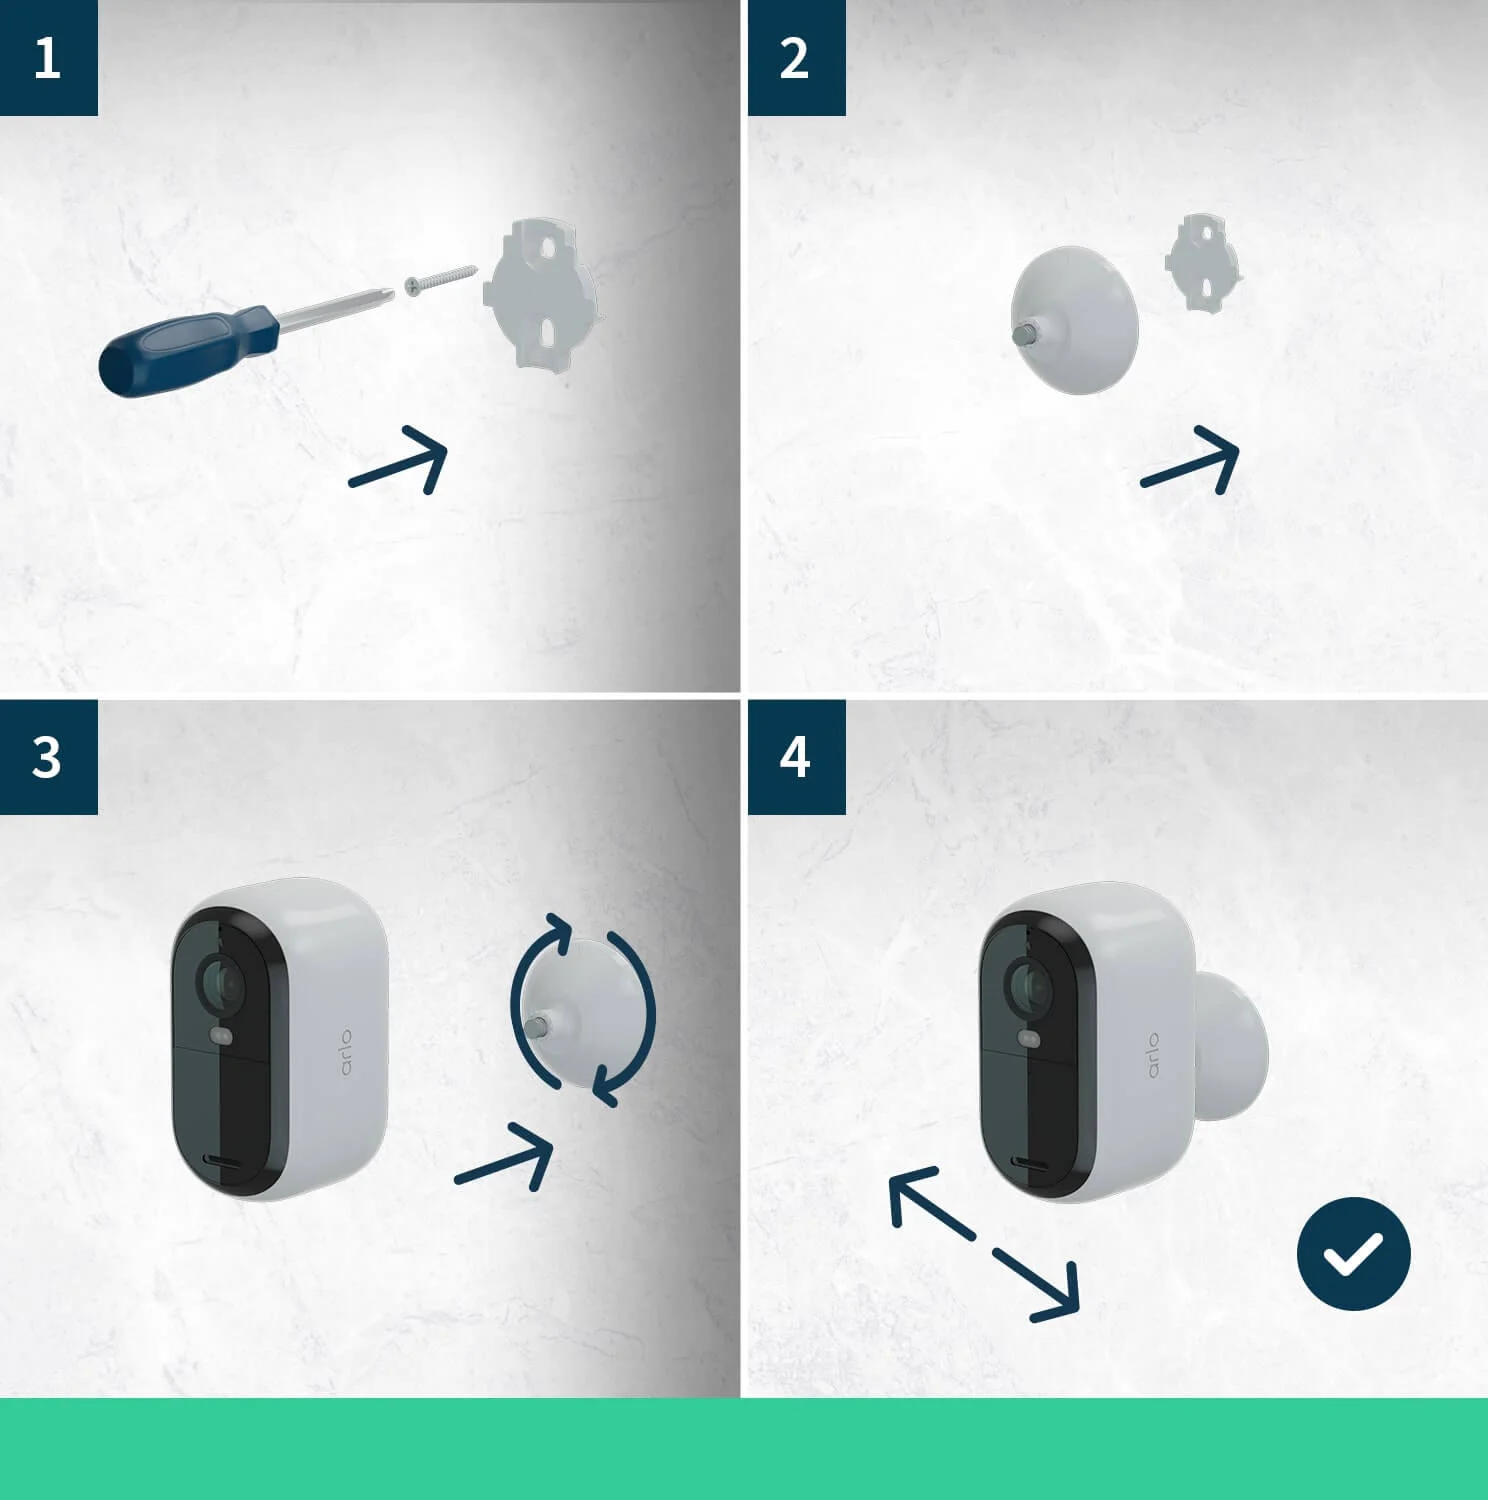
- Mark the Spot: Hold the mounting bracket on the wall where you want the camera. Use a pencil to mark screw holes.
- Drill Pilot Holes: If you’re mounting on wood, you can screw directly in. For brick, concrete, or stucco, drill small pilot holes first.
- Insert Anchors (if needed): For hard surfaces, use the included wall anchors. Push them into the pilot holes.
- Attach the Bracket: Screw the bracket into place.
- Mount the Camera: Slide the camera onto the bracket. Adjust the angle to cover your target area.
- Tighten Screws: Make sure everything is secure, but don’t overtighten—this can crack the plastic.
- Check the View: Use the app’s live feed to confirm the camera angle. Adjust as needed for the best coverage.
Extra tip: If you want to avoid drilling, some users mount the camera under eaves or overhangs using heavy-duty outdoor adhesive tape. However, screws give a more secure hold, especially in bad weather.

Credit: www.youtube.com
Comparing Mounting Surfaces
Here’s a quick look at how different surfaces compare for mounting:
| Surface Type | Ease of Installation | Tools Needed | Durability |
|---|---|---|---|
| Wood | Easy | Screwdriver | Excellent |
| Brick/Concrete | Moderate | Drill, wall anchors | Excellent |
| Vinyl Siding | Easy-Moderate | Screwdriver, possibly anchors | Good |
| Metal | Moderate | Drill, self-tapping screws | Very Good |
Adjusting Settings In The Arlo App
Now that your camera is mounted, fine-tune the settings in the app for best performance.
Motion Detection
Set the sensitivity so the camera captures real activity but ignores small animals or passing cars. Too high, and you’ll get lots of false alerts. Too low, and you might miss important events.
Activity Zones
You can set up to three activity zones. This tells the camera to only trigger recordings and alerts in selected areas, like your porch or driveway, and ignore the street or sidewalk.
Alert Notifications
Customize how you get alerts—push notifications, emails, or both. You can also set schedules, like turning alerts off during the day if you’re usually home.
Video Quality
Higher video quality uses more battery and bandwidth. For most users, 1080p gives a good balance of clarity and battery life.
Two-way Audio
Enable the two-way audio feature to talk to visitors or warn off strangers. Test it to make sure your voice is clear.
Night Vision
The camera automatically switches to color night vision in low light. You can adjust settings if you want to use only black-and-white for longer battery life.
Integrating With Smart Home Devices
The Arlo Essential Outdoor Camera works with many smart home platforms, including Amazon Alexa, Google Assistant, and Apple HomeKit (with a compatible base station).
How to connect:
- Open your smart home app (Alexa, Google Home, etc. ).
- Add Arlo as a device or skill.
- Log in with your Arlo account.
- Link and control your camera with voice commands or routines.
Example: “Alexa, show me the front door camera.”
This integration makes it easier to monitor your home without opening the Arlo app.
Tips For Avoiding Common Installation Mistakes
Many beginners make small errors that can cause frustration later. Here are some tips to avoid them:
- Test Before Mounting: Always connect and test the camera inside before drilling outside.
- Double-Check Wi-Fi: Weak signals cause lag or dropouts. Move your router or add a Wi-Fi extender if needed.
- Avoid Direct Sunlight: Mount in a shaded area to prevent glare and heat damage.
- Secure Your Account: Use a strong password and enable two-factor authentication for your Arlo account.
- Check Local Laws: Some places have rules about recording audio or pointing cameras at public spaces.
- Charge Fully: Install only after a full charge for the longest battery life.
- Weatherproofing: Even though the camera is weather-resistant, avoid aiming it upward where water can pool.
- Use Activity Zones: Reduces false alerts and saves battery.
- Label Your Camera: Give it a clear name in the app for easy identification.
- Regularly Clean the Lens: Dirt or spider webs can blur the video.
How To Extend Battery Life
Battery life is a top concern for many users. Here’s how to get the most from your Arlo Essential:
- Reduce Motion Sensitivity: Fewer false triggers mean less recording.
- Shorten Video Clips: Set recordings to 10-15 seconds unless longer is needed.
- Limit Live View Use: Live streaming uses more power than motion-activated recording.
- Use Scheduled Recording: Only record during hours you need monitoring.
- Install in Shade: Direct sun can heat the battery and shorten its life.
- Update Firmware: Arlo regularly releases updates that improve battery performance.
Insight: Many first-time users think higher video quality always means better security. But if your camera is offline due to a dead battery, you have no coverage. Balance quality with battery life.
Maximizing Security And Privacy
A security camera is only as good as your privacy settings. Here’s how to keep your data safe:
- Encrypt your Wi-Fi: Use WPA2 or WPA3 security on your router.
- Set strong passwords: Avoid simple, easy-to-guess passwords for your Arlo account.
- Enable two-factor authentication: Adds a second layer of security.
- Review who has access: Only share camera access with trusted people.
- Regularly update the app and firmware: Get the latest security patches.
- Check local laws: Some states or countries require signage if you’re recording video or audio.
For more on privacy and smart cameras, see the Consumer Reports Smart Camera Guide.
Credit: kb.arlo.com
Comparing Arlo Essential With Other Outdoor Cameras
If you’re curious how the Arlo Essential stacks up against similar cameras, here’s a quick comparison:
| Feature | Arlo Essential | Ring Stick Up Cam | Google Nest Cam (Battery) |
|---|---|---|---|
| Video Resolution | 1080p | 1080p | 1080p |
| Field of View | 130° | 130° | 130° |
| Battery Life | 3-6 months | 2-6 months | 3-7 months |
| Night Vision | Color | Black & White | Color |
| Local Storage | No (Cloud only) | No (Cloud only) | Yes (with base) |
| Weather Resistant | Yes | Yes | Yes |
| Smart Home Integration | Alexa, Google, HomeKit* | Alexa, Google | Google, Alexa |
* HomeKit integration requires a compatible Arlo base station.
Troubleshooting Common Installation Problems
Even with a simple setup, you might run into issues. Here’s how to solve the most common problems:
Camera Won’t Connect To Wi-fi
- Check if you’re on a 2.4 GHz network (not 5 GHz).
- Ensure the Wi-Fi password is correct.
- Move the camera closer to the router during setup.
- Restart your router and try again.
Poor Video Quality
- Check Wi-Fi signal strength; weak signals cause laggy video.
- Clean the camera lens.
- Reduce the distance between camera and router.
Motion Alerts Not Working
- Increase the motion sensitivity.
- Adjust the camera angle; make sure the area you want is in view.
- Set up or edit activity zones in the app.
Battery Draining Quickly
- Reduce video length and motion sensitivity.
- Disable live streaming unless necessary.
- Ensure the camera is not facing a busy street (constant movement means more recording).
Camera Not Charging
- Use the original charging cable.
- Check for debris in the charging port.
- Try a different USB power source.
If these steps don’t help, visit the Arlo support website or contact their customer service.
Maintaining Your Arlo Essential Outdoor Camera
Regular maintenance keeps your camera working at its best:
- Clean the lens monthly with a soft cloth.
- Check the mount to make sure it’s still tight.
- Inspect for water damage after storms.
- Recharge the battery before it’s completely empty.
- Update the firmware when prompted by the app.
Pro tip: Set a reminder on your phone to check the camera every 2-3 months.
Advanced Tips For Power Users
Once you’re comfortable with the basics, try these advanced tricks:
- Integrate with IFTTT: Trigger smart lights or alarms when motion is detected.
- Share access with family: Give trusted people access without sharing your password.
- Set up geofencing: Automatically arm or disarm the camera when you leave or arrive home.
- Use cloud storage options: Subscribe to Arlo Smart for up to 30 days of video history and advanced AI alerts.
- Combine with other Arlo devices: Build a full security system with doorbells, floodlights, and indoor cameras.
Many beginners don’t realize how much more they can do after basic setup. Explore the app to find features that suit your needs.
Credit: www.arlo.com
Frequently Asked Questions
How Long Does The Arlo Essential Battery Last Between Charges?
With normal use, the battery lasts 3 to 6 months. More motion events and frequent live streaming can reduce this time. Using lower video quality and reducing motion sensitivity helps extend battery life.
Can I Install The Arlo Essential Camera Without Drilling Holes?
Yes, you can use outdoor-rated adhesive mounts or place the camera on a flat surface. However, screwing the mount into a solid surface is more secure, especially in bad weather.
Does The Arlo Essential Outdoor Camera Require A Subscription?
You do not need a subscription for live video and motion alerts. However, a paid Arlo Secure plan unlocks cloud recording, advanced detection (people, animal, package), and longer video history.
What Happens If My Wi-fi Goes Offline?
When Wi-Fi is down, the camera cannot stream live video or send alerts. It will reconnect automatically when Wi-Fi returns. Without a subscription, you will not have a backup recording during the offline time.
Is The Arlo Essential Compatible With Apple Homekit?
The Arlo Essential can work with Apple HomeKit if you have a compatible Arlo SmartHub or Base Station. Without these, it supports Alexa and Google Assistant only.
Securing your home is about both peace of mind and smart technology. Installing the Arlo Essential Outdoor Camera is a project almost anyone can handle with the right steps and preparation. By carefully choosing your camera spot, following the setup instructions, and using the app’s smart features, you’ll enjoy better security and easy control from your phone.
Regular maintenance and good settings mean your camera works when you need it most. With these tips and insights, you can protect your property with confidence, knowing you made the right decisions at every step.