
Installing blinds with an inside mount can give your windows a neat, custom look. It’s a project many people can do themselves with some basic tools, patience, and attention to detail. Whether you want more privacy, better control of sunlight, or just a modern look, inside-mounted blinds are a popular choice in homes and offices.
This guide will walk you through every step, from measuring your windows to making the final adjustments. Along the way, you’ll pick up tips that even experienced DIYers sometimes overlook.
Why Choose Inside Mount Blinds?
Inside mount blinds fit within the window frame, making your window look clean and uncluttered. This style is perfect if you want to show off your window trim or prefer a minimalist appearance. Unlike outside mounts, inside mounts don’t cover the window molding, and they can make rooms feel more spacious because they sit flush with the wall.
Besides the look, inside mounts also help block light more effectively at the edges, especially if measured and installed correctly. However, the window frame must be deep enough for the brackets and the blind itself. Not all windows are suitable, so the first and most important step is accurate measurement.
Choosing The Right Blinds For Inside Mount
Before you buy, think about the type of blind that fits your needs. Each kind works a little differently, and some are easier to install than others.
Common Types Of Inside Mount Blinds
- Venetian blinds – Horizontal slats, often made of wood, faux wood, or aluminum. They give good control over light and privacy.
- Vertical blinds – Long vertical slats, popular for sliding doors or wide windows.
- Roller shades – Fabric that rolls up neatly. Great for a simple look.
- Roman shades – Fabric that folds up in even pleats.
- Cellular shades – Honeycomb design for insulation.
Key Factors To Consider
- Window depth: Measure the distance from the glass to the edge of the window frame. Most inside mount blinds need at least 1.5 to 2.5 inches of depth.
- Light control: Do you want room-darkening or light filtering?
- Material: Consider moisture resistance for kitchens and bathrooms.
- Operation: Cordless options are safer for homes with kids or pets.
Quick Comparison Of Popular Blind Types
| Type | Best For | Depth Needed | Light Control | Ease of Install |
|---|---|---|---|---|
| Venetian | Bedrooms, offices | 2 in+ | Good | Easy |
| Roller | Living rooms, kitchens | 1.5 in+ | Moderate | Very Easy |
| Cellular | Bedrooms, energy saving | 1.75 in+ | Excellent | Easy |
| Roman | Decorative rooms | 2 in+ | Good | Medium |
| Vertical | Wide windows, doors | 2.5 in+ | Good | Medium |
Tools And Materials You’ll Need
Installing inside mount blinds doesn’t require expensive tools. Here’s a list of what you’ll need:
- Tape measure (metal, for accuracy)
- Pencil
- Drill with bits (usually 1/16″ or 1/8″ for pilot holes)
- Screwdriver (Phillips head)
- Level
- Step stool or ladder (if windows are high)
- Blinds kit (includes brackets, screws, and the blind itself)
- Stud finder (optional, for extra support)
- Safety glasses (recommended when drilling)
A helpful tip: Lay out all your tools and parts before you start. Missing pieces or the wrong screws can slow you down later.
Measuring Your Windows For Inside Mount Blinds
Getting the right measurements is the most important part of the whole process. Even a small mistake can make blinds too tight or cause gaps that let in light.
How To Measure For Width
- Measure the inside width of your window at three places: Top, middle, and bottom.
- Write down the smallest number. This ensures your blinds will fit at the tightest point.
How To Measure For Height
- Measure the inside height from the top of the opening to the window sill at three spots: Left, center, and right.
- Record the longest measurement. This makes sure the blind will cover the full window even if it’s not perfectly square.
Check Window Depth
- Measure from the glass to the edge of the frame.
- Make sure your chosen blinds fit within this depth.
Common Mistakes To Avoid
- Rounding up your measurements. Always round down to the nearest 1/8 inch for width.
- Forgetting to check for window locks or handles that could block the blind.
- Not checking for window tilt (some older windows lean in or out).
Example Measurement Table
Below is an example to help organize your measurements:
| Window | Width Top | Width Middle | Width Bottom | Final Width | Height Left | Height Center | Height Right | Final Height | Depth |
|---|---|---|---|---|---|---|---|---|---|
| Living Room | 35.25″ | 35.13″ | 35.00″ | 35.00″ | 60.25″ | 60.00″ | 60.38″ | 60.38″ | 2.5″ |
Preparing For Installation
Before you start drilling, check a few important details:
- Open your blind box and check all parts. Most kits include at least two mounting brackets, a headrail (top part of the blind), screws, and installation instructions.
- If your window frame is made of metal or concrete, you may need special screws or anchors.
- Clean the window area so the brackets sit flush against the surface.
Marking Bracket Placement
Getting the brackets in the right position ensures your blinds work smoothly and look even.
Steps For Marking
- Hold the bracket inside the top of the window frame, about 2 to 3 inches from each end.
- Make sure the bracket is flat against the frame, not tilted.
- Use a pencil to mark the screw holes through the bracket.
- Double-check both brackets are level and the same distance from the front edge.
Pro tip: Use a small level to check alignment. Even a 1/8-inch tilt is easy to notice with blinds.

Credit: www.wikihow.com
Drilling Pilot Holes
Drilling small starter holes (pilot holes) makes it easier to insert screws and reduces the risk of splitting wood.
- Use a drill bit slightly smaller than the screws.
- Drill straight in, not at an angle.
- If your window frame is metal, use a bit designed for metal surfaces.
If you hit a very hard spot, don’t force the drill—move slightly or check for a hidden nail or screw.
Installing The Mounting Brackets
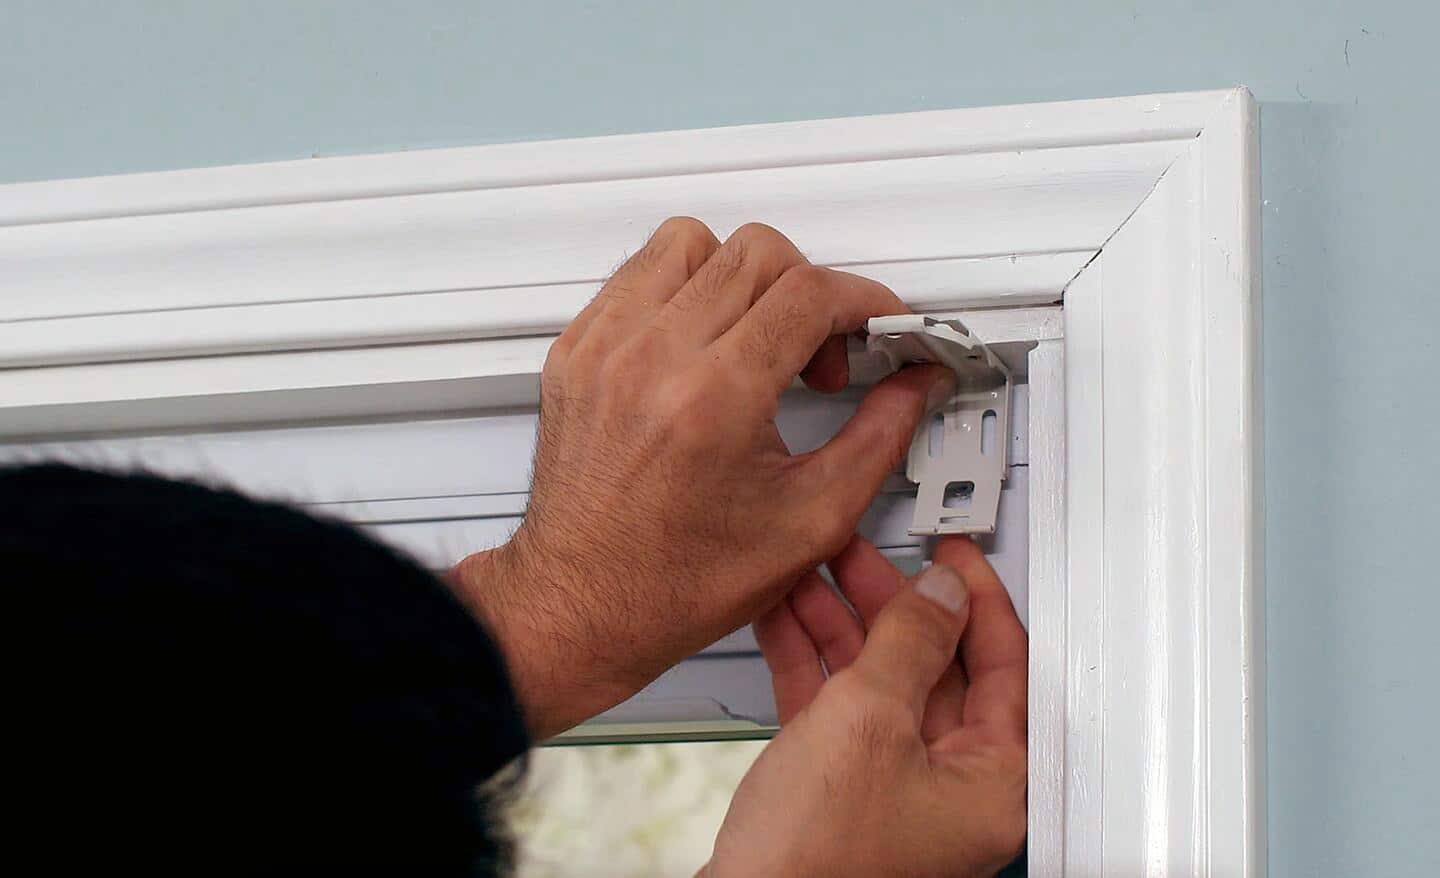
Once pilot holes are ready, attach the brackets.
- Hold the bracket over the pilot holes.
- Insert screws and tighten using a screwdriver or drill.
- The bracket should feel firm, not loose or wobbly.
Most inside mount blinds use two end brackets. Larger or heavier blinds may include a center support bracket. If so, place it in the middle, spaced evenly.
Insight: If your brackets don’t fit flush because the frame is sloped or uneven, add a thin washer behind the bracket to level it out.
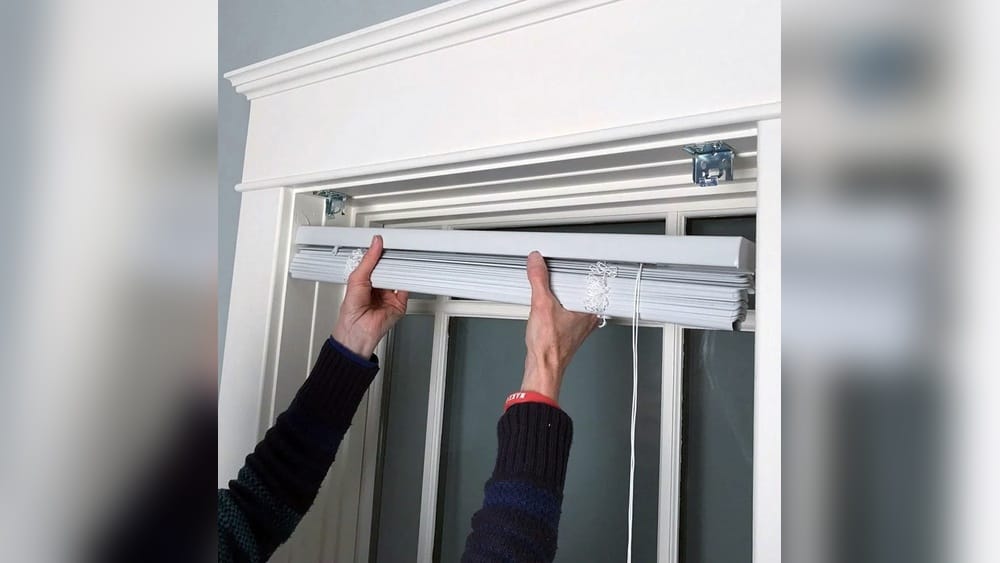
Attaching The Headrail Or Shade
After the brackets are secure, the next step is to snap in the main part of the blind.
For Venetian, Roller, And Cellular Blinds
- Slide or snap the headrail into the brackets as shown in your instructions.
- You may hear a click when it’s locked in place.
- Some blinds have a locking tab or lever—make sure it’s closed.
For Roman And Vertical Blinds
- Roman shades often have a Velcro or hook system. Line up and attach as directed.
- For vertical blinds, attach the headrail first, then snap each slat into the carrier.
Tip: If the headrail doesn’t fit easily, double-check bracket spacing and window measurements.
Testing The Blind Operation
Always test before finalizing. Raise and lower the blind. Tilt the slats (if applicable). The movement should be smooth and quiet. If it’s stiff or jams, check for:
- Brackets that are too tight or too close together.
- An uneven window frame causing the headrail to pinch.
- Hardware that’s not fully snapped in.
If you find problems, remove the headrail and adjust bracket position.
Installing The Valance Or Cover (if Included)
Many blinds come with a valance (decorative cover) that hides the headrail. This step is often missed or rushed.
- Some valances use clips—attach these to the headrail first, then snap on the valance.
- Others use magnets or slide into a groove.
Be gentle—forcing the valance can break clips.
Securing The Bottom Rail (optional)
Some blinds have hold-down brackets to keep the bottom rail in place, especially for doors or windy locations.
- Mark and drill small holes at the bottom corners.
- Attach the hold-down brackets.
- Snap the bottom rail into the brackets.
Cord And Safety Adjustments
Modern blinds often have cordless designs. If yours has cords, keep safety in mind:
- Install included cord cleats at least 64 inches from the floor.
- Wrap cords around the cleat to keep them out of reach of children and pets.
If your blind is cordless but hard to operate, check for packaging left inside the mechanism.
Final Adjustments And Tips
After installation, make a few final checks:
- Use a level to check that the blind hangs straight.
- If the blind doesn’t sit flush with the window, gently bend the brackets or reposition them.
- Clean off any pencil marks with a damp cloth.
Two insights most beginners miss:
- Hidden Obstructions: Window frames sometimes hide screws, nails, or metal reinforcements. If your drill won’t go in, don’t force it—try another spot a few millimeters away.
- Bracket Depth: Some brackets have adjustable depth settings. If your window is just barely deep enough, test-fit the blind first before finalizing bracket placement.

Credit: www.youtube.com
Troubleshooting Common Problems
Even with careful installation, you may face a few challenges. Here’s how to solve the most common ones:
Blinds Won’t Fit Inside The Frame
- Double-check measurements; sometimes the headrail is slightly wider than the slats.
- Shave a tiny bit off the window frame with sandpaper, or order a custom-fit blind if needed.
Blind Is Uneven
- Loosen one bracket and adjust it slightly.
- If the window frame is not square, use a spacer or washer behind the low bracket.
Blinds Won’t Raise Or Lower Smoothly
- Check for packaging or shipping clips left in place.
- Make sure the cords or mechanisms aren’t tangled.
Light Leaks At Edges
- For perfect darkness, pair blinds with inside-mount blackout shades, or add side channels.
- Light gaps are common with inside mounts. Consider an outside mount if this is critical.
Brackets Pull Out Of Frame
- If the window frame is soft or crumbly, use longer screws or wall anchors.
- For metal frames, use self-tapping metal screws.
Cleaning Up And Maintaining Your New Blinds
After your blinds are up, some simple care tips will keep them looking new:
- Dust weekly with a microfiber cloth or duster.
- For sticky spots, use a damp cloth and mild soap.
- Avoid harsh cleaners—these can damage finishes or fade fabrics.
- For fabric blinds, vacuum with a brush attachment.
- Check cords and brackets every few months for signs of wear.
Extra tip: Blinds last longer if you gently open and close them, rather than yanking on cords or pulling too hard.
Inside Mount Vs. Outside Mount: Which Is Better?
Sometimes, you may wonder if you chose the right style. Here’s a quick comparison to help you decide if inside mount is best for you.
| Feature | Inside Mount | Outside Mount |
|---|---|---|
| Look | Clean, built-in | Bold, covers trim |
| Light Coverage | Small gaps at sides | Better at blocking light |
| Space Needed | Requires deep frame | Works on shallow windows |
| Installation | More precise | More forgiving |
| Cost | Usually lower | May need larger blinds |
Practical Tips For A Professional Finish
- Always measure twice before you cut or drill.
- Use a sharp pencil for marking—fat marks can make your brackets uneven.
- If you’re installing multiple blinds in a row, install the center one first to line up the others.
- For extra insulation, choose cellular or honeycomb shades.
- If you’re renting, check with your landlord before drilling.
Insight: If you plan to paint or refinish your window frame, do it before installing the blinds. Paint drips or sanding dust can damage new blinds.
Credit: www.homedepot.com
When To Call A Professional
Most people can handle inside mount installation, but there are times when a pro is the better choice:
- Large, heavy blinds (over 60 inches wide or tall)
- Windows higher than you can safely reach
- Unusual window shapes (arches, triangles)
- Historic homes with fragile trim
A professional installer can also guarantee perfect fit and operation, saving you time and frustration. If you want to compare costs, you can check average prices at HomeAdvisor.
Safety Reminders
- Always wear safety glasses when drilling.
- Keep tools away from children and pets.
- Dispose of packaging materials and old blinds safely.
If you have young children, always use cordless blinds or install safety devices. The US Consumer Product Safety Commission recommends cordless window coverings for all homes with kids.
Frequently Asked Questions
How Do I Know If My Window Is Deep Enough For Inside Mount Blinds?
Measure from the window glass to the front edge of the window frame. Most inside mount blinds need at least 1.5 to 2.5 inches of depth. Check the blind manufacturer’s instructions for the exact measurement required.
Can I Install Inside Mount Blinds On All Types Of Windows?
Inside mount works best on windows with a flat, deep frame. Very shallow, curved, or uneven frames may not support the brackets well. For these, consider outside mount blinds instead.
What If My Measurements Are A Little Off?
If your blind is slightly too wide, you can sometimes trim the headrail (with a hacksaw, for metal or plastic rails). If it’s too narrow, there may be visible gaps. Always measure carefully and, if unsure, order a custom size.
Are Inside Mount Blinds Better For Energy Efficiency?
Cellular (honeycomb) shades are the best for insulation. Inside mount makes a tight fit, which helps trap air and reduce heat loss, but the type of blind matters more than the mounting style.
How Long Does It Take To Install Blinds Inside Mount?
For most DIYers, each window takes 20 to 40 minutes from start to finish. If you’re new to DIY, allow extra time for the first window. Having all tools and parts ready speeds up the process.
Installing inside mount blinds is a satisfying project that can change the look of your space in just an afternoon. With the right tools, careful measurements, and attention to detail, you can enjoy the beauty and convenience of perfectly fitted blinds for years to come.