
Setting up a smart home often starts with a sense of excitement and a touch of anxiety. The idea of monitoring your property from anywhere is powerful, but installing new devices can feel overwhelming, especially if you’re not a tech expert. The MyQ Outdoor Camera is designed to help you keep an eye on your garage or driveway, adding peace of mind to your daily routine. Whether you’re protecting packages, checking on kids, or just wanting to see who’s at your door, knowing how to install your camera properly makes all the difference.
This guide will walk you through every step to install your MyQ Outdoor Camera, from unboxing to final setup. You’ll also discover real-world tips, hidden details many beginners miss, and advice for getting the best performance out of your camera.
With clear instructions, simple language, and practical examples, you’ll feel confident in making your home smarter and safer.
Understanding The Myq Outdoor Camera
Before you start, it’s good to know what makes the MyQ Outdoor Camera unique. Unlike many other cameras, the MyQ model is built to work especially well with garage doors and outdoor spaces. It connects directly to your home Wi-Fi and pairs with the MyQ app, which lets you view live video, receive alerts, and manage settings from your phone.
Some of the main features include:
- 1080p HD video for clear images day and night
- Motion detection to spot movement and send alerts
- Two-way audio so you can talk through the camera
- Weather resistance for reliable outdoor use
- Easy integration with other MyQ products
You’ll need a stable Wi-Fi connection and a smartphone or tablet to use all its features. The camera is also compatible with popular smart home platforms, making it easy to expand your system in the future.
What You Need Before Installation
Starting with the right tools and preparation makes installation smoother. Here’s what you’ll need:
- MyQ Outdoor Camera (with included mounting kit)
- Screwdriver (Phillips head)
- Drill (with correct bits for your wall type)
- Measuring tape
- Pencil
- Wi-Fi network name and password
- Smartphone or tablet with the MyQ app installed
If you’re installing on brick, concrete, or stucco, you may need wall anchors and a masonry drill bit. For wood or vinyl siding, standard screws usually work.
Important tip: Test your Wi-Fi signal where you want to mount the camera before installing. Weak signal can cause video lag or disconnects. If the signal is poor, consider using a Wi-Fi extender.
Unboxing And Checking The Camera Package
When your MyQ Outdoor Camera arrives, open the box and check that all parts are included. Missing pieces can delay installation, so confirm you have:
- The camera itself
- Power adapter and cable
- Mounting bracket
- Screws and wall anchors
- Quick start guide
If anything is missing or damaged, contact the seller right away for replacements.
Choosing The Best Location
Where you place your camera affects both its performance and your security. For most people, the ideal spot is above the garage door or near the driveway, pointing toward the area you want to monitor. Here are some tips for choosing the best location:
- Height: Mount the camera at least 7-10 feet above the ground. This keeps it out of easy reach and gives a wide viewing angle.
- View: Make sure the camera can see the key areas—driveway, garage entrance, or front yard—without obstructions like trees or light fixtures.
- Power: The camera needs a power source. Plan your spot so the power cable can reach an outlet safely, without dangling cords.
- Wi-Fi: Check that your Wi-Fi signal is strong in the installation area. Walls and metal garage doors can block signals.
- Sunlight and Weather: Avoid pointing the camera directly at the sun, which can cause glare. The camera is weather-resistant, but placing it under an eave or overhang can help protect it from rain and snow.
Non-obvious insight: Many beginners forget to test nighttime visibility. Use your phone’s camera at night in the planned spot to see what the camera might “see” in the dark. Adjust your lighting or placement as needed.

Credit: support.chamberlaingroup.com
Comparing Myq Outdoor Camera With Other Brands
If you’re still deciding on a camera or want to see how MyQ stacks up, this table compares its main features with two popular competitors:
| Feature | MyQ Outdoor Camera | Ring Spotlight Cam | Arlo Essential |
|---|---|---|---|
| Resolution | 1080p HD | 1080p HD | 1080p HD |
| Weather Resistant | Yes (IP65) | Yes (IP65) | Yes (IP65) |
| Two-way Audio | Yes | Yes | Yes |
| Power Source | Wired | Battery/Wired | Battery/Wired |
| Integration | MyQ App, Smart Home | Ring App, Alexa | Arlo App, Alexa, Google |
| Subscription Required for Video Storage? | Yes | Yes | Yes |
The MyQ camera is a strong choice if you already use MyQ garage openers or want smooth integration with your garage area.
Step-by-step Installation Guide
Here’s the main part—installing your MyQ Outdoor Camera. Take your time with each step for best results.
1. Prepare The Myq App
- Download the MyQ app from the Apple App Store or Google Play.
- Create or log into your account.
- Choose “Add Device” and select “Camera.”
- The app will guide you through connecting your camera to Wi-Fi. Don’t mount the camera yet—first, finish setup while it’s close to your router.
Pro tip: Connecting the camera to Wi-Fi before mounting avoids struggling with your phone and small buttons on a ladder.
2. Connect The Camera To Power
- Plug the power adapter into an outlet.
- Connect the power cable to the camera.
- Wait for the indicator light to blink (usually blue or green). This means the camera is ready to connect.
3. Pair The Camera With The App
- In the app, follow on-screen instructions to scan the QR code on the camera or its quick start guide.
- Select your Wi-Fi network and enter your password.
- Wait for the app to confirm the connection. This can take up to a minute.
If you see error messages, double-check your Wi-Fi password and make sure your phone is on the same network.
4. Test Video And Audio
- Use the app to view the live camera feed.
- Test the two-way audio by speaking into your phone and listening through the camera.
- Walk in front of the camera to check motion detection.
If everything works, you’re ready to mount the camera.
5. Mark And Drill Mounting Holes
- Hold the mounting bracket against the wall in your chosen spot.
- Use a pencil to mark screw locations.
- For brick or concrete, drill pilot holes and insert wall anchors.
- For wood or siding, pilot holes may be enough.
6. Attach The Mounting Bracket
- Secure the bracket to the wall with screws.
- Make sure it’s tight and level.
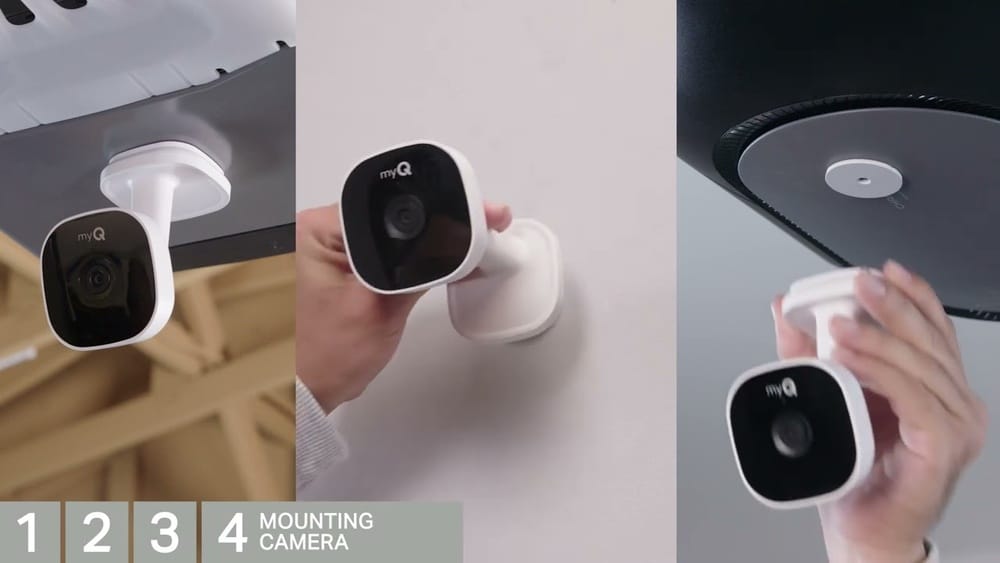
7. Mount The Camera
- Slide or snap the camera onto the bracket.
- Tighten any adjustment knobs or screws to hold it in place.
- Aim the camera for the best view. You can fine-tune later in the app.
8. Manage The Power Cable
- Route the cable neatly along the wall.
- Use cable clips or ties for safety and a clean look.
- Avoid pinching or bending the cable sharply.
9. Final Setup In The App
- In the app, adjust motion zones to reduce false alerts (for example, from passing cars or waving trees).
- Set up notifications for the activities you care about.
- Link the camera to other MyQ devices if needed.
Non-obvious insight: Many users forget to save their custom motion zones. Always tap “Save” or “Apply” after making changes, or the app may revert to default settings.
Troubleshooting Common Installation Issues
Even with careful setup, problems can pop up. Here’s how to handle the most common ones:
Camera Won’t Connect To Wi-fi
- Double-check your Wi-Fi password.
- Make sure your router supports 2.4GHz networks (many cameras don’t work on 5GHz).
- Move the camera closer to the router for setup.
- Restart your router and camera if needed.
Video Is Blurry Or Lags
- Weak Wi-Fi signal is often the cause. Try a Wi-Fi extender.
- Check for interference from metal garage doors or thick walls.
- Lower the video quality setting in the app if your internet speed is slow.
Motion Alerts Too Sensitive
- Use the app to adjust motion sensitivity and activity zones.
- Point the camera away from busy streets or moving branches.
- Schedule alerts for certain times to avoid too many notifications.
Audio Not Working
- Make sure the microphone and speaker settings are enabled in the app.
- Test using another phone or tablet.
- Restart the camera.
If problems continue, visit the MyQ support website or contact their help team.
Safety And Privacy Tips
Smart cameras are powerful tools, but they come with responsibilities. Here are some ways to keep your system safe and your privacy protected:
- Change the default password on your MyQ account and use a strong, unique one.
- Enable two-factor authentication in the app for extra security.
- Place cameras only in public or semi-public areas (like driveways, garages, or entryways)—never aim them at neighbors’ homes or private spaces.
- Regularly update the camera firmware through the app to patch security holes.
- Review the app’s privacy settings to control who can view or share your video feeds.
Non-obvious insight: Some people forget to check local laws about recording audio outdoors. In many states, it’s legal to record video on your property, but audio recording rules can be stricter. Make sure you follow your area’s privacy laws.
Advanced Setup: Integrating With Other Smart Devices
If you want to go beyond basic monitoring, the MyQ Outdoor Camera can work with other smart home devices. Here’s how:
- MyQ Garage Door Opener: Link the camera feed to your garage opener in the app, so you can see who’s at the door before opening.
- Voice Assistants: Some models support integration with Google Assistant or Amazon Alexa, letting you view your camera on smart displays.
- Smart Lighting: Pair with smart lights to turn them on when motion is detected, improving night visibility.
To link devices, follow the integration instructions in the MyQ app. Each platform has slightly different steps, but generally you’ll find an “Add Integration” or “Works With” option.
Optimizing Camera Performance
Once your camera is up and running, a few small changes can make a big difference in performance.
Adjusting Video Settings
- Choose the video quality that matches your internet speed. 1080p gives clearer images but uses more bandwidth.
- Set up night vision mode for better low-light images.
- Calibrate the field of view by tilting or rotating the camera slightly for full coverage.
Managing Notifications
- Use smart alerts to get messages only for people or vehicles, not every motion.
- Schedule alerts for certain hours, such as overnight or while you’re at work.
Maintaining Your Camera
- Clean the lens gently with a soft cloth every few months to avoid blurry images.
- Check the mount and cables after storms or high winds.
- Regularly check for software updates in the app.

Credit: www.antillespr.edu
Cost Breakdown And Subscription Plans
Installing a MyQ Outdoor Camera involves some costs beyond the device itself. Here’s a basic breakdown:
| Item | Typical Cost (USD) | Notes |
|---|---|---|
| MyQ Outdoor Camera | $100–$150 | One-time purchase |
| Mounting Supplies | $0–$20 | Drill bits, anchors, cable clips |
| Wi-Fi Extender (if needed) | $30–$60 | Optional, for weak signal areas |
| Subscription Plan | $3–$10/month | For cloud video storage and smart alerts |
A subscription is not required for live viewing, but is needed for saving video clips and advanced features. Check MyQ’s official site for the latest details.
Real-world Examples And User Experiences
Many users share similar stories when installing their first outdoor camera. Here are a few:
- Package protection: One homeowner found that, after installing the MyQ camera, package thefts dropped to zero. The visible camera alone was enough to deter thieves.
- Nighttime peace of mind: A family living on a busy street used motion alerts to know when their kids arrived home after dark.
- Solving Wi-Fi problems: Another user struggled with poor signal at the garage. Moving their router closer and adding a Wi-Fi extender solved the problem.
Beginner mistake: Some people forget to update their app or camera firmware after installation, which can cause bugs or missed alerts. Always check for updates during your first month.
Why Proper Installation Matters
Taking the time to install your MyQ Outdoor Camera correctly is more than just a technical task. It means:
- Better security: Cameras that are easy to reach or poorly placed are less effective.
- Fewer false alerts: A well-aimed camera with smart zones won’t bother you with useless notifications.
- Longer device life: Proper cable management and weather protection mean fewer repairs and replacements.
In short, a little extra attention now pays off with years of reliable home monitoring.
Frequently Asked Questions
How Do I Reset My Myq Outdoor Camera If It Stops Working?
To reset, press and hold the reset button on the camera (usually near the power port) for about 10 seconds. The indicator light will blink to confirm. After resetting, you’ll need to reconnect the camera to the app and Wi-Fi.
If problems continue, check your app version and Wi-Fi signal.
Can I Use The Myq Outdoor Camera Without A Subscription?
Yes, you can view live video and receive basic alerts without a subscription. However, features like saving video clips, advanced motion detection, and cloud storage require a paid plan. Details are available on the MyQ website or in the app.
Does The Camera Work With Other Smart Home Systems?
The MyQ Outdoor Camera mainly works with the MyQ ecosystem, but some models support integration with Google Assistant and Amazon Alexa. Check the product description or app for compatibility before buying.
What Should I Do If My Wi-fi Signal Is Weak At The Installation Site?
Try moving your router closer, or install a Wi-Fi extender between the router and camera. Avoid placing the camera behind thick walls or metal doors, as these block signals. Testing your signal before mounting saves frustration later.
Is The Myq Outdoor Camera Weatherproof?
Yes, the camera is rated for outdoor use and can handle rain, snow, and dust. For extra protection, mount it under an eave or overhang if possible. Extreme temperatures may affect performance, so check the operating range in the manual.
Installing the MyQ Outdoor Camera is a smart way to protect your home and gain peace of mind, whether you’re across the street or across the world. With careful setup and a few expert tips, you’ll enjoy reliable security and smarter living every day. For more technical information, you can visit the official MyQ support site.

Credit: www.myq.com