
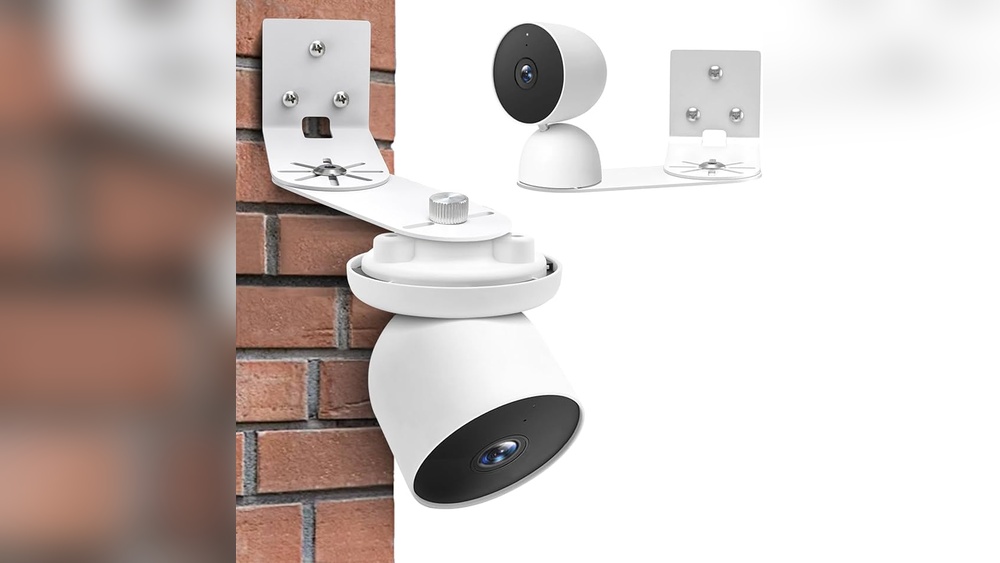
Installing a smart security camera outdoors is a decision that offers both peace of mind and modern convenience. The Nest Cam Outdoor is a top choice for many, thanks to its reliability, weatherproof design, and simple integration with the Google Home ecosystem. If you want to improve your home’s security, understanding how to install the Nest Cam Outdoor correctly is key. This guide will walk you through each step, from unboxing to watching your camera’s live feed, using clear language and practical advice. Along the way, you’ll find tips and common mistakes to avoid—insights that often get missed in quick-start leaflets. Let’s make sure your new Nest Cam Outdoor works smoothly from day one.
Understanding The Nest Cam Outdoor: Key Features And Benefits
Before you install, it’s important to know what makes the Nest Cam Outdoor a smart investment. The camera is designed specifically for outdoor use, with a weatherproof body that can withstand rain, snow, and sun. Its 1080p HD video captures clear images during the day and night, thanks to built-in night vision. The camera also includes a built-in speaker and microphone for two-way talk, letting you communicate with visitors (or warn off suspicious people) right from your phone.
A big advantage is the camera’s constant streaming and cloud storage. With a Nest Aware subscription, you can review video history, get intelligent alerts, and even create custom activity zones. These features, combined with easy app control, make it a solid choice for beginners and tech-savvy users alike.
Here’s a quick comparison of the Nest Cam Outdoor versus other popular outdoor cameras:
| Feature | Nest Cam Outdoor | Ring Stick Up Cam | Arlo Pro 4 |
|---|---|---|---|
| Video Quality | 1080p HD | 1080p HD | 2K HDR |
| Night Vision | Yes | Yes | Yes (color) |
| Two-way Audio | Yes | Yes | Yes |
| Weatherproof Rating | IP65 | IPX5 | IP65 |
| Power Source | Wired | Battery/Wired | Battery/Wired |
What You Need Before Installation
Check Your Wi-fi Strength
For the Nest Cam Outdoor to stream video without delays, you need a strong Wi-Fi signal at your chosen location. Test the signal outside where you plan to install the camera using your smartphone. If videos buffer or the connection drops, consider moving your router or using a Wi-Fi extender.
Tools And Materials List
You’ll need a few simple tools:
- A drill (with a 3/32″ drill bit for pilot holes)
- A Phillips screwdriver
- A ladder (for higher placements)
- Cable clips (included)
- Weatherproof power adapter (included)
- Outdoor extension cord (if your outlet is far away)
- Smartphone or tablet (with the Google Home or Nest app installed)
Don’t forget to check your outdoor outlet for power before you start. If you don’t have an outdoor outlet, you may need a licensed electrician to install one.
Safety Precautions
- Turn off power at the breaker before handling any wiring.
- Use GFCI-protected outlets outdoors.
- Avoid placing the camera where it could be hit by doors or windows.
- If you’re installing at height, always have someone nearby for safety.

Credit: www.youtube.com
Choosing The Best Location For Your Nest Cam Outdoor
Picking the right spot is more than just pointing the camera at your door. Think about what you want to monitor—your driveway, gate, porch, or backyard. Here are some detailed considerations:
- Height: Mount the camera 7–10 feet above the ground. This reduces the chance of tampering and gives a wider view.
- Field of View: Make sure the camera covers important areas without major obstacles like trees or beams.
- Sunlight: Avoid pointing the camera directly at the sun, which can cause glare and unclear images.
- Wi-Fi Signal: The camera must be within range of your router.
- Power Source: The included cable is 25 feet long. Plan your install so the camera can plug into an outlet safely.
A common mistake is mounting the camera too low, making it easy to steal or damage. Also, avoid pointing at neighbors’ windows to respect privacy laws.
Step-by-step Installation Guide
Installing your Nest Cam Outdoor is straightforward, but following each step carefully will save you time and frustration.
Step 1: Unbox And Check Components
Open the box and confirm you have:
- Nest Cam Outdoor camera
- Magnetic mounting base
- Power cable (25 feet)
- Power adapter and wall plate
- Cable clips and screws
- Installation guide
If anything is missing, contact Google Support before you proceed.
Step 2: Plug In And Set Up Indoors
Before going outside, plug the camera into an indoor outlet. Open the Google Home or Nest app on your phone.
- Tap Add device and select Nest Cam Outdoor.
- Follow the prompts to connect the camera to your Wi-Fi network.
- Name your camera (e.g., “Front Door”).
- Check the live video to make sure the camera works.
This indoor setup is important. If you try to connect outdoors and the Wi-Fi is weak, you’ll waste time troubleshooting.
Step 3: Plan Your Cable Route
Walk outside with the camera and its cable. Find the best path from the camera to your outdoor outlet. The cable should stay flat against the wall, away from sharp edges or moving parts (like doors). Use cable clips to secure the wire and prevent wind damage.
If you need a longer cable, only use certified weatherproof extensions. Avoid running the cable through windows, as this can pinch and damage the wire.
Step 4: Mark And Drill Mounting Holes
Hold the mounting plate where you want the camera. Use a pencil to mark the screw holes. Drill pilot holes using a 3/32″ bit. This prevents the wall from cracking and makes it easier to screw in the mount.
For brick, stucco, or concrete, use wall anchors (provided). For wood or siding, anchors aren’t needed.
Step 5: Attach The Mount And Camera
- Screw the mounting plate into the wall.
- Attach the magnetic base to the plate.
- Snap the camera onto the base.
- Adjust the angle to cover your target area.
The strong magnet holds the camera firmly, but always double-check it’s secure.
Step 6: Secure And Hide The Cable
Run the cable along your planned route, attaching cable clips every 12–18 inches. Leave a little slack near the camera for future adjustments.
- Plug the power adapter into your outdoor outlet.
- For extra weather protection, use an outlet cover that closes over the plug.
If you need to drill through a wall to reach an outlet, seal the hole with outdoor silicone caulk to keep out water and bugs.
Step 7: Final Test And App Setup
- Check the live video feed on your phone.
- Adjust the camera angle if needed.
- Set up activity zones and alerts in the app (if you have Nest Aware).
Walk around your yard and check the video to make sure the camera picks up movement in all the right places.
Common Installation Mistakes And How To Avoid Them
Even with simple instructions, many users run into problems. Here are some mistakes and how to fix them:
- Mounting Too Low: Cameras below 7 feet are easy to steal or block. Use a ladder to reach a higher spot for better security.
- Ignoring Wi-Fi Strength: If your camera drops offline, your signal is too weak. Test with your phone before drilling holes.
- Bad Cable Management: Loose wires can be pulled or damaged by weather. Use all the included clips and check the cable regularly.
- No Weatherproofing: Outdoor outlets need weather covers. Cables through walls must be sealed with caulk to stop leaks.
- Wrong Camera Angle: Too much sky or ground means poor coverage. Adjust the angle to focus on doors, gates, or walkways.
Integrating With Google Home And Other Devices
One of the best things about the Nest Cam Outdoor is how easily it works with Google Home and other smart devices. After installing, you can:
- View the live feed on your phone, tablet, or any Google Nest Hub.
- Set up voice commands (“Hey Google, show Front Door camera”).
- Get alerts on your smart speakers if motion is detected.
Integration with smart locks or lights lets you create routines. For example, you can turn on porch lights when the camera spots movement at night.

Credit: www.amazon.com
Customizing Your Security Settings
Motion Zones And Alerts
With a Nest Aware subscription, you can create custom activity zones. This tells the camera to only alert you if something moves in certain parts of the image, like your driveway but not the street.
- Open the app and draw zones on the camera’s live view.
- Name each zone (“Car Zone,” “Front Walk”).
- Choose which zones send alerts to your phone.
This reduces false alerts from passing cars or pets.
Recording And Privacy
- By default, the camera streams and records video when powered.
- You can set up schedules in the app to turn the camera off during certain hours.
- Use privacy masks to block out areas you don’t want recorded, helping protect neighbors’ privacy.
Always let family or visitors know when cameras are in use—some states require this by law.
Weatherproofing Your Installation
The Nest Cam Outdoor is built for all weather, but how you install it affects how well it lasts.
- Use all the included rubber grommets and seals.
- Keep cable connections tight and off the ground.
- Avoid pointing the camera directly at sprinklers or gutters.
If you live in an area with heavy snow or ice, check the camera regularly for buildup that could block the lens.
Troubleshooting Common Issues
Even with a careful install, problems can happen. Here’s how to solve the most common ones:
Camera Won’t Power On
- Check your outlet with another device.
- Make sure all cable connections are tight.
- Try a different outlet if possible.
No Wi-fi Connection
- Move your router closer or add a Wi-Fi extender.
- Reduce interference from metal objects.
- Restart your router and camera.
Blurry Or Dark Image
- Clean the lens with a soft, dry cloth.
- Adjust the angle to avoid bright lights or direct sun.
- Check for spider webs or dirt blocking the view.
Too Many Motion Alerts
- Lower the sensitivity in the app.
- Set up activity zones.
- Turn off alerts for areas with lots of traffic.
If you need more help, check the official Google Nest Support page for guides and troubleshooting.
Maintaining Your Nest Cam Outdoor
Keeping your camera in good shape is simple but important.
- Clean the lens every few months to prevent blurry images.
- Check the cable and mounting for wear or damage after storms.
- Update the Nest app and camera firmware when prompted.
- Test the camera and alerts regularly.
If you plan to be away for a long time, ask a neighbor to check the camera or review footage for you.
When To Call A Professional
While most homeowners can install the Nest Cam Outdoor themselves, there are times when it’s smart to call an expert:
- You need to install a new outdoor outlet.
- You want to hide cables inside walls.
- Your home is made of very hard materials (like stone or concrete).
- You’re not comfortable using a ladder or power tools.
Professional installation adds to the cost but can save you time and prevent mistakes. Some home security companies will install smart cameras as part of a package.
Cost Comparison: Diy Vs. Professional Installation
Installing the camera yourself is usually free, aside from buying tools or extension cords. Professional installation can vary depending on your area and the complexity of the job.
Here’s a breakdown:
| Installation Method | Estimated Cost | What’s Included |
|---|---|---|
| DIY | $0–$50 | Tools, extension cord, your time |
| Professional | $100–$300 | Mounting, wiring, setup, testing |
If you have multiple cameras or need electrical work, professional help may be worth the price.
Maximizing Security: Placement Strategies And Expert Tips
Beyond basic setup, there are strategies to make your Nest Cam Outdoor even more effective:
- Overlapping Views: If you have more than one camera, let their coverage areas overlap slightly. This helps catch faces and actions from different angles.
- Hidden Installations: While the camera’s presence can deter crime, hiding it partially (like under a roof edge) can prevent tampering.
- Lighting: Good outdoor lighting improves night vision and video quality. Motion-activated lights can scare off intruders and make your camera footage clearer.
- Signage: Some experts recommend posting a small sign (“Property Protected by Video Surveillance”). This is legally required in some places and can discourage bad behavior.
Many new users forget to check local laws about video and audio recording. Some states or cities require that you notify people if they’re being recorded, especially in shared spaces.
Data Security And Privacy: What You Need To Know
Smart cameras like the Nest Cam Outdoor record and store video on the cloud. Here’s how to protect your privacy:
- Use a strong Wi-Fi password and enable two-factor authentication on your Google account.
- Don’t share your camera feed with people you don’t trust.
- Review your camera’s data settings in the app. You can delete old footage anytime.
Google’s privacy policy explains how your video is stored and protected. Always keep your app and firmware updated to fix any security issues.
Real-world Examples: How Homeowners Use Nest Cam Outdoor
To help you get the most from your camera, here are examples of smart placements:
- Driveway: Watch for package deliveries and car movement. Place the camera under the roofline to avoid rain on the lens.
- Backyard Gate: Mount high on a fence post to monitor who comes and goes.
- Front Porch: Angle slightly to see both the door and steps, catching faces of visitors and delivery drivers.
Some users set up two cameras—one at the front and one at the back. This covers the most common entry points and helps police if a crime occurs.
Upgrading And Expanding Your Nest System
After your first successful install, you might want to add more Nest Cams or even a Nest Doorbell. The process is similar, and all devices can be controlled from the same app. With multiple cameras, you can:
- Set up routines (e.g., all cameras on when you leave home)
- Share feeds with family members
- Get smarter alerts based on combined activity
Consider your home’s layout and Wi-Fi strength as you add more devices. Too many cameras on a weak network can slow everything down.
Credit: angradoheroismo.pt
Is The Nest Cam Outdoor Right For You?
The Nest Cam Outdoor is a great fit if you want reliable, easy-to-use video security without monthly contracts. It’s best for:
- Homeowners who want to monitor entries, driveways, or yards
- Renters allowed to mount cameras outside
- People who use Google Home or other Nest devices
It may not be the best choice if:
- You need battery power (there are other Nest models for that)
- Your Wi-Fi is weak or unreliable
- You want local storage (Nest Cams use cloud storage)
Always consider your home’s needs, budget, and privacy preferences before buying.
Frequently Asked Questions
How Many Nest Cam Outdoor Cameras Can I Install At My Home?
You can install as many as your Wi-Fi network and power outlets support. The Google Home app allows you to manage multiple cameras, but keep in mind that too many cameras can slow your network if your internet speed is low.
Does Nest Cam Outdoor Work Without A Subscription?
Yes, the camera works without a subscription, letting you watch the live video and get alerts. However, Nest Aware adds features like video history, smarter alerts, and activity zones.
Can I Use The Nest Cam Outdoor With Alexa Or Apple Homekit?
The Nest Cam Outdoor is designed for Google Home, but some features can be used with Amazon Alexa using third-party skills. Full Apple HomeKit integration isn’t available, but you can use Homebridge plugins for limited support.
Is The Nest Cam Outdoor Weatherproof In Extreme Temperatures?
Yes, it’s rated for temperatures from -4°F to 104°F (-20°C to 40°C) and is IP65 weatherproof. In very cold or hot climates, performance may be affected, so check the camera regularly.
What Should I Do If My Camera Is Stolen?
If your camera is stolen, contact Google Support with your purchase details and police report. Some homeowners insurance policies cover stolen cameras. Video footage is stored in the cloud (if you have Nest Aware), so you can access it even if the camera is gone.
Bringing a Nest Cam Outdoor into your home is a smart step toward better security and peace of mind. With careful installation and setup, you’ll enjoy clear video, instant alerts, and the ability to check on your property from anywhere. Whether you do it yourself or hire a professional, following these steps will help your camera last and work its best for years to come.