
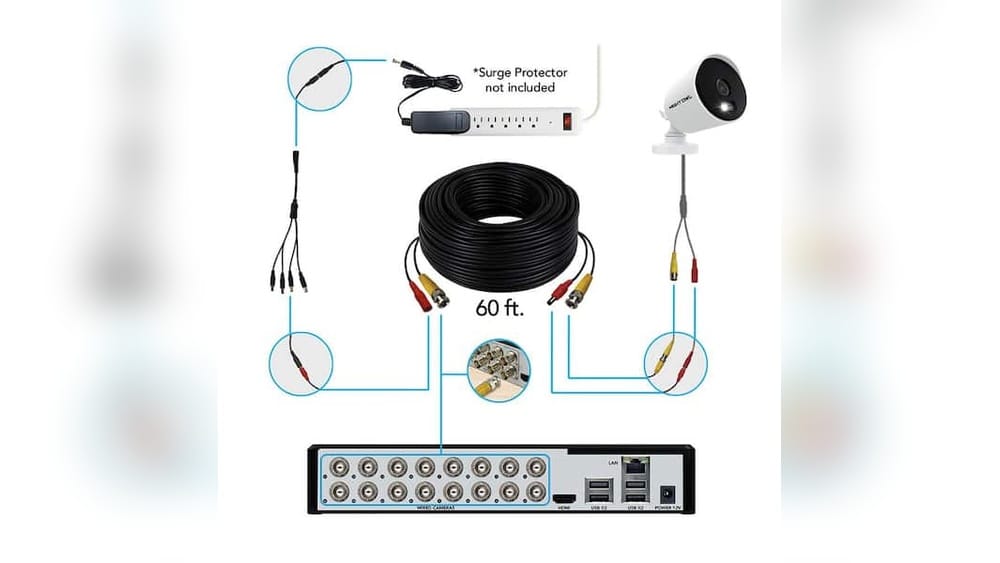
Setting up a security system can feel overwhelming, especially if you’re new to home surveillance. But with the right guidance, installing Night Owl wired security cameras is a project most homeowners can handle on their own. These systems offer strong protection for homes and businesses, and their wired connection means you get reliable video quality day and night. This guide walks you through the process step-by-step—from preparing your space to troubleshooting common issues—so you can complete installation confidently and get the most from your new system.
Understanding Night Owl Wired Security Cameras
Night Owl is a popular brand known for its affordable and user-friendly security products. Wired camera systems, unlike wireless, use cables for both power and video transmission. This setup delivers more stable footage and is less likely to suffer from interference or dropped connections.
Key Features
- High-definition video (usually 1080p or higher)
- Night vision for low-light monitoring
- Motion detection alerts
- Remote viewing through mobile apps
- Continuous recording to a digital video recorder (DVR)
These features ensure your property is watched around the clock, with footage stored locally for extra privacy.
Why Choose Wired Over Wireless?
While wireless cameras are easier to place, wired cameras offer:
- More stable video quality
- No dependency on Wi-Fi signal strength
- Uninterrupted power supply (no batteries to change)
- Better resistance to hacking
Wired systems do require more effort to install since you need to run cables, but the payoff is a more robust system.
Pre-installation Planning
A little preparation can save you hours later. Before drilling or mounting anything, take time to plan your camera layout and gather necessary tools.
Assessing Your Security Needs
Walk around your property and identify:
- Entry points: Front and back doors, windows, garage
- Blind spots: Places out of sight from neighbors or the street
- Valuable areas: Driveways, backyards, storage sheds
Mark these spots on a simple drawing or use a printed floor plan.
Number Of Cameras
Count how many areas you want to monitor. Most Night Owl kits come with 4, 8, or 16 cameras. If you have a large property, you may need to buy additional cameras or a larger DVR.
Cable Routing Plan
Decide how you’ll run cables from the cameras to the DVR. Common routes:
- Along walls under eaves
- Through attics or basements
- Along baseboards inside the house
Avoid running cables where they might be easily cut or tampered with.
Tool Checklist
Before starting, make sure you have:
- Drill and bits
- Screwdrivers
- Ladder
- Fish tape or wire puller (for tough cable runs)
- Cable clips or staples
- Ethernet cables (if connecting DVR to your router)
This preparation helps you avoid unnecessary delays during installation.
Credit: nightowlsp.com
Unboxing And System Overview
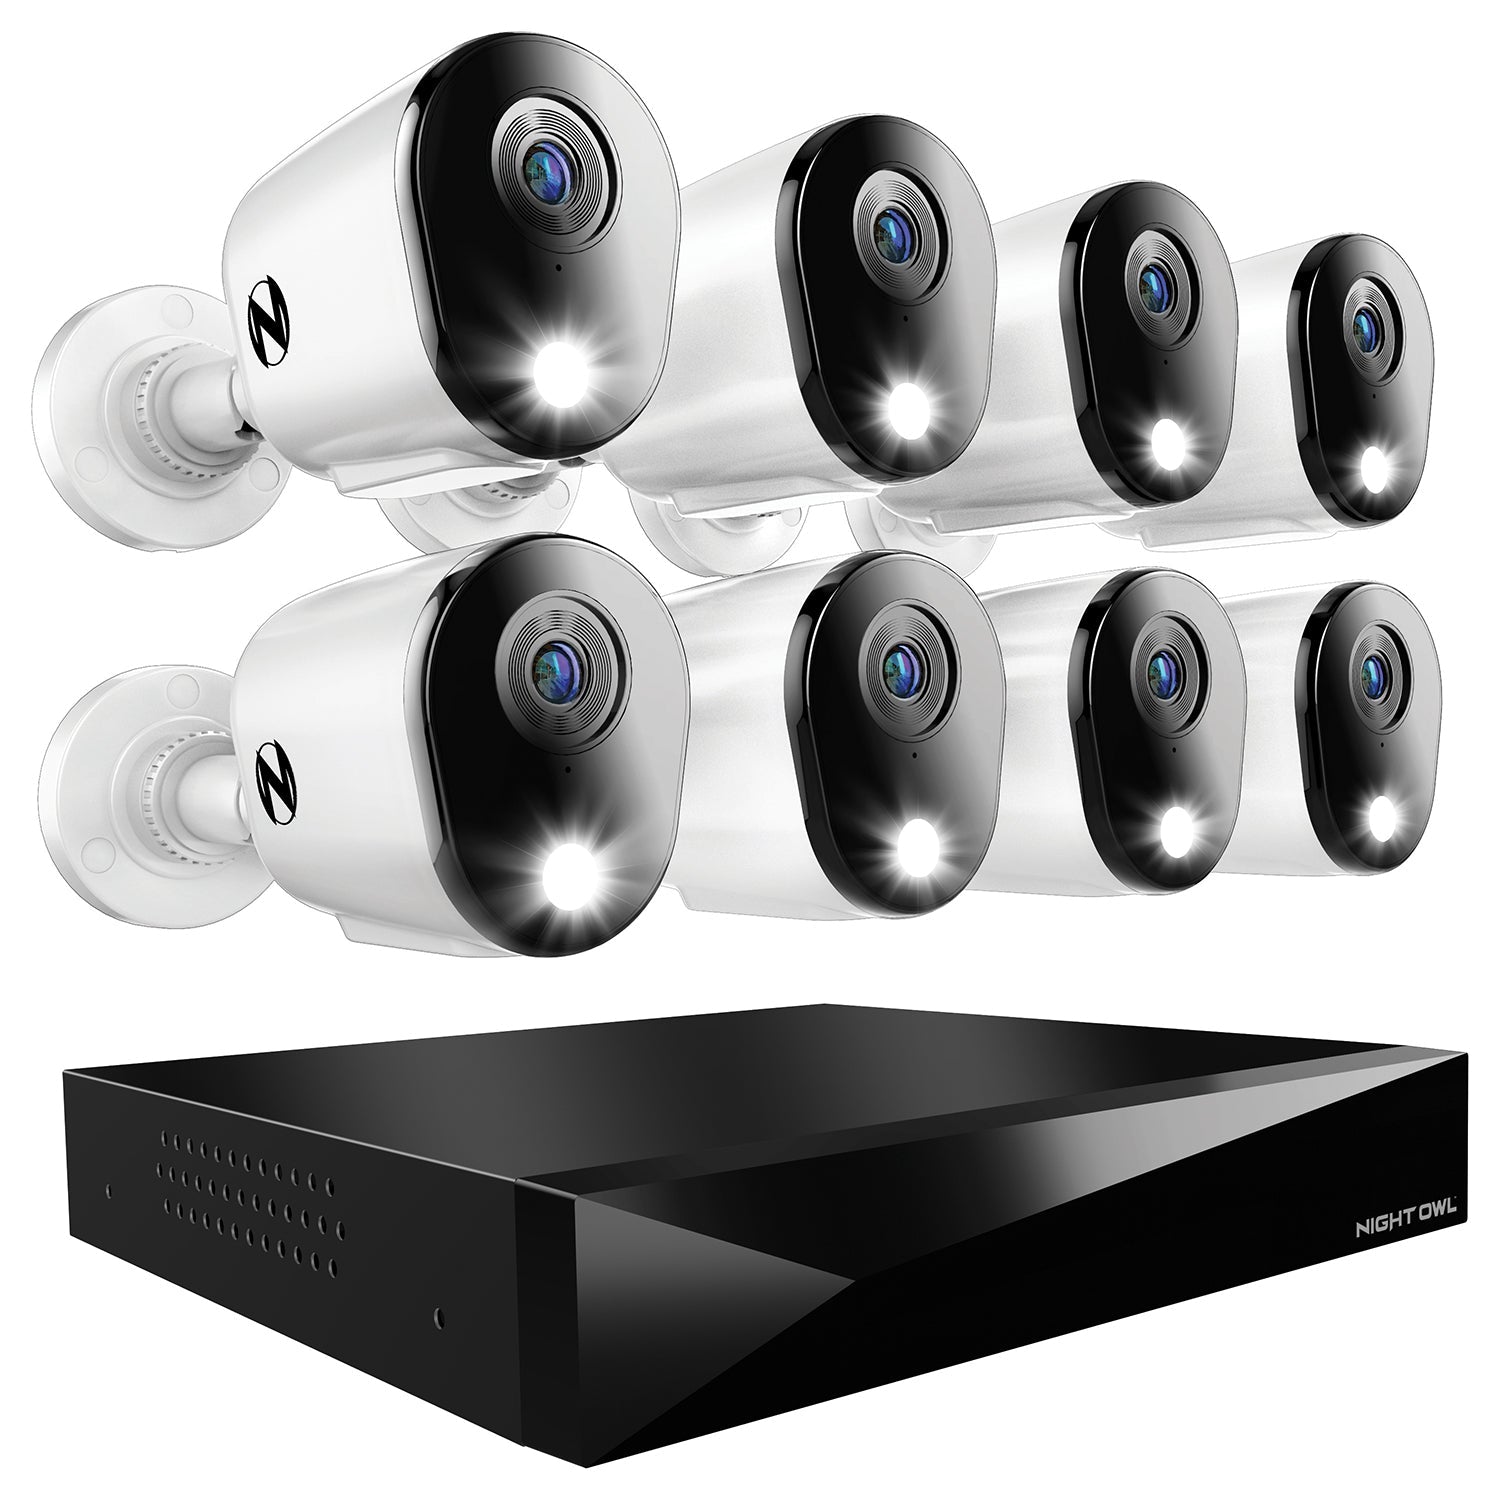
When your Night Owl system arrives, check that all components are included. Most kits contain:
- Cameras (with attached cables)
- DVR
- Power adapters and splitters
- Video/power cables (usually 60 feet per camera)
- Mouse (for DVR control)
- Mounting hardware
- Quick start guide
Lay out everything and compare with the list in your manual.
Typical Camera System Package
Here’s a summary of what you’ll likely find:
| Item | Quantity (4-camera kit) | Purpose |
|---|---|---|
| HD Wired Cameras | 4 | Captures video footage |
| DVR | 1 | Stores and manages recordings |
| Power Adapter | 1 | Powers all cameras via splitter |
| 60 ft. Video/Power Cables | 4 | Transmits power and video |
| Mounting Hardware | 4 sets | Secures cameras to surfaces |
| USB Mouse | 1 | For DVR navigation |
If something is missing, contact Night Owl support before proceeding.
Choosing Camera Locations
Where you place your cameras affects both coverage and image quality. Positioning cameras at the right spots is key for effective surveillance.
Best Practices For Placement
- Height: Mount cameras 8–10 feet above ground. This is high enough to avoid tampering but low enough for clear facial images.
- Angles: Aim cameras to cover entryways, not wide-open areas. Overlapping fields of view ensure nothing is missed.
- Lighting: Avoid pointing cameras directly at bright lights or the sun, which can cause glare and reduce visibility.
- Weather Protection: Place outdoor cameras under eaves or awnings if possible. Night Owl cameras are weather-resistant, but extra protection extends lifespan.
- Privacy: Don’t point cameras at neighbors’ windows or private areas. This avoids legal issues and respects privacy.
Common Coverage Areas
- Front door: 34% of burglars enter here
- Back door: 22% of entries
- First-floor windows: Another common entry point
- Driveway: For vehicles and package deliveries
- Yard or fence lines: To catch trespassers
Careful placement maximizes your system’s effectiveness.
Running Cables
Wired cameras need a physical connection for both power and video. Running these cables is the most time-consuming part of the process.
Planning Your Cable Routes
Before drilling:
- Measure each run to make sure the supplied cable is long enough.
- Use the shortest, most direct route possible.
- Avoid sharp bends or pinching the cable.
Typical Cable Run Methods
| Method | Difficulty | Best For |
|---|---|---|
| Under eaves/outside walls | Easy | Single-story homes |
| Through attic or crawl space | Medium | Multi-story or complex layouts |
| Along baseboards or interior walls | Easy to Medium | Short runs, interior cameras |
If you need to go through exterior walls, use a drill bit suitable for stucco, brick, or siding.
Tips For Cable Management
- Use cable clips to secure wires along walls.
- Label both ends of each cable for easy troubleshooting.
- Leave a little slack near the camera and DVR for future adjustments.
- Hide cables inside plastic conduit for a neater look and more protection.
Safety Note
Always check for electrical wires or plumbing before drilling. A simple stud finder with wire detection can help avoid accidents.
Mounting The Cameras
Once cables are run, it’s time to mount your Night Owl cameras.
Step-by-step Mounting Process
- Mark the screw holes on your chosen surface using the camera’s mounting base.
- Drill pilot holes for the screws. For masonry or brick, use masonry anchors.
- Attach the camera using the screws provided.
- Connect the video/power cable from the camera to the cable you ran earlier.
- Adjust the camera angle to cover the desired area. Tighten adjustment screws.
Most Night Owl cameras have a ball-and-socket mount for easy positioning.
Special Mounting Situations
- For soffits or eaves: Use longer screws if needed, and make sure the mount is secure.
- For inside windows: Be aware that glass can reflect infrared light at night, reducing night vision quality.
After mounting, check each camera’s field of view before final tightening.
Connecting Cameras To The Dvr
With cameras mounted and cables run, it’s time to connect everything at the DVR.
The Back Of The Dvr
You’ll see several ports labeled Video In (one for each camera), plus a Power In and possibly an Ethernet port.
Step-by-step Connection
- Plug each camera’s BNC connector (usually yellow) into a Video In port on the DVR.
- Connect the power splitter to the DVR or a nearby outlet, then plug each camera’s power cable into the splitter.
- Connect the DVR to your monitor (HDMI or VGA cable).
- Connect the mouse to the DVR.
- Power on the DVR and cameras.
If you want to view footage remotely, connect the DVR to your router with an Ethernet cable.
Quick Reference: Port Functions
| Port | Purpose |
|---|---|
| BNC Video In | Connects each camera’s video feed |
| Power In | Powers DVR and possibly cameras |
| HDMI/VGA Out | Connects to your TV or monitor |
| Ethernet | Enables online/app access |
| USB | Connects mouse or for backup |
Connect each cable carefully—forcing cables can damage ports.
Initial System Setup
With all hardware connected, you’re ready to configure your Night Owl system.
Powering Up
Turn on the DVR and your monitor. You should see the Night Owl start-up screen, followed by a live view from each camera. If you don’t, check each connection.
Basic Configuration Steps
- Set the date and time: Accurate time stamps are critical for reviewing footage.
- Create an admin password: Choose a strong password to protect your system.
- Name your cameras: Label each channel (e.g., “Front Door,” “Back Yard”) for easy identification.
- Check each camera’s view: Adjust angles if needed.
- Set recording mode: Most users choose “motion-activated” to save hard drive space, but 24/7 recording is also available.
Connecting To The Night Owl App
For remote viewing:
- Connect the DVR to your internet router using an Ethernet cable.
- Download the Night Owl app on your smartphone.
- Scan the QR code on your DVR screen to link the app with your system.
- Test live view from your phone to ensure remote access works.
You can now monitor your property from anywhere.

Credit: nightowlsp.com
Fine-tuning Camera Settings
Night Owl systems offer a range of settings to optimize performance and reduce false alerts.
Motion Detection
- Set motion zones so only certain areas trigger alerts (e.g., doorways, not busy streets).
- Adjust sensitivity to avoid false alarms from pets or passing cars.
Night Vision
Night Owl cameras automatically switch to night mode in low light. If images are too dark or too bright:
- Ensure the lens is clean and unobstructed.
- Adjust the camera angle to avoid reflecting surfaces.
- Use external lighting for extremely dark areas.
Recording Schedules
Customize when your cameras record:
- 24/7 recording for high-risk areas
- Motion-activated for low-traffic zones
- Custom schedules for business hours
These options help you balance security and storage space.
Audio Recording
Some Night Owl cameras include microphones. Check your local laws before enabling audio, as recording sound may be restricted in some areas.
Troubleshooting Common Issues
Even with careful installation, you might face some challenges. Here’s how to solve the most common problems.
No Video Signal
- Check all cable connections—unplug and replug each one.
- Try a different Video In port on the DVR.
- Test the camera with a shorter cable to rule out cable issues.
Camera Not Powering On
- Verify the power adapter is plugged in and working.
- Swap the power splitter port to test for a bad connection.
- Try powering the camera with a different adapter if available.
Poor Night Vision
- Clean the camera lens and infrared sensors.
- Make sure no objects are too close to the camera (which can reflect IR light).
- Check for spider webs or dust around the lens.
App Not Connecting
- Confirm the DVR is connected to the internet.
- Restart your router and DVR.
- Ensure your app and DVR firmware are up to date.
Dvr Not Recording
- Check recording schedule settings.
- Make sure the hard drive is installed and not full.
- Review motion settings if using motion-activated recording.
If issues persist, consult the Night Owl support site or user manual for advanced troubleshooting.
Tips For A Professional-quality Installation
Homeowners can achieve a clean, reliable setup with a few extra steps.
Use Conduit For Exposed Cables
Plastic or metal conduit protects cables from weather and tampering. It also makes your installation look more professional.
Label Everything
Label each cable at both ends. This makes future maintenance or upgrades much easier.
Test Each Camera Before Final Mounting
Connect each camera to the DVR before screwing it in place. This ensures the camera and cable both work, saving time if there’s a problem.
Keep A System Diagram
Draw a simple diagram showing each camera’s location and corresponding DVR port. Store it with your manual for quick reference.
Back Up Critical Footage
Night Owl DVRs let you export video clips to a USB drive. Regularly back up important footage in case the hard drive fails.
Maintaining Your Night Owl Security System
Routine care keeps your system running smoothly and extends its lifespan.
Clean Lenses And Housings
Dirt, cobwebs, and rain can blur images. Wipe lenses gently with a microfiber cloth every few months.
Check Connections
Every 6–12 months, inspect all cable connections for signs of wear or corrosion.
Update Firmware
Night Owl releases updates to improve performance and security. Check for updates in the DVR menu and apply as needed.
Test Cameras Regularly
Review footage from each camera once a month to confirm proper operation.
Replace Hard Drives As Needed
Security DVR hard drives usually last 3–5 years. If you notice missed recordings or errors, consider replacing the hard drive.
Comparing Night Owl Wired Cameras To Other Systems
How does Night Owl stack up against other leading brands? Here’s a quick side-by-side:
| Feature | Night Owl Wired | Swann Wired | Arlo Pro (Wireless) |
|---|---|---|---|
| Video Quality | 1080p–4K | 1080p–4K | 1080p–2K |
| Power Source | Wired | Wired | Battery |
| Storage | Local DVR | Local DVR | Cloud |
| Remote Viewing | Yes (App) | Yes (App) | Yes (App) |
| Installation | DIY (wiring required) | DIY/Professional | DIY (easy) |
| Monthly Fees | No (unless for cloud backup) | No (unless for cloud backup) | Yes (for most features) |
Night Owl wired systems offer a balance of cost, reliability, and privacy. They’re a strong choice if you want 24/7 recording and don’t mind running cables.
Common Mistakes To Avoid
Many first-time installers make similar errors. Here’s how to avoid them:
- Skipping the planning stage: Rushing into installation often leads to poor camera placement or cable issues.
- Mounting cameras too high or low: This can miss faces or allow tampering.
- Running cables where they’re exposed: Unprotected cables are easier to cut or damage.
- Forgetting to label cables: Troubleshooting is much harder later.
- Ignoring firmware updates: Outdated software may have security flaws.
- Not testing before finalizing: Always check camera views before tightening mounts or sealing holes.
Being aware of these mistakes helps you avoid frustration and ensures a more reliable system.
When To Call A Professional
DIY installation is achievable, but there are times when expert help is wise:
- Complex multi-story homes
- Hard-to-access attics or crawl spaces
- Uncertainty about electrical safety
- Desire for hidden wiring
A professional can complete installation faster and with less mess, though at a higher cost.
Real-world Example: Installing A 4-camera Night Owl Kit
Let’s look at a typical installation in a single-family home:
- Planning: Homeowner maps out camera locations (front door, back door, driveway, backyard).
- Running cables: Uses attic space to hide wires, with cables exiting near each mounting spot.
- Mounting: Screws cameras under eaves for weather protection.
- Connection: Runs all cables to a central hall closet where the DVR is installed.
- Setup: Follows on-screen prompts to set date/time, create password, and name each camera.
- App connection: Scans QR code to enable live viewing on smartphone.
- Testing: Walks in front of each camera to confirm recording and motion alerts.
Total install time: about 6 hours for a beginner, not including planning.

Credit: www.youtube.com
Frequently Asked Questions
How Many Cameras Can I Connect To My Night Owl Dvr?
Most Night Owl DVRs support 4, 8, or 16 cameras, depending on the model. Check your DVR’s specifications before adding more cameras. Mixing different camera models is possible, but video quality and features may vary.
Can I View My Night Owl Cameras From My Phone?
Yes. Download the Night Owl app, create an account, and link your system by scanning the QR code displayed on your DVR. You’ll need to connect the DVR to your home internet for remote viewing.
What Happens If My Internet Goes Out?
Your Night Owl wired system continues to record locally even if the internet is down. You won’t be able to view footage remotely, but all video is saved to the DVR hard drive for later review.
How Long Does The Dvr Store Video Footage?
Recording time depends on your hard drive size, number of cameras, and recording settings. For example, a 1TB hard drive can store about 2–3 weeks of 1080p motion-activated footage from four cameras. You can set the system to overwrite old footage automatically.
Where Can I Find More Technical Support For Night Owl Systems?
The official Night Owl support site offers manuals, troubleshooting guides, and live chat: Night Owl Support.
Securing your home or business with Night Owl wired security cameras is a practical step toward peace of mind. With careful planning, attention to detail, and the right tools, most DIYers can complete installation in a weekend. Remember, the extra effort during setup pays off in years of reliable protection for your property. If you ever need more advanced features or run into issues, resources like the CNET Security Guide can offer further tips and troubleshooting advice. Your investment in a quality system means you’re always one step ahead when it comes to safety.