
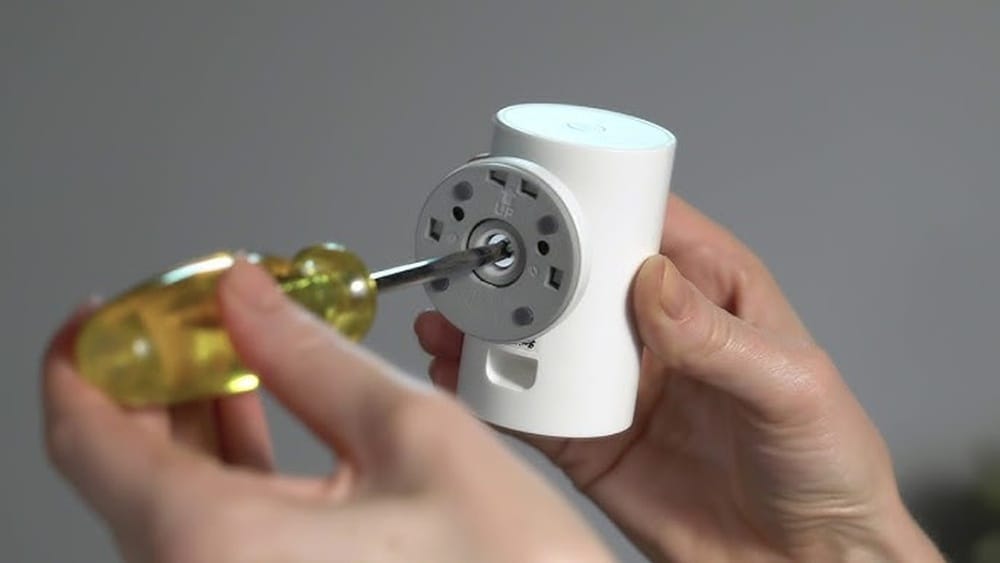
Installing a smart camera in your home can seem like a big task, especially if it’s your first time. The Ring Indoor Camera is a popular choice for people who want to keep an eye on their home, pets, or loved ones. It’s small, affordable, and easy to use, making it great for apartments or houses. But how do you actually set it up? If you’re not a tech expert, you may worry about things like Wi-Fi, app setup, or wiring. The good news: you don’t need to be a tech genius. With some clear steps and a little patience, you can get your camera running in less than 30 minutes. This guide will walk you through everything you need to know about installing a Ring Indoor Camera—no confusing jargon, just simple instructions and practical tips.
Understanding The Ring Indoor Camera
Before you start installation, it’s helpful to know what the Ring Indoor Camera can do. This device is designed for indoor use only. It’s compact, plugs into a standard outlet, and connects to your Wi-Fi. The camera streams live video to your phone or tablet through the Ring app. Some models include two-way talk, motion detection, and night vision.
Many people choose the Ring Indoor Camera because it’s easy to set up and works well with other Ring devices. You can add several cameras around your home and see them all in one app. You don’t need drilling or special tools for most installations, and the camera only needs a nearby power outlet.
Key Features
- 1080p HD video: Clear video, even in low light.
- Two-way audio: Talk to anyone near the camera through the app.
- Motion alerts: Get notifications if the camera detects movement.
- Night vision: See clearly, even in the dark.
- Compact design: Fits on shelves, counters, or can be mounted on a wall.
What’s In The Box?
When you open your Ring Indoor Camera package, you’ll find:
- Ring Indoor Camera
- Power adapter with cable
- Quick start guide
- Wall mounting bracket and screws (if you want to mount it)
- Security stickers
If any of these items are missing, contact Ring support before starting installation.
Planning Your Camera Placement
Choosing the right spot for your camera is one of the most important steps. The camera’s effectiveness depends on its field of view and Wi-Fi signal strength. Here’s what to consider:
Best Locations For Indoor Cameras
- Living Room or Main Entry: Watch who comes in and out.
- Hallways: Monitor movement between rooms.
- Nurseries or Kids’ Rooms: Keep an eye on children or babies.
- Home Office: Monitor valuable equipment or work areas.
- Garage or Basement Entrances: Extra security for less-used doors.
Avoid putting the camera directly across from windows. Sunlight can cause glare and affect video quality, especially during the day.
Factors To Consider
- Power Outlet Access: The camera needs to be plugged in at all times. Choose a spot near a standard wall socket.
- Wi-Fi Signal: Test your Wi-Fi in the location. Weak signals cause video lag or disconnects.
- Privacy: Aim the camera away from private areas, like bathrooms.
- Height: Placing the camera 6–7 feet off the ground usually gives a good view of the room.
Wi-fi Signal Strength
Your camera’s performance depends on a stable Wi-Fi connection. Place the camera within range of your router. If the signal is weak, consider moving your router closer or using a Wi-Fi extender.
Here’s a quick way to check signal strength using your phone:
- Stand where you want to put the camera.
- Open a website or stream a video.
- If it loads quickly, your Wi-Fi should be strong enough.
If you have trouble with Wi-Fi, Ring recommends at least 2 Mbps upload speed per camera.
Setting Up The Ring App
To control your Ring Indoor Camera, you need the Ring app. The app is free and works with most smartphones and tablets.
Downloading And Installing The App
- IOS (Apple devices): Go to the App Store and search for “Ring.”
- Android devices: Open Google Play and search for “Ring.”
Download and install the app. Create a Ring account if you don’t have one. You’ll need an email address and password. Remember these details—you’ll use them to log in on other devices, too.
Creating Your Account
- Open the app and tap “Create Account.”
- Enter your email and a strong password.
- Verify your email address (Ring will send you a link).
- Log in to the app.
Setting Up Two-factor Authentication
For extra security, Ring asks you to use two-factor authentication. This means you’ll get a code on your phone or email when you log in from a new device. It helps keep your account safe from hackers.
You can set this up in the app by following the prompts after you create your account.
Unboxing And Preparing The Camera
Open the package carefully. Take out the camera, cable, and any accessories. Remove all plastic coverings. Don’t plug in the camera yet.
Check For Damage
Look at the camera and power cable. Make sure there are no cracks or exposed wires. If you see damage, contact Ring support before you continue.
Connecting The Power Cable
Plug the power adapter into the camera. Make sure the connection is tight. Plug the other end into a wall outlet near where you want to set up the camera.
The camera should power up. You’ll see a small light on the front. This means it’s ready to connect.
Adding The Camera To The Ring App
Now it’s time to link your camera to your Ring account.
- Open the Ring app.
- Tap the menu (three lines in the top left).
- Tap “Set Up a Device.”
- Choose “Security Cams.”
- Use your phone’s camera to scan the QR code or MAC ID barcode on your Ring device (usually found on the camera or in the quick start guide).
- Follow the instructions in the app.
The app will guide you through naming your camera (like “Living Room” or “Hallway”) and connecting it to Wi-Fi.
Connecting To Wi-fi
When prompted, select your home Wi-Fi network from the list. Enter your Wi-Fi password. Wait for the app to confirm the connection.
If you see an error or the camera doesn’t connect:
- Double-check your Wi-Fi password.
- Move the camera closer to your router for setup.
- Restart your router if needed.
Naming Your Camera
Give your camera a name that makes sense. For example, “Front Hallway Camera” or “Kitchen Cam. ” This helps if you add more cameras later.
Placing And Mounting Your Camera
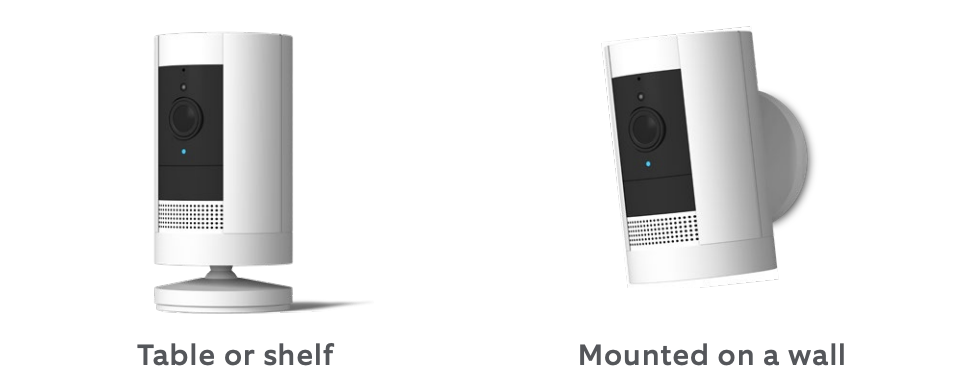
You can place your Ring Indoor Camera on any flat surface or mount it on a wall.
Placing On A Shelf Or Table
For most people, simply placing the camera on a shelf, countertop, or bookcase is enough. Make sure the lens faces the area you want to monitor. Avoid blocking the view with objects like plants or picture frames.
Mounting On A Wall
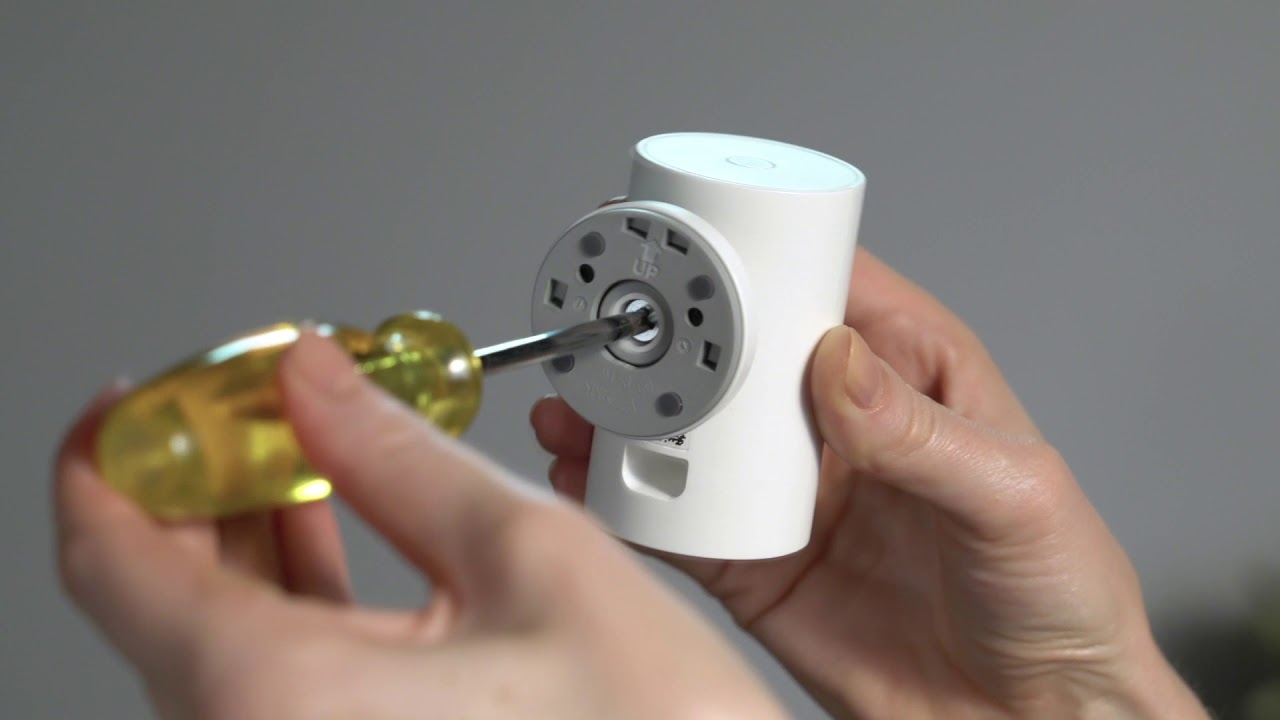
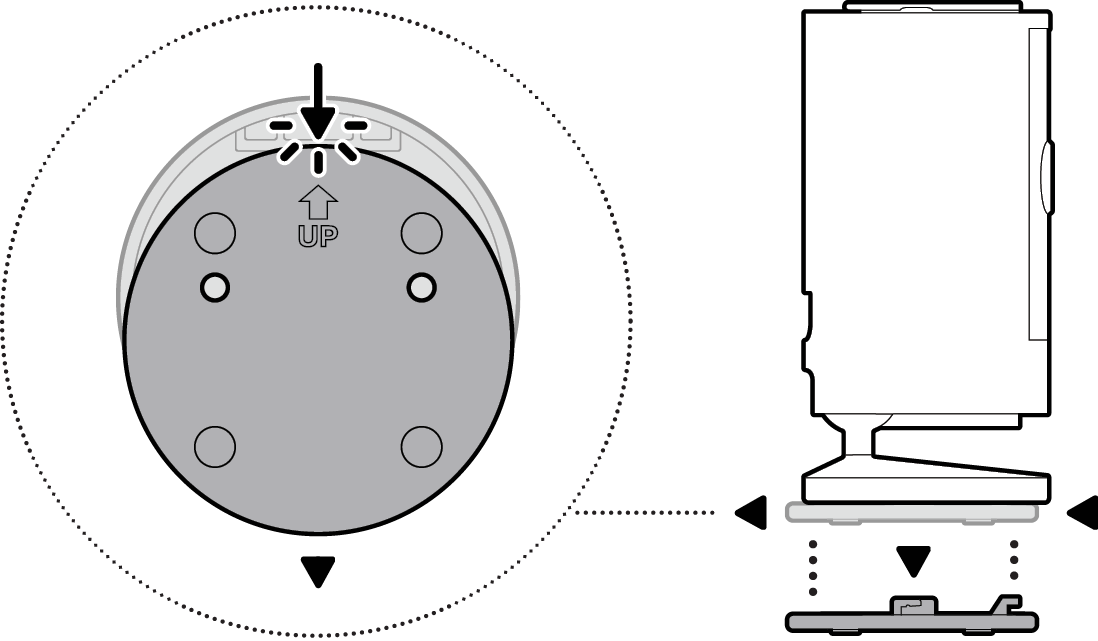
If you prefer to mount your camera, use the included bracket and screws.
Steps For Wall Mounting
- Hold the mounting bracket against the wall where you want the camera.
- Mark the spots for the screws with a pencil.
- Use a drill or screwdriver to insert the screws.
- Clip the camera into the bracket.
- Adjust the angle for the best view.
Tip: If you’re renting, you may want to use removable adhesive strips instead of screws. These won’t damage the wall but may not hold as securely.
Credit: www.youtube.com
Testing The Camera
Once the camera is in place and connected, test it to make sure everything works.
Checking Video Quality
Open the Ring app and tap on your camera. You should see a live video feed. Check for:
- Clear picture: Faces and objects should be easy to see.
- Smooth video: No long delays or freezing.
- Good coverage: The camera shows the area you want.
If the image is blurry or too dark, adjust the camera angle or move it to a better spot.
Testing Two-way Audio
Press the microphone icon in the app. Speak into your phone. You should hear your voice from the camera’s speaker. This feature is useful for talking to family, pets, or even warning off intruders.
Checking Motion Detection
Walk in front of the camera. You should get a notification on your phone within a few seconds. If you don’t, check the camera settings in the app.
Adjusting Camera Settings
The Ring app lets you customize how your camera works.
Motion Zones
You can set motion zones to control where the camera looks for movement. For example, you might want to ignore a busy hallway and only watch the door.
- Open the Ring app and select your camera.
- Go to “Device Settings.”
- Tap “Motion Settings.”
- Adjust the motion zone area by dragging the corners.
Motion Sensitivity
If you get too many alerts, lower the sensitivity. If you miss important events, increase it.
Notifications
Choose when you want to get alerts. You can turn off notifications at night or during certain hours.
Privacy Settings
If you want to block out parts of the view (like a neighbor’s window), use the privacy zones feature. This blacks out parts of the video feed.
Comparing Ring Indoor Camera To Other Indoor Cameras
If you’re wondering how the Ring Indoor Camera stacks up, here’s a quick comparison with two popular competitors: Wyze Cam v3 and Google Nest Cam Indoor.
| Feature | Ring Indoor Camera | Wyze Cam v3 | Google Nest Cam Indoor |
|---|---|---|---|
| Video Quality | 1080p HD | 1080p HD | 1080p HD |
| Two-Way Audio | Yes | Yes | Yes |
| Night Vision | Yes | Yes (color) | Yes |
| Works with Alexa | Yes | Yes | Yes |
| Cloud Storage | Paid subscription | Free/paid options | Paid subscription |
| Price (2024) | ~$59 | ~$35 | ~$99 |
The Ring Indoor Camera is known for its easy setup and strong app, but competitors might offer extra features like free cloud storage or color night vision. Your choice depends on your needs and budget.
Common Problems And How To Fix Them
Even with a simple setup, you might run into issues. Here are some common problems and solutions:
Camera Won’t Connect To Wi-fi
- Make sure you’re using a 2.4GHz Wi-Fi network (Ring Indoor Camera does not support 5GHz networks).
- Check if the Wi-Fi password is correct.
- Move the camera closer to the router during setup.
- Restart your router and try again.
Video Is Blurry Or Laggy
- Check your internet speed. You need at least 2 Mbps upload for smooth video.
- Reduce the number of devices using Wi-Fi at the same time.
- Move your router or use a Wi-Fi extender.
Camera Doesn’t Detect Motion
- Adjust the motion zone settings in the app.
- Increase motion sensitivity.
- Make sure nothing is blocking the camera’s view.
Can’t Hear Audio
- Make sure your phone’s volume is up.
- Check audio settings in the Ring app.
- Restart the camera by unplugging it for 10 seconds.
Camera Keeps Disconnecting
- Weak Wi-Fi is the most common cause. Move the camera or improve your Wi-Fi.
- Make sure the power cable is firmly connected.
Tips For A Smooth Installation
Here are some extra tips to make your installation go smoothly:
- Test before final placement: Plug in the camera and test video and audio before mounting it.
- Label your camera locations: If you have several cameras, label each in the app for easy management.
- Use strong passwords: Protect your Ring account with a strong, unique password.
- Check for updates: The Ring app and camera firmware should be up to date for best performance.
- Plan for privacy: Let guests know cameras are in use, and always respect privacy laws.
Integrating With Other Smart Devices
The Ring Indoor Camera works well with other smart home devices. You can connect it to Amazon Alexa. For example, you can say, “Alexa, show me the living room camera,” and watch live video on an Echo Show or Fire TV.
You can also set up routines. For example, when you say, “Alexa, good night,” you can turn off the lights and arm your Ring cameras at the same time.
Some advanced users connect Ring with third-party services using IFTTT (If This Then That) for even more automation.
Here’s a comparison of smart integrations:
| Smart Assistant | Ring Indoor Camera | Wyze Cam v3 | Google Nest Cam Indoor |
|---|---|---|---|
| Amazon Alexa | Full support | Full support | Full support |
| Google Assistant | Limited support | Full support | Full support |
| Apple HomeKit | No | No | No |
| IFTTT | Limited | Yes | Limited |
Credit: ring.com
Understanding Ring Protect Plans
The Ring Indoor Camera works without a subscription, but you’ll need a Ring Protect Plan for extra features like video recording and sharing.
Protect Plan Options
- Basic: Covers one camera. Save and share videos for up to 180 days. Costs about $4 per month.
- Plus: Covers all Ring devices at one address. Includes extended warranties. Costs about $10 per month.
- Pro: Adds extra features like 24/7 professional monitoring (for Ring Alarm systems).
If you don’t have a plan, you can still get live video and motion alerts, but you can’t save or share recordings.
Is A Subscription Worth It?
If you want to review events later or share clips with family, a plan is useful. Without it, you only see live video.
Here’s a quick breakdown:
| Feature | No Plan | Protect Basic | Protect Plus |
|---|---|---|---|
| Live View | Yes | Yes | Yes |
| Motion Alerts | Yes | Yes | Yes |
| Video Recording | No | Yes | Yes |
| Video Sharing | No | Yes | Yes |
| Extended Warranty | No | No | Yes |
Security And Privacy Considerations
Smart cameras bring convenience, but you should think about privacy and security. Here are some ways to keep your data safe:
- Change default passwords: Use a unique password for your Ring account.
- Enable two-factor authentication: Adds an extra layer of protection.
- Update regularly: Keep your camera and app updated to fix security flaws.
- Review shared devices: Only share camera access with trusted family or friends.
- Use privacy zones: Block parts of the camera view if needed.
For extra information, the Electronic Frontier Foundation offers a helpful guide on smart home privacy: EFF Guide.
Two Insights Most Beginners Miss
- Placement affects motion alerts more than you think. Many new users put their camera facing windows or busy streets. This causes lots of false alerts from cars or people outside. Angling the camera slightly away from windows and towards the main area you want to monitor reduces unwanted notifications.
- Power interruptions can reset settings. If your camera often loses power (for example, from using a loose extension cord), it might disconnect or require setup again. Always use a reliable power outlet and avoid unplugging the camera unless necessary.
Maintenance And Troubleshooting
The Ring Indoor Camera is low-maintenance, but a few quick habits keep it running well:
- Dust the lens every few weeks for clear video.
- Test motion alerts monthly to confirm everything works.
- Check app notifications regularly to avoid missing important events.
- Restart the camera if you notice lag or disconnects—just unplug for 10 seconds and plug back in.
- Review video storage if you have a Protect Plan, to avoid running out of space or missing important events.
If you run into persistent problems, Ring customer support is available by chat, phone, or email.
Credit: ring.com
Frequently Asked Questions
How Long Does It Take To Install A Ring Indoor Camera?
Most people can set up the camera in 15–30 minutes. If you have strong Wi-Fi and follow the app steps, it’s quick and simple. Mounting on a wall may take a few minutes longer.
Does The Ring Indoor Camera Work Without Wi-fi?
No, the camera needs a Wi-Fi connection to stream video and send alerts. Without Wi-Fi, you can’t use live view, get notifications, or record video.
Can I Use The Ring Indoor Camera Outdoors?
The Ring Indoor Camera is designed for indoor use only. It’s not weatherproof and could be damaged by rain, humidity, or extreme temperatures. For outdoor areas, choose a Ring Outdoor Camera.
What Happens If My Wi-fi Goes Down?
If Wi-Fi disconnects, the camera won’t send alerts or record video. When Wi-Fi returns, it will reconnect automatically. You don’t need to set it up again unless there’s a power loss or major router change.
Can I Use Multiple Ring Indoor Cameras In One Home?
Yes. The Ring app lets you add and monitor multiple cameras. Each camera can have its own name and settings. You can view all cameras live in the app at any time.
Setting up a Ring Indoor Camera is an easy way to boost your home’s security and peace of mind. By following these steps, you’ll get the most out of your device—whether you’re keeping an eye on your pets, family, or valuables.
Remember to check your Wi-Fi, keep your app updated, and choose the best spot for your camera. With a bit of planning, you’ll have reliable video monitoring in no time.