
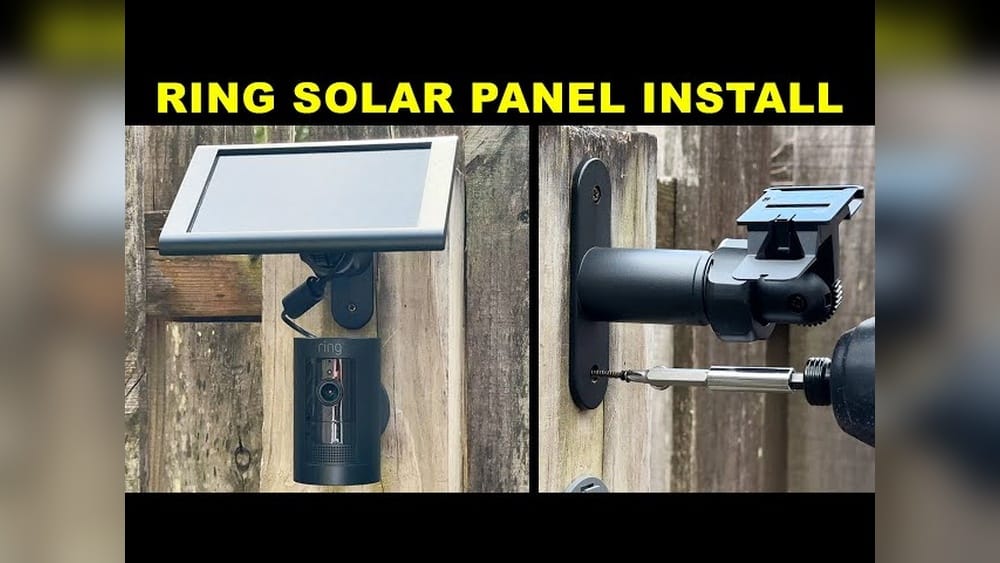
Installing a Ring security camera with a solar panel is a smart way to protect your home while using clean energy. Many homeowners want to avoid running wires or worrying about battery changes. A solar-powered Ring camera offers flexibility and peace of mind, but the installation process can seem confusing at first.
This guide will show you everything you need to know, from choosing the right location to connecting your devices and keeping them running smoothly.
You’ll learn step-by-step instructions, practical tips, and solutions to common problems. This article is designed for beginners who want clear guidance without technical jargon. By the end, you’ll feel confident installing your Ring camera with a solar panel, and you’ll understand how to keep your system working reliably for years.
Why Choose A Ring Security Camera With Solar Panel?
Ring cameras are popular because they’re easy to use, connect to your smartphone, and offer features like HD video and motion alerts. But many people worry about battery life or the hassle of wiring. Adding a solar panel solves these problems.
Benefits Of Solar-powered Ring Cameras
- Continuous Power: The camera stays charged using sunlight. You don’t need to replace batteries as often.
- Easy Installation: No need for electrical wiring. Place the camera anywhere with enough sunlight.
- Eco-Friendly: Solar panels use renewable energy, which reduces your carbon footprint.
- Cost Savings: Over time, you save on battery replacements and electricity bills.
Real-life Example
Sarah installed a Ring Stick Up Cam with a solar panel in her backyard. She lives in Texas, where there’s plenty of sun. After 6 months, she noticed her camera never lost power, even during cloudy days. She didn’t have to climb a ladder to change the battery, and the camera sent alerts to her phone whenever someone walked near her gate.
Choosing The Right Ring Camera Model
Not every Ring camera can use a solar panel. Models like the Ring Stick Up Cam and Ring Spotlight Cam are designed for solar compatibility. Before buying, check the product details to confirm solar support.
What You Need Before Installation
Before starting, gather the necessary tools and devices. This prevents delays and makes the process smoother.
Required Devices
- Ring security camera (solar-compatible model)
- Ring solar panel
- Mounting brackets (usually included)
- Screws and wall anchors
- Screwdriver or drill
- Smartphone with Ring app installed
- Wi-Fi network
Optional Tools
- Ladder (for high placements)
- Level (to make sure mounts are straight)
- Cable clips or ties (to keep wires neat)
Safety Precautions
- Always check for overhead wires or obstacles before using a ladder.
- Wear gloves if installing on rough surfaces.
- If mounting to brick or concrete, use the correct wall anchors.
How To Choose The Best Location
Picking the right spot is crucial for both the camera and the solar panel. Your camera needs a clear view, and your solar panel needs sunlight.
Camera Placement Tips
- Height: Place the camera 6–8 feet above ground. This gives a good view and keeps it out of reach.
- Angle: Aim the camera toward entry points, like doors or gates. Avoid pointing at windows to reduce glare.
- Wi-Fi Signal: Make sure the spot has a strong Wi-Fi signal. Test using your phone.
Solar Panel Placement Tips
- Sunlight: The panel should get direct sunlight for at least 3–4 hours each day. Face it south if you’re in the US.
- Distance: Keep the solar panel within 6–12 feet of the camera. The cable length is limited.
- Shade: Avoid placing the panel under trees or eaves.
Common Mistake
Many beginners mount the solar panel on the north side of the house. This gets less sun and can cause charging problems. Always check which side gets the most sunlight before installing.
Step-by-step Installation Guide
This section will walk you through the whole process, from mounting to connecting your devices.
1. Unbox And Check Your Devices
Open your Ring camera and solar panel packages. Confirm you have all parts. Read the instructions to understand the components.
2. Assemble The Camera Mount
Most Ring cameras come with a mounting bracket. Use the bracket to attach the camera to your wall, fence, or eave.
- Hold the bracket against the surface.
- Mark screw holes with a pencil.
- Use a drill or screwdriver to insert screws.
- If mounting on brick, use masonry anchors.
3. Mount The Camera
Snap the camera onto the bracket. Adjust the angle for the best coverage. Use a level if needed.
4. Install The Solar Panel
- Choose a spot with good sunlight.
- Mark screw holes.
- Secure the mounting bracket with screws.
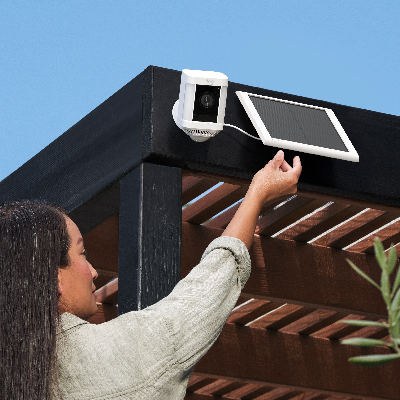
- Attach the panel and adjust the angle toward the sun.
5. Connect The Solar Panel To The Camera
- Plug the solar panel’s cable into the camera’s power port.
- Use cable clips to secure the wire along the wall or fence.
- Check the connection by gently pulling the cable—make sure it’s snug.
6. Set Up The Camera In The Ring App
- Open the Ring app on your smartphone.
- Tap “Set Up a Device.”
- Follow the prompts to connect your camera to Wi-Fi.
- Check the live view to ensure proper placement.
7. Test The System
- Walk in front of the camera to trigger motion alerts.
- Check the app to see if the solar panel is charging.
- Adjust angles if needed.
Example Of Installation Time
Most homeowners finish installation in 30–60 minutes, depending on the surface and placement.
Comparison: Battery Vs Solar-powered Ring Cameras
Some people wonder if a solar panel is worth the effort. Here’s a quick comparison to help you decide.
| Feature | Battery-Powered | Solar-Powered |
|---|---|---|
| Power Source | Rechargeable battery | Sunlight via solar panel |
| Maintenance | Frequent battery changes | Rare battery changes |
| Placement Flexibility | Limited by battery life | Unlimited (if sun available) |
| Cost | Lower upfront | Higher upfront, lower over time |
| Eco-Friendliness | Low | High |
Solar Panel Performance: What To Expect
Solar panels work best in sunny areas, but even in cloudy regions, they can provide enough power. Here are some stats and tips.
Typical Output
- Ring solar panels generate 2–4 watts per hour in direct sunlight.
- This is enough to keep most cameras charged, even with regular motion alerts.
Cloudy Days
- Panels may produce less energy on cloudy days, but Ring cameras have backup batteries.
- In winter, tilt the panel more vertically to catch the low sun.
Example Data
A Ring Spotlight Cam uses about 1–2 watts per hour when idle, and slightly more during recording. With 3–4 hours of sunlight daily, the solar panel can easily keep up.
| Month | Average Sunlight (hrs/day) | Solar Output (watts/day) | Camera Battery Status |
|---|---|---|---|
| June | 6 | 24 | Fully Charged |
| December | 3 | 12 | Charged, may drop slightly |

Credit: www.youtube.com
Common Installation Mistakes And How To Avoid Them
Even with clear instructions, some mistakes are easy to make. Here are the most common problems and how to fix them.
1. Poor Sunlight Exposure
If your solar panel isn’t getting enough sun, your camera battery may drain. Place the panel where it gets midday sun, and avoid shade.
2. Loose Connections
If the cable isn’t fully plugged in, the camera won’t charge. Always check the connection after installation.
3. Ignoring Wi-fi Strength
A weak Wi-Fi signal causes delays or missed alerts. Test your signal before mounting. Use a Wi-Fi extender if needed.
4. Not Using Correct Anchors
If you mount the camera or solar panel on brick, use masonry anchors. Screws alone may loosen over time.
5. Overlooking App Setup
Many people forget to finish setup in the Ring app. Follow all prompts to activate your camera and link it to your account.
Advanced Installation Tips
For users who want the best performance, these tips can help maximize your system.
Solar Panel Angle
Adjust the panel to face the sun’s path. In the US, south-facing is best. In winter, tilt the panel upward to catch lower sun angles.
Cable Management
Use cable clips or ties to secure the wire. This prevents damage from wind or pets.
Multiple Cameras
If you want to install several cameras, keep each solar panel separate. Don’t try to power two cameras with one panel.
Regular Maintenance
- Clean the solar panel monthly to remove dust.
- Check mounts and connections every few months.
- Update the Ring app for new features.
Troubleshooting: When Things Go Wrong
Sometimes, problems happen after installation. Here’s how to fix common issues.
Camera Not Charging
- Check the solar panel’s sunlight exposure.
- Inspect the cable for damage.
- Make sure the port is clean and free from debris.
Battery Drains Quickly
- Reduce motion sensitivity in the Ring app.
- Check for frequent triggers—like moving trees or cars.
- Clean the solar panel to improve charging.
Weak Wi-fi Signal
- Move the router closer to the camera.
- Use a Wi-Fi extender.
- Avoid mounting behind thick walls.
App Not Showing Solar Status
- Update the Ring app.
- Restart your phone.
- Reconnect the camera to Wi-Fi.
Cost Analysis: Is It Worth The Investment?
Many buyers wonder if a solar panel is worth the extra money. Here’s a quick breakdown.
Upfront Costs
- Ring Stick Up Cam: $99–$149
- Ring Solar Panel: $49–$69
- Total: $148–$218
Battery Replacement Costs
A Ring camera battery costs $29–$35. If you change batteries 2–3 times per year, it adds up.
Long-term Savings
Solar panels last 5–10 years. Over that time, you save on battery replacements and electricity.
| Year | Batteries Replaced (Without Solar) | Cost Saved (With Solar) |
|---|---|---|
| 1 | 3 | $90 |
| 5 | 15 | $450 |
| 10 | 30 | $900 |
Non-obvious Insight
Some users don’t realize that a solar panel also extends battery life even if it doesn’t fully charge the camera every day. It reduces stress on the battery, so it lasts longer.
How To Maintain Your Ring Camera And Solar Panel
Keeping your system running is easy, but regular care is important.
Cleaning
Dust and dirt on the solar panel can block sunlight. Wipe the panel with a damp cloth once a month.
Checking Connections
Weather can loosen screws and cables. Inspect your mounts and wires every few months.
Software Updates
Ring releases app updates with new features and security patches. Enable automatic updates on your phone.
Battery Health
Even with solar, check your camera’s battery level in the app. Replace the battery if it shows signs of wear.
Seasonal Adjustments
In winter, adjust the solar panel angle to catch lower sun. In summer, tilt it to avoid overheating.
Real-world User Experiences
Thousands of homeowners use Ring cameras with solar panels. Here are a few examples.
John’s Experience
John installed a Ring Spotlight Cam with a solar panel in California. He noticed that even with heavy use (20–30 motion alerts per day), his camera stayed charged. He cleaned the panel every month and checked the app weekly. After one year, he never had to change the battery.
Maria’s Experience
Maria lives in Ohio, where winters are cloudy. She found that her solar panel kept her camera running most of the time, but during long cloudy periods, she had to recharge the battery once every few months. She adjusted the panel angle each season for better results.
Non-obvious Insight
Some users found that placing the camera near a white wall improves video quality at night. The wall reflects infrared light, making faces clearer in the dark.

Credit: www.newcarncc.com
Comparing Ring Solar Panels To Other Brands
If you’re considering alternatives, it helps to see how Ring panels stack up against others.
| Brand | Power Output | Warranty | Compatibility |
|---|---|---|---|
| Ring | 2–4 watts | 1 year | Ring cameras only |
| Wasserstein | 3–5 watts | 2 years | Ring, Arlo, Nest |
| Arlo | 2–3 watts | 1 year | Arlo cameras |
Ring panels are designed specifically for Ring cameras, ensuring easy setup and reliable performance. Wasserstein offers more compatibility, but may require adapters.
Should You Hire A Professional?
Many people install Ring cameras themselves, but some prefer to hire a pro.
When To Diy
- If you’re comfortable with basic tools
- If you have easy access to the mounting location
- If you understand the app setup
When To Hire A Pro
- If mounting on high walls or roofs
- If your home has complex wiring or thick walls
- If you want a neat, professional finish
Professional installation usually costs $100–$200. Always ask for experience with Ring products.
Credit: trisummit.ca
Environmental Impact
Solar panels help reduce your home’s energy use. According to the US Department of Energy, using solar reduces greenhouse gases by up to 80% compared to grid power for small devices.
By using a Ring camera with a solar panel, you contribute to a cleaner environment and set a good example for your community.
How To Upgrade Or Expand Your System
After installing your first camera, you may want to add more devices.
Adding More Cameras
- Use the Ring app to link new cameras.
- Each camera needs its own solar panel.
- Choose locations with good sunlight and Wi-Fi.
Expanding With Other Ring Devices
Ring offers doorbells, floodlights, and alarms. All connect to the app for easy control.
Integrating With Smart Home Systems
Ring cameras work with Amazon Alexa. You can view camera feeds on Echo Show or control settings with voice commands.
Frequently Asked Questions
How Much Sunlight Does The Ring Solar Panel Need Daily?
The Ring solar panel needs at least 3–4 hours of direct sunlight per day to keep your camera charged. More sunlight is better, but most panels can handle cloudy days as long as there are sunny periods during the week.
Can I Use One Solar Panel For Multiple Ring Cameras?
No, each Ring camera should have its own solar panel. Sharing panels can cause charging issues and reduce performance.
What Happens If The Battery Drains During Cloudy Weather?
Your camera will use its internal battery if the solar panel doesn’t supply enough power. If the battery drops too low, you’ll need to recharge it manually. This is rare in sunny climates but can happen in winter.
Is The Ring Solar Panel Weatherproof?
Yes, Ring solar panels are weatherproof. They can withstand rain, snow, and normal outdoor conditions. For extreme weather, check the mounts and cable connections regularly.
Where Can I Find More Detailed Installation Videos?
Ring offers official installation videos and guides. Visit their Ring Support page for step-by-step tutorials and troubleshooting.
Installing a Ring security camera with a solar panel is a straightforward project that offers lasting benefits. With careful planning and proper placement, your camera will stay charged and ready to protect your home. Solar power makes the system more reliable, cost-effective, and eco-friendly.
Whether you’re a beginner or a tech enthusiast, following these steps will help you enjoy a secure, energy-efficient home for years to come.