
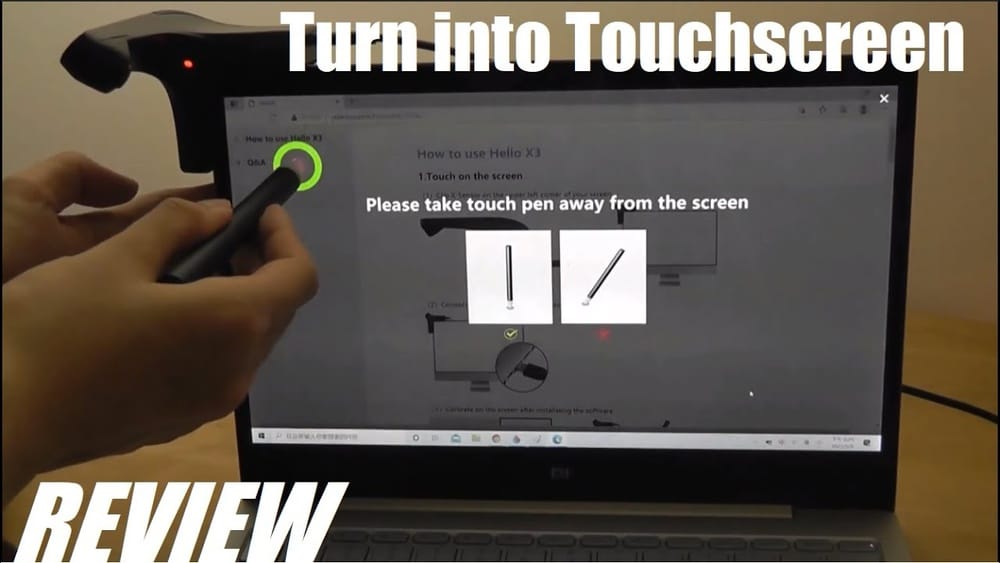
Building a touch screen panel yourself can be both exciting and challenging. With touch screens found everywhere—from smartphones to ATMs—they seem almost magical. But under the glass, the science is clear and fascinating. If you’ve ever wondered how to make a touch screen panel, this guide explains every step, from basic concepts to final assembly.
You’ll see what’s needed, understand the inner workings, and avoid common mistakes. By the end, you’ll have the knowledge to build your own basic touch screen and see how professionals create the interfaces we use every day.
Understanding Touch Screen Technology
Before you start making a touch screen panel, it’s important to know how these devices work. A touch screen is more than just a display; it’s an input device that senses physical touch and translates it into commands. There are several types, but the two most common are resistive and capacitive touch screens.
How Touch Screens Detect Touch
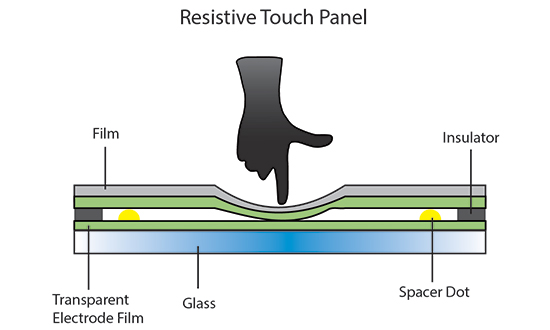
- Resistive touch screens have two flexible layers with a small gap. When you press, the layers touch and change the electrical current at that point.
- Capacitive touch screens use a glass panel coated with a special material. When a finger touches the screen, it changes the electrical charge, which the device senses.
Both methods allow the system to know where you touched. Capacitive screens are more common in modern devices because they allow multi-touch gestures and are more durable.
Touch Screen Panel Components
A typical touch screen panel consists of:
- Touch-sensitive surface (usually glass or plastic)
- Transparent conductive coating
- Controller circuit
- Display unit (LCD/OLED, optional for DIY projects)
- Connection interface (to microcontroller or computer)
Each part is important for accurate touch sensing and display.
Gathering Parts And Tools
To make a basic touch screen panel, you’ll need specific materials and equipment. The exact items depend on the type of touch screen you want to build. Here’s a list for a simple DIY resistive touch screen.
Materials
- Two sheets of transparent plastic (e.g., PET or polycarbonate, around 1mm thick)
- ITO (Indium Tin Oxide) coating or pre-coated ITO plastic sheets
- Conductive adhesive tape
- Spacer dots or thin insulating tape
- Microcontroller (such as Arduino or Raspberry Pi)
- Wires for connections
- Transparent glue
- Protective film or glass cover (optional)
Tools
- Precision cutter or scissors
- Soldering iron and solder
- Multimeter
- Tweezers
- Clean room wipes or soft cloth
If you’re making a capacitive panel, the process is more complex and usually requires special equipment to deposit ITO or other conductive coatings.
Where To Source Materials
- Online electronics suppliers (e.g., Digi-Key, Mouser)
- DIY electronics kits
- Recycling old devices (old tablets or monitors often use resistive touch sheets you can experiment with)
The Science Behind Touch Screens
Understanding the science helps you troubleshoot and improve your design. Let’s compare the two most common types:
| Feature | Resistive Touch Screen | Capacitive Touch Screen |
|---|---|---|
| How it works | Two layers touch to change resistance | Finger changes electrical charge |
| Input Type | Finger, stylus, glove | Conductive object (usually finger) |
| Durability | Can wear out over time | Highly durable |
| Cost | Lower | Higher |
| Multi-touch | Limited | Yes |
| Clarity | Lower due to layers | Higher |
Most DIY builders start with resistive panels because they are easier to make and require less advanced materials.
Designing The Touch Panel Layout
Before cutting or assembling anything, plan your touch panel’s size, shape, and interface points. Small mistakes here can affect accuracy and reliability.
Key Design Choices
- Size: Choose a size that matches your display or project needs (e.g., 4 inches for handheld, 7+ inches for tablets).
- Aspect ratio: Match the display’s ratio for best appearance.
- Touch area: Leave a small border for connections and mounting.
- Connection points: Plan where wires will attach so they don’t block the screen.
Draw your design on paper or use free CAD software for more precision.
Non-obvious Insight: Spacer Dot Placement
Many beginners overlook spacer dots—tiny insulating bits that keep the two plastic layers apart until pressed. If you don’t use enough or place them poorly, the screen may trigger “phantom touches.” Even spacing is critical for accurate sensing.
Building The Resistive Touch Screen Panel
With your plan ready, you can start the assembly. Follow these steps carefully for a reliable result.
Step 1: Prepare The Plastic Sheets
- Cut two identical pieces of transparent plastic to your chosen size.
- Clean both sides with a lint-free cloth. Dust or fingerprints can affect touch sensitivity.
Step 2: Apply The Conductive Layer
If your sheets are not pre-coated, you must add a transparent conductive layer (ITO is standard, but expensive). For DIY, you can use conductive ink or order ITO-coated plastic online.
- Apply the coating evenly on one side of each sheet.
- Let it dry in a clean environment.
Step 3: Add Spacer Dots
- Place small dots (using insulating tape or glue) across one conductive surface.
- Space them every 1–2 cm for panels under 7 inches.
- Dots should be just high enough to keep the layers separated but allow contact when pressed.
Step 4: Attach Conductive Strips
- At the edges of each sheet, attach thin strips of conductive tape to create electrical contacts.
- On one sheet, place strips along the top and bottom; on the other, along the left and right sides.
- These will connect to your microcontroller.
Step 5: Stack And Seal
- Stack the two sheets with the conductive sides facing each other.
- Align them carefully.
- Seal the edges with transparent glue, leaving a small gap for wires.
Step 6: Connect Wires
- Solder wires to each conductive strip.
- Use color-coded wires to avoid confusion.
- Route wires to your controller board.
Step 7: Add Protective Layer
- Optional: Place a thin protective glass or plastic layer on top for strength.
Step 8: Test For Continuity
- Use a multimeter to check connections.
- Gently press different spots; the multimeter should show changes in resistance.
Connecting The Panel To A Microcontroller
After building the physical panel, it’s time to connect it to a computer or microcontroller to read touch inputs.
Popular Microcontrollers
- Arduino Uno
- Raspberry Pi
- ESP32
For most DIY projects, Arduino is easiest.
Wiring The Panel
- Top and bottom wires go to analog input pins.
- Left and right wires go to another set of analog pins.
You will use the microcontroller to measure voltage changes when the screen is pressed.
Sample Arduino Wiring
- Connect four wires from your touch panel to Arduino analog pins (A0–A3).
- Use pull-down resistors if needed to stabilize readings.
- Power the Arduino from USB.
Non-obvious Insight: Avoiding Noise
Touch panels are sensitive to electrical noise. If your readings jump around, twist your wires together or shield them with aluminum foil connected to ground. This trick helps reduce interference and gives more accurate readings.
Writing The Touch Sensing Code
Now, you need a simple program to detect touches. Here’s how the logic works:
- Set top and bottom contacts as outputs (send voltage), sides as inputs (read voltage).
- Pressing the screen creates a voltage divider at the touch point.
- Read the analog value to get the Y coordinate.
- Swap roles (left/right as outputs, top/bottom as inputs) to get the X coordinate.
Example Arduino Code (simplified)
int top = A0;
int bottom = A1;
int left = A2;
int right = A3;
void setup() {
Serial.begin(9600);
}
void loop() {
// Measure Y
pinMode(top, OUTPUT);
pinMode(bottom, OUTPUT);
digitalWrite(top, HIGH);
digitalWrite(bottom, LOW);
pinMode(left, INPUT);
int y = analogRead(left);
// Measure X
pinMode(left, OUTPUT);
pinMode(right, OUTPUT);
digitalWrite(left, HIGH);
digitalWrite(right, LOW);
pinMode(top, INPUT);
int x = analogRead(top);
Serial.print("X: ");
Serial.print(x);
Serial.print(" Y: ");
Serial.println(y);
delay(100);
}
This code gives you X and Y coordinates when you press the screen. You can map these values to your display or project.
Calibrating Your Touch Screen
Calibration ensures your touch panel matches the actual display or control area. Without calibration, touches may be misaligned.
Calibration Steps
- Display a cross or dot at each corner of your screen.
- Touch each cross, record the X and Y values.
- Calculate scaling factors to map raw readings to pixel positions.
Practical Example
If your raw X values range from 200 to 800, and your screen is 0 to 480 pixels wide, use a formula:
screenX = (rawX - 200) * 480 / (800 - 200)
Do the same for Y. Most touch libraries offer built-in calibration, but understanding this process helps if you build your own code.
Non-obvious Insight: Temperature And Humidity Effects
Few beginners realize that temperature and humidity can affect resistive touch panels. High humidity can cause short circuits between layers, leading to false touches. If your panel acts strangely in some environments, sealing the edges with silicone or using a desiccant pack inside the frame can help.
Credit: www.epectec.com
Testing And Troubleshooting
Once assembled, you need to test your touch screen panel under real conditions.
Common Problems And Solutions
- No response: Check all wiring. Test each layer with a multimeter.
- Random touches: Check for dust, debris, or uneven spacer dots.
- Inaccurate reading: Re-run calibration. Check for warped sheets.
- Poor sensitivity: Ensure the conductive layers are not damaged or too thick.
Testing Tips
- Use a stylus and finger to test.
- Try different points across the screen.
- Log readings to see if there are dead spots or drift.
Improving Your Touch Panel
Basic panels work for simple projects, but you can improve them in several ways:
- Use better materials: Commercial ITO coatings are more sensitive and last longer.
- Add a display: Combine with an LCD or OLED for a full touch interface.
- Use a touch controller IC: Chips like the XPT2046 can improve speed and accuracy.
- Increase size: Larger panels need more evenly spaced spacer dots and strong support.
Capacitive Touch Panel: Advanced Diy
Building a capacitive touch panel at home is much harder. It requires:
- Glass substrate
- Transparent conductor (ITO or alternatives)
- Precise patterning (using photolithography or laser etching)
- Sensitive electronics (to detect small charge changes)
Most hobbyists use pre-made capacitive panels and connect them to controllers like the FT6206 or TTP223.
However, if you want to experiment:
- Try using copper tape to make a simple single-touch capacitive pad.
- Connect to an Arduino with a capacitive sensing library.
- Note: Multi-touch and gesture support require specialized chips and are hard to DIY.
Comparing Diy Touch Screens Vs. Commercial Panels
How does a homemade panel compare to what’s inside a smartphone or ATM? Here’s a summary:
| Feature | DIY Touch Panel | Commercial Touch Panel |
|---|---|---|
| Cost | $10–$50 (basic) | $30–$500+ |
| Durability | Moderate | High (tested for millions of touches) |
| Accuracy | Basic | High, supports multi-touch |
| Customization | High (any size or shape) | Limited (fixed models) |
| Ease of Repair | Easy | Difficult |
| Technology | Mainly resistive | Capacitive, projected capacitive, optical, etc. |
Safety And Handling Tips
Working with electronics and chemicals means safety comes first. Here’s how to avoid common risks:
- Wear gloves when handling ITO, chemicals, or solder.
- Work in a ventilated area if using conductive inks or adhesives.
- Keep food and drinks away from your workspace.
- Dispose of electronic waste properly.
Applications For Your Diy Touch Screen
Wondering what to do with your new panel? Here are some practical uses:
- Custom touch interfaces for Arduino or Raspberry Pi projects
- Educational demos—show how touch screens work in a classroom
- Interactive art installations
- Retrofit old devices (add touch to old monitors)
- Assistive technology (simple touch panels for accessibility)
Many hobbyists use touch screens to control robots, home automation, or even games.

Credit: www.amazon.com
Common Mistakes Beginners Make
If you’re building your first touch screen, watch out for these pitfalls:
- Skipping cleaning: Dust or fingerprints cause misreads and lower sensitivity.
- Poor alignment: If sheets are misaligned, touches won’t match the display.
- Weak connections: Solder joints must be solid. Loose wires cause intermittent failures.
- No calibration: Always calibrate after assembly.
- Ignoring environmental factors: Humidity, static, and heat can change performance.
Learning from these mistakes can save hours of frustration.
The Future Of Touch Screen Panels
Touch technology keeps advancing. Today’s projected capacitive touch supports gestures, pressure sensing, and even works under water or with gloves. New materials like graphene and innovations in flexible electronics may soon make touch screens even cheaper and more versatile.
For now, making your own panel is a great way to learn the basics and appreciate the technology in your pocket.
Useful Resources
If you want to go deeper, there are excellent guides, videos, and open-source projects online. For further reading on the history and science of touch screens, see the Wikipedia touchscreen article.
Frequently Asked Questions
What Is The Easiest Touch Screen To Make At Home?
A resistive touch screen is the simplest to build for beginners. It only requires two conductive plastic sheets, some spacer dots, and basic wiring. You don’t need expensive equipment or advanced chemicals.
Can I Use A Diy Touch Panel With Any Display?
Yes, as long as your touch panel matches the size and aspect ratio of your display. You may need to calibrate the coordinates so touches align with the screen image. For best results, use a display and touch panel of similar dimensions.
How Do I Make A Multi-touch Panel At Home?
Building a true multi-touch panel is very complex. It requires a capacitive grid and advanced electronics. Most DIY builders use single-touch resistive panels. For multi-touch, consider buying a pre-made capacitive panel with controller.
Is It Possible To Repair A Broken Touch Screen?
Small issues, like loose wires or dirty contacts, can be repaired. However, cracked glass or damaged conductive layers are hard to fix. For DIY panels, you can usually replace the damaged sheet or reapply conductive ink.
What Are The Main Advantages Of Making My Own Touch Panel?
You can customize size and shape, learn about electronics, and create unique devices. It’s also cheaper for simple projects and helps you understand the technology. However, don’t expect the same durability or features as commercial products.
Building a touch screen panel from scratch is a rewarding way to explore the intersection of electronics, materials science, and user interface design. With clear steps and a careful approach, you can create your own interactive surfaces and join the community of makers pushing technology forward.
Credit: www.youtube.com