
Mounting a ceiling fan can completely change the feel of a room. It’s not only about style—it’s about comfort, energy savings, and even air quality. Many people think installing a ceiling fan is complicated, but with the right guidance, it’s a task most homeowners can tackle in an afternoon.
In this guide, you’ll learn everything you need to know to mount a ceiling fan safely and effectively, whether you’re replacing an old fixture or adding a fan for the first time.
We’ll cover all the practical steps, safety tips, and the little details that make the difference between a wobbly, noisy fan and a smooth, reliable one. Along the way, you’ll find insights even experienced DIYers sometimes miss, plus clear explanations for beginners.
By the end, you’ll feel confident tackling your own ceiling fan installation.
Why Install A Ceiling Fan?
Ceiling fans do more than just move air. They’re a smart addition to almost any room for several reasons:
- Energy savings: A ceiling fan can make a room feel up to 8°F cooler, letting you raise your thermostat and cut summer AC bills by up to 40%.
- Year-round comfort: Many fans have a reverse mode for winter, pushing warm air down from the ceiling and reducing heating costs by up to 10%.
- Style and lighting: Modern fans come in a variety of designs and often include integrated lights, making them a two-in-one upgrade.
- Air quality: Fans keep air circulating, which can help prevent mold and keep rooms fresher.
The most common mistake people make is choosing the wrong fan size or mounting it incorrectly, leading to poor performance, wobble, or even safety hazards. This guide will help you avoid those pitfalls.
Tools And Materials You’ll Need
Preparation is key. Before you start, gather these items:
Tools:
- Screwdriver set (including Phillips and flat-head)
- Adjustable wrench or pliers
- Wire stripper/cutter
- Voltage tester
- Drill and drill bits
- Step ladder (tall enough for your ceiling)
- Measuring tape
- Stud finder (optional but helpful)
- Safety glasses
Materials:
- Ceiling fan kit (with mounting bracket, downrod, hardware, blades, and light kit if included)
- UL-rated ceiling fan box (if replacing a light fixture box)
- Wire connectors (wire nuts)
- Electrical tape
- Extra wood screws (sometimes included, but good to have)
- Support brace (for heavy fans or old ceilings)
Safety tip: Always turn off power at the circuit breaker before starting. Never trust a light switch alone.
Choosing The Right Ceiling Fan
Not all ceiling fans are the same. Picking the right one for your space ensures quiet operation, good airflow, and a safe installation.
Fan Size And Room Dimensions
Use these guidelines to match fan size to your room:
| Room Size (sq ft) | Recommended Fan Blade Span |
|---|---|
| Up to 75 | 29–36 inches |
| 76–144 | 36–42 inches |
| 145–225 | 44–50 inches |
| 226–400 | 50–54 inches |
Pro tip: Bigger isn’t always better. Oversized fans can wobble and create drafts in small rooms.
Mounting Type
- Standard mount: For ceilings 8–10 feet high, with a short downrod.
- Flush mount (hugger): For low ceilings (less than 8 feet).
- Angled mount: For vaulted or sloped ceilings (special kit may be needed).
Other Features To Consider
- Light kit: Needed if you want to use the fan as a room light.
- Remote control: Helpful for high ceilings or convenience.
- Damp/wet rating: For patios or bathrooms, choose a UL damp- or wet-rated fan.
Common mistake: Not checking the ceiling box. It must be rated for ceiling fans (not just light fixtures) or it may not support the weight and movement.
Checking And Replacing The Ceiling Electrical Box
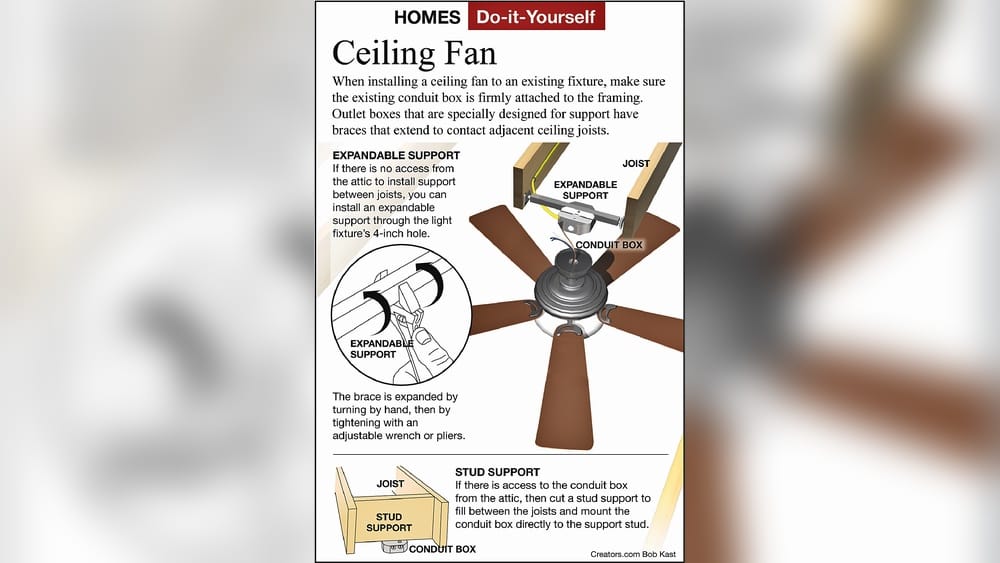
Before mounting your fan, the electrical box in your ceiling must be strong enough to support the fan’s weight and movement. Standard light fixture boxes are often too weak.
- Turn off power at the breaker and test wires with a voltage tester.
- Remove your old light fixture.
- Inspect the box. It should be metal or heavy-duty plastic, marked “For ceiling fan support.”
- If not, replace it with a UL-rated fan box or install a fan brace.
Here’s a quick comparison of box types:
| Box Type | Use For | Support Weight |
|---|---|---|
| Plastic, not fan-rated | Lights only | ~10 lbs |
| Fan-rated metal | Fans or lights | Up to 70 lbs |
| Fan brace kit | Joist mounting | Up to 90 lbs |
Non-obvious insight: If your house is older, the box may be nailed to the joist and hard to remove. Fan brace kits can be installed from below, saving time and ceiling repairs.
Unboxing And Preparing The Ceiling Fan
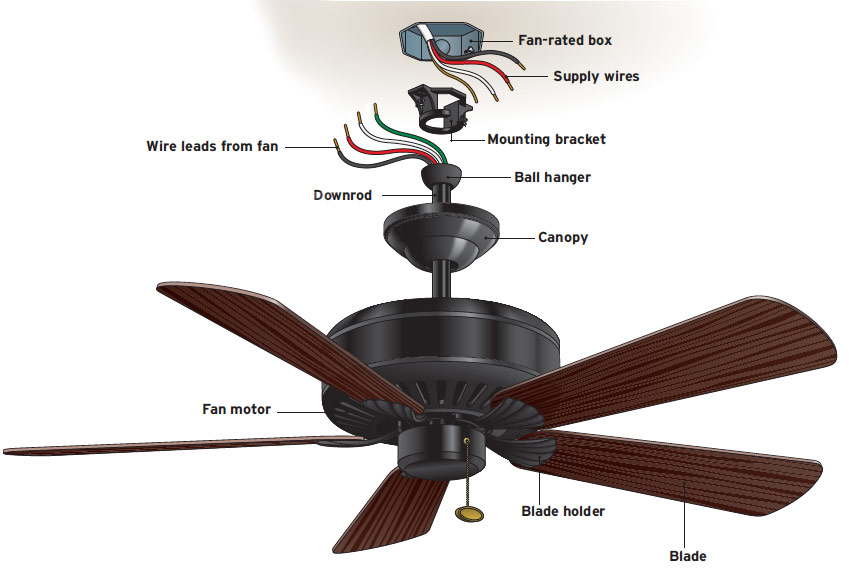
Open your fan kit and check all parts against the instructions. Most fans include:
- Motor housing
- Mounting bracket
- Downrod (or flush mount kit)
- Blades and blade arms
- Light kit (if included)
- Remote control (if included)
- Hardware (screws, washers, wire nuts)
Lay out all parts and read the manufacturer’s manual. Some fans require assembly before mounting; others let you attach blades after the fan is hung.
Pro tip: Assemble the downrod and canopy first if you have a high ceiling. For low ceilings, prepare the flush-mount kit.
Mounting The Bracket To The Ceiling
The mounting bracket attaches the fan to the ceiling box and supports the weight.
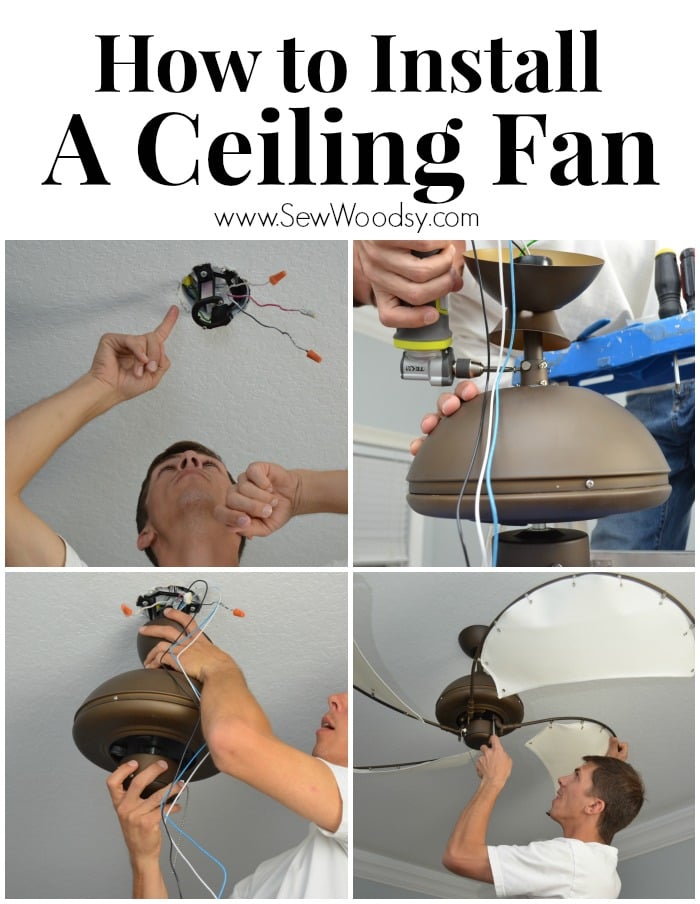
- Hold the bracket up to the box and align screw holes.
- Use the provided screws (or longer wood screws if needed) to secure the bracket directly to the box and, if possible, the ceiling joist.
- Tighten screws firmly. The bracket should not move at all.
If your ceiling is sloped, make sure the bracket allows for angle mounting. Some fans require an adapter.
Beginner tip: Don’t overtighten screws into plastic boxes; you can strip the threads.
Credit: sewwoodsy.com
Wiring The Ceiling Fan
Wiring is the most technical part, but it’s manageable if you take it step by step. Always follow the fan’s instructions and local electrical codes.
Standard Wiring Colors
- Black (or red): Fan power (sometimes for light kit)
- White: Neutral
- Green or bare: Ground
- Blue: Light kit (if included)
Steps To Connect Wires
- Double-check power is off at the breaker.
- Hang the motor housing from the mounting bracket (many fans have a hook for this).
- Match wires from the fan to the ceiling:
- Black (fan) to black (ceiling)
- White (fan) to white (ceiling)
- Green/bare to green or ground screw
- Blue (if present) to black or red (for light kit)
- Twist wires together with wire nuts.
- Wrap connections with electrical tape for extra safety.
- Gently push wires into the box.
Non-obvious insight: If you have two wall switches (one for the fan, one for the light), your ceiling box may have two hot wires—black for fan, red for light. Connect each accordingly.
Warning: If you’re unsure about wiring, it’s wise to consult an electrician. Faulty wiring is a fire risk.
Attaching The Fan Motor And Canopy
Once wired, attach the motor to the bracket.
- Lift the motor housing and align with the bracket.
- Secure with screws or locking pins as shown in your manual.
- Slide the canopy up to cover the bracket and wires. Secure with screws.
Check that the motor housing is tight and does not wobble. A loose mount is a common cause of noisy fans.
Installing The Fan Blades
Fan blades must be attached evenly for quiet, balanced operation.
- Attach blade arms to each blade with the provided screws.
- Fasten blade arms to the motor housing, tightening all screws equally.
- Repeat for all blades.
Tip: Tighten blade screws firmly, but don’t overtighten—wood can crack.
Common mistake: Mixing up screws or using the wrong ones can cause imbalance or vibration.
Installing The Light Kit And Remote Receiver
If your fan includes a light kit or remote, install them next.
Light Kit
- Connect the wires (usually blue to black/red, white to white).
- Attach the light kit to the fan housing with screws.
- Install bulbs (use the recommended wattage).
- Attach glass shades.
Remote Receiver
- Many fans have a small receiver that fits in the canopy.
- Connect wires as shown in the instructions.
- Pair the remote with the receiver after installation.
Beginner tip: If space is tight, arrange wires carefully so nothing is pinched when closing the canopy.
Balancing And Testing The Ceiling Fan
Before finishing, check that your fan is balanced and runs smoothly.
- Turn on the power at the breaker.
- Test the fan at all speeds. Listen for wobbling, clicking, or vibration.
- If the fan wobbles, use the balancing kit (usually included—small weights for the blades).
- Test the light kit and remote functions.
Non-obvious insight: Even small differences in blade weight or angle can cause wobble. If balancing doesn’t help, check that all screws are tight and the mounting bracket is secure.
Ceiling Fan Mounting: Step-by-step Summary
Here’s a quick checklist for mounting a ceiling fan:
- Turn off power at the breaker.
- Remove old fixture and inspect/replace the ceiling box.
- Install mounting bracket securely to the box.
- Assemble the fan (downrod, canopy, blades).
- Wire the fan to the ceiling.
- Mount the motor and attach the canopy.
- Install blades, light kit, and remote receiver as needed.
- Balance and test the fan for safe, smooth operation.
Safety Tips And Common Installation Mistakes
Safety Tips
- Always work with power OFF at the breaker.
- Use a voltage tester on wires before touching.
- Use a sturdy ladder and never overreach.
- Ask a helper to hold the fan during installation, especially for large or heavy fans.
- Follow all manufacturer and local electrical codes.
Common Mistakes To Avoid
- Using a non-rated ceiling box: Standard boxes can fail, risking injury or damage.
- Loose mounting screws: Can cause noise, wobbling, or even the fan falling.
- Mismatched wiring: Double-check connections against your manual.
- Improper blade installation: Uneven screws or swapped blades cause imbalance.
- Skipping the balancing step: Even a small wobble can get worse over time.
Pro insight: Always keep the fan manual. Every model is a bit different, and it’s invaluable for troubleshooting later.
Troubleshooting: What To Do If Your Fan Isn’t Working Right
Even with careful installation, problems can come up. Here’s how to handle the most common issues:
Fan Won’t Turn On
- Check power at the breaker and switch.
- Make sure all wire connections are secure.
- Test bulbs in the light kit.
- If using a remote, replace the batteries.
Fan Wobbles Or Makes Noise
- Check all mounting screws and blade screws.
- Use the included balancing kit.
- Make sure blades aren’t warped or damaged.
Light Kit Doesn’t Work
- Confirm proper wiring of the blue/black wires.
- Check that bulbs are not burned out or over the recommended wattage.
- If there’s a pull chain, test it.
Remote Control Doesn’t Work
- Make sure the receiver is installed and wired correctly.
- Try re-pairing the remote and receiver.
- Replace the remote batteries.
If you’ve double-checked all these and the problem remains, consult the fan’s manual or contact the manufacturer.
Comparing Ceiling Fan Installation: Diy Vs. Professional
Is it better to install a ceiling fan yourself or hire a pro? Here’s a side-by-side comparison to help you decide:
| Factor | DIY | Professional Installation |
|---|---|---|
| Cost | $0 (plus fan and parts) | $100–$300 average |
| Time Required | 2–4 hours | 1–2 hours |
| Skill Level | Intermediate DIY | None needed |
| Safety | Must follow all precautions | Pro handles all risks |
| Warranty/Guarantee | No labor warranty | Usually includes guarantee |
When to call a pro: If your ceiling is very high, the wiring is confusing, or you’re uncomfortable working with electricity, it’s smart to hire a licensed electrician.
Maintenance Tips For Long-lasting Ceiling Fans
Regular maintenance keeps your fan running smoothly and quietly for years.
- Dust blades monthly to prevent wobbling and buildup.
- Tighten screws on blades, arms, and motor housing every few months.
- Lubricate (if required; most modern fans are sealed and don’t need oil).
- Reverse direction seasonally (clockwise in winter, counterclockwise in summer).
- Inspect wiring if you notice flickering lights or strange noises.
Pro tip: Use a pillowcase to dust blades—slide it over the blade and pull, trapping dust inside.
Advanced Installation: Sloped Ceilings And Special Situations
Some ceilings need extra care.
Sloped/vaulted Ceilings
- Use an angled mounting kit if your ceiling is steeper than 32°.
- Longer downrods may be needed to keep blades at least 7 feet from the floor.
Heavy Fans Or Large Rooms
- Use a fan-rated box with a support brace for fans over 35 lbs.
- For rooms over 400 sq ft, consider two smaller fans instead of one large one for better airflow.
No Overhead Wiring?
- You’ll need to run new wiring from a nearby outlet or switch—a job best left to a licensed electrician.
Pro insight: Some fans are “smart” and can be controlled via Wi-Fi or voice assistants, but they still require safe mounting and wiring.
Environmental And Energy Savings Considerations
Ceiling fans are a green choice when used wisely.
- In summer, run the fan counterclockwise to create a breeze.
- In winter, run it clockwise on low to circulate warm air.
- Fans cool people, not rooms—turn them off when you leave to save energy.
- ENERGY STAR rated fans use up to 60% less energy than standard models.
Statistic: According to the U.S. Department of Energy, proper ceiling fan use can save homeowners up to $165 per year on utility bills.
Credit: www.youtube.com
Final Checks Before You Finish
Before you clean up, double-check:
- All screws are tight and nothing is left loose.
- Blades are balanced and secure.
- The fan and light work at all speeds.
- No wires are visible outside the canopy.
- The remote and wall switch work as intended.
Take a few minutes to tidy up and store your manual somewhere safe.
When To Upgrade Or Replace Your Fan
Sometimes, replacing an old fan is better than repairing it.
- Noisy operation even after balancing and tightening.
- Blades are warped or cracked.
- Motor hums or doesn’t start reliably.
- Style is outdated and you want a new look.
- You want smart features or LED lighting.
Fact: Modern ceiling fans are much more energy-efficient and quieter than models made just a decade ago.
Where To Find More Guidance
Manufacturer instructions are always the best reference for your specific model. For more on electrical safety and detailed diagrams, the U.S. Consumer Product Safety Commission has helpful resources. You can also check out this step-by-step ceiling fan installation guide for extra visuals and tips.
Frequently Asked Questions
How Do I Know If My Ceiling Box Can Support A Fan?
Check for a label inside the box that says “fan-rated” or “For ceiling fan support. ” If you don’t see this, or if the box feels flimsy or is only held by nails, replace it with a UL-rated fan box or install a support brace.
What’s The Right Height To Hang A Ceiling Fan?
The bottom of the fan blades should be at least 7 feet from the floor and 8–10 inches below the ceiling. For ceilings over 10 feet, use a longer downrod to keep airflow effective.
Can I Install A Ceiling Fan Where There Was No Light Fixture Before?
Yes, but you’ll need to add a fan-rated ceiling box and run new wiring, which often requires attic access. If you’re not experienced with electrical work, hire a licensed electrician for this step.
Why Does My Ceiling Fan Wobble Even After Installation?
Wobble is usually caused by loose screws, unbalanced blades, or a mounting bracket that’s not secure. Use the included balancing kit, check all screws, and make sure the fan is centered on the box.
Is It Safe To Mount A Ceiling Fan By Myself?
Yes, for most standard installations on flat ceilings, but only if you’re comfortable with wiring and working on a ladder. Always turn off power at the breaker, follow instructions, and ask for help if the fan is heavy or you’re unsure.
Mounting a ceiling fan is a satisfying project that can make your space more comfortable, stylish, and energy-efficient. With good planning and careful steps, you’ll enjoy the cool breeze for years to come.
Credit: www.finehomebuilding.com