
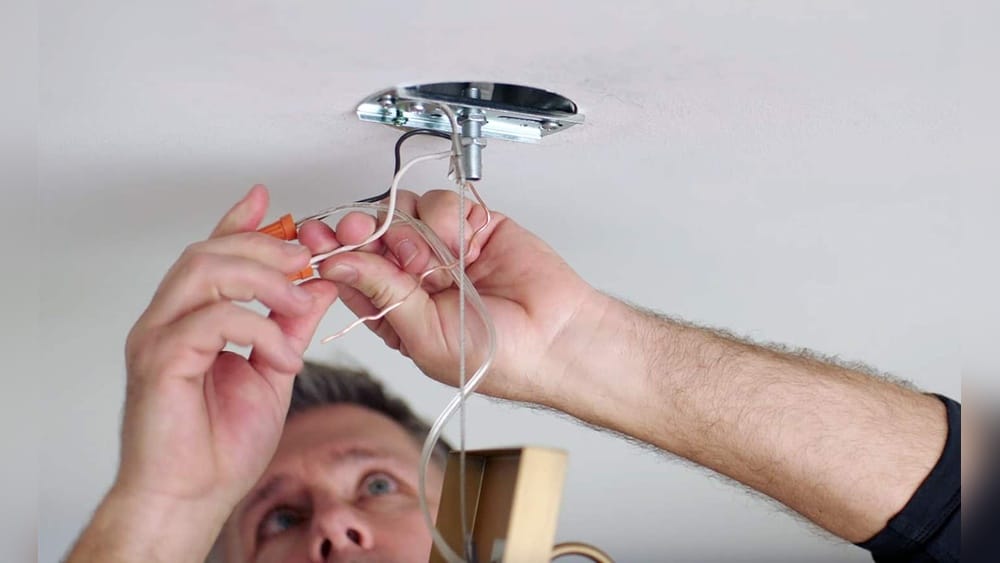
Mounting a chandelier can change the look of any room. It adds elegance, light, and a sense of luxury. But for many homeowners, the idea of hanging a chandelier feels complex and maybe even a bit risky. Wires, weight, and working overhead make the project seem best left to professionals.
The truth is, with the right tools, clear instructions, and a bit of patience, almost anyone can mount a chandelier safely and beautifully.
This guide breaks down every important step. Whether you are replacing a simple ceiling light with a statement chandelier, or installing one where there was none before, you’ll find the answers here. Along the way, you’ll learn tips that save time and money, and avoid common mistakes that often lead to frustration or unsafe results.
Let’s walk through every stage, from planning and shopping to wiring and final touches. You’ll discover how to choose a location, handle heavy fixtures, and make sure your chandelier hangs straight and secure. We’ll even cover what to do if your ceiling box isn’t strong enough, and how to get help when you need it.
Understanding The Basics Of Chandelier Installation
Before you pick up a tool or buy a fixture, it’s important to understand what chandelier installation involves. Mounting a chandelier is more than just attaching a pretty light to your ceiling. It’s about safety, structure, and style.
What Is A Chandelier?
A chandelier is a hanging light fixture that usually has multiple arms or branches. It can be made of glass, metal, crystal, or even wood. Chandeliers range from simple designs to elaborate pieces that weigh over 50 pounds. The right chandelier can be a room’s centerpiece.
Why Is Proper Mounting Important?
Chandeliers are often heavier than standard ceiling lights. That means your ceiling must support the weight. If not mounted correctly, a chandelier can fall, causing damage or injury. Proper wiring is also critical to avoid electrical hazards.
Key Parts Involved
- Mounting bracket: The metal plate or bar that attaches the chandelier to the electrical box.
- Electrical box: The metal or plastic box in the ceiling holding the wiring.
- Wiring: The electrical wires that power the chandelier.
- Canopy: The decorative cover at the ceiling.
Understanding these basics helps you see why careful installation matters. It’s not just about looks—it’s about safety and function.
Choosing The Right Chandelier For Your Space
Picking the right chandelier is the first step toward a successful project. The size, weight, and style of the fixture all affect how and where you can mount it.
Sizing Your Chandelier
A chandelier that’s too large can overwhelm a room, while one that’s too small may not have the desired impact. Here’s a simple formula to help:
- Add the room’s length and width in feet. The total, in inches, gives a good chandelier diameter.
- For example: A 12 ft x 14 ft room = 26 inches in diameter.
For dining tables, the chandelier should be about half to two-thirds the table width.
Weight Considerations
Most standard ceiling boxes support up to 50 pounds. If your chandelier is heavier, you’ll need extra support. Always check the fixture’s weight before buying.
Style And Material
Choose a chandelier that matches your room’s decor and fits the ceiling height. Crystal, metal, and modern glass styles are popular.
Light Output
Check how many bulbs the chandelier uses and the maximum wattage. Make sure it will light your space well.
Comparing Chandelier Types
Here’s a comparison of popular chandelier styles:
| Type | Typical Weight | Best Room Placement | Design Features |
|---|---|---|---|
| Crystal | 20–50 lbs | Dining room, foyer | Elegant, sparkling |
| Modern Glass | 10–30 lbs | Living room, bedroom | Sleek, minimal |
| Rustic/Industrial | 15–40 lbs | Entryway, kitchen | Wood/metal, warm |
| Candle-Style | 12–35 lbs | Dining room, hallway | Classic, traditional |
Non-obvious Tip
Some chandeliers come with adjustable chain or rod lengths. This lets you customize how low they hang. Always check adjustability before buying—especially for rooms with low ceilings.

Credit: countrylivingprimitives.com
Tools And Materials Needed
Having the right tools and materials makes the job much easier and safer. Gather everything before you start.
Essential Tools
- Voltage tester: To make sure power is off
- Screwdrivers (Phillips and flat-head)
- Pliers (needle-nose)
- Wire stripper/cutter
- Drill (for heavy fixtures or new holes)
- Adjustable wrench
- Tape measure
- Step ladder or platform
Materials
- Chandelier (with all included parts)
- Mounting bracket (usually included)
- Wire connectors (wire nuts)
- Electrical tape
- Extra hardware (toggle bolts, if needed)
- Support brace (for fixtures over 50 lbs)
Safety Gear
- Safety glasses
- Gloves
Optional, But Useful
- Helper: Some chandeliers are awkward or heavy, making two-person installation much safer.
- Ceiling medallion: Adds style and covers imperfections.
Practical Insight
A voltage tester is often overlooked, but it’s essential for your safety. Never trust a wall switch alone to cut power—always test before touching wires.
Preparing For Installation
Preparation is key. Rushing here often leads to problems later. Take time to do it right.
Turn Off Power
Turn off power to the existing light fixture at the circuit breaker. Test with your voltage tester to make sure the wires are dead.
Remove The Old Fixture
- Remove bulbs and decorative parts.
- Unscrew the canopy to expose the wiring.
- Use your voltage tester again.
- Disconnect wires (note which wire is which).
- Take down the old fixture.
Inspect The Ceiling Box
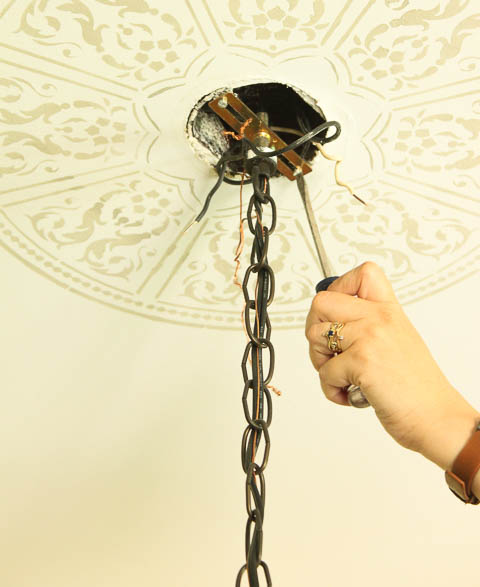
Check if your electrical box is rated to hold the weight of a chandelier. Look for a metal box attached to a ceiling joist. Plastic boxes usually aren’t strong enough for heavy fixtures.
If your box is loose or not rated for ceiling fans or heavy lights, install a fan-rated support brace. These can be added from below without opening the ceiling.
Check Wiring Condition
Old or damaged wires should be replaced. If you see cracked insulation or frayed wires, stop and consult an electrician.
Plan Mounting Height
Standard guidelines for mounting a chandelier:
- Above a table: Bottom of chandelier should be 30–36 inches above the tabletop.
- Open room: At least 7 feet above the floor.
Measure and mark the correct height. Adjust the chain or rod as needed.
Common Mistake
Many people forget to check ceiling box strength. If you skip this, you risk serious ceiling damage or a falling chandelier.
Credit: prettyhandygirl.com
Installing Support For Heavy Chandeliers
If your chandelier weighs more than 50 pounds, you’ll need a special support brace. This step is vital for safety.
Choosing A Support Brace
Support braces are metal bars that expand to fit between ceiling joists. They’re designed to hold 150 pounds or more.
Installation Steps
- Remove the old electrical box.
- Insert the support brace through the ceiling hole.
- Expand the brace so it sits firmly between joists.
- Attach the fan-rated electrical box to the brace.
- Secure everything tightly.
This step can often be done from below, but very old ceilings or tricky locations might require opening the ceiling further.
Comparison Of Ceiling Box Strength
| Type | Weight Limit | Material | Best For |
|---|---|---|---|
| Plastic Box | 10–15 lbs | Plastic | Small flush lights |
| Standard Metal Box | 50 lbs | Steel/Aluminum | Most chandeliers |
| Fan-Rated Box with Brace | 150 lbs | Steel | Large chandeliers, ceiling fans |
Hidden Detail
A support brace also helps prevent ceiling cracks over time, especially in plaster or drywall ceilings.
Assembling The Chandelier
Most chandeliers require some assembly before you hang them. Work on a flat surface with a soft cloth to avoid scratches.
Typical Steps
- Attach arms or branches according to the manufacturer’s instructions.
- Thread the wires through the chain or rod.
- Install decorative parts (crystals, shades, etc.) As directed.
Leave off the bulbs and most fragile decorations until after the chandelier is mounted. This reduces the chance of breakage.
Pro Tip
Take a photo of the assembly instructions and the parts layout. If you ever need to take the chandelier down for cleaning, this makes reassembly much easier.

Credit: prettyhandygirl.com
Wiring The Chandelier
Wiring is the most technical part of the process. If you’re not comfortable with electrical work, it’s best to call a licensed electrician. But if you follow safety rules, most homeowners can handle this job.
Identifying Wires
- Black (or red) wire: Hot
- White wire: Neutral
- Green or bare copper wire: Ground
The chandelier wires are usually black (hot), white (neutral), and sometimes a ground wire.
Wiring Steps
- Connect ground wires: Twist the chandelier ground wire to the ground wire from the ceiling box. Attach both to the green grounding screw in the box.
- Connect neutral wires: Twist chandelier’s white wire to ceiling’s white wire. Secure with a wire nut.
- Connect hot wires: Twist chandelier’s black wire to ceiling’s black (or red) wire. Secure with a wire nut.
- Check all connections: Tug gently to ensure they are tight. Wrap connections with electrical tape for extra security.
Securing The Chandelier
With wiring complete, gently push the wires up into the box. Lift the chandelier and attach the mounting bracket to the ceiling box. Secure the canopy so it covers the box and wiring.
Adding Bulbs And Decorations
Screw in bulbs and attach any crystals or shades. Turn power back on at the breaker and test your chandelier.
Example Wiring Diagram
For a simple chandelier:
- Black ceiling wire → Black chandelier wire
- White ceiling wire → White chandelier wire
- Green/bare wire → Chandelier ground
If your chandelier has extra wires or is controlled by a dimmer, check the instructions or consult an electrician.
Safety Reminder
Never work on live wires. Always turn off the breaker and use a voltage tester before touching any electrical part.
Adjusting And Leveling The Chandelier
Once the chandelier is hanging, make sure it looks perfect. A crooked or too-low chandelier can ruin the effect.
Leveling
Use a tape measure to check that the chandelier hangs evenly from all sides. Adjust the chain or rod links as needed.
Adjusting Height
If your chandelier hangs from a chain, remove or add links to get the right height. For rod-mounted fixtures, you may need to add or remove sections.
Securing The Canopy
Make sure the canopy sits flush against the ceiling to cover the box and wires. Tighten screws gently but firmly.
Final Touches
Clean fingerprints or dust from the fixture. Install decorative parts that you set aside earlier.
Insight For Beginners
Chandeliers often look crooked if the ceiling isn’t perfectly flat. Try shifting the canopy or adjusting the chain slightly to compensate.
Testing And Troubleshooting
Before you finish, test your work. It’s better to catch problems now than after everything is put away.
Testing Steps
- Make sure all wire connections are secure.
- Turn on the breaker.
- Flip the wall switch to test the chandelier.
Common Issues
- No light? Double-check wiring connections and breaker.
- Flickering? Loose wire nut or poor connection.
- Fixture wobbles? Ceiling box or bracket is not tight enough.
If you can’t solve the problem, turn off power and check each step. Don’t hesitate to call an electrician if you have doubts.
Troubleshooting Comparison
| Problem | Possible Cause | Solution |
|---|---|---|
| No power | Tripped breaker, loose wire | Check breaker, retighten wires |
| Flickering | Poor connection | Secure wire nuts, check bulbs |
| Chandelier tilts | Uneven chain or box | Adjust chain, tighten bracket |
| Buzzing sound | Dimmer incompatibility | Use compatible bulbs/dimmer |
Overlooked Detail
Some LED bulbs don’t work well with all dimmers. If you hear buzzing or see flicker, check compatibility.
Safety Considerations
Your safety comes first. Working with electricity always involves some risk. Here’s how to minimize it.
Key Safety Tips
- Always turn off power at the breaker, not just the wall switch.
- Use a voltage tester every time before touching wires.
- Wear rubber-soled shoes and stand on a dry surface.
- Never work alone with heavy fixtures—get help to lift and hold.
When To Call A Professional
- If your home has old or confusing wiring.
- If your ceiling box is loose or damaged.
- If the chandelier is extremely heavy or complex.
Useful Resource
For more about electrical safety, visit the OSHA Electrical Safety page.
Maintenance Tips For Chandeliers
Once your chandelier is up, keep it looking and working its best.
Cleaning
Dust crystals and arms regularly with a microfiber cloth. For deeper cleaning, turn off power and remove bulbs before wiping with a damp cloth.
Bulb Replacement
Use bulbs with the correct wattage. Replacing all bulbs at once keeps light even.
Checking For Looseness
Once or twice a year, check that the fixture is still secure and the canopy is tight.
Non-obvious Maintenance
If your chandelier has lots of hanging crystals, keep a few extras on hand. They sometimes break during cleaning, and matching replacements later can be hard.
Frequently Asked Questions
How Do I Know If My Ceiling Can Hold A Chandelier?
Check the ceiling electrical box. It should be metal and firmly attached to a ceiling joist. If it’s plastic or feels loose, install a fan-rated support brace before hanging a chandelier.
Do I Need A Permit To Mount A Chandelier?
In most homes, replacing an existing fixture doesn’t require a permit. But if you’re running new wiring or adding support braces, check with your local building department.
Can I Install A Chandelier By Myself?
Many homeowners can handle chandeliers under 50 pounds if they follow instructions and safety rules. For heavy or complex fixtures, get help or hire a licensed electrician.
What Is The Right Height To Hang A Chandelier?
Above dining tables, chandeliers should hang 30–36 inches above the tabletop. In open rooms, keep at least 7 feet of clearance from the floor to the bottom of the fixture.
What If My Chandelier Keeps Tilting Or Swaying?
Check that the mounting bracket and ceiling box are tight. Adjust the chain or rod length for balance. If your ceiling is uneven, use a small rubber washer above the canopy to level the fixture.
Mounting a chandelier may seem like a big job, but it’s very doable with planning and care. The right chandelier can change your space and create a stunning focal point. Take your time, follow safety steps, and don’t hesitate to ask for help when needed.
With these tips and techniques, you’ll enjoy your beautiful new chandelier for years to come.