
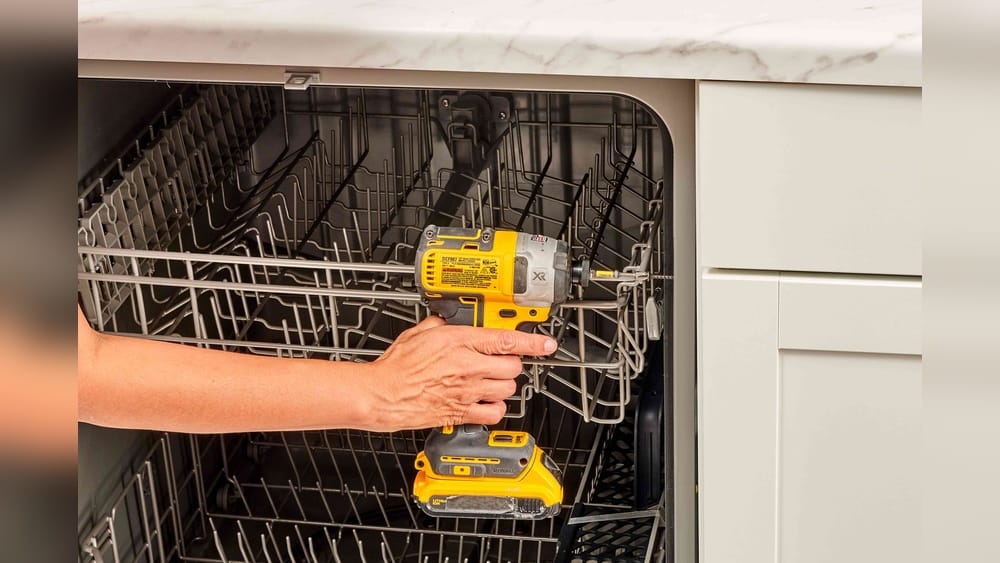
Installing a dishwasher can transform your kitchen, saving time and making life easier. But mounting a dishwasher isn’t always simple. Many people worry about leaks, electrical issues, or damaging cabinets. The good news? With the right tools, a little patience, and a clear guide, most homeowners can successfully mount a dishwasher themselves.
This article walks you through every step, explains the key details, and points out common mistakes—so you get a perfect installation on your first try.
Why Proper Dishwasher Mounting Matters
A dishwasher isn’t just an appliance you slide under the counter. Correct mounting is essential for safety, performance, and longevity. A poorly mounted dishwasher can vibrate, leak, move out of place, or even cause water damage over time. For example, a loose dishwasher may pull on water lines, causing slow leaks that ruin your cabinetry or flooring.
Another factor is energy efficiency. Dishwashers designed for tight installation need proper alignment to close and seal their doors fully. If not mounted level, the door may not seal, letting heat and moisture escape. This wastes electricity and may damage surrounding cabinets.
Finally, many dishwasher warranties require professional installation or correct mounting. Doing it right helps protect your investment and ensures your kitchen is safe and functional.
Tools And Materials Needed
Before you begin, gather all the necessary tools and materials. This step saves frustration later and ensures you won’t need to stop mid-installation.
Essential Tools
- Screwdrivers (Phillips and flathead)
- Drill with drill bits (for making pilot holes)
- Adjustable wrench
- Level (bubble or digital)
- Tape measure
- Pliers (slip-joint and needle-nose)
- Utility knife
- Bucket or towels (in case of water spills)
- Voltage tester (for electrical safety)
Materials
- Dishwasher mounting kit (usually comes with your appliance)
- Screws and brackets
- Teflon tape (for plumbing)
- Wire nuts
- Dishwasher installation hose (if not included)
- Hose clamps
- Electrical cord kit (if not hardwired)
- Safety gloves
Having these items ready makes your work smoother and more efficient.
:max_bytes(150000):strip_icc()/how-to-install-a-dishwasher-2718667-hero-29d78cea29394348ab2bd03aad4d7cb2.jpg)
Credit: www.thespruce.com
Checking Compatibility And Preparing The Space
Before mounting, check that your kitchen and new dishwasher are a good fit for each other. Even a small mismatch in size or connections can cause big headaches.
Measure Twice, Install Once
First, measure the dishwasher opening under your countertop. Most standard dishwashers need a space about 24 inches wide, 24 inches deep, and 34 inches high. But always check the actual size of your model. Even a quarter-inch difference can prevent a proper fit.
Next, check the flooring height. If you have thick tile or other flooring, it may raise the floor and reduce space for the dishwasher. Make sure there’s enough clearance—if not, you may need to adjust the legs or even trim the countertop’s underside.
Electrical, Water, And Drain Access
- Electrical: Most dishwashers need a 120V grounded outlet nearby. Some are hardwired; others use a plug. Check your appliance manual.
- Water supply: There must be a hot water supply line (usually 3/8″ compression fitting) within reach under the sink.
- Drain: The drain hose should connect to either the sink drain or a garbage disposal. Make sure you have a spot for the hose and a way to secure it above the P-trap (to prevent dirty water from siphoning back).
Remove The Old Dishwasher (if Needed)
If replacing an old dishwasher, carefully disconnect the power, water, and drain lines first. Have towels ready—some water will likely spill out. Remove mounting screws from the top or sides, then gently slide out the old unit. Clean the area before you start with the new installation.
Comparing Built-in Vs. Portable Dishwashers
Not all dishwashers are installed the same way. Here’s a quick comparison of built-in and portable dishwashers to help you understand which process fits your kitchen.
| Feature | Built-In Dishwasher | Portable Dishwasher |
|---|---|---|
| Mounting Required | Yes (screwed to cabinets or countertop) | No (rolls into place) |
| Plumbing Connection | Permanent (hot water line, drain) | Temporary (connects to faucet) |
| Electrical | Often hardwired or nearby outlet | Standard outlet plug |
| Space Needed | Under-counter slot | Open kitchen space when in use |
| Mobility | Fixed | Movable |
| Typical Size | 24″ wide (standard) | Varies, often smaller |
Most mounting steps in this article apply to built-in dishwashers. Portable models don’t require fixed mounting, but need careful handling of hoses and power cords.

Credit: www.amazon.com
Step-by-step Guide To Mounting A Dishwasher
With preparations complete, it’s time to mount your dishwasher. Take it slowly, and check each step as you go. Proper mounting ensures your dishwasher will be safe, stable, and leak-free.
1. Position The Dishwasher
- Carefully slide the dishwasher close to the opening, but don’t push it all the way in yet.
- Lay down a piece of cardboard or old towel to protect the floor and appliance.
- If the dishwasher is heavy, ask a friend for help to avoid damaging the floor or straining your back.
2. Connect The Water Supply Line
- Locate the water inlet on the bottom of the dishwasher (usually at the front left).
- Wrap Teflon tape around the threads of the inlet elbow (usually included).
- Attach the water supply line to the elbow, tightening it with a wrench. Don’t overtighten—just snug.
- Connect the other end to the shutoff valve under the sink.
- Open the valve slightly to check for leaks. If you see drips, tighten the connection a bit more.
3. Connect The Drain Hose
- Attach the drain hose to the dishwasher’s drain outlet.
- Secure it with a hose clamp.
- Feed the other end through the cabinet hole to the sink area.
- Connect to either the garbage disposal or the sink drain. Most codes require a “high loop” (the hose loops up under the counter) or an air gap device to prevent backflow.
- Secure the hose with brackets or clips to keep it from sagging.
4. Make The Electrical Connection
Safety tip: Always turn off the power at the circuit breaker before working with electrical wires.
- If the dishwasher uses a plug, make sure the outlet is grounded and within reach.
- If hardwired, remove the electrical cover at the dishwasher’s base.
- Match the wires: Black to black (hot), white to white (neutral), and green or bare to ground.
- Use wire nuts to connect, and tuck the wires back in safely.
- Replace the cover.
Non-obvious insight: Many beginners forget to check if the circuit breaker can handle the dishwasher’s load. Most dishwashers need a dedicated 15-amp circuit. Running other appliances on the same line can cause tripped breakers or overheating.
5. Slide The Dishwasher Into Place
- Slowly push the dishwasher into the cabinet opening.
- Guide the water line, drain hose, and electrical wire so they don’t kink or get caught.
- Use a level to check both front-to-back and side-to-side alignment.
- Adjust the leveling legs at the front (and sometimes rear) to make the dishwasher perfectly level.
- If the unit is not level, the door won’t close right, and water may pool inside.
6. Secure The Dishwasher
- Open the dishwasher door.
- Find the mounting brackets at the top or sides of the dishwasher frame.
- If mounting to the countertop, use the included screws to secure the brackets to the underside of the counter.
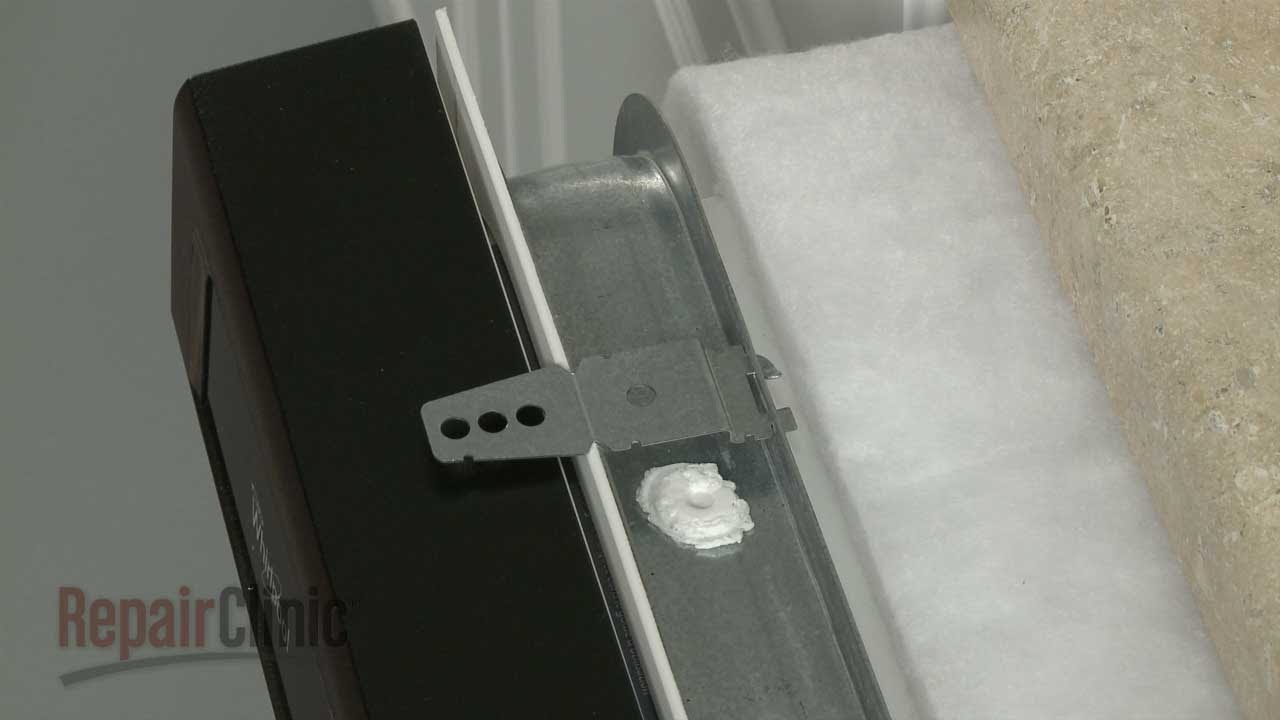
- For side-mount installations (common with stone countertops), attach brackets to the cabinet sides.
- Don’t overtighten—this can damage the countertop or brackets.
7. Test For Leaks And Power
- Turn on the water supply fully.
- Restore power at the circuit breaker or plug in the dishwasher.
- Run a short wash cycle while watching for leaks under the sink and at the dishwasher base.
- Check the drain hose for leaks and make sure water drains quickly.
- Listen for unusual noises, which could mean something is pinched or loose.
8. Attach The Kick Plate And Finish Up
- Once you confirm there are no leaks and the dishwasher runs smoothly, attach the lower kick plate or toe panel.
- Adjust the panel height to cover any gaps.
- Clean up your tools and test the dishwasher again before moving on.
Common Mistakes And How To Avoid Them
Even with clear instructions, people often make small errors that cause big problems later. Here are some frequent mistakes and how to dodge them:
- Skipping the Level Check: An unlevel dishwasher is a top cause of leaks and poor washing. Always check with a level and adjust legs as needed.
- Kinked Hoses: If the water or drain hose is pinched or twisted, water can’t flow properly. Feed hoses gently and check for smooth curves.
- Loose Connections: Hand-tightening is rarely enough for water lines. Use a wrench but don’t overtighten. Leaks often happen at these joints.
- Incorrect Drain Height: If the drain hose is too low, dirty water can siphon back into the dishwasher. Use a high loop or air gap.
- Wrong Electrical Setup: Mixing up wires or skipping the ground can be dangerous. Always double-check connections and use a voltage tester before starting.
- Forgetting the Mounting Brackets: Some people skip securing the dishwasher, thinking the tight fit is enough. Over time, vibrations can move the dishwasher out of place.
- Not Checking for Leaks: Always run a test cycle before putting away your tools. Even small drips can cause mold or damage over weeks.
Non-obvious tip: If your dishwasher moves when you open or close the door, it’s not secured tightly enough. This can slowly pull on the water line, increasing leak risk.
Special Considerations For Different Countertops
Countertop material affects how you mount the dishwasher. Here’s a summary of the main types and what you need to know.
| Countertop Type | Mounting Method | Extra Tips |
|---|---|---|
| Laminate/Wood | Top-mount screws into underside | Easy to drill, use included screws |
| Granite/Stone | Side-mount into cabinets | Never drill into stone; use side brackets only |
| Solid Surface (Corian, etc.) | Side-mount or adhesive brackets | Check manufacturer’s instructions; may allow adhesive pads |
| Tile | Side-mount preferred | Drilling tile is risky; use wood side panels |
Pro tip: If you have a stone countertop and no side cabinets, special mounting kits with adhesive brackets are available. Always follow the manufacturer’s recommendations.
Dishwasher Mounting Height: Why It Matters
Many people overlook the importance of mounting height. If a dishwasher is too low, it can be hard to load and may not drain fully. Too high, and it won’t fit under the counter or may not align with plumbing.
- Standard height: Most dishwashers sit flush with 34-inch-high counters.
- If your flooring is thick (tile, hardwood), you may need to adjust the legs down.
- For raised floors, check that the kick plate still fits and there’s enough airflow under the machine.
Non-obvious insight: An uneven floor can cause a dishwasher to “rock” even if the legs seem adjusted. Always check the whole perimeter with a level.
Tips For A Professional-looking Finish
Even a well-mounted dishwasher can look out of place if you skip the finishing touches. Here’s how to make your installation look like a pro did it:
- Align the front: The face of the dishwasher should line up with cabinet faces. Adjust the legs and brackets so the unit sits flush, not recessed or sticking out.
- Hide gaps: If there’s a small gap between the machine and cabinet, use trim strips or side filler panels for a seamless look.
- Straight kick plate: The lower panel should be parallel to the floor and cover all visible parts.
- Cable management: Tuck away extra hose and wiring so nothing hangs or sticks out.
Comparing Diy Vs. Professional Installation
Should you mount your dishwasher yourself or hire a pro? Here’s a quick look at the differences.
| Aspect | DIY Installation | Professional Installation |
|---|---|---|
| Cost | $0 (if you have tools), $50–$100 for parts | $150–$350 typical fee |
| Time Required | 2–4 hours for beginners | 1–2 hours |
| Warranty Impact | May void if not done to code | Usually keeps full warranty |
| Risk of Mistakes | Higher (leaks, electrical issues) | Low (experienced technicians) |
| Learning Experience | High (hands-on skills) | Low (no learning, but peace of mind) |
If you’re comfortable with basic plumbing and electrical work, DIY mounting can save money and give you a sense of achievement. But if you’re unsure or lack the right tools, a professional install is safer.
When To Call A Professional
Some situations are best left to the experts:
- Old wiring or plumbing: If your house has outdated systems, a licensed plumber or electrician can update connections to meet code.
- Custom cabinetry: Odd sizes, tight fits, or integrated panels may need special tools or skills.
- Major leaks or electrical problems: If you spot problems during installation, don’t risk it—call for help.
- Warranty requirements: Some brands require professional installation for full warranty coverage.
If in doubt, a professional can ensure everything is safe and up to code.
Maintenance Tips After Mounting
A properly mounted dishwasher will last for years, but a few simple habits keep it running smoothly.
- Check for leaks every few months, especially in the first year.
- Clean the filter and spray arms regularly. Blocked filters can cause poor cleaning or drainage.
- Wipe the door seal with a damp cloth to prevent mold and odors.
- Inspect hoses for cracks or wear. Replace if you see any damage.
- Leave the door ajar after cycles to allow moisture to escape and reduce odors.
Non-obvious tip: If your dishwasher smells or gets moldy often, check the drain hose height and loop. Incorrect installation can let dirty water back in, causing odor and bacteria growth.
Credit: www.youtube.com
Frequently Asked Questions
How Long Does It Take To Mount A Dishwasher?
For most homeowners, mounting a dishwasher takes about 2–4 hours. The exact time depends on your experience, the condition of your kitchen, and whether you’re replacing an old unit. A professional can usually finish in 1–2 hours.
Do I Need A Plumber Or Electrician To Mount A Dishwasher?
Not always. If your kitchen already has the correct water, drain, and electrical connections, many people can do it themselves. But if you need to add or change plumbing or wiring, it’s best to hire a licensed plumber or electrician for safety and to meet local codes.
Can I Mount A Dishwasher On My Own, Or Do I Need Help?
Many people install dishwashers alone, but it’s easier with two people—especially when sliding the appliance into place. Dishwashers are heavy and awkward to move. Having a helper reduces the risk of damage or injury.
What’s The Most Common Mistake When Mounting A Dishwasher?
The top mistake is not leveling the dishwasher. An unlevel unit can leak, not drain properly, or have problems closing the door. Always use a level and adjust the legs before securing the dishwasher.
Where Can I Find More Detailed Installation Guides?
For specific models and detailed instructions, check your appliance’s user manual. You can also find reliable installation advice from manufacturers, home improvement websites, or the Family Handyman website.
Mounting a dishwasher may seem tricky at first, but with careful planning and the right steps, it’s a task many homeowners can handle. Take your time, double-check every connection, and enjoy the satisfaction of a job well done. If you ever feel unsure, don’t hesitate to call a professional—your kitchen and peace of mind are worth it.