
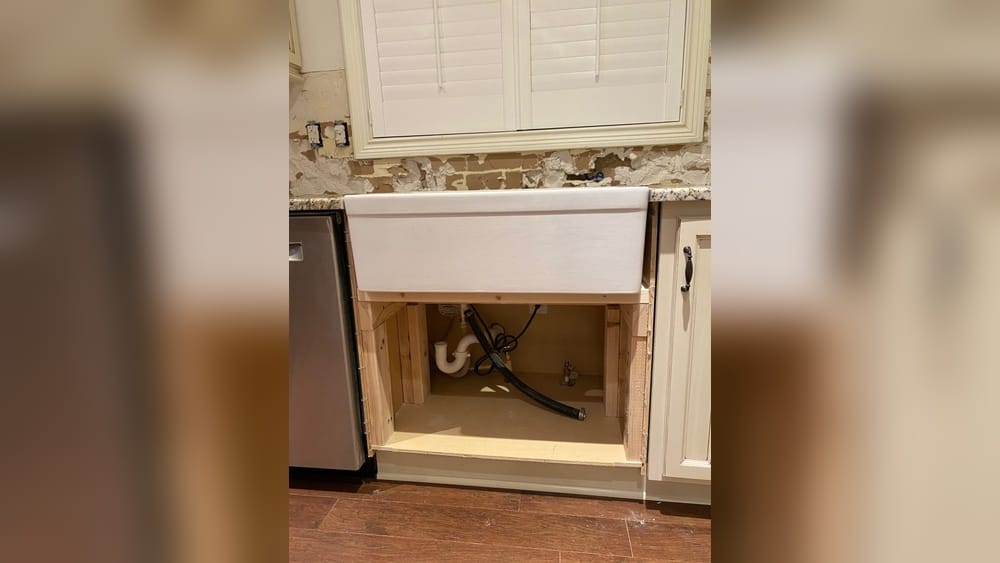
A farmhouse sink, also known as an apron-front sink, is a popular choice for kitchens that blend style, comfort, and practicality. Its deep basin and iconic exposed front add a unique charm, while making it easier to wash large pots and pans.
But while farmhouse sinks look simple and timeless, mounting them is not as straightforward as dropping in a regular sink. Done wrong, you might face leaks, damage to your cabinets, or even a cracked sink. If you’re ready to install a farmhouse sink in your kitchen, this guide will walk you through the process step by step, helping you avoid common mistakes and finish with a professional result.
Understanding The Farmhouse Sink
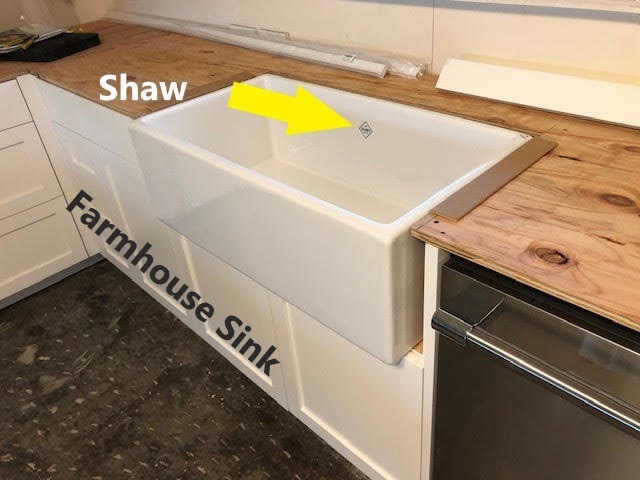
Before you start, it’s important to know what makes a farmhouse sink different from other sinks. Unlike drop-in or undermount sinks, a farmhouse sink has a large, exposed front panel that extends beyond the edge of your countertop. This design means it needs special support and a precise cutout in your cabinets.
Farmhouse sinks come in different sizes, materials, and mounting styles. Most are made of fireclay, porcelain, stainless steel, or cast iron. Each material has its own weight, care needs, and installation requirements. For example, a fireclay farmhouse sink can weigh over 100 pounds, especially when filled with water. This is why strong cabinet support is crucial.
Why Sink Weight Matters
Standard sinks often rest on the countertop, but a farmhouse sink is usually supported by the cabinet base. If your cabinet isn’t strong enough, it could sag or fail over time. Heavy sinks also require extra care during installation to avoid chipping or cracking, especially at the corners.
Common Sizes And Fit
Most farmhouse sinks are 30 to 36 inches wide, but they can be smaller or larger. Before you buy a sink, measure your cabinet opening. The sink must fit both the width and the depth of the cabinet, and the front panel must not block drawers or doors below. Many farmhouse sinks need a special cabinet called an “apron-front cabinet,” but you can also modify a standard cabinet if you’re careful.
Tools And Materials Needed
To mount a farmhouse sink, you’ll need both common and specialized tools. Here’s a checklist to help you gather what you need:
Basic tools:
- Tape measure
- Pencil or marker
- Level
- Drill with bits
- Screwdriver
- Adjustable wrench
- Jigsaw or handsaw
- Utility knife
- Caulk gun
Materials:
- Farmhouse sink (check weight and size)
- Sink support frame or 2×4 lumber
- Screws and brackets
- Silicone caulk or plumber’s putty
- Shims (for leveling)
- Sandpaper
- Pipe fittings and plumber’s tape
- New faucet and drain assembly (if upgrading)
Safety gear:
- Work gloves
- Safety goggles
- Hearing protection (for sawing)
It’s easy to overlook shims or support lumber, but these are essential for a level, secure installation. For heavy sinks, a second pair of hands can make the job much safer.
Planning Your Installation
Mounting a farmhouse sink is not a job to rush. Careful planning can save hours of trouble and help you avoid costly mistakes.
Measure Twice, Cut Once
Start by measuring your cabinet opening, sink dimensions, and countertop thickness. Make sure the sink will fit with some clearance on each side (usually 1/8 to 1/4 inch) to allow for movement and sealing. If your cabinet is too small, you’ll need to make modifications or choose a smaller sink.
Cabinet Modifications
Most standard sink cabinets have a false drawer front and a solid face. To fit a farmhouse sink, you’ll need to:
- Remove the false drawer front.
- Cut down the cabinet face to match the height of the sink’s apron front.
- Build or install a support frame inside the cabinet to hold the sink’s weight.
Tip: If you’re not comfortable making these cuts, consider hiring a carpenter or cabinet installer.
Countertop Adjustments
If you’re reusing your existing countertop, you’ll need to cut it to fit the farmhouse sink. Stone countertops like granite or quartz may need a professional fabricator. Laminate or wood countertops can usually be cut with a jigsaw or circular saw.
Non-obvious insight: For many farmhouse sinks, the countertop must overhang the sink’s sides by at least 1/8 inch to prevent water from leaking into the cabinet. Check your sink’s specifications.
Removing The Old Sink
Before installing your new farmhouse sink, remove the old sink and prepare the area.
- Turn off the water supply and disconnect the faucet and drain lines.
- Remove the old sink by loosening the mounting clips under the countertop.
- Carefully lift out the sink. If it’s stuck, use a utility knife to cut through caulk or sealant.
- Clean the cabinet and countertop area thoroughly.
Pro tip: Take pictures of your plumbing connections before disconnecting them. This makes reassembly easier later.

Credit: www.dododsondesigns.com
Modifying The Cabinet
This is often the most time-consuming part of the project. Here’s how to do it right:
Cutting The Cabinet Front
- Measure the height of your sink’s apron front.
- Mark the cut lines on the cabinet face.
- Use a jigsaw or handsaw to cut out the area.
- Sand the cut edges smooth.
Caution: Always check what’s behind the cabinet face before cutting. Watch for wires or pipes.
Building The Support Frame
A farmhouse sink needs a strong support frame inside the cabinet. Here’s one common method:
- Cut two pieces of 2×4 lumber to fit the inside width of the cabinet.
- Attach them to the cabinet sides at the correct height (usually just below the apron front).
- Add cross supports as needed for extra strength.
- Check that the frame is level from front to back and side to side.
Non-obvious insight: If your sink is especially heavy (over 100 lbs), add extra vertical supports under the frame for long-term strength.
Dry-fitting The Sink
Before sealing or finalizing anything, set the sink in place to check the fit. Make sure:
- The sink sits level and flush with the front of the cabinet.
- There is enough clearance on each side.
- The support frame holds the sink securely.
If needed, adjust the frame or use shims to level the sink.
Adjusting The Countertop
Once the sink fits the cabinet, you may need to trim your countertop.
- Mark the cut lines based on the sink’s width and depth.
- Use a jigsaw or circular saw to cut the opening.
- For stone countertops, contact a fabricator for a precise cut.
Tip: Always support the countertop when cutting to prevent cracks or chips.
Installing The Farmhouse Sink
Now it’s time to set the sink in place for good. Follow these steps for the best results.
Placing The Sink
- Apply a bead of silicone caulk around the top edges of the support frame.
- Lower the sink onto the frame, making sure it sits evenly.
- Check for level again. Adjust with shims if needed.
Why silicone? Silicone caulk creates a waterproof seal and helps keep the sink in place.
Sealing The Edges
- Run a thin bead of silicone caulk around the edges where the sink meets the countertop.
- Smooth the caulk with a finger or caulk tool for a clean finish.
- Wipe away excess before it dries.
Non-obvious insight: Do not use plumber’s putty on natural stone countertops—it can stain the surface. Stick with 100% silicone for all sealing.
Reattaching Plumbing
- Install the drain and garbage disposal (if needed) before reconnecting pipes.
- Use plumber’s tape on threaded connections to prevent leaks.
- Reconnect the faucet and water supply lines.
Pro tip: Test for leaks by filling the sink with water and checking all connections before using the sink daily.
Countertop Comparisons For Farmhouse Sinks
Different countertops react differently to farmhouse sinks. Here’s a side-by-side comparison of common types:
| Countertop Type | Ease of Cutting | Suitability | Special Precautions |
|---|---|---|---|
| Laminated Wood | Easy (DIY) | Good | Seal edges against water |
| Solid Wood/Butcher Block | Moderate | Excellent | Regular sealing needed |
| Granite/Quartz | Difficult (Professional) | Excellent | Prevent chipping, hire a pro |
| Tile | Hard | Fair | Reinforce edges, careful cutting |
Tip: Always check with your countertop manufacturer for installation recommendations.
Common Mounting Styles
Farmhouse sinks can be mounted in several ways. The most popular are:
- Flush mount: The sink is level with the countertop.
- Undermount: The countertop slightly overhangs the sink.
- Raised/lip mount: The sink’s rim sits above the countertop.
Each style has pros and cons. Undermount gives a seamless look but may be harder to clean around the seam. Raised mount makes for easier installation but can trap crumbs. Flush mount is a balance of both.
Avoiding Common Mistakes
Mounting a farmhouse sink can be tricky. Here are mistakes to watch for:
- Skipping the support frame: Don’t rely on the countertop to hold the sink.
- Poor measuring: Even a 1/8 inch mistake can mean the sink won’t fit.
- Not sealing edges: Water can damage cabinets if not sealed properly.
- Ignoring sink weight: Heavy sinks need extra support and careful handling.
- Forgetting plumbing adjustments: Farmhouse sinks sit lower, so drain pipes may need lowering.
Non-obvious insight: Some farmhouse sinks need custom drains or extra-long tailpieces because of their deep basins. Check your plumbing before final assembly.
Credit: www.youtube.com
Comparing Sink Materials
Choosing the right material is as important as proper mounting. Here’s a quick comparison:
| Material | Weight | Durability | Maintenance | Typical Price |
|---|---|---|---|---|
| Fireclay | Heavy | High | Low | $$$ |
| Porcelain | Moderate | Medium | Medium | $$ |
| Stainless Steel | Light | High | Low | $$ |
| Cast Iron | Very Heavy | Very High | Medium | $$$ |
Note: Fireclay and cast iron sinks are durable but very heavy, requiring strong support.
Step-by-step Mounting Summary
To help you visualize the process, here’s a step-by-step checklist:
- Measure your cabinet and sink.
- Remove the old sink and clean the area.
- Modify the cabinet front and build a support frame.
- Dry-fit the sink and adjust as needed.
- Cut the countertop to fit (if needed).
- Place the sink, check for level, and seal with silicone.
- Reconnect plumbing and test for leaks.
Following these steps in order will prevent most installation problems.
Practical Tips For A Professional Finish
- Use painter’s tape on cut lines to prevent splintering.
- Always check for level after each step.
- Allow silicone caulk to cure for at least 24 hours before using the sink.
- If your sink has a glossy finish, avoid abrasive cleaners that can scratch it.
- For deep sinks, consider adding a sink grid to prevent heavy pots from cracking the bottom.
Non-obvious insight: If your countertop is slightly uneven, use plastic shims rather than wood—they’re less likely to warp or rot over time.
How Much Does It Cost To Mount A Farmhouse Sink?
Costs can vary widely depending on your sink, countertop, and whether you hire help. Here’s a rough breakdown:
| Item | DIY Cost | Professional Cost |
|---|---|---|
| Farmhouse Sink | $300–$1,200 | $300–$1,200 |
| Support Frame Materials | $20–$50 | Included |
| Countertop Modification | $0–$300 | $200–$600 |
| Plumbing Adjustments | $20–$100 | $150–$400 |
| Professional Labor | — | $500–$1,500 |
Total DIY: $340–$1,650
Total Professional: $1,170–$3,700
Tip: If you have stone countertops, budget extra for professional cutting.

Credit: ashleybrooke.com
When To Call A Professional
While many handy homeowners can mount a farmhouse sink, there are times when hiring a pro is wise:
- You have stone countertops that need cutting.
- Your cabinet needs major modification.
- The sink is very heavy and you don’t have help.
- You’re not comfortable with plumbing adjustments.
A professional can ensure a leak-free, safe installation and may save you money in the long run by avoiding mistakes.
Maintenance After Installation
A farmhouse sink is built to last, but a little care goes a long way:
- Wipe down the sink after each use to prevent stains.
- Avoid dropping heavy items into the sink to prevent chipping.
- Use mild cleaners—avoid bleach or harsh chemicals.
- Check caulked joints yearly and recaulk if needed.
- Clean drains regularly to prevent clogs.
With proper care, a farmhouse sink can remain the heart of your kitchen for decades.
Frequently Asked Questions
How Much Space Do I Need For A Farmhouse Sink?
You need a cabinet at least as wide as your sink, plus 1/8 to 1/4 inch clearance on each side. Standard farmhouse sinks are 30 to 36 inches wide, so most base cabinets are at least 33 inches. Always measure your actual cabinet and sink before starting.
Can I Install A Farmhouse Sink In Existing Cabinets?
Yes, but you’ll likely need to modify the cabinet front and build a support frame. Some cabinets may not have enough depth or strength, especially if they are older or made from particleboard. Upgrading to a reinforced cabinet is sometimes easier for heavy sinks.
Do Farmhouse Sinks Require Special Faucets?
Not always, but many farmhouse sinks have a deeper bowl, which can make it harder to reach the faucet. Choose a faucet with a longer spout or pull-down spray to improve reach and usability. Check that the faucet holes align with your sink and countertop.
What’s The Best Way To Seal A Farmhouse Sink?
Use 100% silicone caulk around the edges where the sink meets the countertop. This prevents water from leaking into the cabinet. Avoid plumber’s putty on natural stone countertops, as it may cause stains.
Are Farmhouse Sinks More Likely To Leak?
Not if installed correctly. Leaks usually happen when the edges aren’t sealed well or if the cabinet support fails and the sink shifts. Careful mounting and sealing are key to a leak-free sink.
Mounting a farmhouse sink is a rewarding project that adds both beauty and function to your kitchen. With proper planning, the right tools, and attention to detail, you can achieve a professional result—even as a DIYer. If you want to see more photos and step-by-step visuals, check out this detailed guide from Houzz.
By following these steps and tips, you’ll enjoy a stunning, functional farmhouse sink for years to come.