
Mounting a light fixture can seem tricky if you’re new to home improvement. But with the right steps, tools, and a little patience, you can update your space with better lighting and save money on electrician fees. Whether you’re swapping out an old ceiling lamp for a modern LED, or installing a new chandelier in your dining room, the process follows a logical order.
This guide will walk you through every step, offer expert tips, and help you avoid common mistakes. You’ll also find answers to frequent questions and helpful tables for choosing the right hardware and troubleshooting issues. Get ready to brighten your home with confidence and safety.
Understanding The Basics Of Light Fixtures
Before you start, it’s important to know what a light fixture is and how it connects to your home’s electrical system. A light fixture (sometimes called a luminaire) is a device that holds and powers a light bulb. It connects to your home’s wiring through a junction box in the ceiling or wall.
There are many types of fixtures—flush mount, semi-flush, pendant, chandelier, track lighting, and wall sconces. Each has a different style and mounting method, but the electrical connection is often similar.
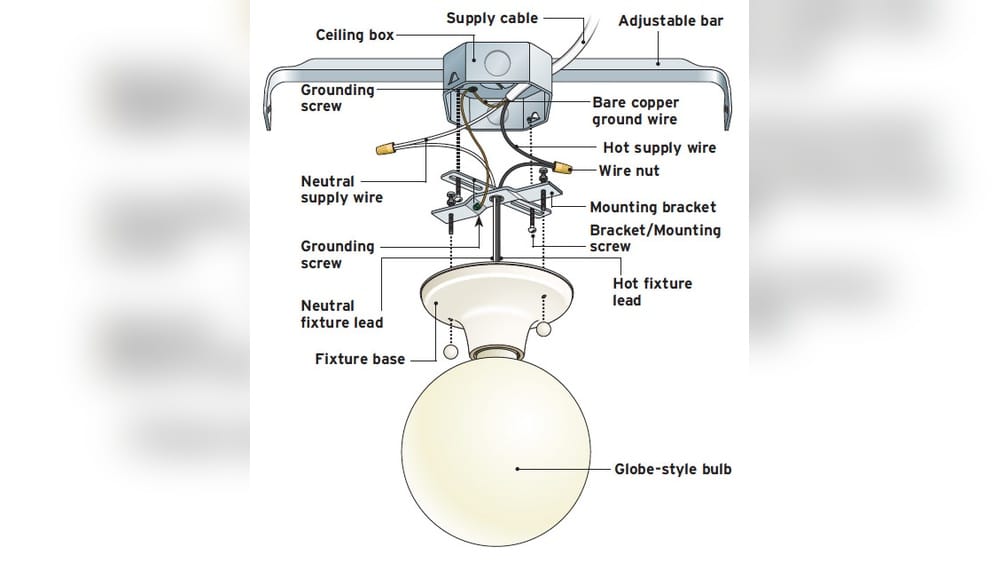
Key parts of a typical light fixture:
- Mounting bracket or plate: Attaches to the junction box.
- Fixture canopy: Covers the wiring and mounting hardware.
- Wires: Usually black (hot), white (neutral), and green or bare (ground).
- Screws and wire nuts: Secure the fixture and connect the wires.
Non-obvious insight: Many people forget to check the maximum wattage allowed for a fixture. Using bulbs with too high wattage can overheat wires and cause a fire risk.
Preparing For The Project
Before touching any wires, take some time to get ready. Good preparation makes the work safer and easier.
Safety First
Electrical work carries risks. Even a small mistake can cause shocks or fires. Here’s how to stay safe:
- Turn off the power: Find the circuit breaker for the room. Switch it off.
- Test with a voltage tester: Never trust a light switch. Always check that the wires are dead before working.
- Work in daylight or have a flashlight ready: You’ll likely turn off the power, so have extra light.
- Use a sturdy ladder: Especially for ceiling fixtures.
- Wear safety glasses: Protect your eyes from falling dust or debris.
Tools And Materials You’ll Need
Gather everything before you start. Here’s a checklist:
- Screwdriver set (flathead and Phillips)
- Wire stripper/cutter
- Voltage tester
- Ladder
- Wire nuts (usually included with fixtures)
- Electrical tape
- Pliers
- Drill and bits (sometimes needed)
- Light bulbs (correct wattage and type)
- Mounting hardware (supplied with fixture)
- Work gloves (for safety and grip)
Practical tip: Keep all small parts in a cup or tray to avoid losing screws.

Credit: www.hammerandaheadband.com
Choosing The Right Light Fixture
Not every fixture fits every room or ceiling. Before buying, consider these factors:
Types Of Light Fixtures
Each room and ceiling type calls for a different fixture. Here’s a quick comparison:
| Fixture Type | Best for | Typical Mounting | Average Cost (USD) |
|---|---|---|---|
| Flush Mount | Bedrooms, hallways | Flat against ceiling | $20–$100 |
| Pendant | Kitchens, dining rooms | Hangs from chain/rod | $30–$300 |
| Chandelier | Dining, entryways | Suspended, decorative | $100–$2,000+ |
| Wall Sconce | Hallways, bathrooms | Mounts on wall | $25–$250 |
| Track Lighting | Offices, kitchens | Tracks along ceiling | $50–$400 |
Size And Weight
- Check the weight limit of your ceiling box. Most boxes can hold up to 50 lbs, but heavy chandeliers need a special support.
- Measure the room. A fixture that’s too big can overwhelm a small space.
- For dining tables, choose a fixture that’s about one-half to two-thirds the table’s width.
Electrical Compatibility
- Confirm your home voltage (usually 120V in the US).
- Check the fixture’s wattage rating.
- Make sure the fixture is compatible with your dimmer switch, if you use one.
Style And Finish
Pick a style that fits your decor. Fixtures come in chrome, bronze, black, gold, and more. Matte black and brushed nickel are popular and hide fingerprints.
Beginner’s mistake: Not measuring ceiling height. Hanging lights need enough clearance for people to walk under.
Removing The Old Light Fixture
If you’re replacing an old fixture, removing it safely is your first step.
Steps For Safe Removal
- Turn off the power at the breaker.
- Test the fixture wires with a voltage tester.
- Remove the bulbs and any glass shades to prevent breakage.
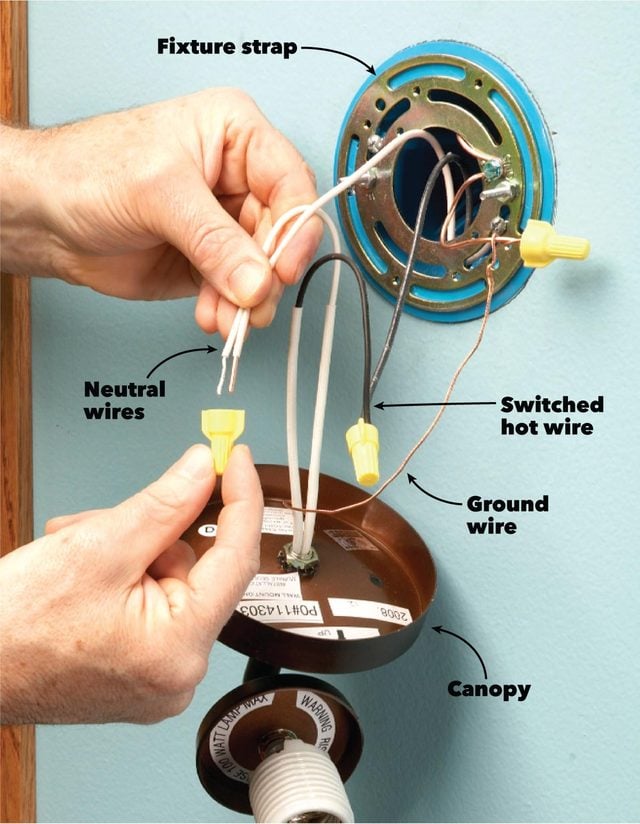
- Unscrew the canopy to expose the wiring and mounting bracket.
- Take a photo of the wire connections with your phone—this helps later.
- Disconnect the wires: Unscrew the wire nuts and gently pull wires apart.
- Unscrew the mounting bracket from the junction box.
Non-obvious insight: Sometimes, old paint or caulk seals the fixture to the ceiling. Use a utility knife to gently cut around the edge before prying.
Tip: If the fixture is heavy, have a helper hold it while you disconnect wires.
Credit: www.familyhandyman.com
Inspecting And Preparing The Electrical Box
Before installing a new fixture, check that the junction box is strong and up to code.
What To Look For
- The box should be securely attached to the framing, not loose.
- Metal or plastic boxes are both common, but for heavy fixtures (over 50 lbs), use a fan-rated box or brace.
- The box should be flush or just above the ceiling surface.
- Wires should not be frayed or damaged. If you see cracked insulation, call an electrician.
- There must be a ground wire (bare copper or green).
Table: Ceiling Box Types and Weight Limits
| Box Type | Material | Max Weight Support | Best Use |
|---|---|---|---|
| Standard Ceiling Box | Plastic | Up to 50 lbs | Most fixtures |
| Metal Box | Steel | Up to 50 lbs | Heavier fixtures |
| Fan-Rated Box | Plastic/Metal | Up to 150 lbs | Ceiling fans, chandeliers |
Making Repairs
If the box is loose, tighten the screws or replace it with a stronger one. If there’s no ground wire, it’s best to have an electrician run one. Never hang a heavy light from a box that feels unstable.
Assembling The New Light Fixture
Most fixtures need some assembly before you hang them. Follow the manufacturer’s instructions, but here are general tips:
- Attach any rods, chains, or decorative pieces.
- Thread wires through the canopy and down the chain or rod.
- If the fixture is heavy, assemble as much as possible on the ground.
Expert advice: Don’t fully tighten decorative nuts until the fixture is mounted and level.
Common mistake: Skipping the assembly steps and trying to hang the fixture piece by piece. This can lead to dropped parts or damage.
Wiring The Light Fixture
Connecting the wires is the most delicate part of the job. Move slowly and double-check each connection.
Understanding Fixture Wiring
Most household fixtures have three wires:
- Black (hot): Carries power from the switch.
- White (neutral): Completes the circuit.
- Green or bare (ground): Protects against electrical faults.
Some fixtures (especially in older homes) may use red or blue wires. Always match the fixture wires to the house wires by color.
Step-by-step Wiring Process
- Hold the fixture close to the ceiling. If it’s heavy, have a helper support it.
- Connect the ground wires first. Twist the ground from the box (bare or green) to the fixture’s ground wire. Use a wire nut.
- Connect neutral wires. Twist the white fixture wire to the white supply wire. Secure with a wire nut.
- Connect hot wires. Twist the black fixture wire to the black supply wire. Secure with a wire nut.
- Double-check all connections. Tug gently to ensure wires are tight.
- Wrap connections with electrical tape for extra safety.
- Tuck wires carefully into the electrical box.
Practical tip: If the supply wires are too short, use wire extensions (pigtails) of the same gauge.
Special Cases
- No ground wire in box: Use a grounding screw on the metal box if possible.
- Multiple switches: If your fixture works with two switches (three-way), you may have extra red wires. Label them during removal and connect as before.
Beginner’s mistake: Mixing up the hot and neutral wires. This can cause a short or prevent the light from working.
Mounting And Securing The Fixture
After wiring, it’s time to attach the fixture to the ceiling or wall.
Mounting The Bracket
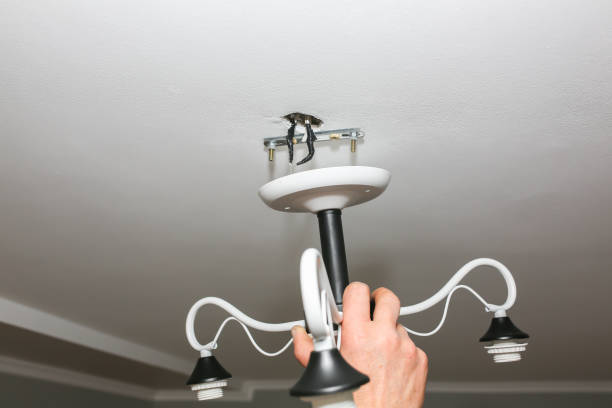
- Screw the mounting bracket or strap to the junction box using the provided screws.
- Some fixtures use a crossbar or U-shaped bracket—follow the instructions.
- Make sure the bracket is snug, not wobbly.
Attaching The Fixture
- Align the fixture’s holes with the bracket posts or screws.
- Secure the canopy or base with the decorative nuts or screws.
- For hanging fixtures, adjust the chain or rod length before final tightening.
Final Checks
- Make sure the fixture is level and sits flush against the ceiling or wall.
- Tighten all visible screws, but avoid over-tightening which could crack glass or strip threads.
Non-obvious insight: For ceiling fixtures, do a gentle “wiggle test.” If the fixture moves more than a few millimeters, check the mounting bracket.
Installing Bulbs And Shades
After mounting, add the bulbs and any glass shades or covers.
- Use bulbs within the recommended wattage.
- Handle glass shades with gloves to avoid fingerprints and smudges.
- Make sure bulbs are screwed in snugly, but not forced.
Table: Bulb Types and Their Uses
| Bulb Type | Typical Use | Energy Efficiency | Average Lifespan (hours) |
|---|---|---|---|
| Incandescent | Older fixtures | Low | 1,000 |
| Halogen | Track, recessed | Moderate | 2,000 |
| CFL | General use | High | 10,000 |
| LED | All fixtures | Very High | 25,000+ |
Tip: LEDs save energy and last much longer than older bulb types. Choose soft white (2700K–3000K) for a cozy feel, or daylight (5000K) for work areas.
Testing The Fixture
You’re almost done! Now, make sure everything works.
- Turn the power back on at the breaker.
- Test the light switch. The fixture should turn on and off without flickering.
- Check for strange smells or sounds. If you notice burning or buzzing, turn off the power and recheck your wiring.
- Inspect for loose parts. Tighten any screws or nuts if needed.
- Test with different bulbs if the fixture doesn’t light up. Sometimes a bulb is defective.
Expert advice: If the fixture trips the breaker, double-check that no wires are touching or exposed.
Troubleshooting Common Problems
Even with careful work, issues can happen. Here’s how to solve the most frequent ones.
The Light Doesn’t Turn On
- Check that the breaker is on.
- Make sure the bulb works (try it in another lamp).
- Check all wire connections—loose wires are a common cause.
- Ensure the switch is not faulty.
- If nothing helps, you may have a bad fixture or a wiring issue in the wall.
Flickering Or Dimming
- This often means a loose wire or poor connection.
- Check all wire nuts and retighten.
- Try a different bulb; some LED bulbs flicker with older dimmer switches.
The Fixture Is Crooked
- Adjust the mounting bracket and retighten.
- Check that all screws are even.
- For pendants, make sure the chain or cord is untwisted and hangs straight.
Breaker Keeps Tripping
- This can be a sign of a short circuit.
- Double-check wiring; make sure no bare wires are touching.
- If the problem continues, consult an electrician.
Fixture Feels Hot
- Use bulbs with correct wattage.
- High heat can mean too much wattage or poor ventilation.
Non-obvious insight: If you have aluminum house wiring (common in homes from the 1960s-70s), special connectors are needed for safety. Ordinary wire nuts can cause overheating.
Upgrading For Smart Features
Many new light fixtures support smart bulbs or built-in smart controls. These let you control lights by app or voice.
- Choose fixtures with enough space to fit smart bulbs—they are sometimes larger than regular bulbs.
- Some fixtures come with built-in WiFi or Bluetooth controls.
- For smart switches, make sure there’s a neutral wire in the box (required by most models).
Tip: Not all dimmer switches work with smart bulbs. Check compatibility before buying.
Credit: lightingshs.com
Cost And Time Estimates
Understanding how much you’ll spend and how long the project takes helps with planning.
Average Cost Breakdown
- Basic ceiling fixture: $30–$100
- Fancy chandelier: $100–$2,000+
- Tools and supplies (if you need to buy): $25–$75
Hiring an electrician costs $50–$150 per hour, but doing it yourself usually takes 1–2 hours for a simple fixture, up to 4 hours for a complex one.
Cost Comparison Table
| Project Type | DIY Cost | Pro Installation Cost | Time Required (DIY) |
|---|---|---|---|
| Replace basic fixture | $30–$100 | $150–$300 | 1–2 hours |
| Install chandelier | $100–$500 | $300–$700 | 2–4 hours |
| Add new ceiling box | $25–$75 (box only) | $200–$400 | 2–3 hours |
Beginner’s mistake: Forgetting to budget for tools or the right bulbs. Always check what’s included with your fixture.
Safety Reminders And When To Call A Professional
Doing electrical work is rewarding, but never take risks with safety.
- If you see damaged wires, loose boxes, or have old (knob-and-tube or aluminum) wiring, call a licensed electrician.
- If you’re not sure about a wiring diagram, don’t guess—get help.
- Never work with wet hands or in damp conditions.
For more detailed electrical safety tips, see the National Fire Protection Association guide.
Frequently Asked Questions
How Do I Know If My Electrical Box Can Hold A Heavy Light Fixture?
Most ceiling boxes can hold up to 50 lbs, but heavy fixtures like large chandeliers need a fan-rated box or special bracing. Always check the box’s labeling or consult an expert if unsure.
Can I Mount A Light Fixture Where There Is No Existing Box?
No, you need a junction box for safe, code-compliant installation. Never attach a fixture directly to drywall or plaster. If you need a new box, some models are designed for old work and can be added with minimal ceiling damage.
What If My Wires Are Not Color-coded?
In older homes, wire colors may be faded or missing. The hot wire is usually black or red, the neutral is white, and the ground is green or bare. If you’re unsure, use a voltage tester to identify wires, or consult an electrician.
Can I Use Led Bulbs In Any Light Fixture?
Most modern fixtures support LED bulbs, but always check the fixture’s labeling. Some older dimmers are not compatible with LEDs and may cause flickering or buzzing.
Is It Safe To Mount A Light Fixture Alone?
For small, lightweight fixtures, it’s usually safe to work alone if you’re careful. For heavy or awkward fixtures, get a helper. Holding a fixture with one hand while wiring with the other increases the risk of dropping it or making mistakes.
Lighting affects the mood, safety, and style of your home. Learning how to mount a light fixture yourself is a valuable skill that saves money and gives you more control over your space. With careful preparation, attention to safety, and the steps in this guide, you can update your lighting confidently.
And remember, when in doubt, don’t hesitate to call a professional. Let your home shine—safely and beautifully.