
Quilts are more than just bed covers—they are pieces of art, family treasures, and statements of creativity. Mounting a quilt on a wall lets you display its beauty, protect its condition, and add warmth to your space. But there’s more to hanging a quilt than just hammering a nail.
The right method keeps your quilt secure, flat, and undamaged for years. This guide explains everything you need to know about how to mount a quilt on a wall, from choosing the right location to step-by-step hanging methods, preservation tips, and even ways to avoid common mistakes.
Whether you’re a quilt maker, a collector, or simply someone who wants to showcase a cherished piece, you’ll find practical advice and non-obvious tips to help you do it right.
Why Mount Quilts On The Wall?
Hanging a quilt transforms it into a focal point and allows you to enjoy its details every day. Many people mount quilts for these reasons:
- Showcase craftsmanship: Quilts often feature intricate patterns and hand-stitched details worth displaying.
- Preserve memories: Heirloom quilts or gifts from loved ones become a visible part of your home story.
- Protect from wear: Wall mounting keeps quilts off beds and away from frequent handling, reducing fading and fabric stress.
Displaying a quilt on your wall is also a way to connect with tradition. In many cultures, quilts have been hung during celebrations or as part of home decor for generations.
Choosing The Best Location
The place where you mount your quilt is just as important as how you hang it. A poor location can lead to fading, fabric damage, or even mold. Consider these factors before you begin:
Light Exposure
Direct sunlight is the enemy of quilt fibers and colors. UV rays cause fading, especially in vintage or brightly colored quilts. Choose a wall that doesn’t get strong sunlight. North-facing walls or areas with indirect light are best.
Humidity And Temperature
Quilts are sensitive to moisture and extreme temperatures:
- Avoid placing quilts near bathrooms, kitchens, or exterior walls that may get damp.
- Keep quilts away from heating vents, radiators, or fireplaces, which can dry out and weaken fabric.
Wall Space And Height
Measure the quilt and wall area to find the right fit. Hanging a quilt too close to the ceiling or floor can look awkward and make it hard to see details.
Pro tip: If you want to display a group of quilts, leave enough space between each piece so they don’t look crowded.
Preparing Your Quilt For Hanging
Before mounting, make sure your quilt is clean and ready for display.
Cleaning And Inspection
- Dust and debris: Shake the quilt gently to remove dust. Use a lint roller for surface particles, but avoid sticky rollers on delicate fabrics.
- Washing: If your quilt is sturdy and washable, clean it by hand with mild detergent. Test for colorfastness first.
- Check for damage: Look for loose seams, tears, or weak areas. Repair these before hanging to prevent further stress.
Adding A Hanging Sleeve
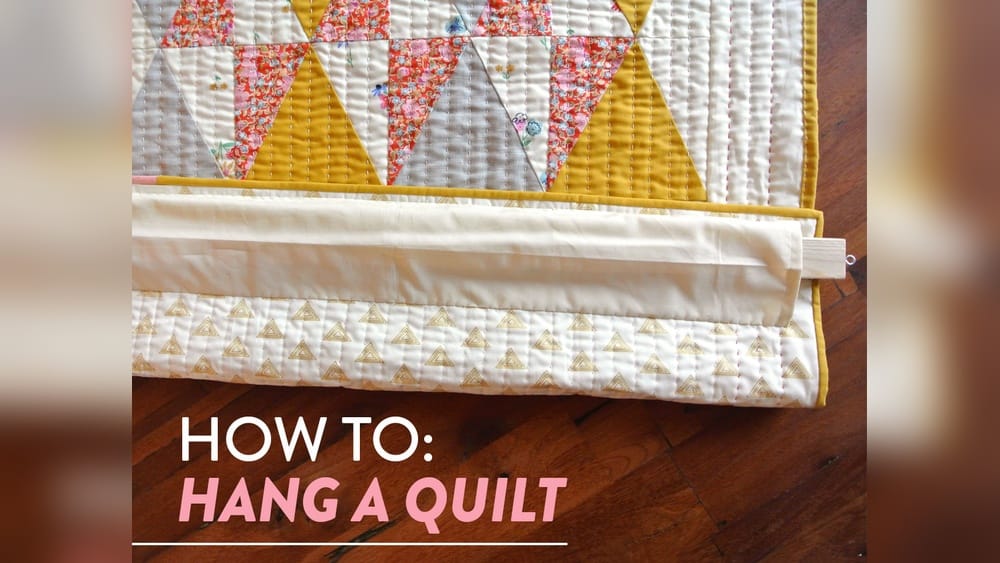
Most professional quilt displays use a fabric sleeve sewn to the back. This method is safe and keeps the quilt flat.
- Use cotton or muslin fabric for the sleeve.
- The sleeve should be the width of the quilt and about 4 inches tall.
- Stitch the sleeve to the back, close to the top edge, using a large hand-sewn stitch that doesn’t go through to the front.
Adding a sleeve is a non-damaging way to prepare your quilt and is recommended by museums and quilt experts.
Essential Tools And Materials
Different mounting methods require different tools. Here’s a comparison of common tools and their purposes:
| Tool/Material | Purpose | Best For |
|---|---|---|
| Hanging Rod | Supports quilt with sleeve | Medium to large quilts |
| Command Strips | Adhesive mounting without holes | Lightweight or small quilts |
| Velcro Tape | Removable, flexible attachment | Frequent changes or rentals |
| Quilt Clips | Grasp quilt edge, attach to wall | Temporary displays |
| Wooden Slat | Insert in sleeve for structure | Heavier or long quilts |
| Picture Hanging Hardware | Secure rods or slats to wall | Permanent installations |
Choose your materials based on your quilt’s size, weight, and how permanent you want the display to be.
Main Methods For Mounting Quilts
Several proven methods exist for mounting quilts. Each has its own advantages and best uses.
Method 1: Hanging Sleeve And Rod
This is the most recommended method for medium to large quilts, especially heirlooms.
Steps:
- Sew a sleeve: Attach a 4-inch wide fabric tube (the sleeve) to the back of your quilt along the top edge.
- Choose a rod: Use a wooden dowel, curtain rod, or metal bar that fits inside the sleeve and matches the quilt’s width.
- Install wall supports: Use decorative brackets, hooks, or picture hanging hardware to hold the rod.
- Slide the rod: Insert the rod into the sleeve and hang it on the supports.
Advantages: Even weight distribution, no damage, professional appearance.
Drawbacks: Requires sewing and hardware installation.
Non-obvious tip: For wider quilts, use two supports closer to the ends, not just the center, to prevent sagging.
Method 2: Velcro (hook And Loop) System
Used by many museums, this method is secure and nearly invisible.
Steps:
- Sew the soft Velcro strip: Attach the loop (soft) side of the Velcro along the quilt’s top edge on the back.
- Attach the hook side: Fasten the hook (rough) side to a wooden slat or directly onto the wall (if smooth and clean).
- Mount the slat: Secure the wood slat to the wall with screws or removable mounting strips.
- Press the quilt onto the wall: Align the Velcro strips and press them together.
Advantages: Easy removal, adjustable, doesn’t distort the quilt.
Drawbacks: Sewing is required; Velcro can collect lint if quilt is taken down often.
Non-obvious insight: This system is excellent for rotating quilts in your display, as you can swap pieces with minimal effort.
Method 3: Quilt Clips Or Clamps
Quick and non-permanent, good for temporary displays.
Steps:
- Select quilt-safe clips: Use large binder clips with padded jaws or special quilt hangers.
- Measure spacing: Place clips every 12-18 inches along the quilt’s top edge.
- Attach to wall: Hang the clips from nails, hooks, or a mounted rod.
Advantages: No sewing, easy to move.
Drawbacks: May leave marks on delicate fabrics, less secure for heavy quilts.
Method 4: Command Strips Or Adhesive Hooks
Good for renters or lightweight quilts.
Steps:
- Clean the wall: Ensure surface is smooth and dust-free.
- Apply strips or hooks: Follow package instructions; place evenly across quilt width.
- Hang the quilt: Attach by the corners or use loops sewn to the back.
Advantages: No wall damage, simple to use.
Drawbacks: Only for lightweight quilts; adhesives may fail over time.
Method 5: Wood Slat In Sleeve
Provides extra support for long or heavy quilts.
Steps:
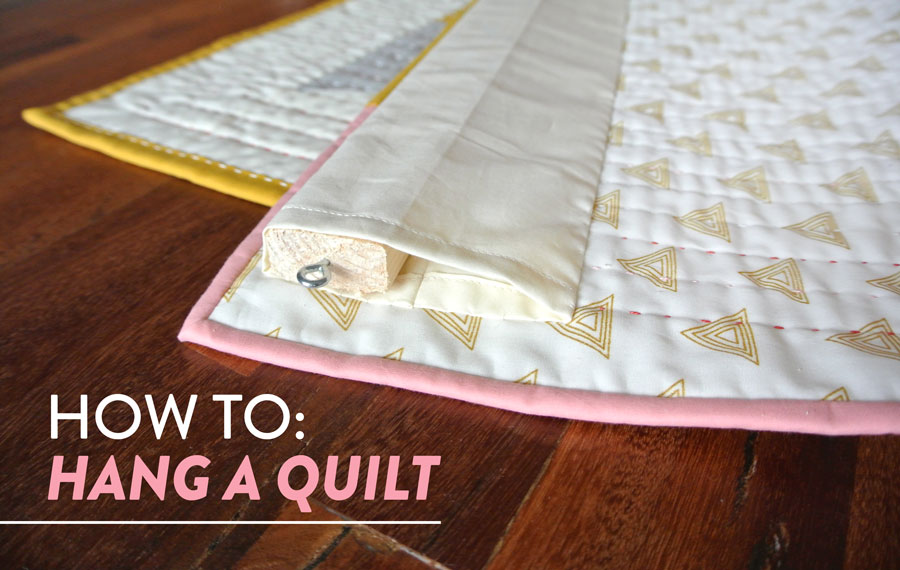
- Sew a deep sleeve: Make the sleeve wide enough for a 1-inch wood slat.
- Insert slat: Cut wood so it’s 1 inch shorter than quilt width; sand edges smooth.
- Drill holes in slat ends: For screws or hooks.
- Mount slat: Attach to wall brackets or hooks.
Advantages: Prevents sagging, supports heavier quilts.
Drawbacks: Permanent hardware, needs precise measuring.
Comparison Of Mounting Methods
Here’s a summary to help you choose the right method:
| Method | Best For | Pros | Cons |
|---|---|---|---|
| Hanging Sleeve & Rod | Medium/large quilts | Even support, professional look | Requires sewing, wall hardware |
| Velcro System | Rotating displays | Easy to swap, museum standard | Velcro sewing, lint build-up |
| Quilt Clips | Temporary use | No sewing, simple | Marks on fabric, less secure |
| Command Strips | Lightweight/rental spaces | No wall damage, easy | Not strong for heavy quilts |
| Wood Slat in Sleeve | Heavy/long quilts | Strong, no sagging | More work, wall holes |
Step-by-step Guide: Hanging With A Sleeve And Rod
Let’s walk through the most common and safest method in detail.
Materials Needed
- Quilt with sleeve (already sewn on)
- Wooden dowel or curtain rod (length = quilt width)
- Two wall brackets or hooks
- Level
- Measuring tape
- Pencil
- Screws and anchors (if mounting into drywall)
Instructions
- Measure the wall area where you want to hang the quilt. Mark the top line with a pencil, using a level to ensure it’s straight.
- Install the brackets. Use anchors if not screwing into studs. Place brackets the same distance apart as the quilt’s sleeve length.
- Slide the rod through the sleeve on the quilt’s back.
- Lift the rod and quilt together and set the rod into the brackets.
- Adjust the quilt so it hangs flat and even.
Extra tip: If your quilt is wavy or pulling, try inserting a thin foam pipe along with the rod inside the sleeve to gently fill out the top edge.
Protecting Your Quilt On The Wall
Mounting isn’t just about getting the quilt up—it’s about keeping it safe.
Preventing Fading
- Hang quilts away from direct sunlight and strong artificial lights.
- Consider using UV-protective window films if your room is bright.
- Rotate quilts every few months to limit exposure and wear.
Controlling Humidity
- Keep indoor humidity between 40-55%. Use a small dehumidifier if your area is damp.
- Avoid hanging quilts in basements or bathrooms.
- Check the wall behind the quilt for signs of condensation or mildew.
Gentle Cleaning
- Dust the quilt every few weeks with a clean, soft brush or vacuum with a gentle brush attachment.
- Avoid using chemical cleaners or sprays on or near the quilt.
Handling And Storage
- When removing the quilt, wash hands first or wear cotton gloves.
- Fold quilts as little as possible to avoid permanent creases.
- If storing, roll the quilt around an acid-free tube instead of folding.

Credit: www.bobbininquilts.com
Creative Display Ideas
Mounting a quilt doesn’t have to be boring. Here are ways to make your display unique:
- Group smaller quilts in a gallery-style arrangement for visual impact.
- Use a decorative curtain rod with finials for an elegant look.
- Hang quilts on wooden ladders leaning against the wall for a casual, flexible display.
- Frame a small quilt block or mini-quilt in a deep shadow box.
- For children’s rooms, hang story quilts at child-eye level for interaction.
Non-obvious insight: When displaying several quilts together, choose pieces with a unifying color or theme for a harmonious look.
Common Mistakes To Avoid
Many beginners damage their quilts or end up with crooked, sagging displays. Avoid these pitfalls:
- Skipping the sleeve: Hanging by pins or nails can tear fabric or cause distortion.
- Ignoring light and moisture: Fading and mildew are often permanent.
- Using too few supports: A single hook or nail can cause the quilt to stretch or droop.
- Over-tightening clips: This can crush batting and leave marks.
- Mounting on rough surfaces: Textured walls can snag or abrade the back of the quilt.
Pay attention to these details and you’ll enjoy your quilt for years without regret.
Credit: suzyquilts.com
Advanced Techniques
If you want a truly professional look or have a very large or valuable quilt, consider these options:
French Cleat System
A French cleat is a strong, wall-mounted support often used for heavy items.
- Attach one angled wood strip to the wall and the matching piece to the back of a mounting board or slat behind the quilt.
- The angled edges lock together, holding the quilt securely.
This method is ideal for large quilts in public spaces or galleries.
Archival Mounting
For antique or museum-quality quilts:
- Use acid-free materials for sleeves and supports.
- Avoid adhesives or tapes.
- Consult a textile conservator for valuable pieces.
Learn more about quilt preservation from the Smithsonian Institution’s textile collection.
Maintenance And Rotating Displays
Quilts last longer if they’re not left in the same place year after year.
- Take quilts down every 6-12 months to rest, air out, and check for damage.
- Store off-display quilts rolled, not folded, to prevent creases.
- If you love changing your decor, the Velcro system or clips make swapping quilts easy.
Tip: Document each quilt’s display period and location. This helps prevent overexposure to light and keeps your collection in good shape.
Troubleshooting Display Issues
Even with the best plan, problems can arise:
- Quilt is not hanging flat: Check if the sleeve is too tight or uneven. Adjust or resew if needed.
- Quilt is sagging in the middle: Add a center support or use a stiffer rod.
- Wall hooks are coming loose: Use wall anchors or move supports to studs.
- Quilt has new stains: Remove from wall and clean promptly. Check for leaks or condensation on the wall.
If in doubt, ask at a local quilt shop or museum for advice. Many have experience helping with tricky displays.
Environmental Considerations
Some homes have challenges like high humidity, pests, or old walls. Here’s what to do:
- Use silica gel packets behind the quilt for moisture control.
- Inspect quilts regularly for signs of moths or insects.
- If walls are rough or painted with old lead-based paint, add a thin barrier layer (like unbleached muslin) between quilt and wall.

Credit: www.mixmeasuremake.com
Special Cases: Mounting Large, Odd-shaped, Or Fragile Quilts
Large Quilts
- Use multiple supports spaced every 18-24 inches.
- Consider dividing the weight with two rods or a rail system.
Odd-shaped Quilts
- Sew a sleeve that matches the shape, or use carefully placed Velcro strips.
- For circular or curved quilts, a custom ring or frame may be needed.
Fragile Or Antique Quilts
- Never use adhesives, pins, or clips that might damage fibers.
- Use padded supports and acid-free backing material.
- If in doubt, display a reproduction and keep the original in storage.
Cost And Time Estimates
Mounting a quilt can be budget-friendly or more involved, depending on your choices.
| Method | Approximate Cost | Time Required | Skill Level |
|---|---|---|---|
| Hanging Sleeve & Rod | $10–$40 | 1–2 hours | Beginner–Intermediate |
| Velcro System | $15–$50 | 1–2 hours | Intermediate |
| Quilt Clips | $5–$20 | 15–30 minutes | Beginner |
| Command Strips | $10–$25 | 30–45 minutes | Beginner |
| Wood Slat in Sleeve | $15–$35 | 1–2 hours | Intermediate |
Non-obvious tip: Investing a little more in quality rods or brackets makes a big difference for heavy quilts and avoids future repairs.
Frequently Asked Questions
How Do I Hang A Quilt Without Damaging The Wall?
Use Command Strips or removable adhesive hooks for lightweight quilts. For heavier quilts, mount a rod or slat with wall anchors in existing holes, then patch and paint when removed. Avoid nails or screws directly into plaster.
What’s The Best Way To Hang An Antique Quilt?
Sew a cotton sleeve with large, loose stitches so it can be removed later. Use a wooden rod or Velcro system attached to acid-free materials. Keep the quilt away from light and humidity, and never use adhesives or pins.
Can I Hang A Quilt With Push Pins Or Tacks?
It’s not recommended. Pins and tacks can damage fibers, leave holes, or cause stretching. Use quilt clips or sew on small fabric loops instead if you need a temporary solution.
How Often Should I Rotate Quilts On Display?
Switch quilts every 3–6 months to minimize light exposure and fabric stress. This also lets you enjoy more of your collection and keeps your display fresh.
What Should I Do If My Quilt Starts To Fade Or Discolor?
Remove it from the wall immediately. Check the room’s light and humidity levels. Consult a textile conservator for cleaning or repairs, especially for valuable or antique quilts.
Displaying a quilt on your wall can be deeply rewarding, both visually and emotionally. With the right method, tools, and care, your quilt will become an admired centerpiece—protected and preserved for years to come. Take your time, follow the steps, and enjoy the unique beauty that only a handmade quilt can bring to your home.