
Mounting a toilet might seem like a complicated task, but with the right guidance, tools, and preparation, it’s a job many homeowners can handle successfully. Whether you’re replacing an old toilet or installing one in a new bathroom, understanding each step of the process helps prevent leaks, wobbling, and costly mistakes.
This guide will walk you through everything you need to know about how to mount a toilet, from choosing the right model to the final checks after installation.
Choosing The Right Toilet For Your Bathroom
The first step in mounting a toilet is selecting the right unit for your space. There are several types and features to consider, each affecting installation and long-term satisfaction.
Toilet Types
There are three main types of toilets:
- Two-piece toilets: The bowl and tank are separate pieces joined during installation. These are the most common and generally more affordable.
- One-piece toilets: The bowl and tank are fused into a single unit. These are easier to clean but typically heavier and more expensive.
- Wall-mounted toilets: The bowl is attached to the wall, with the tank hidden inside the wall. These save floor space but require special installation and wall reinforcement.
Rough-in Size
The rough-in size is the distance from the wall to the center of the toilet flange (the pipe fitting on the floor). The standard in the US is 12 inches, but you might find 10 or 14-inch models in older homes. Measure carefully before buying; the wrong size won’t fit.
Other Features
Modern toilets offer various features:
- Water-saving models use less than 1.28 gallons per flush.
- Comfort height toilets are 17–19 inches from floor to seat, easier for taller people or those with mobility issues.
- Elongated bowls provide more comfort but need more space than round bowls.
If you’re not sure what’s best for your needs, consult store staff or a plumber before purchasing.
Essential Tools And Materials
Before starting, gather all the tools and materials you’ll need. Having everything on hand reduces stress and helps avoid mistakes.
Tools
- Adjustable wrench
- Flathead and Phillips screwdrivers
- Tape measure
- Putty knife
- Level
- Hacksaw (for cutting bolts if needed)
- Sponge and bucket
- Utility knife
Materials
- Toilet (bowl and tank)
- Wax ring or wax-free seal
- Closet bolts and caps (usually come with a new toilet)
- Toilet mounting flange (if replacing)
- Water supply line (braided steel recommended)
- Toilet shims (for leveling, if needed)
- Plumber’s tape (Teflon tape)
- Rubber gloves and towels
Always check the toilet box for included parts. Some manufacturers provide all bolts, seals, and even a basic wrench.
Safety And Preparation
Mounting a toilet involves water, heavy lifting, and sometimes exposure to old waste. Take these safety steps:
- Turn off the water supply at the shutoff valve near the toilet’s base.
- Wear rubber gloves to protect your hands.
- If you’re removing an old toilet, have a friend help lift it (bowls can weigh 60–120 lbs).
- Ventilate the bathroom to reduce odors.
- Place old towels or a plastic sheet to protect the floor.
If your toilet is on an upper floor or you have mobility issues, consider hiring a professional for heavy lifting.
Removing The Old Toilet
If you’re replacing an old toilet, you must first remove it safely. This process is just as important as installing the new one.
- Shut Off Water and Drain: Turn off the water valve. Flush the toilet to empty most water from the tank and bowl. Use a sponge or small cup to remove any remaining water.
- Disconnect Water Supply: Unscrew the supply line from the bottom of the tank.
- Remove Tank (if two-piece): Unscrew the bolts connecting the tank to the bowl. Lift the tank straight up and set it aside.
- Unbolt Bowl: Pop off the bolt caps at the toilet’s base. Use a wrench to remove the nuts from the closet bolts.
- Break Seal and Lift Bowl: Rock the bowl gently to break the wax seal. Lift the bowl straight up and move it out of the way.
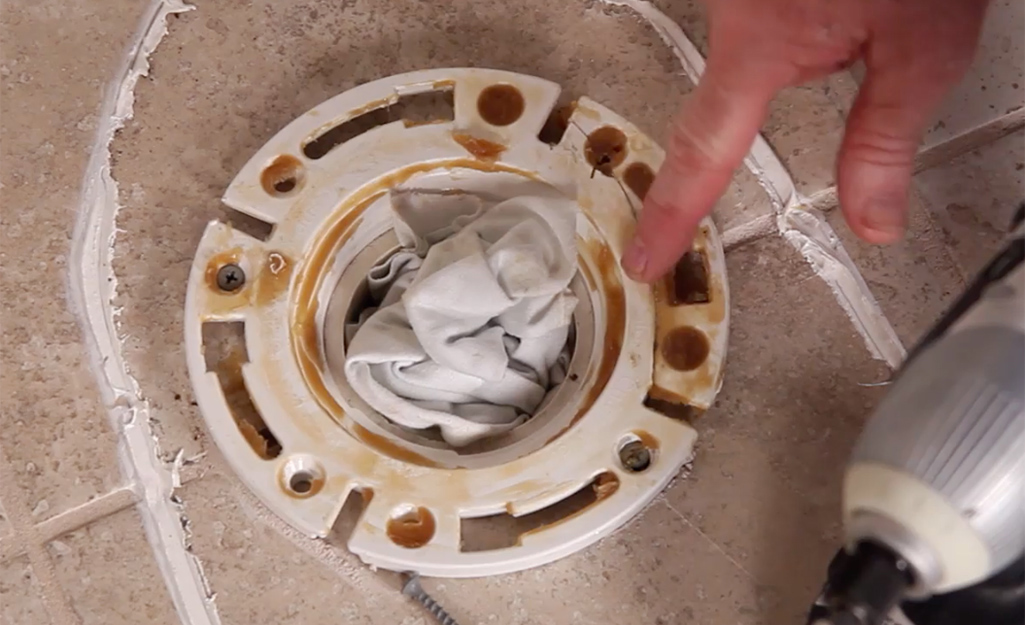
- Plug Drain: Stuff a rag into the drain opening to block sewer gases. Do not leave this open for long.
This is a good time to check the floor and flange for any damage or rot. If the floor feels soft or the flange is cracked, repair these before moving forward.
Preparing The Toilet Flange
The toilet flange is the circular pipe fitting that connects your toilet to the drain. A secure, level flange is vital for a leak-free installation.
- Inspect the flange for cracks or rust. Metal or PVC flanges should be solid and well-anchored to the floor.
- Replace or repair damaged flanges with repair kits from the hardware store.
- The flange should sit level with the finished floor. If it’s too low, use flange extenders.
- Scrape away old wax with a putty knife so the new wax ring seals correctly.
If you need to install or repair a flange, follow the instructions on the packaging or consult a plumber for more complex repairs.
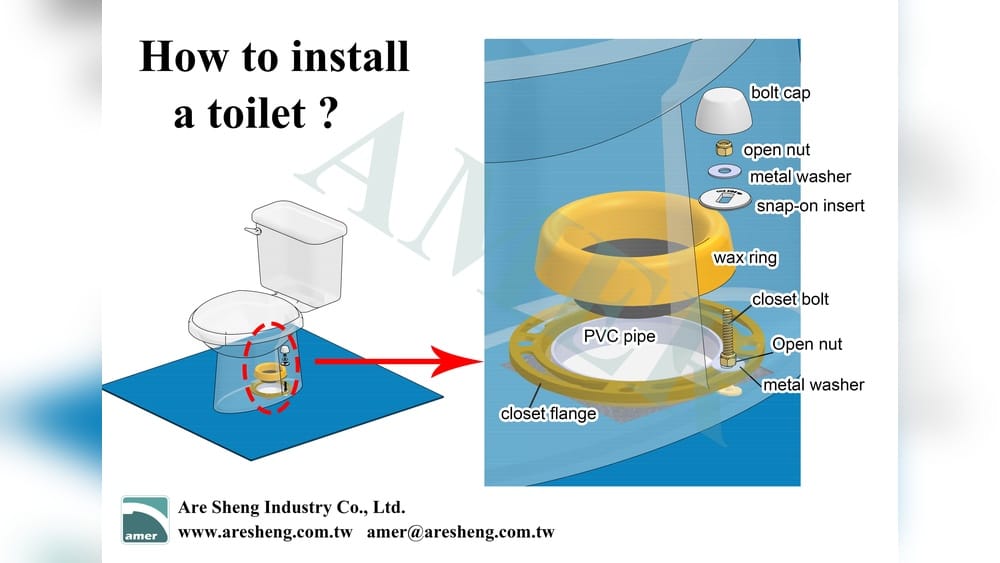
Installing Closet Bolts
Closet bolts secure the toilet to the flange and floor.
- Slide the bolts into the slots on the flange.
- Make sure they’re straight and even.
- Use plastic washers to hold them upright.
- Check that the bolts are spaced correctly for your toilet’s base holes.
Properly installed closet bolts make it much easier to lower the toilet bowl without misalignment.
Setting The Wax Ring
The wax ring creates a watertight seal between the toilet and the drain. You can use a traditional wax ring or a modern wax-free gasket.
- Place the ring (or gasket) on the toilet flange, not on the toilet.
- Center it carefully to cover the drain opening.
- Do not stack multiple rings unless absolutely necessary (for very uneven floors).
Wax rings are cheap but critical. If you misplace or damage one, do not reuse it—get a new one.
Lowering The Toilet Bowl
Now comes a key moment: mounting the toilet bowl.
- Align the Bowl: With a helper, lift the bowl over the flange, lining up the holes with the closet bolts.
- Lower Carefully: Gently lower the bowl straight down onto the wax ring. Avoid rocking or twisting, which can break the seal.
- Press Down: Sit on the bowl or apply downward pressure to compress the wax ring and ensure a tight seal.
- Check Alignment: Make sure the bowl is square to the wall and centered over the flange.
If you make a mistake and must lift the bowl, always replace the wax ring. A compressed ring will not reseal properly.
Securing The Toilet Base
With the bowl in place, you’ll secure it to the floor.
- Place washers and nuts on the closet bolts.
- Tighten nuts evenly, alternating sides, until snug. Do not overtighten—porcelain can crack.
- Trim excess bolt length with a hacksaw if needed.
- Snap on the decorative bolt caps.
Check that the toilet doesn’t rock. If your floor is uneven, insert toilet shims under the base before tightening fully. Caulk around the base (leaving a small gap at the back for leak detection) for a finished look and extra stability.
Attaching The Tank
For two-piece toilets, you’ll now attach the tank to the bowl.
- Set the tank-to-bowl gasket (often a thick rubber ring) on the tank outlet.
- Place the tank on the bowl, lining up the mounting holes.
- Insert tank bolts with rubber washers.
- Tighten the nuts from below, alternating sides, until the tank is firm but not stressed.
Check that the tank is level and does not wobble. If you see leaks after the first flush, tighten the bolts slightly more.
Connecting The Water Supply
Next, you’ll connect the toilet to your home’s water supply.
- Attach the supply line to the fill valve under the tank. Hand-tighten, then give a quarter turn with a wrench.
- Connect the other end to the shutoff valve.
- Turn the water on slowly.
- Check for leaks at both connections. If you see drips, tighten gently.
Use Teflon tape on threaded fittings for a better seal. Avoid overtightening, which can strip threads or crack plastic parts.
Testing The Toilet
Testing ensures your new toilet works properly and no leaks exist.
- Let the tank fill. Watch for leaks around the base, tank bolts, and supply line.
- Flush several times. Check for water on the floor.
- Sit on the toilet and rock gently to ensure it’s stable.
- Inspect the bowl for proper flush and refill.
If you notice slow filling, strange sounds, or leaks, address them immediately. Common issues include loose supply lines, uneven bolts, or a misaligned wax ring.
Finishing Touches
With the main steps done, add the finishing touches to your toilet installation.
- Attach the toilet seat according to the manufacturer’s instructions. Most use plastic bolts or quick-release hinges.
- Caulk around the base for a neat appearance and to block smells or insects.
- Clean up any debris, old wax, or fingerprints.
If you replaced the floor or made repairs, reinstall any baseboards or trim.
Common Mistakes And How To Avoid Them
Mounting a toilet isn’t difficult, but it’s easy to make small mistakes that cause big problems. Here’s how to avoid the most common ones:
- Reusing Old Wax Rings: They won’t reseal and will leak.
- Overtightening Bolts: This can crack porcelain, leading to expensive replacement.
- Ignoring Uneven Floors: Always use shims if the toilet rocks.
- Not Replacing Old Supply Lines: Old or corroded lines can leak soon after installation.
- Forgetting to Check for Leaks: Water damage can start small and become a major repair.
If you’re ever unsure, stop and seek advice from a professional or online resources like the Family Handyman.
Comparing Toilet Types And Features
Choosing the right toilet affects installation and long-term satisfaction. Here’s a quick comparison of common types and features:
| Type | Pros | Cons | Average Cost |
|---|---|---|---|
| Two-piece | Affordable, easy to move/install | More seams to clean | $120–$350 |
| One-piece | Sleek look, easy to clean | Heavier, pricier | $250–$600 |
| Wall-mounted | Saves space, modern style | Requires wall work, expensive | $400–$1000+ |
Water Usage And Savings
Modern toilets are much more efficient than older models. The US federal standard is 1. 6 gallons per flush (GPF), but many new toilets use less.
| Toilet Age/Type | Gallons Per Flush | Annual Water Use* | Notes |
|---|---|---|---|
| Pre-1980 | 5–7 GPF | 24,000+ gallons | Very inefficient |
| 1990s Standard | 3.5 GPF | 16,000 gallons | Older low-flow models |
| Modern (current standard) | 1.6 GPF | 9,000 gallons | Meets US law |
| High-efficiency | 1.28 GPF | 7,000 gallons | WaterSense labeled |
*Based on average household use (12,000 flushes/year)
Replacing an old toilet can save thousands of gallons of water and reduce your utility bill by $50–100 per year.
Understanding Toilet Flanges And Adapters
Not all floors or plumbing are the same. Sometimes, you’ll need a flange adapter or repair ring.
| Situation | Solution | Notes |
|---|---|---|
| Flange below floor level | Flange extender | Builds up height for proper seal |
| Cracked/broken flange | Repair ring/kit | Secures bolts without full replacement |
| Offset drain location | Offset flange | Moves opening up to 2 inches |
Non-obvious Insights For A Successful Installation
- Test-Fit Your Toilet: Before adding the wax ring, do a “dry fit.” Place the bowl on the flange to check alignment, bolt fit, and if you need shims. This small step helps avoid wax ring mistakes.
- Warm the Wax Ring: If you’re working in a cold room, warm the wax ring to room temperature. Cold wax is hard and doesn’t seal well.
- Leave a Caulk Gap: Always leave a small gap at the back of the toilet base when caulking. This way, leaks from a failed seal will flow out and be visible, not hide under the floor.
- Check Local Codes: Some local codes require caulking around the base, while others do not. Check before starting for best practice in your area.
- Use a Level: Even a slight tilt can cause leaks or an uncomfortable seat. Always check that the bowl and tank are level before fully tightening bolts.
Troubleshooting Common Problems
Even with careful work, problems can arise after mounting a toilet. Here’s how to solve the most common ones:
Leaking At The Base
- Cause: Misaligned wax ring, cracked flange, or uneven floor.
- Solution: Remove and reset the toilet with a new wax ring. Level the floor or use shims.
Rocking Toilet
- Cause: Uneven floor or loose bolts.
- Solution: Insert shims under the base. Tighten bolts gently but firmly.
Tank Leaks
- Cause: Loose bolts, damaged gasket, or uneven tank.
- Solution: Tighten tank bolts evenly. Replace the gasket if needed.
Weak Flush
- Cause: Blocked rim holes, low water level, or partial clog.
- Solution: Clean rim holes with a wire. Adjust the fill valve. Use a plunger or auger.
Constant Running
- Cause: Faulty flapper, float, or fill valve.
- Solution: Adjust or replace the flapper or float. Replace the fill valve if old.
If you can’t solve a problem with these steps, consult a licensed plumber.
When To Call A Professional
While many homeowners can mount a toilet, some situations require expert help:
- Flange is broken or recessed far below the floor
- Water damage or soft spots around the toilet
- Wall-mounted or specialty toilets
- No shutoff valve in the bathroom
- You’re uncomfortable with plumbing work
Professional installation usually costs $150–$400, depending on your region and bathroom setup. This can be money well spent if you want peace of mind.
Maintaining Your Newly Mounted Toilet
Once your toilet is mounted and working, a little maintenance will keep it trouble-free for years.
- Check for leaks around the base and supply line every few months.
- Clean the bowl and tank regularly to prevent stains and mineral buildup.
- Avoid using chemical drain cleaners, which can damage seals and pipes.
- Test the shutoff valve once a year to ensure it works.
- Replace the supply line every 5–10 years, or sooner if you see corrosion.
These steps will help your toilet last 20 years or more.
Frequently Asked Questions
How Long Does It Take To Mount A Toilet?
For most people, mounting a toilet takes 2 to 4 hours, including removing the old unit and cleaning up. If you need to repair the flange or floor, allow extra time.
Can I Reuse The Old Wax Ring When Installing A New Toilet?
No. Always use a new wax ring for every installation. Old wax will not reseal and can cause leaks.
Is Caulking Around The Toilet Base Necessary?
Caulking is recommended for a finished look and to prevent smells or insects. However, always leave a small gap at the back to reveal leaks. Some local codes require caulking.
What Should I Do If My Toilet Rocks After Installation?
If your toilet rocks, use plastic shims to level it before tightening the bolts. Never overtighten, as this can crack the porcelain.
What Is The Most Common Mistake When Mounting A Toilet?
The most common mistake is misaligning or compressing the wax ring incorrectly, leading to leaks. Always align the bowl carefully and press down evenly.
Mounting a toilet can be a satisfying DIY project with real benefits. By following the steps above and avoiding common mistakes, you can enjoy a reliable, leak-free toilet for years to come. If you ever feel unsure, don’t hesitate to consult a professional or seek trusted resources like Wikipedia’s guide to toilet installation. Your bathroom’s comfort and safety are worth the effort.
Credit: www.homedepot.com