
Mounting a window might sound challenging, but with the right preparation and clear steps, most homeowners can do it themselves. Whether you’re replacing an old window, updating your home’s look, or installing one for the first time, understanding the process helps you avoid costly mistakes.
This guide explains how to mount a window safely, efficiently, and with results that last.
Windows are more than just glass—they keep your home comfortable, secure, and energy efficient. Installing them the right way means fewer drafts, better insulation, and a more attractive home. You’ll learn how to prepare the opening, handle the window, and secure it properly.
With practical tips and real-world advice, you’ll feel confident tackling this project.
Understanding The Basics Of Window Mounting
Before you start, it’s important to know what mounting a window involves. Window mounting means fitting a window unit into a prepared opening in a wall, securing it, sealing it against weather, and finishing the trim. This process works for both replacement windows (swapping an old window for a new one) and new construction windows (installing a window where none existed before).
Types Of Windows
There are many window types, but the mounting process is similar for the most common ones:
- Single/Double-Hung: Move up and down, often seen in bedrooms.
- Casement: Open outward with a crank, good for kitchens.
- Sliding: Move side-to-side, popular for patios.
- Picture: Fixed, don’t open—used for views and light.
Key Parts Of A Window
Knowing the names of window parts helps you follow instructions:
- Sash: The part that moves (or would move) in the frame.
- Frame: The outer structure that holds the window.
- Jambs: The sides of the window frame.
- Sill: The bottom part of the frame.
- Head: The top part of the frame.
- Nailing Flange: Used to secure new-construction windows.
Most DIYers mount vinyl or wood windows, but aluminum and fiberglass are also common.
Choosing The Right Window For Your Project
Picking the right window is just as important as mounting it correctly. Here’s what you should consider:
- Size: The window must fit your opening. Measure carefully—width, height, and depth.
- Material: Vinyl is low-maintenance, wood is classic but needs care, fiberglass lasts long, and aluminum works well in modern homes.
- Glass Type: Double-pane or triple-pane glass saves energy. Low-E coatings block UV rays.
- Style: The style affects light, ventilation, and the look of your home.
- Energy Efficiency: Check the U-factor (lower is better) and Solar Heat Gain Coefficient (SHGC).
Comparing Window Materials
Here’s a quick look at how popular window materials compare:
| Material | Cost | Maintenance | Durability | Energy Efficiency |
|---|---|---|---|---|
| Vinyl | Low | Very Low | Good | High |
| Wood | High | High | Moderate | High |
| Fiberglass | Moderate | Low | Excellent | High |
| Aluminum | Low | Low | High | Moderate |
Non-obvious tip: Not all windows are a “standard” size. Even small variations in your rough opening can affect the fit. Always measure twice—don’t trust the old window’s numbers.
Credit: langexterior.com
Tools And Materials Needed
Having the right tools saves time and avoids frustration. Here’s what you’ll need for most window mounting projects:
- Measuring tape
- Level (2-foot and 4-foot sizes)
- Hammer or drill/driver
- Pry bar (for old windows)
- Utility knife
- Caulk gun and exterior-grade caulk
- Expanding foam insulation (window and door type)
- Screws or nails (as specified by the window manufacturer)
- Shims (plastic or wood)
- Safety glasses and gloves
- Flashing tape or membrane
- House wrap (for new construction)
- Saw (reciprocating or hand saw for opening adjustments)
- Putty knife
- Paint and trim (for finishing)
- Ladder (if working above ground floor)
Pro insight: Use shims specifically made for windows—regular wood shims can rot or warp.
Measuring And Preparing The Opening
Getting the size right is the foundation for a good window install. Don’t rush this step.
How To Measure The Opening
- Measure the width at three points: Top, middle, and bottom. Use the smallest number.
- Measure the height at three points: Left, center, and right. Use the smallest number.
- Measure the depth to ensure the new window isn’t thicker than your wall.
Subtract 1/4 inch from your smallest width and height to allow for fitting and shims.
Removing The Old Window (if Replacing)
- Carefully remove the trim or casing using a utility knife and pry bar.
- Take out any nails, screws, or fasteners.
- Remove the sashes and old frame (if needed).
- Clean the opening—remove dust, old caulk, and debris.
Tip: Save the trim if you plan to reuse it. Label pieces to make reinstallation easier.
Preparing The Rough Opening
- Check for rot, mold, or water damage. Repair as needed before proceeding.
- Confirm the opening is square by measuring diagonals—both should be the same.
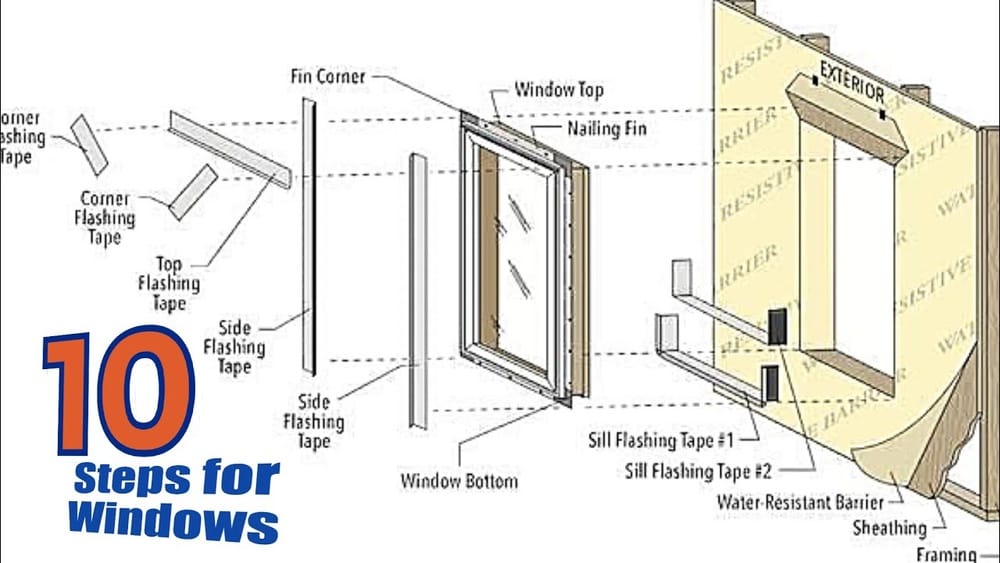
- Apply a layer of house wrap and flashing tape around the opening if required.
Mistake to avoid: Skipping repair of wood rot or uneven surfaces. This can lead to leaks and poor window performance.
Dry Fitting The Window
Before you secure the window, do a dry fit. Place the window in the opening to check the fit. It should slide in without force but not be too loose.
- Use shims to temporarily hold the window in place.
- Make sure it sits level and plumb (straight up and down).
- Check that the window opens and closes smoothly.
If the fit is off, adjust the opening with a saw or add filler strips as needed. Do not force a window into an opening that’s too small.
Installing The Window
Now you’re ready to secure the window. The details matter here—take your time for the best result.
Step 1: Apply Flashing And Sealant
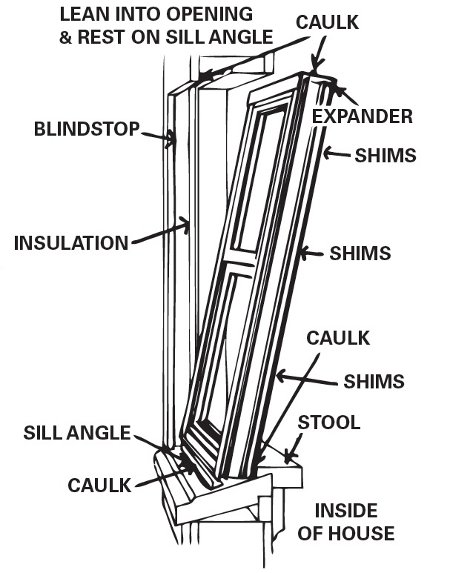
- Put a thick bead of exterior-grade caulk along the sill (bottom) and sides of the rough opening, just before installing the window.
- Stick flashing tape to the sill and sides for extra water protection.
Step 2: Place The Window
- Set the bottom of the window into the opening first, then tilt the top into place.
- Press the window frame into the caulk and flashing.
- Insert shims at the sides and bottom to keep the window level and plumb.
Step 3: Secure The Window
- For new construction windows, drive screws or nails through the nailing flange into the wall framing.
- For replacement windows, use the manufacturer’s mounting holes, typically through the sides or top/bottom of the frame.
- Check the window remains square as you fasten each corner—adjust shims as needed.
Do not overtighten screws; this can warp the frame.
Step 4: Test Operation
- Open and close the window several times. It should move smoothly, with even gaps on all sides.
- Adjust shims until movement is easy and the window feels solid.
Step 5: Insulate The Gaps
- Insert low-expansion spray foam insulation around the window, between the frame and the rough opening.
- Don’t overfill; too much foam can bow the window frame.
Non-obvious tip: Window and door foam is different from general-purpose foam. The wrong foam expands too much and can ruin your installation.
Step 6: Install Interior Trim
- Replace interior casing and trim, or install new pieces.
- Caulk any gaps between trim and wall for a finished look.
Step 7: Exterior Sealing And Flashing
- Add flashing tape over the nailing flange or frame for extra weather protection.
- Caulk along the exterior edges where the window meets the siding or brick.
Tip: Use paintable caulk if you plan to paint the window trim.
Comparing Replacement And New Construction Window Mounting
The process is different depending on the type of project. Here’s a comparison:
| Feature | Replacement Window | New Construction Window |
|---|---|---|
| Use Case | Existing openings | New walls or major remodels |
| Preparation | Minimal (remove old window) | Full opening, add house wrap & flashing |
| Attachment | Mounting holes in frame | Nailing flange to studs |
| Exterior Siding | Usually left in place | Often removed/reinstalled |
| Speed | Faster | Slower, more steps |
Insight: Replacement windows are easier for DIYers, but new construction windows are best for major renovations or when the wall is open.
Sealing And Waterproofing: Preventing Leaks
A well-mounted window must keep out water and wind. Waterproofing is about more than just caulk.
Why Flashing Matters
Flashing is a thin, waterproof material that directs water away from your window. It usually comes as tape or metal strips.
- Apply flashing under the window before installing it.
- Add layers above and on the sides after mounting, overlapping so water flows down and out.
Sealing Tricks
- Always use exterior-grade caulk, not indoor caulk.
- Fill all gaps, but allow small drainage holes at the bottom (weep holes) if your window has them.
- Paint or cover all exposed wood.
Advanced tip: Use a “back dam” (a small raised edge at the interior of the sill) to keep water out in very wet climates.
Finishing Touches: Interior And Exterior Trim
Once your window is mounted and sealed, finish the look with trim.
Interior Trim
- Nail the trim to the wall, not the window frame, to prevent pulling the window out of square.
- Use filler and caulk for a seamless appearance.
- Paint or stain as desired.
Exterior Trim (cladding)
- Use vinyl or aluminum trim for low maintenance.
- Seal all joints with weatherproof caulk.
- Flashing should run under the siding at the top and sides.
Pro insight: In older homes, matching new trim to old styles can be tricky. Take a sample to the hardware store for the best match.
Common Mistakes And How To Avoid Them
Even careful DIYers can make errors. Here’s what to watch out for:
- Poor Measuring: Windows that are too big or small won’t seal well.
- Skipping the Level: An unlevel window won’t open or close properly.
- Ignoring Rot: Don’t mount a window in a damaged frame—fix the problem first.
- Wrong Foam: General spray foam expands too much for window gaps.
- Not Enough Flashing: Skipping waterproof layers leads to leaks.
- Overtightening Screws: Can warp or break the window frame.
- Skipping Weep Holes: Blocks drainage, leading to rot.
Tip: Take photos as you work. If there’s a problem later, you’ll have a record for troubleshooting.

Credit: www.youtube.com
Window Maintenance After Mounting
A well-mounted window needs only basic care:
- Check seals and caulk once a year; repair any cracks.
- Clean tracks and hardware to prevent sticking.
- Repaint or stain wood trim every few years.
- Inspect exterior flashing for damage after storms.
- Open and close windows regularly to keep parts moving smoothly.
Non-obvious tip: If condensation appears between panes, it means the seal is broken. This often requires glass replacement, not just resealing the edges.
Cost And Value: What To Expect
Mounting a window yourself saves money. Here’s what to expect:
- DIY window cost: $150–$600 per window for materials (average vinyl window).
- Pro installation: $300–$1,200 per window, including labor.
- Time per window: 2–4 hours for an average replacement; longer for new construction.
Value insight: A properly mounted, energy-efficient window can cut heating and cooling costs by up to 15%, according to the U.S. Department of Energy.

Credit: www.smartwingshome.com
Safety Tips For Window Mounting
Working with windows means handling heavy glass and working at heights. Stay safe by following these rules:
- Wear gloves and safety glasses.
- Use a sturdy ladder on level ground.
- Get help lifting large or second-story windows.
- Don’t remove old windows on windy days—glass can break easily.
- Keep children and pets away from the work area.
- Dispose of old windows carefully, especially if glass is broken.
Pro insight: If your home was built before 1978, watch for lead paint around old windows. Check local rules for safe removal.
Troubleshooting: Fixing Common Problems
Sometimes, even a careful installation has hiccups. Here’s how to fix the most common issues:
Window Sticks Or Won’t Open
- Check that the window is level and plumb.
- Adjust or add shims until movement is smooth.
Gaps Or Drafts Around Window
- Add more insulation foam in the gaps.
- Check for missing caulk or flashing outside.
Water Leaks
- Inspect flashing for gaps or tears; reapply if needed.
- Check caulk lines and touch up as necessary.
Window Frame Warped
- Loosen fasteners, adjust shims, and retighten.
- If the frame is still warped, the opening may need rebuilding.
Foggy Glass
- This means the seal inside the glass is broken. Replacement glass is needed.
Pro tip: Many window manufacturers offer support or replacement parts if you register your new windows.
When To Call A Professional
While mounting a window is a manageable DIY project, some situations call for expert help:
- Openings that need resizing or structural changes.
- Windows above the second floor.
- Historic homes with special requirements.
- Rot or mold that affects the wall structure.
- Large or unusually shaped windows (bay, bow, etc. ).
Insight: Poor installation can void your window warranty. Read the instructions that come with your window and follow them closely.
Sustainability And Energy Efficiency
Installing modern windows offers more than looks—they can make your home greener.
- Look for ENERGY STAR® rated windows.
- Double or triple glazing cuts heat loss.
- Low-E coatings reflect heat back inside in winter, out in summer.
- Proper mounting and sealing maximize efficiency gains.
Example: Replacing single-pane windows with double-pane, ENERGY STAR® units can save up to $465 a year in energy bills for an average U.S. home.
For more about energy-efficient windows, see the U.S. Department of Energy.
Frequently Asked Questions
What Is The Difference Between A Replacement Window And A New Construction Window?
A replacement window is made to fit into an existing window opening, usually after removing the old window’s sashes but keeping the original frame. A new construction window has a nailing flange and is installed when building a new wall or doing a full remodel, often before siding goes on. Replacement windows are faster and less invasive for existing homes, while new construction windows are best for new builds or major renovations.
How Do I Know If My Opening Is Square And Ready For A Window?
Measure from one corner diagonally to the opposite corner, then measure the other diagonal. If the numbers match, your opening is square. If they differ, adjust the opening or use shims to correct it before mounting the window. A square opening is key for smooth operation and a tight seal.
Can I Mount A Window By Myself, Or Do I Need Help?
Small windows can sometimes be mounted alone, but it’s safer and easier with two people—especially for heavy or second-story windows. One person can hold the window in place while the other secures it, reducing the risk of dropping or misaligning the unit.
What Kind Of Caulk And Foam Should I Use When Mounting A Window?
Always use exterior-grade, paintable silicone or polyurethane caulk for weather sealing. For insulation, choose low-expansion spray foam made for windows and doors. Regular foam expands too much and can warp your window frame.
How Long Does It Take To Mount A Window?
For someone with basic DIY skills, mounting a replacement window usually takes 2 to 4 hours. New construction windows or tricky openings can take longer. Allow extra time for careful measuring, sealing, and trim work—you’ll get better results and avoid costly mistakes.
Mounting a window is a rewarding project that can save money, boost your home’s comfort, and improve its appearance. Careful preparation, the right materials, and attention to detail will give you results you’ll enjoy for years. With these practical steps and expert tips, you’re ready to tackle your next window installation with confidence.