
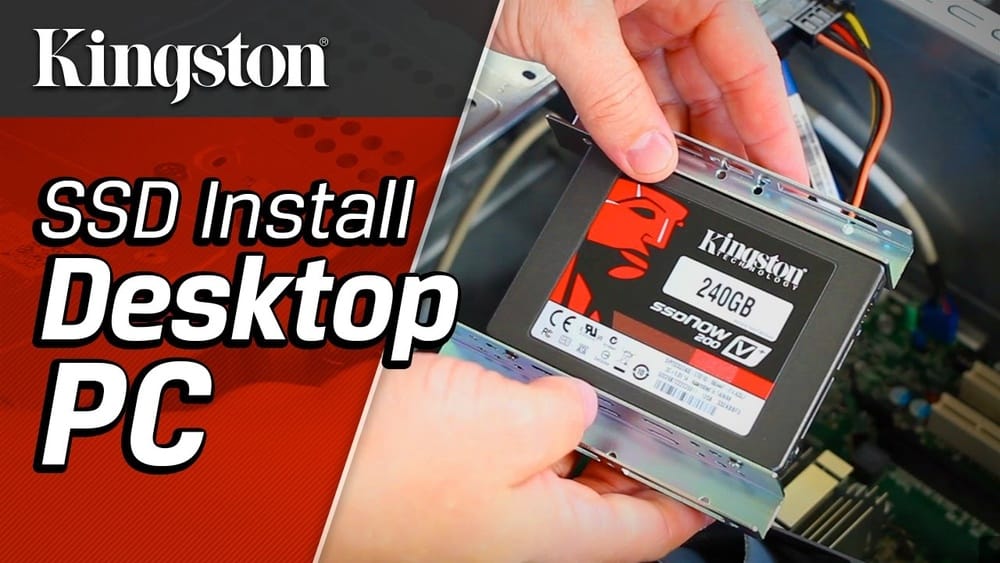
Mounting an SSD in your desktop can transform your computer’s speed and reliability. If your desktop still uses a traditional hard drive, you’re missing out on the huge performance boost that solid-state drives (SSDs) offer. Many people worry this upgrade is complicated, but with the right steps, you can do it yourself—even if you’re not a tech expert. This guide will show you how to mount an SSD in your desktop computer, from choosing the right drive to making sure your operating system recognizes it.
Upgrading to an SSD doesn’t just make your system faster. It also means your computer becomes quieter, uses less power, and is less likely to lose data from bumps or drops. But picking the right SSD and installing it properly is important.
Mistakes can cost you time, money, or even important files. We’ll help you avoid these problems with practical advice and tips that even many experienced users miss.
Why Upgrade To An Ssd?
SSDs are much faster than traditional hard disk drives (HDDs). An SSD uses flash memory to store data, which means there are no moving parts. This makes them more durable and less likely to fail over time. Here’s how an SSD can improve your computer:
- Faster boot times: Your operating system loads in seconds, not minutes.
- Quicker file transfers: Copying large files or launching applications feels instant.
- More reliable: Less chance of damage from shocks or movement.
- Silent operation: No spinning disks means less noise.
- Lower power consumption: Useful if you want a greener setup or have a small power supply.
A typical SSD can deliver read/write speeds between 500 MB/s to 7,000 MB/s (for newer NVMe models), while most HDDs are limited to around 100–150 MB/s. This speed difference is easy to feel in everyday use.
Types Of Ssds For Desktop Computers
Choosing the right SSD for your desktop is important. Not all SSDs fit all computers. Here’s what you need to know about the main types:
1. Sata 2.5-inch Ssd
- The most common type.
- Similar in size to a laptop hard drive.
- Uses the SATA data and power cables.
- Fits into most desktops, but may need a mounting bracket.
2. M.2 Ssd
- Looks like a stick of gum (small, slim).
- Plugs directly into the motherboard.
- Can use SATA or NVMe (PCIe) interface (check your motherboard support).
- NVMe is much faster than SATA.
3. Pcie Add-in Card Ssd
- Larger, fits into a PCIe slot (like a graphics card).
- Used for very high-speed storage needs.
- Not common for average users.
Here’s a comparison of the main SSD types:
| Type | Size | Interface | Max Speed (MB/s) | Typical Use |
|---|---|---|---|---|
| SATA 2.5-inch | 2.5 inches | SATA | 500–600 | General upgrade |
| M.2 SATA | 22x80mm (varies) | SATA | 500–600 | Laptops, desktops |
| M.2 NVMe | 22x80mm (varies) | PCIe | 1,500–7,000+ | High performance |
| PCIe Card | Full/half-length | PCIe | 3,000–8,000+ | Servers, pros |
Non-obvious insight: Some M.2 slots only support SATA, not NVMe. Always check your motherboard’s manual before buying an M.2 SSD.
.JPG?width=1920&height=1920&fit=bounds&quality=80&format=jpg&auto=webp)
Credit: www.ff-veitsch.at
What You Need Before Installing An Ssd
Before you open your desktop, get these tools and materials ready:
- The right SSD for your desktop (see the section above).
- Screwdriver (usually a Phillips #2).
- Mounting bracket (if your desktop only has 3.5-inch bays and you have a 2.5-inch SSD).
- SATA data cable (for SATA SSDs, often included with your motherboard or SSD).
- Power cable from your power supply (SATA power connector).
- Antistatic wrist strap (optional but safer for sensitive components).
- Your desktop’s manual (for reference on opening the case and locating connectors).
Practical tip: If you’re upgrading your primary drive (where Windows or your OS lives), you’ll need a way to clone your old drive or reinstall your operating system.
Back Up Your Data First
Before making any hardware changes, back up your important files. Mistakes can happen, and you don’t want to lose photos, documents, or work projects. You can use an external hard drive, a USB stick, or a cloud service.
Many users skip this step and regret it later. Even if you’re just adding a new drive (not replacing your old one), backup is a good habit.
Step-by-step: Mounting A Sata Ssd In Your Desktop
This section focuses on the most common upgrade: adding a 2.5-inch SATA SSD. Most desktops support this type, and the process is straightforward.
1. Power Down And Unplug Everything
Shut down your computer completely. Disconnect the power cable and all other cables (monitor, keyboard, etc. ). This keeps you safe and protects your hardware.
2. Open The Case
Most desktops have screws at the back or side. Unscrew them and slide off the side panel. Some cases have a button or latch instead.
Non-obvious insight: Place the screws in a small cup or tray so you don’t lose them. Desktop screws are easy to misplace.
3. Ground Yourself
Touch a metal part of the case to discharge static electricity, or use an antistatic wrist strap. Static can damage components, and it’s easy to avoid.
4. Locate The Drive Bays
Find the section inside your case where hard drives are installed. Most cases have 3.5-inch bays for traditional hard drives. Your SSD is 2.5 inches, so you may need a mounting bracket to fit it securely.
5. Attach The Ssd To A Bracket (if Needed)
If your case has a dedicated 2.5-inch bay or tray, you can skip this. Otherwise:
- Place the SSD in the bracket.
- Align the screw holes.
- Secure the SSD with the included screws.
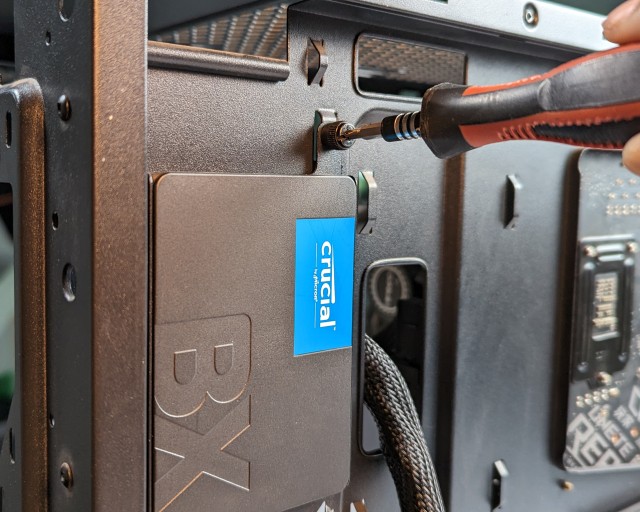
6. Mount The Ssd In The Case
Slide the SSD (or bracket+SSD) into an open drive bay. Secure it with screws on both sides so it doesn’t rattle or move.
7. Connect The Sata Data Cable
Plug one end of the SATA data cable into the SSD. The other end goes into an open SATA port on your motherboard. SATA ports are usually grouped together and labeled.
8. Connect The Sata Power Cable
Take a SATA power connector from your power supply and plug it into the SSD. It’s shaped so it only fits one way.
9. Double-check Connections
Make sure all cables are firmly attached and the SSD is secure.
10. Close The Case And Reconnect
Replace the side panel and secure it with screws. Plug all cables back into your computer (power, monitor, keyboard, etc. ).
11. Power On And Enter Bios/uefi
Turn on your computer. As it boots, look for the prompt to enter BIOS/UEFI (often by pressing Delete, F2, or F12). Check that your new SSD is listed among the storage devices.
If you don’t see the SSD: Reseat the cables and try a different SATA port.
12. Format And Partition The Ssd
If you’re using the SSD as a secondary drive:
- In Windows, right-click This PC > Manage > Disk Management.
- Find the new SSD (it will appear as “unallocated”).
- Right-click and choose “New Simple Volume.”
- Follow the prompts to format and assign a drive letter.
If you want to install Windows on the SSD, you’ll need to boot from a USB or DVD installer and follow the prompts to install the OS onto the SSD.
Practical tip: Keep your old drive connected until you’ve moved all files or finished cloning. Then, you can remove or format the old drive later.
Step-by-step: Installing An M.2 Ssd
M.2 SSDs are popular for their small size and high speed. Here’s how to mount one in your desktop:
1. Power Down, Unplug, And Open The Case
Follow the same safety steps as above.
2. Locate The M.2 Slot
Check your motherboard manual for the M.2 slot location. It’s usually near the RAM slots, flat on the board.
3. Prepare The M.2 Slot
- Remove the small screw at the end of the slot (save it).
- Align the gold contacts of the SSD with the slot.
4. Insert The M.2 Ssd
- Insert the SSD at a slight angle (about 30 degrees).
- Gently push it until it’s fully seated.
5. Secure The Ssd
- Press the SSD down flat.
- Replace the small screw to hold it in place.
6. Close The Case, Reconnect, And Power On
Same as above. Enter BIOS/UEFI to confirm the SSD is detected.
7. Format The Drive
Use Disk Management in Windows or Disk Utility in macOS to format and prepare the SSD.
Non-obvious insight: Some M.2 slots share bandwidth with other motherboard features (like SATA ports or PCIe slots). If your SSD isn’t detected, check your motherboard’s manual for conflicts.
Credit: www.foerderverein-dillenburg.de
Cloning Your Old Drive To The Ssd
If you want to move your operating system and files to the new SSD, you’ll need to clone the old drive. This process copies everything, so your system works just like before—but faster.
How To Clone Your Drive
- Connect both drives to your computer (old HDD and new SSD).
- Download cloning software (Macrium Reflect, Clonezilla, or Samsung Data Migration if you have a Samsung SSD).
- Follow the software’s instructions to copy your data.
- When finished, shut down and disconnect your old drive if you want to boot only from the SSD.
Tip: Cloning works best if your SSD is as large as (or larger than) your old drive. If your SSD is smaller, move large files (like videos) to another drive first.
Mounting A Pcie Card Ssd
These SSDs are rare for home use but common in workstations and servers. The process is similar to installing a graphics card:
- Power down and open your case.
- Find an open PCIe slot on your motherboard.
- Remove the slot cover from the back of the case.
- Insert the SSD card into the slot.
- Secure with a screw.
- Close your case and power on.
Common Installation Mistakes And How To Avoid Them
Mounting an SSD is simple, but some mistakes can cause headaches:
- Forcing connectors: SATA and M.2 connectors only fit one way. Forcing them can break pins or the drive.
- Not securing the SSD: Loose drives can vibrate or disconnect.
- Skipping BIOS check: Always check the drive appears in BIOS/UEFI before installing software.
- Overlooking data backup: Accidental data loss is common during upgrades.
- Not formatting the SSD: A new drive won’t appear in Windows Explorer until it’s formatted.
Ssd Vs Hdd: Real-world Performance
Here’s a real-world speed comparison:
| Task | HDD Time | SATA SSD Time | NVMe SSD Time |
|---|---|---|---|
| Boot Windows 10 | 45–90 sec | 10–20 sec | 7–10 sec |
| Open Photoshop | 20–30 sec | 7–12 sec | 4–7 sec |
| Copy 10GB file | 2–3 min | 20–30 sec | 10–15 sec |
This shows why SSDs are the best upgrade for most desktops. The difference is dramatic, especially for booting and large files.
Ssd Mounting: Special Cases And Tips
Mounting In Small Form Factor (sff) Or Mini Pcs
Some desktops are very small and have limited space. In these, you may need special brackets or even double-sided tape to secure a 2. 5-inch SSD. Always make sure the SSD is not touching other components and has some airflow.
Using Ssds For Gaming
Modern games load much faster from SSDs. Some newer games even require SSDs for best performance, especially open-world titles.
Ssds In Raid Setups
If you want even more speed or redundancy, you can set up RAID with multiple SSDs. This is advanced and not needed for most users, but some professionals or enthusiasts use RAID 0 for speed or RAID 1 for data safety.
How To Choose The Right Ssd
Not all SSDs are created equal. Here’s what matters most:
1. Storage Capacity
Most users need at least 500GB for the operating system and basic files. Gamers or content creators may want 1TB or more.
2. Interface
- SATA is compatible with most desktops and still very fast for everyday use.
- NVMe (M.2/PCIe) is ideal for power users or those who edit large files.
3. Endurance And Warranty
Look for the TBW (terabytes written) rating. Higher numbers mean a longer life. Most SSDs come with a 3–5 year warranty.
4. Price
SSD prices have dropped. In 2024, you can find a reliable 1TB SATA SSD for $50–$80 and 1TB NVMe SSDs for $60–$120.
Ssd Comparison Table
Here’s a quick look at popular SSD models:
| Model | Type | Capacity | Max Read Speed (MB/s) | Warranty |
|---|---|---|---|---|
| Samsung 870 EVO | SATA 2.5″ | 250GB–4TB | 560 | 5 years |
| Crucial MX500 | SATA 2.5″ | 250GB–2TB | 560 | 5 years |
| WD Black SN850 | M.2 NVMe | 500GB–2TB | 7,000 | 5 years |
| Kingston NV2 | M.2 NVMe | 250GB–2TB | 3,500 | 3 years |
Ssd Maintenance After Installation
After mounting your SSD, a few steps can help it last longer and perform well:
- Enable TRIM: Modern operating systems do this automatically. It helps the SSD manage data and stay fast.
- Keep some free space: SSDs slow down if they’re nearly full. Try to leave at least 10–20% free.
- Update firmware: SSD manufacturers sometimes release updates for better reliability.
- Don’t defragment: Unlike HDDs, SSDs don’t need defragmentation. It can actually wear them out faster.
What To Do With Your Old Hard Drive
Your old HDD still has value. Here are some ideas:
- Use as extra storage: Keep files, backups, or less-used data.
- External drive: Put it in a USB enclosure for portable storage.
- Sell or recycle: If you don’t need it, wipe the data and sell or recycle responsibly.
Tip: Don’t throw away old drives without wiping them. Sensitive data can be recovered even after deletion.
Troubleshooting: Ssd Not Detected
Sometimes, your SSD doesn’t show up after installation. Here’s what to check:
- Cables: Make sure all connections are firm.
- BIOS/UEFI: Enter BIOS and see if the drive appears.
- Try a different port: Use another SATA port or cable.
- Initialize in Windows: Open Disk Management. If the SSD is unallocated, right-click and initialize.
- Motherboard compatibility: Some older boards need BIOS updates for NVMe SSDs.
If you still have problems, check the SSD on another computer or contact support.
Advanced: Installing Multiple Ssds
Desktops often have space for more than one SSD. You can:
- Use one SSD for your operating system, and another for games or work files.
- Mix SATA and M.2 SSDs for best use of your motherboard’s features.
Just make sure your power supply has enough connectors, and your motherboard has enough ports.

Credit: www.youtube.com
Environmental And Power Benefits
Switching to an SSD can lower your desktop’s power use. SSDs use about 2–5 watts, while HDDs use 6–15 watts. Over time, this can mean lower electricity bills and less heat in your PC.
Resources For Further Learning
If you want to learn more about SSD technology, reliability, or advanced configurations, check out the Wikipedia page on solid-state drives. It covers technical details, history, and performance.
Frequently Asked Questions
How Long Does It Take To Mount An Ssd In A Desktop?
For most users, the physical installation takes about 15–30 minutes. This includes opening the case, securing the SSD, and connecting cables. If you’re also installing an operating system or cloning your old drive, add another 30–60 minutes.
Can I Use Both My Ssd And Old Hdd Together?
Yes, you can keep both drives in your desktop. Many users install the operating system on the SSD for speed and use the HDD for extra storage. Just make sure both drives are connected to the motherboard and power supply.
Will I Lose My Data If I Install An Ssd?
Installing an SSD itself does not erase data from your old drive. However, if you remove or format your old drive, you will lose data. Always back up important files before upgrading, especially if you plan to do a clean OS install.
Do I Need To Reinstall Windows When Adding An Ssd?
Not always. If you want to move Windows to your SSD, you can clone your old drive. If you’re starting fresh, you’ll need to install Windows on the new SSD. For best performance, a fresh install is sometimes recommended.
Is An M.2 Ssd Better Than A Sata Ssd?
M.2 SSDs can be much faster than SATA SSDs, especially if they use the NVMe (PCIe) interface. However, for everyday tasks, both feel fast compared to HDDs. M.2 is better for heavy workloads, gaming, or if you want the fastest possible speeds.
Mounting an SSD in your desktop is one of the best upgrades you can make. With careful planning and the right steps, you’ll enjoy a faster, quieter, and more reliable computer—often in less than an hour.