
Mounting curtain rods can seem simple, but doing it right makes a big difference. The way you hang your curtains affects how your room looks, how much light comes in, and even your privacy. Many people rush this job, only to end up with crooked rods, weak mounts, or holes in the wrong places.
Getting it right saves you time and frustration later. This article will walk you through every step, from planning to finishing touches, so you can hang your curtain rods like a pro—even if you’ve never done it before.
Why Proper Curtain Rod Installation Matters
Hanging curtain rods is not just about looks. The way you install them affects much more than many people realize:
- Room appearance: Properly hung curtains frame windows, add height, and make rooms feel bigger.
- Functionality: A secure rod holds heavy drapes, blocks light, and gives privacy.
- Wall damage: Poor installation can lead to sagging rods, ripped drywall, or large holes.
- Energy efficiency: Well-placed curtains can help keep rooms warmer in winter and cooler in summer.
It’s common for beginners to think any screw will do, or to eyeball placement. But skipping steps leads to problems later. Taking your time and following the right process pays off every day you use your curtains.
Tools And Materials Needed
Before you start, gather the tools and materials. Missing one can slow you down or cause mistakes.
Essential Tools
- Tape measure: For accurate window and rod measurements
- Pencil: To mark drill spots
- Level: Ensures the rod is straight
- Drill: Makes clean holes
- Drill bits: Match to your wall type (wood, drywall, masonry)
- Screwdriver: Tightens screws
- Stud finder: Checks for wall studs
- Step ladder: For higher windows
Materials
- Curtain rod kit: Rod, brackets, and hardware (usually included)
- Wall anchors: For drywall or plaster walls, to hold screws securely
- Screws: Should fit your brackets and wall type
- Curtains: Have them ready to hang
Optional Items
- Painter’s tape: For making marks visible, protecting the wall
- Toggle bolts: For extra-heavy curtains or rods
Many curtain rod kits include hardware, but sometimes it’s too weak for heavy drapes. If your curtains are thick or extra long, buy stronger anchors and screws. It’s better to over-prepare than risk a falling rod.
/how-to-install-curtain-rods-6751198-01-cdd7a7f7308f4112b7f7b37d673f2b9e.jpg)
Credit: www.thespruce.com
Choosing The Right Curtain Rod
Not all curtain rods are the same. Choosing the right one depends on your window, wall type, and the look you want.
Types Of Curtain Rods
- Standard rods: Most common, round shape, fit most curtains.
- Tension rods: Sit inside the window frame—good for light curtains but not for heavy drapes.
- Double rods: For layering two sets of curtains (like sheer and blackout).
- Traverse rods: For opening and closing curtains with a cord; best for wide windows.
- Decorative rods: Feature finials and stylish ends, acting as a design element.
Material And Strength
Curtain rods come in metal, wood, and plastic. Metal is the strongest, wood adds warmth, and plastic is for lightweight jobs only.
If your window is wider than 6 feet or your curtains are heavy, use a center support bracket. This keeps the rod from sagging in the middle.
Rod Diameter
Thicker rods (1 inch or more) hold more weight and look more substantial, especially on large windows. Thinner rods suit light curtains or small windows.
Matching Brackets And Hardware
Brackets must fit the rod size and be strong enough for your curtain weight. Don’t mix brackets and rods from different brands unless you’re sure they fit.
Measuring For Curtain Rod Placement
Most mistakes happen during measurement. Taking time to measure twice will save you from redrilling holes or having lopsided curtains.
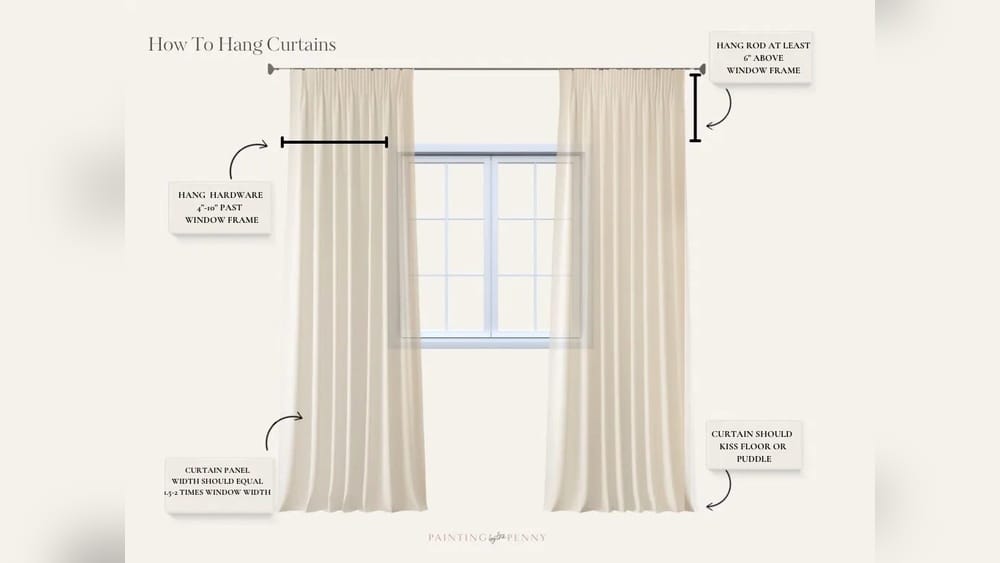
Height Above The Window
- Standard: Hang rods 4 to 6 inches above the window frame.
- For a taller look: Go up to 8 to 12 inches above the frame, especially if ceilings are high.
- For floor-length curtains: Make sure there’s space so the curtains just touch or slightly “kiss” the floor.
Width Beyond The Window
- Extend the rod 3 to 6 inches beyond each side of the window frame.
- This makes the window look wider and allows curtains to open fully, letting in more light.
Centering The Rod
- The rod should be centered over the window—measure the window’s width and mark the center above it.
- Double-check with a tape measure, not just your eyes.
Example: Calculating Bracket Placement
Suppose your window is 48 inches wide. To make the window look bigger and allow the curtains to fully open:
- Add 6 inches on each side: 48 + 6 + 6 = 60 inches total rod length.
- Mark bracket spots at least 3 inches outside the window frame on each side.
Tip Most Miss
Don’t assume your ceiling or window frame is perfectly level. Always use a level when marking bracket spots. Even small tilts will be very noticeable once the curtains are hung.

Credit: www.paintingbythepenny.com
Marking And Preparing The Wall
Careful marking is key to straight, strong installation.
- Use a tape measure to mark the desired height above the window on both sides.
- Use a level to draw a light pencil line from one side to the other.
- Mark bracket positions on both ends, and the center if you’re using a support bracket.
If you’re installing double rods, measure for both rods before drilling.
Finding Wall Studs
- Use a stud finder to check for studs where the brackets will go.
- If you find a stud, you can screw directly into it for maximum strength.
- If there’s no stud, you MUST use a wall anchor to keep the rod from pulling out.
Special Cases
- Brick or concrete walls: Use masonry drill bits and anchors.
- Plaster walls: Go slow, as plaster can crack easily.
- Window frames: You can screw into wood frames, but avoid damaging window hardware.
Drilling And Installing Brackets
Now it’s time to make the holes and attach the brackets.
Steps For Installation
- Double-check your marks with the level and tape measure.
- Drill pilot holes at each mark. Use a bit slightly smaller than your anchor or screw.
- Insert wall anchors if you’re not drilling into a stud.
- Position the bracket over the holes and screw it tightly to the wall.
- Repeat for each bracket.
If using a center support, install it after the side brackets are secure.
Table: Common Wall Types And Hardware
Here is a quick reference for what hardware to use for each wall type:
| Wall Type | Drill Bit | Anchor Type | Notes |
|---|---|---|---|
| Drywall | Standard | Plastic or metal wall anchors | Use for light to medium curtains |
| Plaster | Masonry | Toggle bolts | Drill slowly to avoid cracking |
| Wood stud | Standard | No anchor needed | Best for heavy rods |
| Brick/Concrete | Masonry | Masonry anchors | Use hammer drill if possible |
Extra Tips
- If your brackets feel loose, try a larger anchor.
- For very heavy curtains, use double anchors on each bracket for extra strength.
Mounting The Curtain Rod
Once the brackets are secure, you can install the rod.
- Slide the curtain onto the rod (unless you have rings or hooks that attach after).
- Place the rod into the brackets. Some rods have set screws—tighten these to hold the rod in place.
- Check for level again. Adjust the brackets if needed before tightening everything down.
If the rod is telescoping (expands/shrinks), make sure both sides are even.
Table: Curtain Rod Types And Weight Limits
Choosing the wrong rod can lead to sagging or breakage. Compare common rod types below:
| Rod Type | Max Width | Weight Capacity | Best For |
|---|---|---|---|
| Standard metal rod | 72 inches | 20-30 lbs | Most living rooms and bedrooms |
| Tension rod | 54 inches | 8-10 lbs | Light curtains, rentals |
| Double rod | 84 inches | 25-35 lbs | Layered curtains |
| Decorative rod (thick) | 120 inches | 40+ lbs | Wide windows, heavy drapes |
Hanging And Adjusting Curtains
Now you’re ready for the final step: hanging and adjusting your curtains.
Steps
- Attach curtain rings or hooks if needed.
- Thread the curtain onto the rod. Make sure the pattern or texture faces the room.
- Hang the rod in the brackets.
- Spread the curtains evenly. Adjust pleats or folds for a neat look.
- Check curtain length. The bottom should just touch the floor or windowsill, unless you want a “puddle” effect.
Finishing Touches
- Add finials (decorative rod ends) for style.
- Make sure curtains open and close smoothly—no catching or sticking.
- Adjust bracket tightness if the rod wobbles.
Pro Tip
If your curtains hang crooked, check the rod with a level and adjust the brackets, not the rod itself. Sometimes, uneven curtains are caused by uneven floors or window frames. Always fix at the bracket level.

Credit: chrislovesjulia.com
Common Mistakes And How To Avoid Them
Even confident DIYers make mistakes when mounting curtain rods. Here are errors to watch for:
- Skipping the level: Leads to slanted rods that look odd.
- Not using anchors: Causes rods to pull out of drywall.
- Hanging too low: Makes windows and ceilings look shorter.
- Not extending rods far enough: Curtains block too much window when open.
- Guessing measurements: Results in uneven placement.
How To Avoid Them
- Always use a level for every mark and bracket.
- Use the right anchor for your wall type.
- Measure both height and width twice.
- Mark with a pencil before drilling.
- Read instructions for your specific rod and bracket system.
Special Situations And Advanced Tips
Some windows or walls need special solutions. Here’s how to handle tricky cases.
Bay Windows
Use flexible rods or buy special bay window rods that bend at angles. Measure each section of the window separately.
Corner Windows
Corner curtain rods connect at a right angle. Some brands make corner connectors, or you can overlap two rods.
Extra Wide Windows
Use a center support bracket for rods longer than 6 feet. For very heavy drapes, consider using two rods side by side.
Rental Apartments
If you can’t drill, use tension rods or adhesive hooks. These hold light curtains but not heavy ones.
Plaster Walls
Drill slowly and use tape to prevent chipping. Use toggle bolts for secure installation.
Table: Solutions For Tricky Windows
| Window Situation | Recommended Rod/Bracket | Important Tips |
|---|---|---|
| Bay window | Flexible/bendable rod | Measure each section, adjust angles |
| Corner window | Corner connector rod | Overlap rods or use special connectors |
| Wide window | Rod with center support | Use extra bracket to prevent sagging |
| Rental (no drilling) | Tension rod | Only for lightweight curtains |
| Plaster walls | Toggle bolts | Drill slowly, anchor securely |
Maintaining Your Curtain Rods
Once installed, curtain rods need some care to look and work their best.
Cleaning
- Dust rods and brackets every few weeks.
- For metal rods, use a damp cloth. For wood, use a dry or slightly damp cloth.
- Check for rust on metal rods, especially in humid rooms.
Checking For Loose Brackets
- Every few months, check if screws have loosened—especially if you open and close curtains daily.
- Tighten as needed to prevent sagging.
Repairing Small Issues
- If you notice wall anchors pulling out, remove the rod and install a larger anchor.
- Touch up paint around bracket holes if needed.
Replacing Curtains
When changing curtains, check if the rod and brackets are strong enough for heavier or lighter drapes. If not, upgrade your hardware.
When To Call A Professional
Most people can mount curtain rods themselves, but some situations need expert help:
- Very high windows (more than 9 feet up)
- Fragile or historic walls (like old plaster)
- Motorized or automated rod systems
- Extra-large or custom-shaped windows
If you feel unsure, or if your project requires special tools, hiring a professional can save time and prevent damage.
Summary And Final Thoughts
Mounting curtain rods is a project anyone can do with patience and the right tools. The key steps—measuring carefully, choosing strong hardware, using a level, and installing securely—make all the difference. Don’t rush or guess. Taking time to plan, mark, and drill correctly means your curtains will look great and function perfectly for years.
Remember, not all windows or rods are the same. Adjust your approach for special cases and always use anchors if you’re not screwing into a stud. Maintain your rods and brackets, and don’t hesitate to call for help if you hit a tricky spot. For more on home improvement basics, check out Family Handyman’s guide.
Frequently Asked Questions
How High Should I Mount Curtain Rods Above The Window?
Most designers recommend mounting curtain rods 4 to 6 inches above the window frame. For a more dramatic look, go up to 8 to 12 inches. The higher you mount, the taller your window will appear.
Can I Install Curtain Rods Without Drilling Holes?
Yes, you can use tension rods or special adhesive hooks for lightweight curtains. However, these solutions are not strong enough for heavy drapes or wide windows. Drilling provides the most secure and long-lasting installation.
What Anchors Should I Use For Drywall?
Use plastic wall anchors for light to medium curtains. For heavy curtains, use metal anchors or toggle bolts. Always match the anchor size to your screw and bracket.
Why Is My Curtain Rod Sagging In The Middle?
Sagging is usually caused by a rod that is too long or not strong enough. Use a center support bracket for rods over 6 feet or heavy curtains. Make sure the rod material is thick and sturdy.
How Can I Make My Windows Look Bigger With Curtains?
Extend your curtain rod 3 to 6 inches beyond each side of the window frame. Hang the rod higher above the window. Use curtains that reach the floor for a tall, wide effect. This framing trick visually enlarges your window and makes the room feel bigger.