
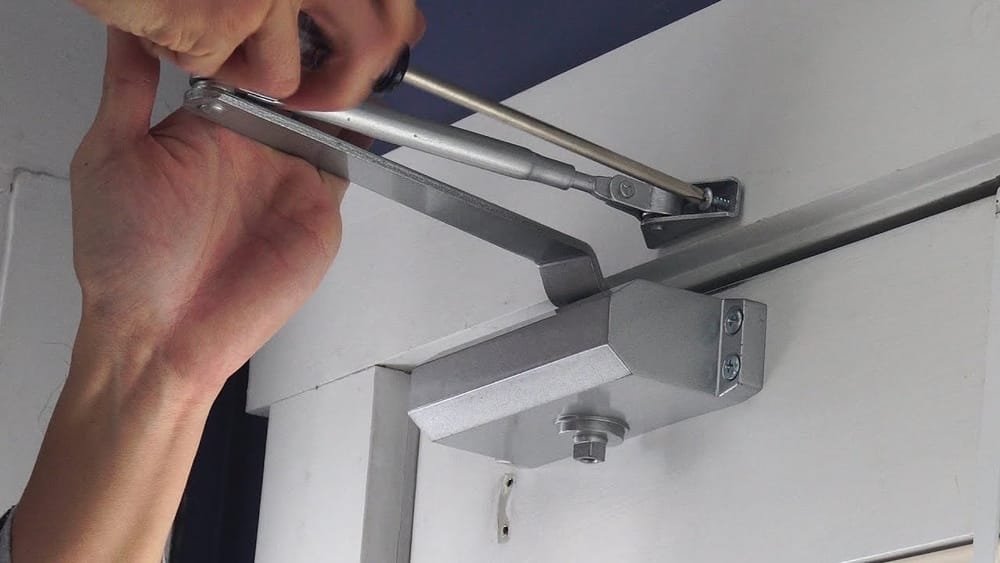
Mounting a door closer might seem like a simple DIY project, but getting it right can make a big difference in how a door works and how long it lasts. A properly installed door closer can prevent slamming, reduce noise, improve security, and help with energy savings by making sure doors close tightly every time. While many people install door closers in homes, they are even more common in offices, schools, hospitals, and other public buildings, where automatic closing is required by safety codes. This guide will walk you through everything you need to know about how to mount a door closer—from choosing the right model to step-by-step instructions, common mistakes, and expert tips that will help you get professional results.
Why Install A Door Closer?
People install door closers for several important reasons. First, they help control door movement. This means doors won’t slam shut—reducing noise and preventing damage to the door, frame, and nearby walls. Second, many fire codes require self-closing doors to help contain smoke and fire in emergencies. Third, a door closer can improve security by making sure a door closes and latches every time, so it’s not left open by accident.
For businesses, door closers are important for ADA compliance (making doors easy to open for people with disabilities), and for controlling air flow and temperatures between rooms. In homes, they’re often used on front doors, garage entry doors, or patio doors to keep pets and children safe or prevent energy loss.
Types Of Door Closers
Before you mount a door closer, you need to pick the right type for your door and situation. There are several main types, and each has unique advantages and installation needs.
| Type | Best For | Mounting Style | Price Range |
|---|---|---|---|
| Surface-mounted | Most doors, easy retrofit | On door or frame surface | $20-$200 |
| Concealed/invisible | High-end, aesthetics | Inside door/frame | $80-$600 |
| Floor-spring | Heavy glass doors | In floor beneath door | $150-$800 |
| Overhead concealed | Glass/aluminum doors | In head frame | $100-$500 |
| Hydraulic/pneumatic | Storm/screen doors | On door or frame | $10-$50 |
Most Common: Surface-mounted Closers
The most popular and easiest to install are surface-mounted door closers. These are visible on the door or frame and come with an adjustable arm. They work well for wood, metal, or aluminum doors in homes and businesses.
Concealed Types
Concealed closers hide inside the door or frame, making them nearly invisible. They are popular for upscale offices, hotels, or when you want a clean look with no visible hardware.
Floor-spring And Overhead Concealed
These types are used mostly for heavy glass or aluminum doors, often in commercial buildings. Floor-spring closers are hidden in the floor, while overhead concealed models are hidden in the frame above the door.
Hydraulic/pneumatic Closers
Often used for storm or screen doors, these closers use air or oil to control the speed. They are simple, affordable, and easy to install, but not suitable for heavy doors.

Credit: www.amazon.ie
What You Need Before You Start
Mounting a door closer is easier if you gather all your tools and materials before you begin. Here’s what you’ll typically need:
- Door closer kit (includes closer body, arm, screws, brackets, and template)
- Screwdrivers (usually Phillips head)
- Drill and drill bits
- Measuring tape
- Pencil or marker
- Level
- Step ladder (for tall doors)
- Safety glasses
- Wrench or Allen key (for adjustments)
Some kits include all necessary screws and a paper template for marking holes. If you’re missing a template, you can often download one from the manufacturer’s website.
Pro Tip: Always read the manufacturer’s instructions. Some door closers have unique installation steps or special adjustment screws.
How To Choose The Right Door Closer
Choosing the correct door closer is more important than many people realize. The wrong size or type can lead to poor performance, early failure, or even safety risks.
Consider Door Weight And Size
Door closers are rated for weight and width. A small closer on a heavy door will wear out quickly or may not close the door fully. Most closers have adjustable strength, but always check the product specs.
Example: A closer rated for doors up to 80kg (176 lbs) and 1100mm (43 inches) wide will not work well for a large commercial entry door.
Match The Door And Frame Material
Wood, metal, and glass doors may require different mounting screws or brackets. For metal frames, you may need self-tapping screws; for wood, standard screws usually work.
Fire Codes And Accessibility
If your door is a fire door, you must use a fire-rated closer. For public buildings, check for ADA-compliant models, which require less force to open.
Indoor Vs. Outdoor Use
If the door is outside, pick a weather-resistant closer made from stainless steel, aluminum, or with a rust-proof finish.
Budget
Surface-mounted models start at around $20. High-end concealed or floor-spring types can cost several hundred dollars. For most home use, a $30-$70 closer is enough.

Credit: help.idealinc.com
Step-by-step Guide: How To Mount A Door Closer
Once you have the right door closer and tools, you can start the installation. Below is a detailed guide for mounting a standard surface-mounted door closer, the most common type used in homes and businesses.
1. Decide On The Mounting Position
Most surface-mounted closers can be installed in one of three ways:
- Regular arm (pull side): Closer on door, arm on frame (most common)
- Top jamb (push side): Closer on frame, arm on door (for outward-opening doors)
- Parallel arm: Closer on door, arm parallel to frame (more secure, used in schools/hospitals)
Check your door’s swing direction and choose the best position for your needs. Your closer’s instructions will show mounting diagrams for each style.
2. Mark Hole Positions
Use the paper template from your kit. Tape it to the door and frame, aligning it with the edge as shown. Mark the screw holes for both the closer body and arm bracket using a pencil.
Practical tip: Double-check the template is level. Even a small tilt can affect how the door closes.
3. Drill Pilot Holes
Remove the template. Drill small pilot holes at the marked points. For metal doors, use a 1/8-inch bit. For wood, a 3/32-inch bit is common. Pilot holes make it easier to drive screws and prevent splitting.
Non-obvious insight: For hollow metal doors, use machine screws with sex nuts (through-bolts) instead of wood screws—they hold better and won’t pull out over time.
4. Attach The Door Closer Body
Hold the door closer in place and drive in the mounting screws. Don’t overtighten—just snug enough to hold firm. The closer should be positioned as shown in the template, with the adjustment valves facing the hinge or latch side, depending on the model.
5. Install The Arm Bracket
Mount the arm bracket to the frame (or door, depending on your mounting style) using the marked screw holes. Make sure the bracket is level and tightly secured.
6. Connect The Arm To The Closer Body
Most closers have an adjustable arm that connects to a spindle on the closer body. Slide the arm over the spindle and attach using the provided screw or pin. Extend or retract the arm as needed to match the distance between the closer and bracket.
Expert tip: For parallel arm installations, you may need to rotate the arm 90 degrees and use a special bracket. Always check your instructions.
7. Adjust The Closing Speed
Most closers have two or three adjustment valves:
- Closing speed: How fast the door moves from open to about 5 inches from closed
- Latching speed: How fast the door moves in the last 5 inches
- Backcheck: Slows the door if opened too quickly (prevents wall damage)
Use a small screwdriver or Allen key to turn the valves. Clockwise usually slows the door, counterclockwise speeds it up. Test the door a few times and adjust until it closes smoothly but not too slowly.
8. Test The Door
Open the door fully and let it close by itself. It should close firmly but gently, latch without slamming, and not bounce back. Adjust the arm length or closer speed if needed.
If the door doesn’t close all the way or slams too hard, fine-tune the settings. Test with a strong push and with light use—make sure it works in all cases.
9. Tighten All Screws And Clean Up
Once you’re happy with the operation, tighten all screws again. Wipe away pencil marks or debris. Some closers have a plastic cover for a clean look—snap it into place if included.
Table: Common Door Closer Problems And Solutions
Here’s a quick reference for the most frequent issues people face after mounting a door closer:
| Problem | Possible Cause | Solution |
|---|---|---|
| Door slams shut | Closing speed too fast | Turn adjustment valve clockwise |
| Door won’t close fully | Not enough power or wrong arm length | Increase spring power or adjust arm |
| Door closes too slowly | Valves set too tight | Open adjustment valves slightly |
| Oil leaking from closer | Closer damaged or worn out | Replace closer |
| Closer loosens from door | Poor mounting or wrong screws | Use proper screws, through-bolts for metal |
Tips For A Professional Finish
Getting a door closer to work smoothly and last for years takes more than just following instructions. Here are some extra tips that many beginners miss:
- Mount as close as possible to the hinge: This gives the best leverage and reduces stress on the closer and door.
- Use all provided screws: Missing screws can cause the closer to loosen or shift over time.
- Check for obstructions: Make sure nothing blocks the arm’s movement—especially in tight hallways or with glass doors.
- Don’t overtighten adjustment valves: Forcing the valves can strip them or cause oil leaks.
- Use thread-locker on screws: In high-traffic doors, a drop of thread-locking fluid keeps screws from backing out.
- Regularly check and adjust: Door closers need occasional fine-tuning as doors settle or seasons change.
Non-obvious insight: On fire doors, never prop the door open or disable the closer. This is both unsafe and illegal in many areas.
Special Cases: Mounting On Different Door Types
Not every door is the same. Here’s what to watch out for with some special doors:
Hollow Metal Doors
Many commercial doors are hollow metal. Use machine screws with through-bolts (sex nuts) for the closer body. Standard wood screws will pull out or strip over time.
Glass Doors
Mounting a closer on glass requires special hardware. Never drill into glass unless the closer is designed for it. Most glass doors use overhead concealed or floor-spring types.
Fire-rated Doors
Always use a fire-rated closer. These have special markings (like UL listing) and often have more robust construction.
Storm And Screen Doors
Hydraulic or pneumatic closers for these doors are easier to install. Attach the closer to the top of the door and frame. Adjust the speed with the screw at the end.
Comparing Door Closer Brands
Not all door closers are created equal. Here is a quick comparison of three popular brands for home and light commercial use:
| Brand | Price Range | Strength Adjustment | Warranty | Special Features |
|---|---|---|---|---|
| Norton | $30-$250 | Yes (multi-size) | 5-10 years | Fire-rated, ADA options |
| LCN | $80-$400 | Yes (wide range) | 10 years | Heavy-duty, many finishes |
| Dorma | $50-$300 | Yes (adjustable) | 5 years | European style, smooth action |
Pro tip: Stick to well-known brands for better reliability, access to parts, and easier support.
Common Mistakes To Avoid
Many people make the same errors when installing a door closer. Avoiding these can save you time, money, and frustration.
- Skipping the template: Guessing hole positions almost always leads to misalignment.
- Using the wrong screws: Always match screws to the door and frame material.
- Mounting too far from the hinge: This reduces closing force and can wear out the closer.
- Forgetting to adjust the arm length: The arm should be at a 90-degree angle to the door when closed for best operation.
- Not testing with the latch engaged: Always check that the door fully latches, not just closes.
- Ignoring local codes: For fire or public doors, check building and fire codes before you start.

Credit: www.youtube.com
Maintenance After Mounting
A door closer isn’t a “set it and forget it” device. Regular checks and simple maintenance can keep it working for years.
- Monthly: Test the door for smooth closing, adjust speed if needed.
- Twice a year: Check screws for tightness, clean the closer body, and oil any moving parts if recommended by the manufacturer.
- After heavy use or slamming: Inspect for leaks or loose mounting.
Non-obvious insight: If your door closer suddenly starts to slam or stops closing, check for temperature swings. Cold oil in winter can slow a closer, while heat can speed it up.
When To Call A Professional
While most surface-mounted door closers can be installed by a handy homeowner, some situations call for an expert:
- Glass or very heavy doors
- Fire-rated or code-required installations
- High-value doors (historic or custom woodwork)
- If you need to cut or weld hardware
A professional can ensure compliance with safety codes and guarantee the closer is set up perfectly for years of reliable use.
Environmental And Safety Considerations
Door closers are not just about convenience. They help with:
- Energy savings: By keeping doors closed, they reduce heating/cooling loss.
- Security: Doors always latch, reducing the risk of theft or intrusion.
- Fire safety: Self-closing doors help contain fire and smoke.
- Accessibility: Properly adjusted closers make doors easier for everyone.
Extra tip: For schools or hospitals, choose closers with a delayed action setting. This holds the door open briefly for people who need more time.
Frequently Asked Questions
How Do I Know Which Size Door Closer To Buy?
Choose a door closer rated for the weight and width of your door. Most packaging or online listings show the supported size range. For heavy or wide doors, pick a closer with adjustable strength.
Can I Install A Door Closer On A Glass Door?
Most surface-mounted closers are not for glass doors. Use a special glass door closer—usually overhead concealed or floor-spring types. Always check the manufacturer’s instructions, and avoid drilling glass unless the closer is specifically made for it.
How Do I Adjust The Closing Speed Of My Door Closer?
Look for small adjustment valves on the closer body. Use a screwdriver or Allen key to turn them. Clockwise usually slows the speed, counterclockwise speeds it up. Test the door after each small adjustment.
Why Does My Door Closer Leak Oil?
Oil leaks mean the internal seals are broken or the closer is worn out. Leaking closers cannot be repaired—replace the closer right away. Operating a leaking closer can damage your door or frame.
Do I Need A Fire-rated Closer For My Home?
For most homes, a standard closer is enough. If you have a door between the garage and living space, or a fire door by code, you must use a fire-rated closer. Always check local building codes if you’re unsure.
Mounting a door closer is a smart upgrade that improves safety, comfort, and energy efficiency. With the right tools, a little patience, and the tips in this guide, you can achieve professional results that will last for years. For more details on door hardware standards, you can visit the Wikipedia Door Closer page. Whether you’re securing a front door, upgrading an office, or improving fire safety, a well-installed door closer is a small change that makes a big difference.