
If you want to feel safe at home, installing an indoor Ring camera is a smart decision. These cameras let you see, hear, and speak to people and pets from your phone, wherever you are. But many people feel worried about mounting the camera the right way. Maybe you don’t want to damage your wall, or you fear the camera won’t cover the whole room. Some wonder if the Wi-Fi will work well, or how to keep the camera’s wires hidden and tidy.
This guide will show you exactly how to mount an indoor Ring camera step by step. You’ll learn where to place it, how to attach it to different surfaces, and how to connect it to Wi-Fi. You’ll also see tips for avoiding common mistakes, and ways to make your camera look neat in your home.
Whether you rent or own your place, you’ll find clear advice here—so you can finish the job confidently.
Understanding The Indoor Ring Camera
Before you start, it helps to know what the indoor Ring camera can do. Most models, like the Ring Indoor Cam (2nd Gen), are small and light, about 2 inches wide and 4 inches tall. They record in 1080p HD video, have night vision, two-way audio, and connect to your home Wi-Fi. Many also have motion detection and work with the Ring app for live view and alerts.
There are also wired and battery-powered versions. The wired model needs to stay plugged in, while battery-powered ones give you more freedom about where to put them.
Key features:
- 1080p HD video for clear images
- Motion alerts sent to your phone
- Two-way audio lets you talk and listen
- Night vision for low-light
- Compact design fits small spaces
The camera comes with a mounting base, screws, wall anchors, and a USB power adapter. Some packages also include a sticky pad for quick, no-drill installation.
Choosing The Best Location
Where you put your camera affects how well it works. The right spot means you’ll see more of your room, get better motion detection, and have fewer false alarms.
What To Consider
- Field of view: Indoor Ring cameras usually have a 140°-155° wide-angle lens. Place the camera in a corner, about 6-7 feet above the floor. This position lets you see the whole room without blind spots.
- Power outlet access: For wired models, check there’s an outlet nearby. The power cable is usually about 6.5 feet long.
- Wi-Fi signal strength: The camera needs a good signal. If the Wi-Fi is weak, video may lag or disconnect. You can use your phone to test Wi-Fi in the spot you choose.
- Privacy: Don’t point cameras toward bathrooms, bedrooms, or neighbor’s windows. Keep in mind privacy laws in your state or country.
- Pet and child safety: Mount the camera high enough so children or pets can’t grab the wires or the device.
Common Mounting Locations
- Living room corner: Captures main entrances and activity
- Hallway ceiling: Monitors movement between rooms
- Home office: Keeps an eye on valuables
- Garage or basement: Watches storage areas
Spots To Avoid
- Direct sunlight: Can cause glare and heat up the camera
- Near heat sources: Avoid above radiators or stoves
- Behind obstacles: Don’t block the lens with furniture or decor
Tools And Supplies You’ll Need
Mounting your camera is easier when you have the right tools ready. Here’s what you’ll need for most Ring indoor cameras:
- Phillips screwdriver (included in some kits)
- Drill (for drywall, wood, or masonry)
- Level (optional, helps keep camera straight)
- Pencil for marking holes
- Tape measure or ruler
- Wall anchors and mounting screws (included)
- Double-sided adhesive pad (included, for no-drill install)
- Cable clips or cord covers (to hide wires)
Pro tip: Before you drill any holes, plug in the camera and test the video in your chosen spot. Move the camera around to find the best angle.
Understanding Your Wall Or Surface
Not all walls are the same. Mounting on drywall, brick, wood, or tile needs a different approach.
Wall Types And Mounting Methods
| Wall Type | Best Mounting Method | Tips |
|---|---|---|
| Drywall | Use wall anchors and screws | Drill small pilot hole first |
| Wood | Screws only | No anchors needed; drill gently |
| Brick/Masonry | Masonry anchors and screws | Use hammer drill and masonry bit |
| Tile | Special tile drill bit + anchors | Go slow to avoid cracks |
| Glass/Metal | Adhesive pad | No drilling; clean surface first |
If you rent, ask your landlord before drilling or use adhesive pads.
Step-by-step Guide: Mounting Your Indoor Ring Camera
Let’s walk through each step, from unboxing to mounting and setup. This process works for most Ring indoor cameras.
1. Unpack And Inspect The Camera
Open the box and check you have:
- The Ring indoor camera
- Mounting base
- Screws and wall anchors
- Power cable and adapter
- Quick start guide
- Adhesive pad (if included)
Make sure the camera is not damaged and all parts are present.
2. Power Up And Connect Temporarily
Plug in the camera using the included cable and adapter. Place it in your chosen spot, resting on a shelf or table for now.
Open the Ring app on your phone, tap “Set Up a Device,” and follow instructions. Connect to your Wi-Fi and check the video feed. Move the camera if needed for a better view.
Non-obvious tip: Use this time to test the camera’s speaker and microphone. Ask someone to talk or walk in front of the camera so you can check audio quality.
3. Mark The Mounting Holes
Once you like the position:
- Hold the mounting base against the wall.
- Use a pencil to mark the screw holes.
- Use a level if you want the camera perfectly straight.
4. Drill Holes And Insert Anchors
For drywall, brick, or tile:
- Use a drill bit the same size as your anchors.
- Drill holes at the marks.
- Insert wall anchors by pushing or tapping them in gently.
For wood: Skip anchors, just drill a small pilot hole for the screws.
For glass or metal: Skip drilling; use the adhesive pad.
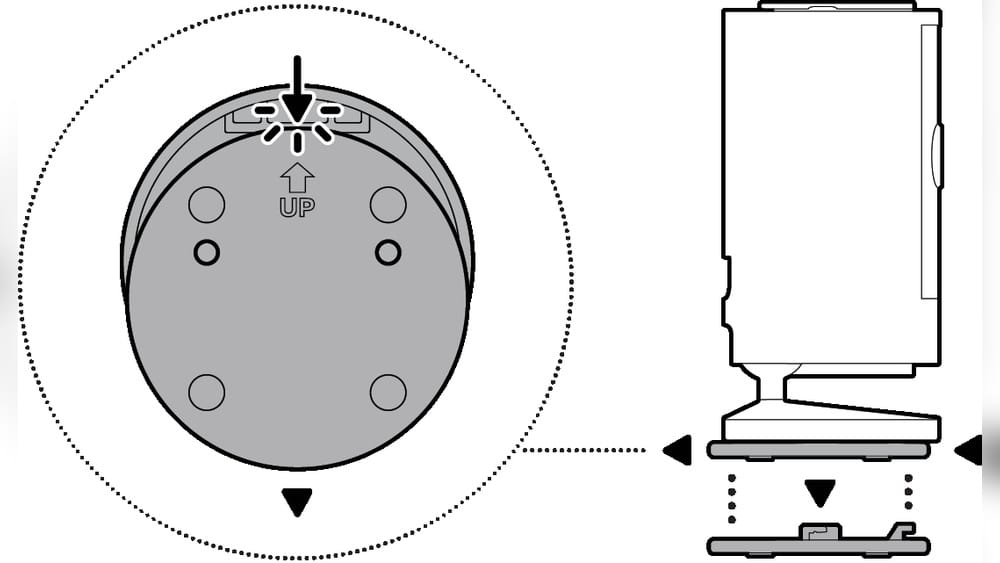
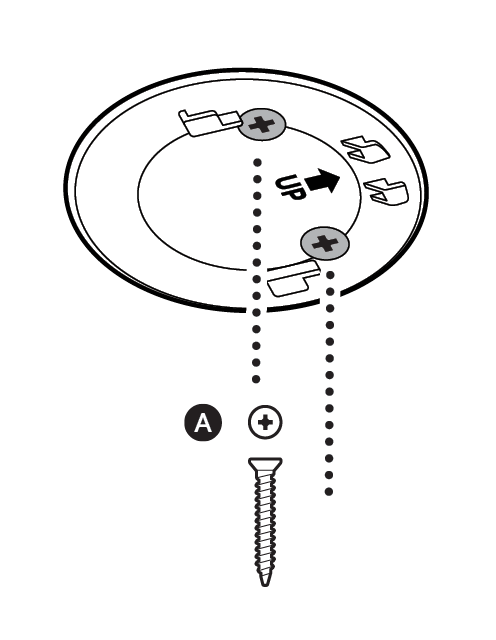
5. Attach The Mounting Base
- Line up the base with the holes.
- Screw the base securely to the wall using a screwdriver.
- Don’t overtighten—snug is enough.
If using adhesive, peel off the backing and press the base firmly to the wall for 30 seconds.
6. Mount The Camera
- Snap or screw the camera onto the base, depending on model.
- Adjust the angle: Tilt or swivel as needed.
- Make sure the lens points at the area you want to cover.
7. Route And Hide The Power Cable
A messy cable can ruin the look. Here are ways to keep it neat:
- Use cable clips to run the wire along the wall or baseboard.
- Hide the cord behind furniture when possible.
- For a professional look, use a cord cover (plastic channel) to hide the wire. Paint it to match your wall.
8. Final Setup In The Ring App
- Plug in the camera.
- Open the Ring app and check the live video.
- Adjust motion zones and notifications in the app.
- If the image is upside-down, use the app’s “Rotate Video” option.
Pro tip: Turn on “People Only Mode” to reduce false alerts from pets or moving curtains.
Alternative Mounting Options
Not everyone wants to drill holes or use screws. There are other ways to mount your camera.
Adhesive Pads
Most Ring cameras are light enough for double-sided sticky pads. Clean the wall first with alcohol. Stick the pad to the mounting base, then press to the wall. This works best on smooth, flat surfaces.
Caution: Adhesive may not hold well on textured walls or in humid areas.
Tripod Or Stand
Some models have a tripod socket underneath. You can use a small camera tripod or stand to place the camera on a shelf, bookcase, or desk—no mounting needed.
Magnetic Mount
Third-party magnetic mounts are available. These let you stick the camera to a metal surface, like a fridge or steel door frame.
Corner Mount Bracket
Special corner brackets let you mount the camera perfectly in a corner for the widest possible view. These are sold separately.
Credit: ring.com
Comparing Ring Indoor Cameras And Mounting Styles
To help you choose the right setup, here’s a quick comparison of common Ring camera models and their mounting options:
| Model | Mounting Options | Power Source | Best Use |
|---|---|---|---|
| Ring Indoor Cam (Wired) | Wall, shelf, adhesive | Plug-in only | Permanent indoor spot |
| Ring Stick Up Cam (Battery) | Wall, ceiling, shelf, tripod | Battery or plug-in | Flexible or temporary |
| Ring Stick Up Cam (Wired) | Wall, ceiling, shelf | Plug-in only | High-traffic rooms |
| Ring Pan-Tilt Cam | Shelf, tripod | Plug-in only | Wide-area coverage |
Non-obvious insight: Some users forget that battery models can also be plugged in for non-stop power. This gives you flexibility if you move the camera later.
Setting Up The Camera In The Ring App
Mounting is only half the job. To get the most from your camera, you’ll need to set up features in the Ring app.
Step-by-step Setup
- Download the Ring app from the App Store or Google Play.
- Create a Ring account if you don’t have one.
- Tap Set Up a Device and choose Security Cameras.
- Scan the QR code on your camera or in the box.
- Choose your Wi-Fi network and enter the password.
- Name your camera (e.g., “Living Room”).
- Complete setup—now you can view live video.
Optimizing Settings
- Motion Zones: Draw custom shapes on the screen to focus motion alerts on doors or windows.
- Motion Sensitivity: Lower sensitivity to avoid false alarms from pets.
- Scheduling: Set times when alerts are on or off (good for privacy).
- People Only Mode: Only alerts when people are detected, not pets or shadows.
- Privacy Zones: Block out areas you don’t want recorded (like a neighbor’s window).
Sharing Access
You can share the camera’s feed with family. In the app, go to Device Settings > Shared Users and invite by email.

Credit: www.youtube.com
Common Mistakes And How To Avoid Them
Many people make simple mistakes when mounting their camera. Here’s how to avoid them:
- Mounting too high or too low: If the camera is too high, you’ll see only the tops of heads. Too low, and pets may trigger alerts. Stick to about 6-7 feet from the floor.
- Ignoring Wi-Fi strength: Video quality drops with weak Wi-Fi. Test Wi-Fi with your phone in the camera’s spot before mounting.
- Not securing cables: Dangling wires look messy and can be pulled by pets. Use clips or covers.
- Pointing at windows: Cameras aimed at windows often get glare, especially at night. Face the camera away from glass when possible.
- Forgetting privacy: Avoid placing cameras in private areas, and always inform guests they’re being recorded.
- Skipping the test: Always plug in and check the camera’s view before drilling holes.
Maintenance Tips For Your Indoor Camera
Once mounted, your camera needs little care. Here’s how to keep it working well:
- Clean the lens every month with a soft cloth to remove dust.
- Check Wi-Fi if video lags. Move your router or add a Wi-Fi extender if needed.
- Update firmware in the Ring app. Updates add security and new features.
- Test motion detection regularly to make sure you’re getting alerts.
- Inspect mounts and cables every few months to ensure nothing is loose.
Non-obvious tip: If you move furniture, always check that the camera’s view isn’t blocked.
Security And Privacy Considerations
Indoor cameras add security, but also raise privacy questions. Here’s how to stay safe and respectful:
- Use strong passwords for your Ring account and home Wi-Fi.
- Turn on two-factor authentication in the app for extra protection.
- Inform guests that your home has cameras.
- Place cameras only in common areas, not bedrooms or bathrooms.
- Set privacy zones in the app to block sensitive areas from recording.
Some countries and states have laws about recording audio or video. Check local rules if you have roommates, renters, or guests. For more, see the official Ring privacy policy.
Troubleshooting: Fixing Common Problems
If your camera isn’t working as expected, try these solutions.
Camera Won’t Connect To Wi-fi
- Move the camera closer to your router.
- Restart your router and camera.
- Check your Wi-Fi password is correct.
- Use the Ring app’s “Reconnect” feature.
Blurry Or Dark Video
- Clean the camera lens with a soft cloth.
- Check for low light or glare from windows.
- Adjust the camera angle.
Motion Alerts Not Working
- Open the app and adjust motion zones and sensitivity.
- Make sure notifications are turned on in your phone settings.
Power Issues
- Check that the power adapter is plugged in firmly.
- Try a different outlet.
- If using battery power, recharge or replace the battery.
Camera Feels Warm
It’s normal for the camera to feel slightly warm during use. If it’s hot, unplug and contact Ring support.

Credit: www.youtube.com
Upgrading Or Moving Your Camera
Sometimes you want to move the camera to a new spot, or upgrade to a newer model.
Moving The Camera
- Unplug the camera and remove it from the mount.
- Patch old holes with spackle if needed.
- Repeat the mounting steps in the new location.
- Reconnect to Wi-Fi in the Ring app if necessary.
Upgrading To A New Model
- Remove the old camera and mount.
- Install the new mounting base if it’s a different size.
- Follow setup instructions for the new camera.
Non-obvious insight: If you switch from a wired to a battery model, you can still use your old mount if the screw holes line up.
Comparing Ring Indoor Camera To Other Brands
How does the Ring indoor camera stack up against the competition? Here’s a quick look:
| Brand/Model | Video Quality | Mounting Options | App Features |
|---|---|---|---|
| Ring Indoor Cam | 1080p HD | Wall, shelf, adhesive | Custom motion, privacy zones |
| Wyze Cam v3 | 1080p HD | Wall, magnetic, stand | Cloud & SD storage |
| Google Nest Cam (Indoor) | 1080p HD | Wall, magnetic | Person alerts, Google Home |
| Arlo Essential Indoor | 1080p HD | Wall, shelf | Privacy shutter, cloud |
Ring stands out for its strong app, easy setup, and wide compatibility with smart home devices.
Maximizing Your Indoor Camera’s Value
To get the most from your indoor Ring camera:
- Subscribe to Ring Protect for cloud storage and video history.
- Integrate with Alexa or other smart assistants for voice control.
- Use routines (e.g., turn on lights when motion is detected).
- Add extra cameras for full coverage.
Non-obvious tip: You can set up motion-based routines with smart plugs or bulbs, so your Ring camera can trigger lights or alarms.
Safety For Renters And Shared Homes
If you rent or share your home, consider these points:
- Use adhesive mounts or stands to avoid wall damage.
- Always get permission before installing cameras in shared spaces.
- Respect roommates’ and guests’ privacy.
- Remove cameras and patch holes when you move out.
Frequently Asked Questions
Can I Install A Ring Indoor Camera Without Drilling Holes?
Yes, you can use the included adhesive pad or a third-party sticky mount for most Ring indoor cameras. Just clean the wall, stick the pad, and press firmly. This works best on smooth walls and is perfect for renters.
How Do I Know If My Wi-fi Is Strong Enough For The Camera?
Use your smartphone to check Wi-Fi strength in the camera’s spot. If you can stream video or load websites quickly, your camera should work well. If not, consider moving your router, adding a Wi-Fi extender, or choosing a spot closer to the router.
Can I Move My Ring Camera After Mounting It?
Absolutely. Unplug the camera, unscrew or unclip it from the mount, and reinstall in a new spot. If you used adhesive, you may need to use a new pad. Remember to patch any holes if you move out or change location.
What Should I Do If My Camera Shows A Black Screen?
First, check that the camera is powered and the lens is clean. If the room is dark, make sure night vision is on. Try resetting the camera in the Ring app. If the problem continues, contact Ring customer support.
Is Video From My Indoor Ring Camera Private?
Yes, your video is encrypted and only viewable by you and shared users. Always use strong passwords and two-factor authentication. To learn more, visit the Ring Privacy Portal.
—
Mounting your indoor Ring camera doesn’t have to be stressful. With the right tools and a careful plan, you’ll have your home protected in less than an hour. Take your time, test as you go, and always think about privacy and neatness.
The peace of mind from seeing your loved ones and valuables safe is well worth the effort.