
Mounting a Ring Doorbell is one of the best ways to boost your home security and stay aware of who’s at your door. Many people worry that installing a smart doorbell is difficult or risky. The truth is, anyone can mount a Ring Doorbell if they follow clear steps.
You don’t need to be a tech expert. With the right tools, a bit of planning, and proper guidance, your new device will be working in less than an hour.
This guide explains every detail you need. You’ll learn how to choose the best location, prepare your doorbell and tools, mount the device correctly, and connect it to your Wi-Fi. We’ll discuss common mistakes, give practical examples, and answer real questions.
You’ll also see comparison tables that help you select the right Ring model and mounting accessories. By the end, you’ll feel confident to install your Ring Doorbell and avoid problems that frustrate beginners.
Understanding Ring Doorbell Models
Before you start, you must know which Ring Doorbell you have. There are several models, and each has different mounting requirements. Some connect to existing doorbell wiring; others use batteries. Choosing the right approach depends on your model.
| Model | Power Source | Video Quality | Mounting Difficulty |
|---|---|---|---|
| Ring Doorbell (1st Gen) | Battery/Wired | 720p | Easy |
| Ring Doorbell 2 | Battery/Wired | 1080p | Easy |
| Ring Doorbell 3/3 Plus | Battery/Wired | 1080p | Easy |
| Ring Doorbell Pro | Wired Only | 1080p | Moderate |
| Ring Doorbell 4 | Battery/Wired | 1080p | Easy |
| Ring Elite | Ethernet | 1080p | Advanced |
Most people use the battery-powered models (Ring Doorbell 2, 3, 4). These are simple to mount and don’t require electrical wiring. Wired models give constant power and are slightly harder to install. Knowing your model helps you plan the steps and avoid surprises.
Non-obvious insight: Battery models are easier for renters because you can uninstall them without damaging the wall. Wired models are best for homeowners who want a permanent solution.
Choosing The Best Location
The right location for your Ring Doorbell is critical. It affects your video quality, motion detection, and Wi-Fi connection.
Key Factors For Placement
- Height: Mount your doorbell at about 48 inches (122 cm) above the ground. This height helps the camera capture faces and packages, not just feet or the sky.
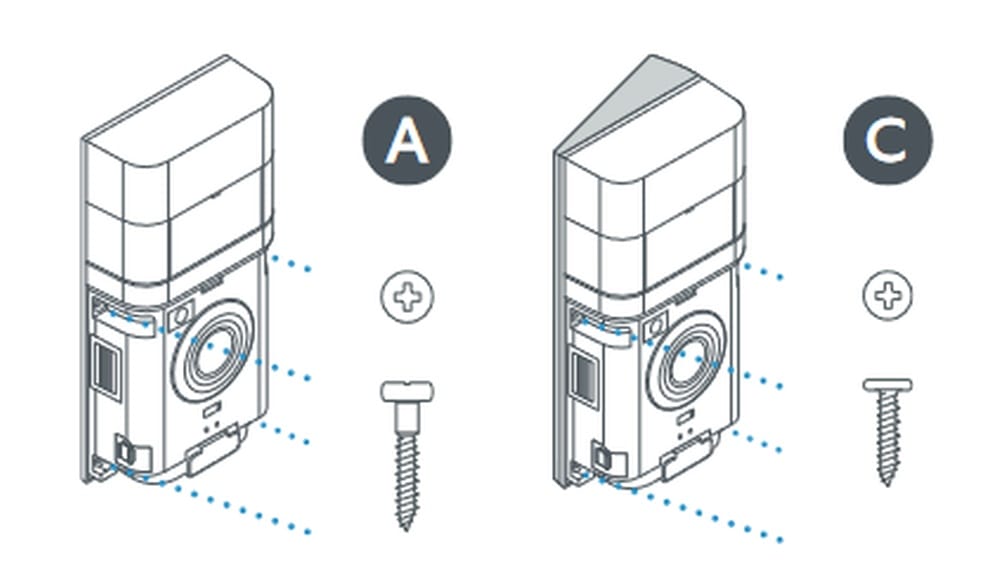
- Angle: Avoid placing your Ring Doorbell facing direct sunlight. Glare can reduce video quality. If your entrance gets sun, use a wedge mount to tilt the device.
- Visibility: Make sure visitors can easily see and reach the button. Don’t hide it behind plants or decorations.
- Wi-Fi Signal: Your device must connect to your home Wi-Fi. Test the signal strength at your chosen spot using your phone. A weak signal causes delays or missed recordings.
- Existing Doorbell Wiring: If you have a wired model, check if your old doorbell wires reach the spot. Sometimes, moving just a few inches can make installation much easier.
Common Mistakes
- Mounting too high or too low. Video may miss faces or packages.
- Placing near metal doors or frames. Metal can block Wi-Fi signals.
- Ignoring nearby power sources for wired models. Extension wires can be messy and unsafe.
Practical tip: Walk outside and view your entrance as a visitor would. This helps you see where the Ring Doorbell will work best.
:strip_icc()/BHG-how-to-install-video-doorbell-6833360-part-01-step-04-3ef659b395df47e2880dbb810cf31b73.jpg)
Credit: www.sepr.es
Gathering Tools And Materials
You don’t need expensive tools to mount a Ring Doorbell. Most models come with a small toolkit. However, having a few extra items can make the process smoother.
Essential Tools
- Screwdriver (usually a Phillips head)
- Drill (for mounting on brick, stucco, or concrete)
- Level (to keep the device straight)
- Tape measure or ruler
- Pencil (for marking screw holes)
- Anchors (for hard surfaces)
- Wedge or corner mounts (optional, for angled placement)
Materials Included With Ring Doorbell
- Mounting bracket
- Screws
- Security screws (for anti-theft protection)
- Quick start guide
Optional Accessories
- Wedge mount: Tilts the camera up or down.
- Corner mount: Adjusts the device’s angle for side placement.
- Solar charger: Adds power for battery models.
- Chime: Lets you hear the doorbell inside, even if your phone is off.
| Accessory | Purpose | Recommended for |
|---|---|---|
| Wedge Mount | Adjust vertical angle | Entrances with steps |
| Corner Mount | Adjust horizontal angle | Side walls or angled doors |
| Chime | Indoor alert sound | Large homes, noisy environments |
| Solar Charger | Extra power | Battery models in sunny areas |
Non-obvious insight: Many beginners forget about wedge mounts. They’re useful if your doorbell faces a busy street or direct sunlight.
Preparing The Mounting Surface
The mounting surface affects the difficulty of installation. Wood is easy. Brick, stucco, and concrete require drilling and anchors. Check your wall type before starting.
For Wood Or Siding
- Use the provided screws.
- No need for anchors.
- Mark holes with a pencil; drill pilot holes for easier screwing.
For Brick, Stucco, Or Concrete
- Use a masonry drill bit.
- Insert wall anchors into drilled holes before screwing.
- Take extra care to keep the device level.
For Metal
- Use self-tapping screws.
- Avoid mounting on large metal surfaces, which weaken Wi-Fi.
Practical tip: If you’re unsure about your wall type, tap it gently. Hollow sounds often mean drywall or siding; solid sounds mean brick or concrete.
Credit: ring.com
Step-by-step Mounting Instructions
Now, let’s walk through the actual mounting process. Each step is simple if you follow carefully.
Step 1: Charge Or Prepare The Device
For battery models:
- Remove the battery and charge it using the USB cable.
- Wait until the light turns green (usually 4–6 hours).
For wired models:
- Turn off power to your existing doorbell circuit at the breaker.
- Check for voltage with a tester before touching wires.
Step 2: Mark The Mounting Holes
- Hold the mounting bracket at your chosen spot, about 48 inches high.
- Use a level to make sure it’s straight.
- Mark screw holes with a pencil.
Step 3: Drill Holes
- For wood: Drill small pilot holes where you marked.
- For brick/concrete: Use a masonry drill bit to drill holes; insert anchors.
Step 4: Attach The Mounting Bracket
- Align the bracket with your holes.
- Secure with screws (and anchors if needed).
- Double-check with the level.
Step 5: Connect Power (if Wired)
- Attach the old doorbell wires to the screws on the back of the Ring Doorbell.
- Tighten screws, making sure wires are secure.
- For battery models, skip this step.
Step 6: Snap The Doorbell Onto The Bracket
- For most models, align the device with the bracket and press firmly until you hear a click.
- Insert security screws at the bottom or top (depending on model).
Step 7: Restore Power And Test
- For wired models, turn the breaker back on.
- For battery models, insert the charged battery.
Step 8: Set Up In The Ring App
- Download the Ring app (iOS or Android).
- Create or log into your account.
- Tap “Set Up a Device” and follow instructions.
- Connect to Wi-Fi; test video and doorbell functions.
Practical tip: Always test the device before finishing the installation. This saves time if you need to adjust the angle or Wi-Fi.
Connecting To Wi-fi And Setting Up Notifications
Your Ring Doorbell depends on a reliable Wi-Fi connection. Weak signal means missed alerts or poor video quality.
Checking Wi-fi Strength
- Use your phone’s Wi-Fi indicator at the mounting spot.
- Ring recommends at least RSSI -60 or better for smooth video.
Solving Wi-fi Problems
- Move your router closer if possible.
- Use a Wi-Fi extender or mesh network for large homes.
- Avoid mounting near thick walls, metal, or electronics.
Setting Up Notifications
- In the Ring app, choose notification preferences.
- Enable motion alerts and doorbell rings.
- Adjust sensitivity so you don’t get too many false alerts.
Non-obvious insight: Many beginners forget to adjust motion zones. Customizing these zones in the app can reduce unwanted alerts from passing cars or neighbors.
Credit: ring.com
Installing Wedge Or Corner Mounts
Sometimes your entrance isn’t ideal for straight mounting. Wedge and corner mounts help solve this.
When To Use Mounts
- If your doorbell faces direct sunlight, use a wedge to tilt it down.
- If your door is on a side wall, use a corner mount to angle toward visitors.
Installing Accessory Mounts
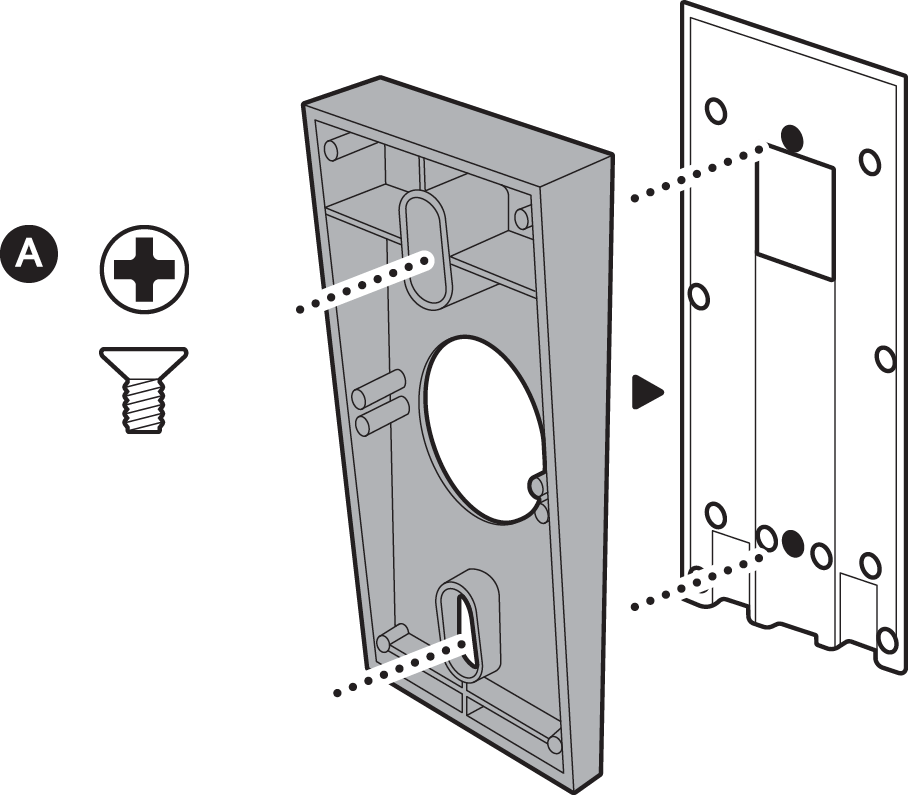
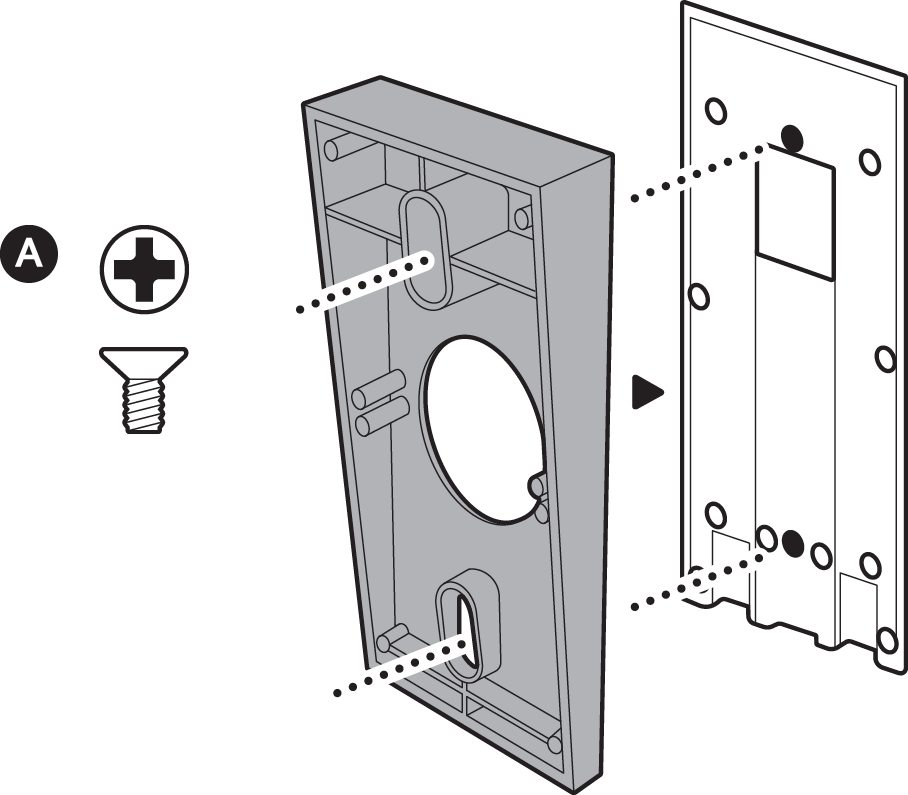
- Attach the wedge or corner mount to the wall first.
- Then, attach the Ring mounting bracket to the accessory.
- Follow the same steps as basic mounting.
Practical tip: Stack multiple wedges if needed. Ring sells kits with up to three wedges for tricky spots.
Securing Your Doorbell Against Theft
Ring Doorbells are valuable and sometimes targeted by thieves. Here’s how to protect your device.
Security Screws
- Use the provided security screws to lock the device onto the bracket.
- These screws need a special tool (included), making removal difficult.
Video Recording
- Ring devices start recording when tampered with.
- If someone tries to steal it, video is saved to the cloud.
Neighborhood Alerts
- Join the Ring Neighbors network in the app.
- Get alerts about suspicious activity in your area.
Practical tip: If you ever need to remove your Ring Doorbell, keep the security tool in a safe place. Losing it makes removal very difficult.
Comparing Ring Doorbell Mounting Accessories
With so many accessories, it’s easy to get confused. Here’s a quick comparison to help you choose what you need.
| Accessory | Compatible Models | Adjustment | Installation Difficulty |
|---|---|---|---|
| Wedge Mount | Ring 2, 3, 4, Pro | Vertical tilt | Easy |
| Corner Mount | Ring 2, 3, 4 | Horizontal angle | Easy |
| Solar Charger | Ring 2, 3, 4 | Power boost | Moderate |
| No-drill Mount | Ring 2, 3, 4 | Temporary | Very easy |
| Floodlight Cam Mount | Ring Floodlight | Lighting + video | Advanced |
Non-obvious insight: The no-drill mount is perfect for renters. It uses strong adhesive and can be removed without damage.
Troubleshooting Common Problems
Sometimes, things don’t work as planned. Here are solutions to the most frequent issues.
Weak Wi-fi Signal
- Use a Wi-Fi extender.
- Move your router closer.
- Reduce obstacles (walls, metal, electronics).
Video Quality Issues
- Clean the camera lens.
- Adjust the angle for less glare.
- Use wedge mounts if needed.
Doorbell Not Ringing Indoors
- Add a Ring Chime device.
- Check app settings for notifications.
Device Not Turning On
- For battery models, recharge the battery fully.
- For wired models, check power at the wires and breaker.
False Motion Alerts
- Adjust motion zones in the app.
- Reduce sensitivity.
- Avoid mounting near moving trees or busy streets.
Practical tip: Updating the Ring app often fixes bugs. Always use the latest version.
Safety Tips For Mounting
Safety is important when installing any device. Take these precautions:
- Turn off power at the breaker when working with wires.
- Use a sturdy ladder for high spots.
- Wear eye protection when drilling.
- Don’t mount in dangerous weather (rain, snow, extreme heat).
Experience-based guide: I’ve seen people rush through installation and damage their wall or device. Take your time, double-check each step, and ask for help if needed.
Enhancing Your Ring Doorbell Experience
Mounting is just the start. You can make your Ring Doorbell even better with a few extra steps.
Link To Other Devices
- Connect your Ring Doorbell to smart speakers (Amazon Echo, Google Home).
- Set up routines like turning on lights when motion is detected.
Share Access
- Add family members to your Ring account for shared alerts.
- Use the Ring app to create guest permissions.
Upgrade Storage
- Subscribe to Ring Protect Plan for video storage.
- Basic plan starts at $3/month; keeps video for 60 days.
Neighborhood Watch
- Use the Ring Neighbors feature to help your community.
- Report suspicious activity and get local crime alerts.
Practical tip: Linking Ring to your smart home system makes security automatic. For example, you can have lights turn on when someone rings the bell.
Maintenance And Long-term Care
Your Ring Doorbell needs occasional care to keep working well.
Cleaning
- Wipe the camera lens monthly with a soft cloth.
- Remove dust, spider webs, and rain spots.
Battery Care
- Charge battery models every 6–12 months, depending on usage.
- Cold weather drains batteries faster. Keep this in mind during winter.
Software Updates
- Update the Ring app and device firmware regularly.
- Updates improve security and fix bugs.
Checking Mounts
- Inspect screws and brackets every few months.
- Tighten loose screws and check for damage.
Non-obvious insight: Many people ignore software updates. These can fix critical security issues, so always update when prompted.
Frequently Asked Questions
How Long Does It Take To Mount A Ring Doorbell?
Most people can mount a Ring Doorbell in 30–60 minutes. Battery models are faster because you don’t need to connect wires. Wired models may take longer if you need to adjust electrical connections or drill into hard surfaces.
Can I Mount A Ring Doorbell Without Drilling?
Yes, you can use a no-drill mount. This accessory uses strong adhesive and is ideal for renters or anyone who doesn’t want to make holes. However, it works best on smooth surfaces like glass or painted wood.
What Should I Do If My Ring Doorbell Won’t Connect To Wi-fi?
First, check your Wi-Fi signal strength at the mounting spot. If the signal is weak, move your router closer or use a Wi-Fi extender. Make sure you enter the correct password during setup. If problems continue, restart your router and Ring device.
Is It Possible To Mount A Ring Doorbell On A Gate Or Fence?
Yes, but you need to protect the device from rain and theft. Use a weatherproof cover and secure the device with additional brackets or security screws. Make sure the gate has a reliable Wi-Fi signal.
Do I Need A Ring Subscription To Use The Doorbell?
No, you can use basic features without a subscription. However, without a Ring Protect Plan, you won’t be able to store or review old videos. The subscription starts at $3/month and unlocks extra storage and features.
Final Thoughts
Mounting a Ring Doorbell is easier than most people expect. With careful planning and the right tools, you can install your device and enjoy better security within an hour. Start by choosing the best location, gather your tools, and follow the clear steps.
Don’t forget to test your device before finishing, and use accessories like wedge mounts or no-drill brackets if needed. Keep your Ring Doorbell updated and clean, and check your mounting hardware regularly.
If you ever feel unsure, check the official Ring support site or join the Ring community forums for help. Security starts at your front door, and mounting your Ring Doorbell is a great first step. For more details and official guidance, visit the Ring Help Center.
By following these instructions and tips, you’ll have a smart doorbell that works reliably and keeps your home safer.