
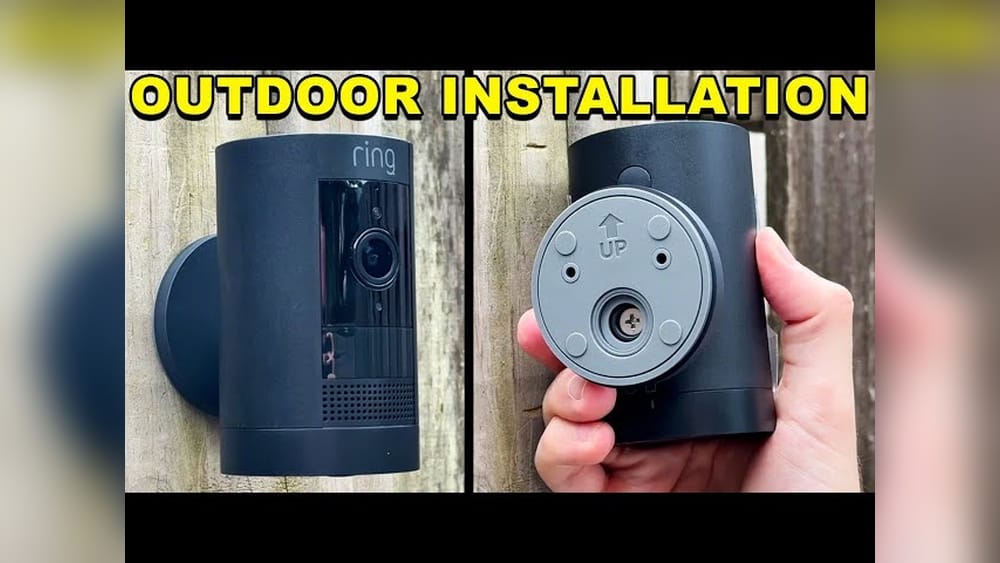
Mounting a Ring Stick Up Cam can feel like a big task, especially if you are doing it for the first time. You want your camera to work well, look good, and keep your home safe. But there are many small details that can make a big difference—choosing the right spot, using the right tools, and setting up the camera for the best view.
This guide will help you every step of the way. You’ll learn not only how to mount your Ring Stick Up Cam, but also how to avoid mistakes and make sure your camera works exactly as you hope. With clear explanations, real-life tips, and practical advice, you can finish the job with confidence—even if you have never installed a security camera before.
Understanding The Ring Stick Up Cam
The Ring Stick Up Cam is a popular home security camera. It works both inside and outside your home. It comes in different versions—Battery, Plug-In, Solar, and Wired. All models share the same basic shape and mounting system. This means that if you know how to mount one, you can mount any of them.
Here are some main features of the Ring Stick Up Cam:
- HD video (1080p)
- Two-way talk
- Motion detection
- Works with Ring app
- Flexible power options (battery, plug, solar, or wired)
- Weather resistant for outdoor use
Why does this matter? Knowing your camera’s model and features helps you plan where and how to mount it.
Ring Stick Up Cam Models At A Glance
Here’s a quick overview of the main models:
| Model | Power Source | Indoor/Outdoor | Battery Life | Special Features |
|---|---|---|---|---|
| Battery | Rechargeable Battery | Both | 3-6 months (typical) | No wires, easy to move |
| Plug-In | AC Power Adapter | Both | N/A | Continuous power, needs outlet |
| Solar | Solar Panel + Battery | Both | Almost unlimited (with sun) | Eco-friendly, set and forget |
| Wired | Ethernet/PoE | Both | N/A | Stable connection, needs wiring |
Each type affects how and where you mount your camera. For example, battery and solar models are more flexible, while plug-in and wired versions need to be near a power source.
Where To Mount Your Ring Stick Up Cam
Choosing the right location is the most important step. A good spot means better security and clearer video. But it’s easy to make mistakes here—many people choose a place that’s convenient, not what’s effective.
Key Factors When Choosing A Spot
- Viewpoint: Place your camera where it can see what matters—your door, driveway, or backyard. Make sure nothing blocks the view.
- Height: The best height is 7–9 feet above the ground. This gives a wide view but is still close enough to see faces.
- Sunlight: Avoid pointing the camera directly at the sun. This can make the video too bright or create glare.
- Wi-Fi Signal: Test your Wi-Fi where you want to mount the camera. Weak signal means poor video and missed alerts.
- Power Source: If your camera needs a plug, make sure an outlet is nearby.
- Weather Protection: Ring Stick Up Cam is weather-resistant, but mounting under an eave or roof edge adds extra protection.
Common Mistakes To Avoid
- Mounting too high: People think higher is better, but faces become too small to see.
- Hiding the camera: A visible camera can scare off troublemakers. Don’t hide it completely.
- Ignoring Wi-Fi: A strong connection is as important as a good view.
Real-life Example
Imagine you want to watch your front porch. If you mount the camera in the top corner under your roof, you can see who comes to your door and your package deliveries. If you put it on the side wall, you might miss faces or get blocked by open doors.

Credit: www.etsy.com
Tools And Materials You Will Need
Before you start, gather these items:
- Ring Stick Up Cam (with battery charged, if using Battery or Solar model)
- Mounting bracket (comes with the camera)
- Screws and anchors (included)
- Screwdriver (Phillips head)
- Drill (for brick, stone, or hard surfaces)
- Drill bits (usually 1/4 inch for anchors)
- Level (optional, but helps keep the camera straight)
- Ladder (for high spots)
- Smartphone or tablet (with Ring app)
If you’re mounting outside, you may also want:
- Silicone sealant (to keep out water, if drilling outside)
- Cable clips (for plug-in or wired models, to tidy cords)
Non-obvious Tips
- Charge your battery fully before mounting. It’s easier to do now than after the camera is on the wall.
- Test your camera and app inside the house first. This makes sure everything works before you climb a ladder.
Step-by-step: Mounting The Ring Stick Up Cam
Mounting the camera is simple if you follow each step. Take your time, and you’ll get a clean, solid installation.
1. Set Up Your Camera In The Ring App
Before you put the camera on the wall, set it up in the Ring app:
- Download the Ring app on your phone or tablet.
- Open the app and create or log in to your account.
- Tap Set Up a Device and follow the prompts.
- Choose your device type and model.
- Scan the QR code on the camera or in the box.
- Connect to Wi-Fi when asked.
- Test the camera’s video feed.
Setting up first helps you see if your Wi-Fi is strong enough at the spot you choose.
2. Mark The Mounting Location
Hold the mounting bracket where you want to install the camera. Use a pencil to mark where the screws will go. Check that the bracket is straight (a level helps).
Tip: If you’re not sure about the height, use painter’s tape to hold the bracket and check the camera’s view in the app.
3. Drill The Holes
- For wood or drywall: You may not need anchors—just screws.
- For brick, stucco, or concrete: Use the drill and included anchors.
Drill slowly and keep the holes straight. If you are drilling outside, add a bit of silicone sealant in each hole to stop water from getting in.
4. Attach The Mounting Bracket
Screw the bracket into place. Make sure it’s tight, but don’t overtighten or you might crack the wall or strip the screws.
5. Mount The Camera
Slide or snap the Ring Stick Up Cam onto the bracket (check your model’s manual—some twist on, others click). Tighten any set screws if required.
6. Adjust The Camera Angle
Open the Ring app and check the live video feed. Adjust the camera up, down, left, or right until you get the view you want. Make sure you see faces, not just the tops of heads.
7. Secure And Tidy Up
If your camera uses a power cable, use cable clips to hold the wire against the wall. This prevents snags and keeps everything neat. For outdoor installs, make sure all connections are weather-tight.
8. Final Check
- Test motion detection in the app.
- Check video quality at different times of day.
- Make sure you get alerts on your phone.
If Everything Works, You’re Done!
Special Cases: Mounting On Different Surfaces
Every wall is different. Here’s what you need to know for each surface.
Drywall
Drywall is common inside homes. For lightweight cameras like Ring Stick Up Cam, you can usually use the included screws. If you want extra strength, use drywall anchors.
Tip: Avoid mounting near the edge of a wall, as drywall is weaker there.
Brick Or Concrete
For hard surfaces, use a masonry drill bit and the wall anchors that come with your camera. Drill slowly and clean out the dust before pushing in the anchors.
Practical Insight: If you mount in mortar (the gray stuff between bricks), it’s easier to drill, but may not hold as tightly as brick.
Siding
Vinyl or wood siding is common outside. You can drill through siding, but make sure you’re hitting solid wood behind. Use longer screws if needed.
Non-Obvious Detail: If your siding moves or bends when you push, use a mounting block behind the camera for extra support.
Metal
Metal walls or posts need special self-tapping screws. Drill a small pilot hole first, then use the self-tapping screws.
Ceilings
You can mount the camera on a ceiling. Use the same steps as for walls, but make sure your bracket and screws are strong enough to hold the camera upside down. Use the Ring app to flip the video image if needed.
Comparing Mounting Positions
Where you place your camera changes what it can see. Here’s a comparison for common spots:
| Location | Best For | Pros | Cons |
|---|---|---|---|
| Front Door (7 ft high, facing out) | Seeing faces, packages, visitors | Clear faces, good coverage | May need ladder to adjust |
| Above Garage | Driveway, cars, wide view | Covers large area | Details may be smaller |
| Backyard Fence | Yard, pets, rear entrance | Good for privacy | Needs weather protection |
| Inside Home (corner) | Living room, main entry | Wide view indoors | May miss small details |
Pro Insight: For doors, aim the camera slightly down. For yards or driveways, keep it level for a wider field of view.
Powering Your Ring Stick Up Cam
How you power your camera affects where you can mount it.
Battery Model
- Charge the battery first (can take 5–10 hours).
- Easy to place anywhere.
- Check battery level in the app every few months.
Plug-in Model
- Needs a power outlet nearby.
- Best for places where you want constant power.
- Use outdoor-rated extension cords for outside.
Solar Model
- Needs sunlight for the solar panel.
- Mount the panel where it gets at least a few hours of direct sun.
- Panel can be up to 13 feet from the camera.
Wired Model
- Uses Ethernet cable for power and data (PoE).
- Needs wiring—best for permanent installs.
Tip: If you need to drill a hole for the cable, measure carefully before you start.
Setting Up Motion Zones And Alerts
A good camera is not just about the view—it’s about smart alerts. Ring Stick Up Cam lets you set motion zones in the app. This means you can tell the camera what to watch and what to ignore.
How To Set Motion Zones
- Open the Ring app.
- Tap your camera, then tap Motion Settings.
- Tap Edit Zones.
- Draw boxes on the screen where you want to detect motion.
- Save your settings.
Why Motion Zones Matter
- Fewer false alarms (ignore busy roads, waving trees)
- More focused alerts
- Longer battery life (less recording when not needed)
Non-Obvious Detail: You can set different sensitivity levels for each zone. If you get too many alerts, turn the sensitivity down.

Credit: www.youtube.com
Weatherproofing And Outdoor Setup
Ring Stick Up Cam is built for outdoor use, but you can make it last longer with a few extra steps.
- Seal around drilled holes with silicone to keep water out.
- Face the camera away from direct rain if possible.
- Use the weatherproof plug (included) for any open ports.
- In extreme cold (below -5°F), battery life may drop. Bring the camera inside to charge if needed.
Practical Tip: Clean the lens every few months. Dirt and spider webs can block the view.
Connecting To Wi-fi And Troubleshooting
A strong Wi-Fi connection is key for clear video and fast alerts.
How To Test Wi-fi Signal
- Use your phone at the camera spot.
- Watch a YouTube video or run a speed test. If it’s slow, move your router or add a Wi-Fi extender.
Troubleshooting Tips
- Poor signal? Try moving your router closer or using a mesh network.
- Camera offline? Unplug and replug the camera, or remove and replace the battery.
- No alerts? Check app settings, motion zones, and make sure notifications are allowed.
Pro Insight: Wi-Fi signals can drop 50% through brick or stone walls. If your camera is far from the router, consider a Powerline adapter or a dedicated Wi-Fi extender.

Credit: ring.com
Advanced Installation Options
Some users want to go beyond the basics. Here are extra ideas for a pro-level setup.
Using Corner Mounts
Ring sells special corner mounts to angle your camera for a better view. This is helpful if you want to see both your front door and walkway.
Mounting Under Eaves
You can mount the camera upside down under a roof edge. Use the app to flip the image if needed. This keeps the camera dry and out of the sun.
Integrating With Other Devices
Ring Stick Up Cam works with Alexa and other smart home systems. You can link the camera to smart lights or locks for extra security.
Multi-camera Setups
If you have more than one camera, set each to cover a different area. Overlap the edges of their views so there are no blind spots.
Advanced Tip: Name each camera in the app (Front Door, Garage, Backyard) so you know which alert is which.
Comparing Ring Stick Up Cam To Other Cameras
If you’re considering other options, here’s a quick comparison:
| Camera | Video Quality | Power Options | Weatherproof | Audio | Works With |
|---|---|---|---|---|---|
| Ring Stick Up Cam | 1080p HD | Battery, Plug, Solar, Wired | Yes | Two-way talk | Alexa, Ring |
| Arlo Essential | 1080p HD | Battery, Plug | Yes | Two-way talk | Google, Alexa |
| Google Nest Cam | 1080p HD | Battery, Plug | Yes | Two-way talk | Google Home |
| Blink Outdoor | 1080p HD | Battery | Yes | Two-way talk | Alexa |
Insight: Ring Stick Up Cam is one of the most flexible cameras for mounting and power options.
Maintaining Your Mounted Camera
A well-mounted camera can last for years, but a few simple steps keep it working its best.
- Check battery level every few months.
- Clean the lens with a soft cloth.
- Update firmware in the Ring app when prompted.
- Inspect the mount and wires for signs of damage.
- Test video and alerts every few months.
Pro Tip: Write a calendar reminder to check your camera every 6 months.
Safety Tips For Mounting
Safety matters when climbing ladders and using tools.
- Have a friend hold the ladder if possible.
- Don’t install during rain or storms.
- Keep tools and screws organized.
- Wear safety glasses when drilling.
Non-Obvious Safety Tip: If mounting over a door, check that the door can open fully without hitting the camera.
When To Call A Professional
Most people can mount a Ring Stick Up Cam themselves. But if you face these challenges, consider hiring help:
- You need to run long wires through walls.
- You can’t drill into hard surfaces.
- You have trouble with Wi-Fi setup.
- You want a very high or tricky install.
Ring offers installation services in some areas, or you can hire a local handyman.
Where To Find More Help
The Ring website and support center have videos and guides. There are also helpful forums where users share tips. For power users, the Ring Community is a great place to learn advanced tricks.
For official guidance, visit the Ring Support Center.
Frequently Asked Questions
How Long Does It Take To Mount A Ring Stick Up Cam?
Most installs take 20–45 minutes. The first time may take a bit longer, especially if you need to drill into brick or run wires. Setting up the app and testing your camera adds a few minutes.
Can I Move My Ring Stick Up Cam After It’s Mounted?
Yes. The camera is easy to remove from the bracket. You can charge the battery or move the camera to a new spot. If you want to mount in a new place, you may need to drill new holes.
Does The Camera Work At Night?
Yes. Ring Stick Up Cam has infrared night vision. It can see in the dark up to about 30 feet. The video switches to black-and-white at night.
What Happens If Wi-fi Goes Down?
The camera cannot send live video or alerts without Wi-Fi. It will try to reconnect when Wi-Fi comes back. For important security, make sure your Wi-Fi is stable.
How Do I Make Sure My Camera Is Weatherproof?
Mount under an eave or roof edge for best protection. Use silicone sealant in drilled holes. Check all connections are tight and use the weatherproof plug for any unused ports.
Mounting your Ring Stick Up Cam is one of the best ways to upgrade your home security. With the right tools, careful planning, and a little patience, you can get great results. Remember, the key is in the details—choose the right spot, test your setup, and check your camera regularly.
With this guide, you’re ready to protect your home with confidence.