
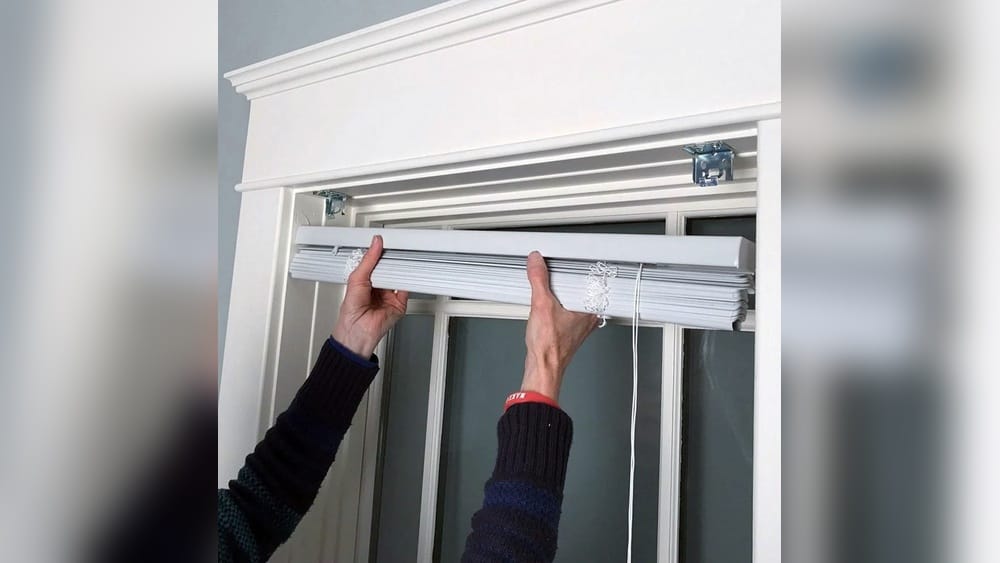
Mounting window blinds may seem simple, but it’s a project that can turn frustrating if you don’t know the right steps. Done well, blinds can transform your room’s look, improve privacy, and help control sunlight. Many people worry about drilling holes, measuring correctly, or choosing the right type of blinds for their windows.
This guide will walk you through everything, from selecting the best blinds to installing them like a pro, even if you’ve never handled a drill before.
You’ll learn how to avoid common mistakes, measure your windows with confidence, and use tools safely. Whether you want to mount blinds inside or outside the window frame, this article explains the differences and gives you practical advice. By the end, you’ll have all the knowledge you need to mount blinds perfectly, making your home feel more comfortable and stylish.
Understanding Window Blinds Types
Before you start mounting, you need to choose the right type of window blinds. There are several options, each offering a unique look and functionality. Here’s a quick overview:
Venetian Blinds
These are made of horizontal slats, usually wood, aluminum, or plastic. They can be tilted to control light, raised, or lowered. Venetian blinds are popular because they’re easy to clean and offer precise light control.
Roller Blinds
Roller blinds use a fabric sheet that rolls up at the top. They’re simple, modern, and ideal for rooms where you want a sleek, minimal look. They block sunlight effectively and are available in blackout versions.
Vertical Blinds
These have vertical slats that rotate and slide side-to-side. They’re suitable for large windows or sliding doors. Vertical blinds are also easy to maintain and offer great privacy.
Roman Blinds
Roman blinds are fabric-based and fold into neat pleats when raised. They add softness and elegance to rooms but are less effective at blocking light compared to roller blinds.
Cellular (honeycomb) Blinds
These are made from fabric cells that trap air, providing insulation. Cellular blinds are excellent for energy efficiency, especially in extreme climates.
Comparison Table: Blind Types And Features
Here’s a table showing the pros and cons of each blind type:
| Blind Type | Light Control | Insulation | Cleaning | Best For |
|---|---|---|---|---|
| Venetian | Excellent | Moderate | Easy | Offices, Bedrooms |
| Roller | Good | Low | Easy | Living Rooms, Kitchens |
| Vertical | Good | Low | Easy | Patio Doors |
| Roman | Moderate | Moderate | Medium | Dining Rooms |
| Cellular | Good | High | Easy | Bedrooms, Cold Rooms |
Choosing the right type matters, as mounting steps can vary slightly. Always check the manufacturer’s instructions for your blinds.
Choosing Mounting Location: Inside Vs Outside Mount
One important decision is where to mount your blinds: inside the window frame or outside. Each option has its own benefits.
Inside Mount
With an inside mount, the blinds sit within the window frame. This gives a clean, built-in look and lets you keep window trim visible. You need deep window frames (usually at least 2 inches) for this method.
Pros:
- Sleek appearance
- Keeps trim visible
- Good for smaller windows
Cons:
- Requires precise measurements
- May leave light gaps
Outside Mount
An outside mount places blinds over the window frame, covering trim and sometimes the wall area. It’s ideal for shallow frames or when you want to block more light.
Pros:
- Covers light gaps better
- Works with shallow frames
- Can make windows look larger
Cons:
- Hides window trim
- May require bigger blinds
Comparison Table: Mounting Methods
Here’s how inside and outside mounting compare:
| Mounting Type | Appearance | Light Blockage | Frame Depth Needed | Installation Difficulty |
|---|---|---|---|---|
| Inside Mount | Clean, Built-In | Moderate | 2+ inches | High |
| Outside Mount | Bold, Covers Trim | High | None | Medium |
Most beginners overlook how mounting position affects light control and appearance. Consider your needs before deciding.
Measuring Windows For Blinds
Correct measurements are crucial. Many mounting problems happen because of inaccurate measurements. Here’s how to measure for both inside and outside mounts:
Tools Needed
- Steel tape measure
- Notepad and pen
- Step stool (for tall windows)
Inside Mount Steps
- Measure width at the top, middle, and bottom of the window. Write down the smallest measurement.
- Measure height at the left, center, and right. Use the largest measurement.
- Measure depth of the window frame. Check the minimum depth required for your blinds.
Outside Mount Steps
- Measure width from where you want the blind to start and end, usually 2–3 inches beyond the window frame for better coverage.
- Measure height from the top of where the blind will hang to the bottom, adding extra length if you want to cover the window sill.
Common Mistakes
- Using fabric tape measures (they stretch and give inaccurate results)
- Not measuring all areas (windows can be uneven)
- Forgetting to check frame depth for inside mounts
Example
Suppose your window measures 36 inches wide at the top, 35.75 inches in the middle, and 36.25 inches at the bottom. Use 35.75 inches as your width.
Selecting Tools And Hardware
Mounting blinds requires basic tools, but having the right hardware makes the job easier and safer.
Essential Tools
- Drill (cordless preferred)
- Screwdriver
- Level
- Pencil
- Tape measure
- Step stool or ladder
- Safety glasses (recommended)
Hardware Included
Most blinds come with:
- Mounting brackets
- Screws
- Headrail
- Pulley or cord system
Check your blind packaging to avoid missing pieces. If your wall is drywall or plaster, you may need anchors to prevent screws from loosening.
Table: Recommended Tools For Each Blind Type
| Blind Type | Drill Needed? | Special Hardware | Safety Gear |
|---|---|---|---|
| Venetian | Yes | Wall anchors (optional) | Safety glasses |
| Roller | Yes | Level required | Safety glasses |
| Vertical | Yes | Extra brackets | Safety glasses |
| Roman | Yes | Heavy-duty screws | Safety glasses |
| Cellular | Yes | Anchors for drywall | Safety glasses |
Many people skip using a level, but crooked blinds are a common result. Always check alignment before drilling.
/how-to-hang-blinds-7489340-hero-02-214eb54885fd43b181e6b6729da0fe16.jpg)
Credit: www.thespruce.com
Preparing For Installation
Preparation prevents mistakes and saves time. Here’s what you should do before mounting:
Clear The Area
Remove curtains, old blinds, and anything blocking the window. Move furniture away for easy access.
Read Instructions
Blinds from different brands may require unique steps. Read the manufacturer’s manual carefully.
Gather Tools
Place all tools and hardware near the window. Check you have enough screws and brackets.
Mark Mounting Points
Use a pencil to mark where the brackets will go. Double-check measurements, especially for inside mounts.
Safety Tips
- Wear safety glasses to protect your eyes.
- If using a ladder, make sure it’s stable and on a flat surface.
- Keep small parts away from children and pets.
Preparation is often rushed by beginners. Taking 10 minutes to prepare can prevent hours of frustration.
Step-by-step Guide: Mounting Window Blinds
Now, let’s get into the actual installation. The steps below cover most blind types. Always adjust for your specific model.
Step 1: Mark Bracket Locations
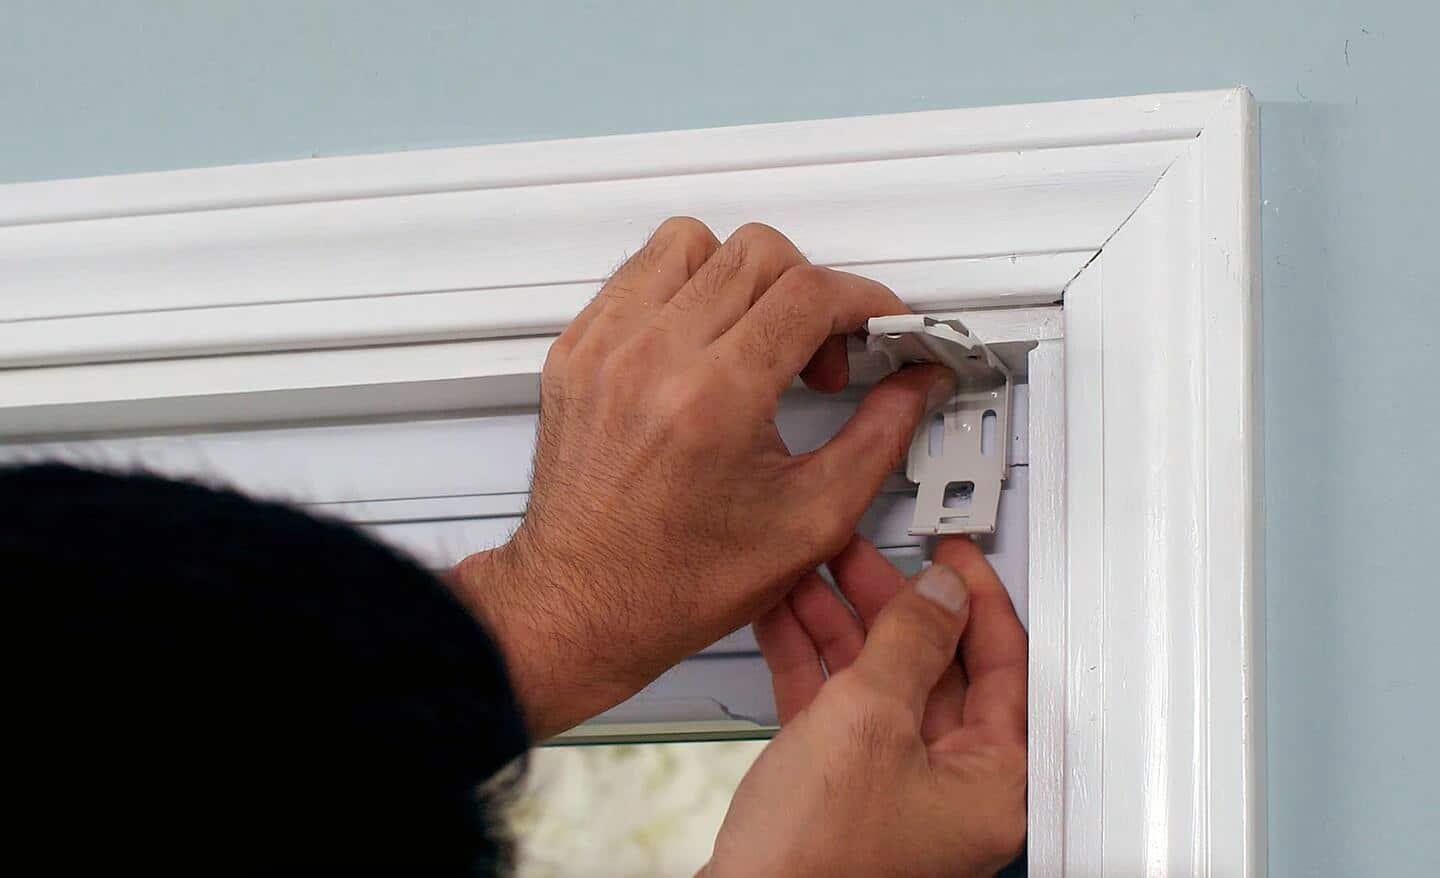
Hold the brackets against the window frame or wall, depending on inside or outside mount. Use a pencil to mark screw holes. For inside mounts, brackets usually go at the top corners. For outside mounts, place brackets above and outside the window frame.
Step 2: Drill Pilot Holes
Use a drill to make small holes where you marked. This helps screws go in easily and prevents wood from splitting.
Pro Tip
If your wall is drywall, use anchors to keep screws secure. For wooden frames, anchors are not needed.
Step 3: Attach Brackets
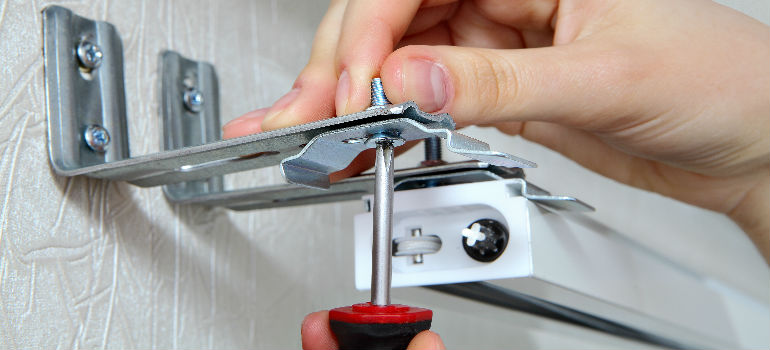
Using a screwdriver or drill, secure the brackets with screws. Make sure brackets are level. Use a bubble level for accuracy.
Step 4: Install Headrail
Slide the headrail (the main bar holding the blind slats) into the brackets. It should click or lock into place. Check that it’s secure.
Step 5: Hang Or Attach Blinds
Depending on the type, attach slats (Venetian, vertical), roll the fabric (roller), or hang fabric panels (Roman). For cordless blinds, ensure the mechanism works smoothly.
Step 6: Test Operation
Pull cords, tilt slats, or raise/lower the blinds. Make sure everything moves easily. Adjust brackets if blinds are crooked or don’t operate smoothly.
Step 7: Final Touches
Close blinds and check for light gaps. For outside mounts, adjust the blind position to cover the window fully. Tighten any loose screws.
Example: Mounting Roller Blinds
Roller blinds are among the easiest to mount. After marking and drilling, simply attach brackets, slide in the roller tube, and secure with screws. Check the rolling mechanism before finishing.
Common Mistakes In Mounting
- Not checking level, leading to uneven blinds
- Using wrong screws (too short or too long)
- Forgetting wall anchors on drywall
- Rushing measurements or skipping them
Non-obvious Insight
Some windows are not perfectly square. Always measure at multiple points, and use the smallest width for inside mounts. Beginners often miss that small errors in measurement can lead to blinds not fitting at all.
Credit: www.homedepot.com
Adjusting And Troubleshooting
After mounting, you may notice small problems. Here’s how to solve them:
Crooked Blinds
If blinds look uneven, loosen the screws slightly, adjust the bracket position, and retighten. Use a level to check alignment.
Stuck Or Hard-to-operate Mechanism
Check if screws are too tight or if the headrail is not seated properly. Adjust as needed.
Light Gaps
For inside mounts, light gaps are common. If this is a problem, consider outside mounting or using blackout blinds.
Squeaky Or Noisy Blinds
Lubricate moving parts (such as the tilt mechanism) with a small amount of silicone spray.
Damaged Walls
If you drilled in the wrong spot, fill holes with wood filler or wall putty before remounting. Do not reuse loose holes.
Cleaning And Maintenance Tips
Keeping your blinds clean helps them last longer and look better. Here’s how to maintain each type:
Venetian Blinds
Dust regularly with a microfiber cloth. For deep cleaning, remove slats and wash with mild soap and water.
Roller Blinds
Vacuum with a soft brush. Spot clean stains with mild detergent.
Vertical Blinds
Wipe slats with damp cloth. Some fabric vertical blinds can be removed and washed.
Roman Blinds
Vacuum gently. For stains, use fabric cleaner but test on a small area first.
Cellular Blinds
Dust with a soft brush. Avoid getting them wet, as the material can warp.
Maintenance Table: Cleaning Frequency
| Blind Type | Recommended Cleaning | Frequency |
|---|---|---|
| Venetian | Dust, Wash Slats | Weekly/Monthly |
| Roller | Vacuum, Spot Clean | Monthly |
| Vertical | Wipe, Wash Fabric | Monthly |
| Roman | Vacuum, Fabric Cleaner | Monthly |
| Cellular | Dust Only | Monthly |
Cleaning prevents dust buildup and allergies. Many people forget to clean blinds, but it is important for air quality.
Safety And Childproofing
Window blinds can pose risks, especially to children and pets. Here’s how to make them safer:
Cord Safety
Loose cords can be dangerous. Install cord cleats or use cordless blinds. Keep cords out of reach.
Anchor Brackets
Ensure brackets are tightly secured. Loose blinds can fall, causing injury.
Use Safety Stops
Some blinds come with safety stops to prevent over-pulling. Always install these if available.
Non-obvious Insight
Cordless blinds are safer and easier to operate. They also look cleaner, but many buyers overlook them because they cost a bit more.
Advanced Tips: Getting A Professional Finish
If you want your blinds to look perfect, here are some expert tricks:
Paint Screw Heads
If your screws are visible, use touch-up paint to match your wall or window trim.
Hide Bracket Edges
Some blinds come with covers for brackets. Use them for a seamless look.
Use Spacer Blocks
If your window trim sticks out, use spacer blocks to keep blinds away from the trim. This is an advanced tip many beginners miss.
Upgrade To Motorized Blinds
Motorized blinds are more expensive, but they offer remote control and smart home integration. Install according to manufacturer instructions.
Credit: www.fantastichandyman.co.uk
Comparing Diy Vs Professional Installation
Mounting blinds yourself saves money, but sometimes hiring a pro is best. Here’s a comparison:
| Factor | DIY Installation | Professional Installation |
|---|---|---|
| Cost | Low (tools & time) | High ($50–$100/window) |
| Time Required | 1–2 hours/window | 30 min/window |
| Skill Level Needed | Moderate | None |
| Warranty | None | Usually included |
| Finish Quality | Varies | High |
If you have many windows or complex blinds, consider a pro. For simple blinds, DIY is a great skill to learn.
Cost And Time Estimates
Mounting blinds isn’t expensive, but knowing the costs helps you plan.
Average Costs
- Blinds: $20–$100 per window, depending on type and size
- Tools: $10–$50 (if not already owned)
- Installation kits: Usually included
Time Needed
- Simple blinds: 30–45 minutes per window
- Complex blinds: 1–2 hours per window
Example
A homeowner with 5 windows spends about $250–$500 on blinds and 3–5 hours to install them all.
Where To Buy Quality Blinds And Hardware
You can find blinds at hardware stores, home improvement centers, and online retailers. Look for brands with good reviews and clear installation guides.
Trusted Sources
- Home Depot
- Lowe’s
- Wayfair
- Amazon
- Manufacturer websites
Always check return policies and warranty options. For more tips, visit Consumer Reports.
Frequently Asked Questions
How Do I Know If My Window Frame Is Deep Enough For Inside Mounting?
Measure the depth from the inside edge to the glass. Most inside mounts need at least 2 inches. If your frame is shallower, use outside mounting.
Can I Mount Blinds Without Drilling?
Some blinds use adhesive brackets or tension rods, but these are less secure and may not last. For permanent, sturdy installation, drilling is best.
What If My Blinds Are Too Wide For The Window?
You can trim some blinds, especially roller and vertical types. Use a hacksaw or scissors for fabric blinds. Always check the manufacturer’s instructions before cutting.
How Can I Prevent Blinds From Getting Dusty?
Regular cleaning helps. Use a microfiber cloth weekly. For extra protection, keep windows closed during windy days.
Are Motorized Blinds Worth It?
Motorized blinds offer convenience and child safety. They cost more ($200+ per window) but are ideal for hard-to-reach windows or smart home integration.
Mounting window blinds is a practical home improvement skill. With careful measuring, the right tools, and attention to detail, you can install blinds that look great and last for years. Take your time, follow the steps, and enjoy the new look and comfort in your home.