
Programming a Harbor Breeze remote control can seem confusing if you have never done it before. Many people buy a ceiling fan with a remote, only to realize they must link the remote to the fan themselves. This can feel like a technical task, but it is not as hard as it sounds. With the right steps and a clear explanation, you can do it in under 20 minutes. This guide will show you how to program a Harbor Breeze remote control, handle common issues, and get the most from your fan and remote. Whether you are replacing an old remote or setting up a new fan, you will find everything you need here.
Understanding Harbor Breeze Remote Controls
Harbor Breeze, sold mainly at Lowe’s, is a leading ceiling fan brand in North America. Their fans often come with remote controls, offering convenience to adjust speed, lights, and sometimes even direction. But not all remotes or fans are the same.
Types Of Harbor Breeze Remotes
There are two main types:
- Universal remotes: Can work with most Harbor Breeze fans, even older ones.
- Model-specific remotes: Designed for a particular fan model, with unique button layouts or features.
Some advanced models also have Bluetooth or Wi-Fi features for smart home integration, but most common models use a basic radio frequency (RF) remote.
How The Remote Communicates
Harbor Breeze remotes do not use infrared like TV remotes. Instead, they use radio frequency. This allows the remote to work through walls, but it also means you need to set the correct code or frequency so your remote talks only to your fan, not your neighbor’s.
The key to this communication is the dip switch, a small set of switches inside both the fan receiver and the remote control. Matching these switches is what “programming” usually means.
Tools And Preparation
Before starting, you need a few things to program your Harbor Breeze remote:
- A small Phillips screwdriver (often needed to open the remote and the fan canopy)
- A ladder or safe step stool (to reach the fan)
- The new or replacement remote (and batteries, usually AAA or 9V)
- Your Harbor Breeze fan manual (if available)
- Paper and pen (to note down dip switch positions)
If you don’t have the manual, do not worry. Most steps are standard across models.
Safety First: Turning Off Power
Before you touch the fan, always turn off the power at the breaker box. Ceiling fans are wired directly to home electricity, and touching them while live can be dangerous. Just flipping the wall switch is not enough because the wiring above the ceiling may still have power.
- Go to your home’s circuit breaker panel.
- Find the switch labeled for the room with your fan.
- Flip it to the “off” position.
- Test the fan to make sure it doesn’t turn on.
Never skip this step. Many injuries happen from working on “live” fans.
Step-by-step: Programming A Harbor Breeze Remote
Here’s how to program the remote for most standard Harbor Breeze ceiling fans.
1. Open The Remote Control
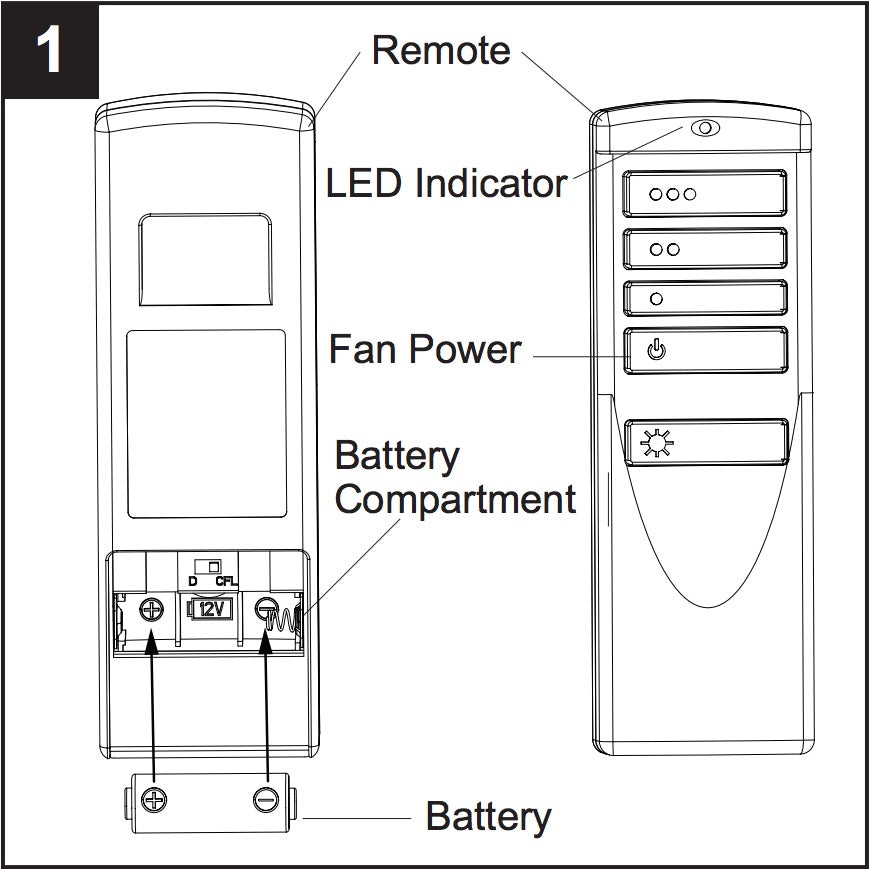
Turn the remote over. Look for a small battery compartment door. Slide it open. You’ll see the battery and, often above or beside it, a small set of switches—these are the dip switches.
- Remove the battery for easier access.
- Note the current dip switch positions (write down or take a photo).
2. Access The Fan Receiver
The receiver is a small box inside the fan’s canopy (the part against the ceiling).
- Use your ladder to reach the fan.
- Remove the screws holding the canopy in place.
- Lower the canopy gently; the wires and receiver should now be visible.
- The receiver will have a similar set of dip switches.
If you see a sticker with model information, take a picture or note it—it may help if you need tech support.
3. Match The Dip Switches
The dip switches on the remote and receiver must match exactly.
- If your remote and receiver already match, you can skip to the next step.
- If not, use a small tool or pen to move the switches on the remote, the receiver, or both, so they match.
There are usually 4 dip switches, giving 16 possible codes (2⁴ combinations). Some advanced models have 5 or more.
Non-obvious tip: If you have more than one Harbor Breeze fan in your home, give each fan a unique dip switch code to prevent one remote from controlling multiple fans.
4. Replace The Batteries And Test
Put the battery back in the remote. Do not close the battery door yet, in case you need to adjust again.
5. Restore Power
Go back to your breaker panel and turn the power back on.
6. Test The Remote
Stand under the fan and press the power button on the remote. Try changing the speed and turning the light on/off (if your fan has a light).
If everything works, you have successfully programmed your Harbor Breeze remote. If not, double-check the dip switch positions and make sure the batteries are fresh.
7. Finalize
Once the fan responds, close the battery door on the remote and reattach the canopy to the ceiling.
Credit: www.anderic.com
What If Your Fan Or Remote Has No Dip Switches?
Some newer Harbor Breeze fans and remotes use auto-pairing instead of dip switches. Here’s how to pair these models:
- Turn off power at the breaker for at least 1 minute.
- Turn the power back on.
- Within 30 seconds, press and hold the “Learn” button (often inside the battery compartment) on the remote for 3-5 seconds.
- The fan will usually beep or the lights will blink, showing that pairing is complete.
Note: Not all fans have a “Learn” button. If you don’t see one, your fan likely uses dip switches.
Troubleshooting Common Problems
Programming does not always go smoothly. Here are some common issues and solutions.
The Fan Does Not Respond
- Check batteries: Weak or dead batteries are a top cause.
- Double-check dip switches: Even one switch out of place will stop the remote from working.
- Make sure the receiver is connected: Sometimes, a wire can come loose when replacing the receiver or fan.
- Test the remote: Use it on another Harbor Breeze fan (if available) to see if the remote itself is bad.
The Remote Controls Multiple Fans
- Change the dip switch settings on each remote and receiver so each fan has a unique code.
The Fan Only Works With Wall Switch
- The remote receiver may not be getting power. Check wiring connections.
- Reset the breaker and try pairing again.
The Light Works But The Fan Does Not (or Vice Versa)
- The remote may have a faulty button or the receiver’s relay may be stuck.
- Try resetting the remote and fan (turn power off for 1 minute, then back on, and re-pair).
The Remote Range Is Very Short
- Move closer: RF remotes generally work within 30–50 feet.
- Avoid interference: Cordless phones, Wi-Fi routers, and other electronics can cause interference. Try moving these devices.
- Check for obstructions: Metal objects between the remote and receiver can block the signal.
Credit: www.anderic.com
Step-by-step Example: Programming A Universal Harbor Breeze Remote
Let’s walk through a specific example with a universal Harbor Breeze remote and a standard ceiling fan.
- Turn off power at the breaker.
- Open remote battery compartment—find 4 dip switches set to “up, up, down, up.”
- Open fan canopy—find receiver with dip switches set to “up, up, down, up.”
- If not matching, set both to same code.
- Insert batteries and restore power.
- Test remote: Press “fan on,” then “light on.” Both work.
- Reattach canopy and close battery door.
Non-obvious insight: Always write down your dip switch code and keep it in a safe place. If you ever need to replace the remote, you can quickly match the new one.
Table: Common Harbor Breeze Remote Models And Their Features
To help you identify your remote and what to expect, here is a comparison of popular Harbor Breeze remote models:
| Remote Model | Dip Switches | Light Control | Fan Speed Control | Special Features |
|---|---|---|---|---|
| UC7078T | Yes (4) | Yes | 3-Speed | Reverse button |
| CHQ8BT7030T | No (Auto Pair) | Yes | 3-Speed | Timer function |
| A25-TX012 | Yes (4) | Yes | 3-Speed | Light dimmer |
| KOF-Fan9T | No (Auto Pair) | Yes | 6-Speed | Reverse, Breeze Mode |

Credit: manuals.plus
When To Replace The Remote Or Receiver
If your remote or receiver is damaged, programming will not help. Here’s how to know when to replace them.
Signs Your Remote Is Failing
- Buttons stick or do not respond.
- The remote works only at very close range.
- LED indicator on remote does not light up with new batteries.
Signs The Receiver Is Failing
- The fan or light does not respond, even with a new remote.
- You hear a buzzing noise from the fan.
- The fan changes speed or turns on/off by itself.
Tip: Receivers are more prone to fail from power surges or moisture. Always replace with an official Harbor Breeze receiver for compatibility.
How To Replace A Receiver
- Turn off power at the breaker.
- Open the fan canopy.
- Disconnect the old receiver (note wire colors and connections).
- Connect the new receiver wires exactly as the old one.
- Match the dip switches or pair as needed.
- Restore power and test.
Caution: If you are not comfortable working with electrical wiring, hire a professional.
Table: Harbor Breeze Remote Vs. Wall Control Vs. Smart Control
To help you decide if you want to stick with a remote or upgrade, here’s a comparison:
| Control Type | Ease of Installation | Features | Reliability | Smart Home Ready |
|---|---|---|---|---|
| Remote Control | Very Easy | Fan speed, light control, sometimes timer | Good (if line of sight issues are avoided) | Rarely |
| Wall Control | Medium | Speed and light, always accessible | Very Good | No |
| Smart Control (Wi-Fi/Bluetooth) | Medium-Hard | Voice, app, automation | Depends on network | Yes |
Practical Tips For Long-term Success
- Keep extra batteries handy. Most remotes use AAA or 9V batteries.
- Label your remotes if you have multiple fans in your home.
- Clean the remote occasionally. Dust and grime can affect button contacts.
- Avoid dropping the remote, as impact can loosen internal parts.
- Update your wiring diagram. When you program or change codes, write down the new code or take a photo.
- Check for software updates if you have a smart Harbor Breeze fan. Some newer models allow firmware updates to improve pairing and features.
Harbor Breeze Remote Programming: Advanced Questions
Can I Use A Universal Remote?
Yes, as long as the universal remote supports the Harbor Breeze brand and matches the frequency and features you need (such as light dimming or multiple fan speeds). Always check compatibility before buying.
What About Smart Home Integration?
Some modern Harbor Breeze fans support Wi-Fi or Bluetooth for use with Alexa, Google Home, or mobile apps. These models may have different pairing steps, often handled through an app. Refer to your fan’s manual or the official Harbor Breeze website for details.
What If The Remote Is Lost?
If you lose your remote, you can buy a replacement. Match the dip switch code to your fan’s receiver, and it should work. If your fan uses auto-pairing, follow the pairing steps as above.
How Many Remotes Can I Pair With One Fan?
You can pair multiple remotes to one receiver by matching the dip switch settings or using the auto-pair feature. This is useful for large rooms or if you want a remote in more than one place.
Non-obvious insight: If you have two fans in adjacent rooms, set their codes at least one switch different to prevent accidental control overlap.
Table: Troubleshooting Harbor Breeze Remote Issues
A quick reference for common issues and solutions:
| Issue | Possible Cause | Solution |
|---|---|---|
| Fan and light do not respond | Wrong dip switch code, dead batteries, power off | Check codes, replace batteries, check breaker |
| Fan works, light does not | Wiring issue, faulty receiver or remote button | Check wiring, try different remote, replace receiver |
| Remote controls multiple fans | Same dip switch code on both fans | Change one fan’s code |
| Short remote range | Interference, low batteries, obstacles | Move closer, replace batteries, remove obstacles |
Frequently Asked Questions
What If My Harbor Breeze Remote Is Not Working After Changing Batteries?
First, check that the batteries are installed correctly and are fresh. If the remote still does not work, ensure the dip switches have not shifted during battery replacement. If you have an auto-pairing remote, try re-pairing by turning off the fan power for a minute, then following the pairing steps.
Can I Program One Harbor Breeze Remote To Control Multiple Fans?
Yes, you can. Set the same dip switch code (or use the same auto-pairing process) for all fans you want to control with one remote. However, this means all fans will respond at once. To control fans separately, assign unique codes to each.
Where Can I Find The “learn” Button On My Remote?
The “Learn” button is usually inside the battery compartment. Look for a small button labeled “Learn” or “Pair. ” Not all remotes have this button—only those designed for auto-pairing models.
Is It Safe To Open The Fan’s Canopy Myself?
Yes, as long as you turn off the power at the breaker before starting. Use a sturdy ladder and basic tools. If you feel unsure about working with electrical wiring, it is best to call an electrician.
Where Can I Get Official Replacement Remotes Or Receivers?
Official Harbor Breeze parts are sold at Lowe’s, the brand’s main retailer. You can also find them on the Lowe’s website. Always match the model number before buying to ensure compatibility.
Getting your Harbor Breeze remote programmed and working is a straightforward process if you follow these steps and tips. With a little care and attention to detail, you can enjoy the full convenience of your ceiling fan for years to come.