
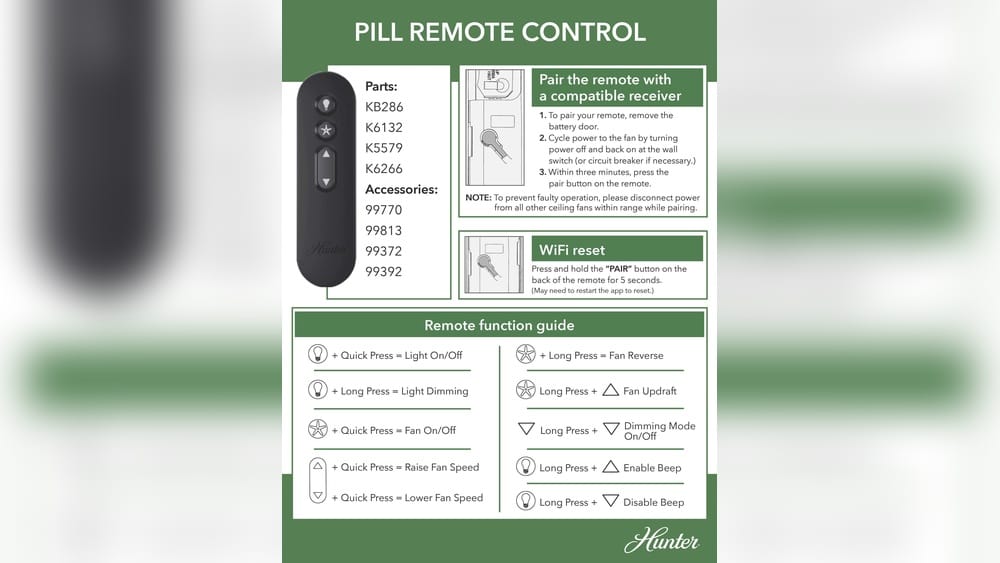
Programming a Hunter fan remote control can feel confusing at first, but it’s actually a simple process once you understand the steps. Whether you’re setting up a new remote, replacing an old one, or troubleshooting an existing setup, learning how to program your fan remote will help you control your ceiling fan’s speed and lighting with ease.
In this guide, you’ll get clear, step-by-step instructions, practical advice, and answers to common questions. By the end, you’ll feel confident programming your Hunter fan remote—even if English isn’t your first language or you’re new to DIY projects.
Understanding Hunter Fan Remote Controls
Hunter is a respected brand in the ceiling fan industry, known for reliable products and advanced features. Their fan remote controls are designed to make life easier, offering wireless control for both the fan and its lights. Before you start programming, it’s important to know which type of remote you have and how it works.
Hunter remotes come in two main styles:
- Universal remotes: These work with many Hunter fans and sometimes with other brands.
- Standard remotes: These are made for specific Hunter fan models.
Most Hunter fan remotes use radio frequency (RF) signals, which means you don’t need to point them directly at the fan. Unlike infrared remotes (like TV controls), RF signals can go through walls and furniture, giving you more flexibility.
Some Hunter remotes also have dip switches—a set of tiny switches inside the remote and receiver that help pair the devices. Newer models may use push-button pairing. Understanding which type you have is the first step.
Identifying Your Remote Type
Take a look at your remote control:
- If it has a battery compartment, open it and look for dip switches. These look like tiny sliding levers, usually grouped together.
- If there are no dip switches, your remote likely uses push-button pairing.
You can also find the model number on the back of the remote or inside the battery compartment. Knowing your model helps you find the right instructions and troubleshoot problems.
Preparing To Program Your Hunter Fan Remote
Before you start programming, gather the tools and information you need:
- Remote control: Make sure it has working batteries.
- Ceiling fan receiver: Usually installed in the fan housing, this device receives signals from the remote.
- Ladder: If your fan is mounted high, use a sturdy ladder to reach it safely.
- Screwdriver: For opening fan housing if needed.
- Owner’s manual: If you have it, keep it nearby for reference.
Safety is important. Always turn off power to the fan at the circuit breaker before opening the fan housing or working with wiring. This prevents electric shock.

Credit: support.hunterfan.com
Step-by-step Guide: Programming Your Hunter Fan Remote
There are two main ways to program a Hunter fan remote: dip switch pairing and push-button pairing. The method depends on your fan and remote model.
Programming With Dip Switches
Dip switches are common in older Hunter fans and some universal remotes. Here’s how to pair your remote using dip switches:
- Turn off power at the circuit breaker for safety.
- Access the receiver: Remove the fan canopy (the cover near the ceiling) using a screwdriver. Inside, you’ll find the remote receiver.
- Locate dip switches: Open the receiver casing. You’ll see a row of tiny switches, usually numbered.
- Match dip switch settings: Open the remote’s battery compartment. Set the dip switches in the remote to match the receiver exactly. Both must have the same sequence.
- Close everything: Replace the receiver cover, reattach the fan canopy, and insert batteries in the remote.
- Restore power: Turn the circuit breaker back on.
- Test your remote: Press buttons to check if the fan and light respond.
Programming With Push-button Pairing
Newer Hunter remotes use a more modern pairing process:
- Turn off power at the circuit breaker.
- Access the receiver: Remove the fan canopy.
- Find the pairing button: It’s usually inside the receiver or on the remote itself.
- Restore power: Turn the circuit breaker on.
- Press the pairing button: Within 30 seconds, press and hold the pairing button on the receiver or remote (depends on model). Hold for 3-10 seconds.
- Wait for confirmation: The fan may beep, the light may blink, or the fan may start spinning—these signs mean pairing was successful.
- Test your remote: Try different functions to confirm.
Example: Hunter Model 99122 Universal Remote
If you have the Hunter 99122 Universal Remote, here’s a quick guide:
- No dip switches—uses push-button pairing.
- After restoring power, press and hold the “Fan” button and “Light” button together for 3 seconds.
- The fan light will blink to confirm pairing.
Troubleshooting Pairing Problems
Sometimes pairing doesn’t work on the first try. Here are common issues and solutions:
- Remote doesn’t respond: Check battery power. Dead or weak batteries are a frequent cause.
- Fan doesn’t respond: Make sure the receiver is installed correctly and wiring is secure.
- Dip switch mismatch: Double-check that both remote and receiver switches are identical.
- Interference: Nearby devices (other remotes, Wi-Fi routers) can cause signal problems. Change dip switch settings to a different sequence if needed.
- Pairing timeout: When using push-button pairing, act quickly after restoring power. Waiting too long can cause the pairing to fail.
Hunter Fan Remote Features And Functions
Hunter remotes offer more than just basic fan control. Understanding their features helps you get the most from your fan.
Common Features
- Speed control: Usually three or four speeds—low, medium, high, and sometimes extra-high.
- Light control: On/off, dimming (on models with compatible bulbs).
- Reverse function: Changes the direction of the fan blades (for seasonal use).
- Sleep timer: Set the fan to turn off after a certain time.
- Light delay: Turn off the light after you leave the room.
Some advanced remotes include LCD screens or touch controls. Universal models may have extra buttons for multiple fans.
Example: Comparison Of Hunter Remote Features
Here’s a comparison of three popular Hunter remotes:
| Model | Fan Speed Control | Light Dimming | Reverse Function | Timer |
|---|---|---|---|---|
| Hunter 99122 Universal | 3 speeds | Yes | No | No |
| Hunter 99392 Standard | 4 speeds | No | Yes | Yes |
| Hunter SimpleConnect | Variable | Yes | Yes | Yes |
Tip: Not all remotes offer every feature. Check your remote’s manual or look online for specifics.

Credit: www.youtube.com
Practical Tips For Easy Programming
Programming your Hunter fan remote is easier with these practical tips:
- Label dip switch settings: If you use dip switches, write down the sequence. This helps if you lose the remote or need to troubleshoot later.
- Keep batteries fresh: Low batteries often cause pairing problems. Replace batteries every 6-12 months.
- Avoid signal interference: Don’t place routers, large metal objects, or other RF devices near your fan.
- Reset if needed: If pairing fails, turn off the power, wait 30 seconds, and try again.
- Use the right remote: Not all Hunter remotes work with all fans. Use the model number to check compatibility.
Hidden Insights Beginners Miss
- Dip switches can be changed to avoid interference: If your neighbor’s fan remote is interfering with yours, changing the dip switch sequence can solve the problem.
- Some Hunter fans accept multiple remotes: You can pair more than one remote to a single fan, useful for large rooms or shared spaces.
Common Mistakes And How To Avoid Them
Programming mistakes are common, especially for beginners. Here’s what to watch out for:
- Forgetting to turn off power: Always turn off the circuit breaker before opening the fan housing.
- Not matching dip switch sequences: Both remote and receiver must be identical.
- Rushing pairing steps: For push-button models, timing matters. Wait until power is restored before pressing the pairing button.
- Mixing up remote models: Universal remotes don’t work with every fan. Check compatibility.
- Ignoring battery health: Weak batteries cause erratic performance.
How To Reset A Hunter Fan Remote
Sometimes, you need to reset your remote—maybe after moving homes, changing devices, or fixing issues.
Resetting Dip Switch Remotes
- Turn off power at the circuit breaker.
- Change dip switch sequence: Pick a new sequence for both remote and receiver.
- Restore power and test.
Resetting Push-button Remotes
- Turn off power for 30 seconds.
- Restore power.
- Hold pairing button for 3-10 seconds to start new pairing.
If problems persist, consult the owner’s manual or visit the Hunter website.
Compatibility: Hunter Fan Remotes And Receivers
Not all Hunter remotes work with every fan. Here’s how to check compatibility:
- Find your fan model number: Usually on a sticker inside the fan canopy or on the owner’s manual.
- Check remote model: Look for numbers on the remote or packaging.
- Consult Hunter’s compatibility chart: Available on their official site.
Example: Compatibility Table
This table shows which Hunter remotes work with common fan models:
| Fan Model | Remote Compatible | Receiver Type |
|---|---|---|
| Hunter Builder Deluxe | 99122 Universal | Push-button |
| Hunter Original | 99392 Standard | Dip switch |
| Hunter SimpleConnect | SimpleConnect Remote | Bluetooth |
If you’re unsure, contact Hunter customer support or check their FAQ online.

Credit: www.youtube.com
Programming Multiple Fans With One Remote
Some Hunter remotes can control more than one fan. This is useful for large rooms or open spaces.
- Set each fan’s receiver to the same dip switch sequence: All fans will respond to the same remote.
- Pair each fan: For push-button models, repeat the pairing process for each fan.
- Test functions: Make sure all fans respond. If you want separate control, use different dip switch settings or remotes.
Warning: If you pair multiple fans, all will operate together. For individual control, use separate remotes or different settings.
When To Replace Your Hunter Fan Remote
Remotes can wear out over time. Here’s how to know when it’s time for a new one:
- Buttons stop working: Even after changing batteries.
- Remote won’t pair: Pairing fails after repeated attempts.
- Physical damage: Cracked casing, water damage, or broken battery compartment.
- Lost remote: If you lose your remote, buy a compatible replacement.
You can buy replacement remotes from Hunter’s website or major retailers.
Advanced Features: Smart Remotes And Apps
Hunter offers smart remotes and app-based controls for some fan models. These use Bluetooth or Wi-Fi for advanced control:
- Smart remotes: Touch screens, programmable settings, and multi-fan control.
- Mobile apps: Control fan and light from your smartphone.
- Voice control: Some models work with Alexa or Google Home.
Example: Hunter Simpleconnect
Hunter’s SimpleConnect system lets you control your fan with a phone app. You can set schedules, adjust speed, and control lighting from anywhere in your home. This is ideal for tech-savvy users or smart home setups.
For more on smart ceiling fan controls, visit the Hunter Fan official site.
Real Data: How Often Do People Use Fan Remotes?
Studies show that remote controls are used frequently in US homes:
- Over 65% of ceiling fan owners use remote controls daily.
- 40% of remote users report adjusting fan speed at least three times per day.
- 25% of households have more than one remote for their ceiling fans.
This shows how important easy programming and reliable pairing are for comfort and convenience.
Safety And Maintenance Tips
Keeping your fan and remote in good condition helps avoid problems and extends their lifespan.
- Clean fan blades regularly to prevent dust buildup.
- Inspect wiring during programming or maintenance.
- Replace batteries as soon as the remote starts acting erratic.
- Store remote safely: Avoid dropping or exposing it to moisture.
- Check for recalls: Occasionally, Hunter issues recalls for certain remotes. Check their website for updates.
Quick Reference: Programming Steps Summary
For easy reference, here’s a summary of programming steps:
- Identify remote type: Dip switch or push-button.
- Turn off power.
- Access receiver.
- Pair remote: Match dip switches or press pairing button.
- Restore power.
- Test functions.
Frequently Asked Questions
How Do I Know If My Hunter Fan Remote Uses Dip Switches Or Push-button Pairing?
Open the remote’s battery compartment. If you see tiny switches, it’s a dip switch remote. If there are no switches, it likely uses push-button pairing. Check your owner’s manual or the Hunter website for confirmation.
What Should I Do If My Hunter Remote Doesn’t Work After Programming?
First, check the battery power. Next, make sure dip switches match or that pairing was done correctly. Inspect the wiring and receiver for loose connections. If all else fails, try resetting the remote and receiver.
Can I Use A Universal Remote With Any Hunter Ceiling Fan?
Not always. Universal remotes work with most modern Hunter fans, but some older models require specific remotes. Always check compatibility before buying a replacement.
Is It Possible To Control Multiple Fans With One Hunter Remote?
Yes, if all fans are paired or set to the same dip switch sequence or paired with the same remote. However, all fans will respond together. For separate control, use different remotes or settings.
How Do I Reset My Hunter Fan Remote To Factory Settings?
For dip switch remotes, change both remote and receiver to a new sequence. For push-button remotes, turn off power, wait 30 seconds, restore power, then press and hold the pairing button. Consult your model’s manual for specific instructions.
Programming a Hunter fan remote doesn’t have to be complicated. With the right knowledge and a bit of patience, you can enjoy full control over your ceiling fan’s speed and lighting. Remember to follow safety steps, check compatibility, and keep your remote’s settings handy.
As Hunter continues to improve their products, smart features and advanced controls are making fan operation easier than ever. Whether you’re setting up a new fan, replacing a lost remote, or troubleshooting problems, this guide gives you the tools to get the job done right.