
Programming a Crestron touch panel can transform a space, making it smarter and easier to control. Whether you’re managing lights, screens, climate, or AV equipment, a well-programmed Crestron panel brings everything together with a simple touch. But how do you move from a blank panel to a customized, reliable interface? The process involves both creativity and technical know-how. This guide walks you through every major step: planning your system, using Crestron’s tools, writing code, testing, and troubleshooting. Even if you’re new to Crestron, you’ll learn practical methods, avoid common mistakes, and discover tips that save time and reduce frustration.
As a calm expert, I’ll explain each concept clearly, sharing real-world examples and insights. You’ll see how to select the right equipment, design an intuitive layout, and program features that users actually need. We’ll explore the unique strengths of Crestron’s system—especially the flexibility and power of its programming environment.
Whether you’re a tech manager, installer, or a curious learner, this article gives you the complete roadmap for programming a Crestron touch panel with confidence.
Understanding Crestron Touch Panels
Crestron touch panels are interactive screens used to control devices and systems, from conference rooms to smart homes. They support various sizes and mounting options, including wall, table, and wireless models. Most modern panels use capacitive touch technology, similar to smartphones, offering fast response and a smooth user experience.
Key Features
- Customizable user interface: You can design screens, buttons, and workflows to fit any project.
- Network integration: Touch panels connect via Ethernet or Wi-Fi, communicating with Crestron control processors and other devices.
- Multiple platforms: Panels run Crestron’s Smart Graphics or HTML5 interfaces, supporting both older and new projects.
Popular Models
| Model | Display Size | Mounting | Network | Interface Type |
|---|---|---|---|---|
| TSW-1060 | 10.1″ | Wall/Table | Ethernet/PoE | Smart Graphics |
| TSW-760 | 7″ | Wall/Table | Ethernet/PoE | Smart Graphics |
| TSS-1070 | 10.1″ | Wall/Table | Ethernet/Wi-Fi | HTML5 |
Understanding the differences helps in choosing the right panel for your application.
Planning Your Crestron Touch Panel System
A successful touch panel project starts with careful planning. Before you write a single line of code, define what the panel must do and how users will interact with it.
Identify User Needs
- List all functions users require (lighting, AV, shades, climate, etc. ).
- Interview end-users or stakeholders to learn about their routines and pain points.
- Sketch a user journey showing typical tasks and how users will complete them.
Map Device Integration
- Create a diagram connecting the touch panel, control processor, and all target devices.
- Check device compatibility. Some equipment may need special modules or drivers.
- Plan for future expansion if possible (e.g., adding more rooms or features).
Decide On Interface Style
- Choose between Smart Graphics (for classic projects) or HTML5 (for modern, web-based interfaces).
- Consider company branding, color schemes, and accessibility needs.
Non-obvious insight: Many beginners overlook the importance of early user feedback. It’s easier to adjust plans now than to change a finished interface later.
Required Tools And Software
Programming a Crestron panel requires more than just the hardware. You’ll need the right software, a PC, and sometimes extra drivers or licenses.
Essential Software
- Crestron Toolbox: For device setup, firmware updates, and diagnostics.
- VisionTools Pro-e (VT Pro-e): The main tool for designing Smart Graphics interfaces.
- Crestron Studio or SIMPL Windows: For programming control logic (SIMPL is more widely used in commercial projects).
- HTML5 User Interface Editor: For newer panels supporting HTML5.
- Device modules/drivers: Download from the Crestron website for specific third-party equipment.
Hardware Needed
- PC or laptop with Windows (macOS is not officially supported).
- Network switch or router for local device connection.
- Cables: Ethernet, USB, or serial, depending on your devices.
Pro tip: Always keep your software up to date. Firmware mismatches between panel and processor often cause setup issues.
Setting Up The Crestron Touch Panel
Before programming, you must connect and configure the hardware. Each step ensures reliable communication and sets the foundation for your project.
Physical Installation
- Mount the panel securely on the wall or table. Use the brackets and templates provided.
- Connect to power: Most panels use Power over Ethernet (PoE), which delivers power and data through one cable.
- Plug into the network: Connect the Ethernet cable to your LAN, ensuring access to the control processor.
Initial Configuration
- Power up the panel and wait for it to boot.
- Use the on-screen menu or web interface to set the IP address. Static IPs are best for stability.
- Test network connectivity by pinging the panel from your PC.
Firmware Updates
- Open Crestron Toolbox and connect to the panel.
- Check the current firmware version. If needed, update to the latest version to avoid compatibility problems.
Non-obvious insight: Many new programmers skip firmware updates, leading to errors during interface uploads or when adding new features.

Credit: docs.crestron.com
Designing The User Interface
Now comes the creative part: designing how the panel will look and behave. A good UI is simple, clear, and matches user expectations.
Using Visiontools Pro-e
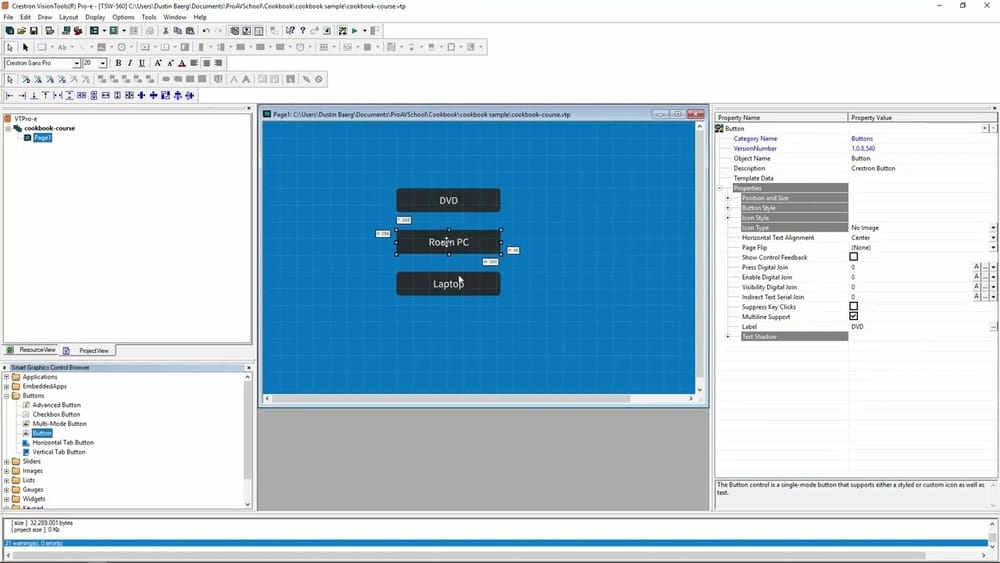
VisionTools Pro-e (VT Pro-e) is Crestron’s main tool for Smart Graphics panels. It offers drag-and-drop design, button libraries, and advanced controls.
Steps To Design
- Start a new project and select your panel model.
- Add pages for each main function (Home, Lights, AV, Climate, etc. ).
- Place objects like buttons, sliders, and lists. Group related controls together.
- Customize graphics: Add company logos, colors, and backgrounds.
- Set button properties: Assign join numbers, labels, and actions.
- Preview the interface on your PC before uploading to the panel.
Ui Best Practices
- Keep screens uncluttered. Too many buttons confuse users.
- Use large, readable fonts and high-contrast colors.
- Place most-used functions on the Home page.
- Offer feedback (like button highlights) to show actions were successful.
Example: A conference room might have Home, Meeting Start, Lights, Shades, and Help pages. Each page shows only the controls needed for that task.
Designing For Html5 Panels
Newer panels support HTML5 interfaces. These are built using web tools (like Crestron’s HTML5 Editor or other web frameworks).
- Design responsive layouts that adjust to different screen sizes.
- Use Crestron’s UI Kit or your own branding assets.
- Test in multiple browsers and on the panel hardware.
Programming The Control Logic
The panel interface only becomes useful when it triggers real-world actions. This is where SIMPL Windows or Crestron Studio come in.
Simpl Windows Overview
SIMPL Windows is a drag-and-drop programming environment. You create logic by wiring together modules, symbols, and signals.
Main Programming Steps
- Create a new project and select your control processor model.
- Add the touch panel as a device and assign network settings.
- Import device modules for each AV or environmental system (e.g., projector, amplifier).
- Map join numbers: Link touch panel button joins to control logic.
- Wire logic: Connect signals from buttons to modules (e.g., pressing “Lights On” sends a command to the lighting system).
- Compile and upload the program to the processor.
Using Crestron Studio
Crestron Studio offers a more modern, object-based workflow. It allows for quicker system setup and easier troubleshooting, but some advanced features may be limited compared to SIMPL Windows.
Common Programming Patterns
- Toggle actions: One button turns a device on and off.
- Scenes: Multiple devices adjust together with a single button (e.g., “Presentation Mode” sets lights, lowers screen, turns on projector).
- Feedback signals: The panel shows real-time device status (e.g., projector power, room temperature).
Practical tip: Use comments and clear signal names in your programming. It makes future edits much easier, especially in large systems.
Uploading And Testing Your Interface
Once the design and logic are ready, it’s time to upload the UI file and test how everything works together.
Uploading The Project
- In VT Pro-e, generate the .vtz file for Smart Graphics panels.
- Open Crestron Toolbox, connect to the panel’s IP address.
- Use the Transfer function to upload the UI file.
- For HTML5 panels, upload the project using the web interface or the HTML5 Editor tools.
Testing Checklist
- Tap each button. Does it trigger the correct action?
- Check feedback indicators (LEDs, status messages). Are they updating in real time?
- Test error conditions (e.g., device offline). Does the panel show a clear warning?
- Try using the panel as a new user. Is the interface intuitive?
Example: In a classroom, you might test the sequence: power on projector, lower screen, dim lights. All should work from the panel and show correct status.
Debugging Tips
- Use Crestron Toolbox’s monitoring tools to watch signals and device responses.
- Check network logs for communication errors.
- If a button doesn’t work, verify the join number and wiring in both the UI and logic program.
Non-obvious insight: Beginners often test only the main functions. Always test edge cases—like pressing multiple buttons quickly or disconnecting a device—to catch subtle bugs.
Advanced Features And Customization
Crestron panels support advanced features that can make your system more powerful and user-friendly.
Macros And Sequences
- Create macros to perform several actions with one button (e.g., “Start Meeting” powers on all AV equipment and sets the lights).
- Use delays or conditional logic (e.g., wait until projector warms up before showing the next control).
Dynamic Pages And Popups
- Show or hide UI elements based on device status (e.g., display extra controls only when the projector is on).
- Use popups for warnings, help screens, or quick settings.
Scheduling And Automation
- Integrate with calendars or sensors to automate tasks (e.g., turn off lights if room is empty).
- Use the control processor’s scheduling features for timed events.
Security And Access Control
- Add password protection for sensitive controls (e.g., system settings).
- Limit access to certain pages or functions based on user roles.
| Feature | Benefit | Example Use |
|---|---|---|
| Macros | Save time, reduce errors | One-touch meeting startup |
| Dynamic Pages | Cleaner interface | Show controls as needed |
| Access Control | Improve security | Admin-only settings |
Pro tip: Users appreciate when rarely used functions are hidden unless needed. It keeps the main interface simple and less intimidating.
Common Challenges And Mistakes
Programming a Crestron panel is powerful but can be tricky. Here are frequent problems and how to avoid them.
- Mixing up join numbers: Each button and feedback element uses a unique join number. Errors here cause buttons to fail or control the wrong device.
- Poor network setup: Unstable connections can make panels unresponsive. Use static IPs and reliable switches.
- Overcomplicated UI: Too many options overwhelm users. Focus on what people use most.
- Neglecting feedback: If users can’t see what’s happening, they’ll get frustrated. Always provide clear status indicators.
- Ignoring firmware updates: Old firmware causes compatibility issues, especially with new features.
Practical advice: Double-check all join mappings before testing. Keep interface changes minimal once users are trained, to avoid confusion.
Optimizing For Performance And Reliability
A great Crestron panel is fast, stable, and easy to maintain. Here’s how to achieve that.
Network Best Practices
- Use wired Ethernet where possible. Wi-Fi can be less reliable for real-time control.
- Assign static IP addresses to all panels and control processors.
- Segment control traffic from general internet traffic for better security.
Code Optimization
- Reuse logic blocks and modules instead of duplicating code.
- Limit use of heavy graphics or animations—they can slow down older panels.
- Test with multiple users to ensure the interface handles quick, repeated commands.
Maintenance Tips
- Schedule regular firmware and software updates.
- Document your programming, including join numbers, page layouts, and device mappings.
- Keep backup copies of all project files.
Non-obvious insight: Documenting your join assignments in a spreadsheet or diagram makes troubleshooting much faster, especially in large projects.

Credit: www.youtube.com
Real-world Example: Conference Room Setup
Imagine you’re programming a touch panel for a modern conference room. Here’s how the process would look from start to finish.
Step 1: Planning
- Main functions: Start meeting, control lights, adjust shades, select AV source, volume control.
- Stakeholders: Facilities manager, IT staff, regular meeting organizers.
Step 2: Hardware And Network
- Select TSW-1060 panel, connect via PoE, assign static IP.
- Mount near the room entrance for easy access.
Step 3: Ui Design
- Home page: Large “Start Meeting” button, quick access to lights and shades.
- AV page: Source selection, volume slider, “End Meeting” button.
- Help page: Contact info, troubleshooting tips.
Step 4: Programming
- Use SIMPL Windows to link panel joins to lighting system, AV switcher, and motorized shades.
- Write macros for “Start Meeting” and “End Meeting.”
- Add feedback: Show projector status and room occupancy.
Step 5: Testing
- Test all functions with real users.
- Adjust button sizes and colors based on feedback.
- Fix any timing issues (e.g., projector warm-up delays).
Step 6: Deployment
- Upload final UI and logic.
- Train users on basic functions.
- Leave documentation and backup files with IT staff.
This example shows how careful planning, clear UI, and robust programming lead to a reliable, user-friendly system.
Integrating Third-party Devices
Many projects require controlling devices from other brands—like TVs, amplifiers, or HVAC systems. Here’s how to handle integration smoothly.
Finding And Using Device Modules
- Download official or community-created device modules from the Crestron website or trusted sources.
- Import modules into SIMPL Windows or Crestron Studio.
- Map control and feedback signals to panel joins.
Common Integration Protocols
- IR (infrared): Simple but one-way; for TVs and projectors.
- Serial (RS-232): Reliable two-way communication for professional equipment.
- IP (network control): Modern devices often support direct IP commands.
Troubleshooting Integration
- Check wiring and physical connections.
- Use Crestron Toolbox’s diagnostic tools to monitor data flow.
- If a device doesn’t respond, verify the protocol settings (baud rate, IP address, etc. ).
Pro tip: Always test third-party device control before the final user interface upload. Integration bugs are easiest to fix early.

Credit: docs.crestron.com
Future-proofing Your Crestron System
Technology changes quickly, and a good Crestron system should last for years. Here’s how to plan for the future.
Choose Scalable Hardware
- Select panels and processors with extra capacity for future rooms or features.
- Use networked devices where possible for easier upgrades.
Modular Programming
- Write code in reusable blocks (macros, subpages) so you can add features without rewriting everything.
- Document your system well, making it easy for others to expand or maintain.
Stay Updated
- Follow Crestron’s software and firmware release notes.
- Join user forums or training events to learn about new features and best practices.
- Consider cloud or remote management options for large systems.
Example: A university installs panels in all classrooms. By planning modular code and updating software regularly, IT staff can add new AV equipment or features with minimal disruption.
Frequently Asked Questions
What Is The Difference Between Smart Graphics And Html5 Interfaces?
Smart Graphics is Crestron’s classic interface technology, designed in VT Pro-e and used for most panels released before 2020. HTML5 interfaces use modern web standards and support more flexible, responsive designs. HTML5 is recommended for new projects, especially if you want a consistent look across devices or need advanced animation.
Do I Need Programming Experience To Set Up A Crestron Touch Panel?
Basic setup (networking, uploading UI files) does not require deep programming skills. However, creating complex logic or integrating many devices is much easier if you understand programming principles and the Crestron workflow. Crestron offers training and certification to help you learn more.
Can I Control Third-party Devices (like Sony Tvs Or Lutron Lights) From A Crestron Panel?
Yes, but you need the correct device modules or drivers, and the devices must support a compatible control protocol (IR, serial, or IP). Always test third-party integration early in your project.
How Do I Update The Firmware On A Crestron Touch Panel?
Use Crestron Toolbox to connect to the panel via its IP address. Check the current firmware version and follow Crestron’s instructions to upload the latest firmware file. Always back up your project before updating, as some updates can reset settings.
Where Can I Find More Resources Or Support For Crestron Programming?
Crestron’s official website offers extensive documentation, software downloads, and user forums. For advanced questions, you can also visit the AVS Forum, which hosts discussions and troubleshooting guides for AV professionals.
Programming a Crestron touch panel may seem complex at first, but with the right steps, tools, and mindset, you can deliver a polished, reliable, and user-friendly system. By investing time in planning, clear design, and thorough testing, you’ll create interfaces that users love—and systems that are easy to manage for years to come.