
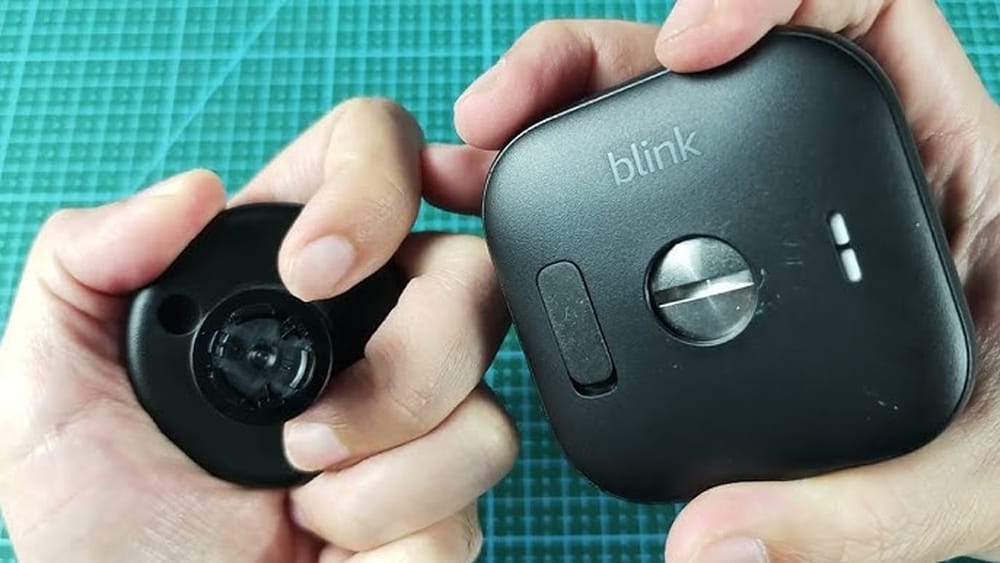
Removing a Blink Outdoor Camera from its mount might sound simple, but many users struggle with stuck cameras, tricky mounts, or concerns about damaging their device. If you want to reposition your camera, recharge its batteries, or move it indoors for safety, knowing the right steps matters.
You don’t want to break a clip, drop the camera, or leave your system vulnerable. This guide explains the process in clear, practical steps, with tips for every Blink Outdoor model. Whether you’re new to smart home devices or an experienced user, you’ll find answers to common problems, side-by-side comparisons of different mounts, and troubleshooting advice if things go wrong.
Let’s get your camera safely off the mount—and ready for whatever comes next.
Understanding Blink Outdoor Camera Mounts
Before you start, it’s important to know what type of Blink Outdoor Camera mount you have. Blink offers several styles, and third-party mounts are also popular. The removal method can change depending on the mount design.
Types Of Official Blink Outdoor Mounts
- Standard Mount (included with most Blink Outdoor kits): This is a small, black, plastic mount. It has a circular base and a short arm that snaps into the back of the camera.
- Wedge Mount: Used to angle the camera for a better view. It’s often installed near doors or on uneven surfaces.
- Floodlight Mount: Holds both the camera and a Blink-compatible floodlight, usually for better night vision and large-area coverage.
Common Third-party Mounts
Besides Blink’s own mounts, many users buy adjustable mounts online. These might include:
- Swivel ball mounts for 360° rotation
- Gutter mounts (attach without drilling)
- Tree or pole mounts
Understanding your mount type helps you avoid damage and choose the right removal tools.
How Mount Design Affects Removal
Some mounts have tight clips, while others use screws or adhesive. For example:
- Standard mounts snap in—no tools needed.
- Floodlight mounts may have a screw at the base.
- Third-party mounts can use thumb screws, hex bolts, or clamps.
If you’re unsure, check the product box, the Blink app, or manufacturer’s instructions for your mount type.
Tools And Preparation
Good preparation keeps your camera and mount safe. Here’s what you need before you start.
Essential Tools
Most Blink Outdoor cameras don’t need special tools for removal, but having these on hand helps:
- Small Phillips screwdriver (for floodlight or some third-party mounts)
- Step stool or ladder (for high placements)
- Soft cloth or gloves (to avoid fingerprints)
- Non-slip mat (if working above hard surfaces)
- Small tray or zip bag (for screws)
- Phone flashlight (for dark corners)
Safety Precautions
- Power off the camera from the Blink app before removal, if possible.
- Avoid removing cameras during rain or storms.
- If using a ladder, make sure it’s stable and on a flat surface.
- Don’t force or twist the camera if it feels stuck; check for hidden screws or clips.
Preparing Your System
- Open the Blink app and select the camera you’re removing.
- Tap “Device Settings” and, if needed, choose “Power Off” or “Remove Device.” This isn’t required but helps avoid accidental recordings or alerts.
- Notify anyone else who uses the system so they aren’t surprised by offline notifications.
Many beginners forget to power off their camera or rush removal, risking dropped devices. Take a few extra minutes to prepare, and you’ll save time and money.
Step-by-step: Removing A Blink Outdoor Camera From The Standard Mount
The standard Blink Outdoor mount is the most common. Here’s how to remove your camera safely.
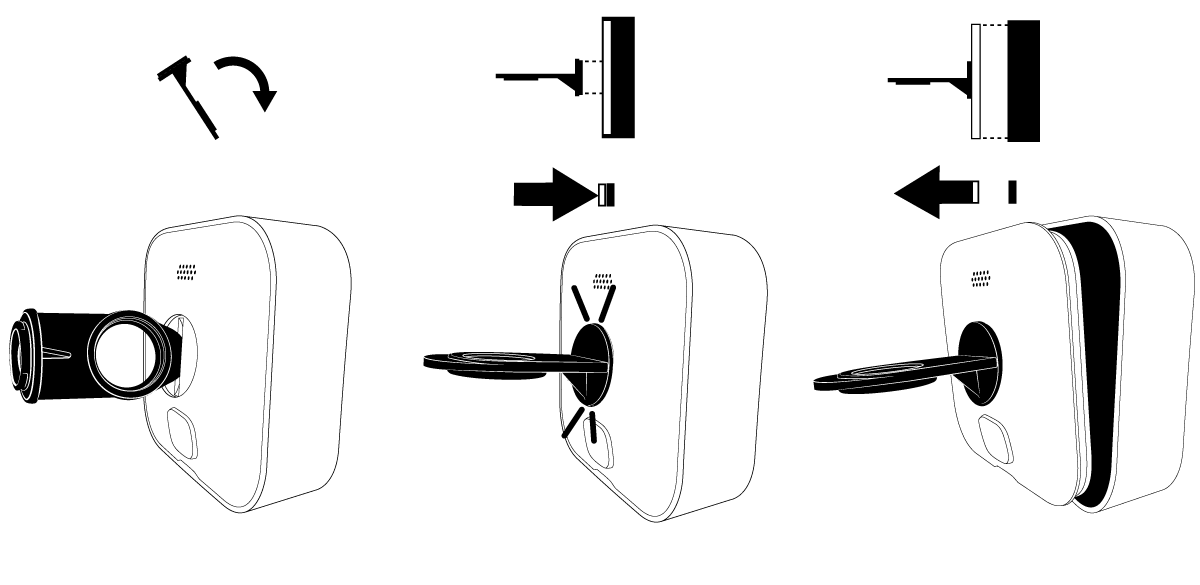
1. Locate The Release Clip
Look at the back of your Blink Outdoor Camera. You’ll see a small, rectangular tab where the mount arm connects to the camera. This is the release clip.
2. Support The Camera
Hold the camera body with one hand. Use your other hand to press down the release clip gently. Don’t use too much force—these clips are sturdy but can break if bent too far.
3. Slide The Camera Off
While pressing the clip, slide the camera upward (away from the mount base). The camera should move easily. If it’s stuck, check for dirt, ice, or paint that could block the release.
4. Check For Cables
If your camera uses a USB cable (for floodlight or solar panel mounts), disconnect the cable before fully removing the camera. Pull gently on the plug—not the wire.
5. Inspect The Mount
After removal, look at the mount arm and clip. If you see cracks or worn plastic, consider replacing the mount before reinstalling your camera.
Example: Removing A Camera From A Porch Mount
Imagine your camera is mounted near your front door. Stand on a stable step stool, press the release clip, and gently slide the camera up. If it doesn’t move, check for paint or debris around the clip. Wipe with a soft cloth if needed.
Removing Cameras From Other Official Blink Mounts
Some Blink Outdoor systems use different mounts, like wedge or floodlight designs. Here’s how to handle them.
Removing From A Wedge Mount
- Wedge mounts use the same release clip as the standard mount.
- Support the camera, press the clip, and slide upward.
- If the wedge feels loose, check for wall screws—tighten or remove as needed.
Removing From A Floodlight Mount
Floodlight mounts are heavier and may have a locking screw:
- Use a small Phillips screwdriver to loosen the screw at the base.
- Hold the floodlight with one hand and the camera with the other.
- Press the camera’s release clip and slide it off.
- If disconnecting power, turn off electricity at the breaker first.
Handling Third-party And Speciality Mounts
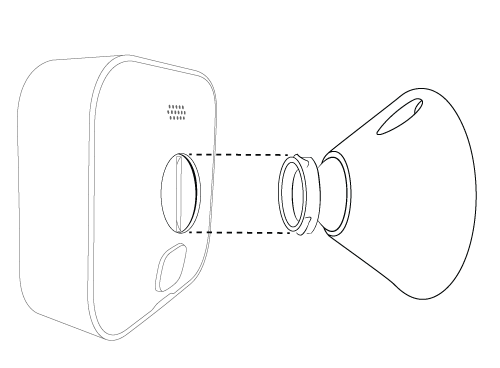
Many third-party mounts use thumb screws or twist locks:
- Loosen the screw or twist collar by hand.
- Slide or unscrew the camera from the mount arm.
- If the mount is stuck, spray a bit of compressed air to remove dust.
Some models have weatherproof covers—remove these before detaching the camera.
Credit: support.blinkforhome.com
Special Scenarios: High, Tight, Or Difficult Mounts
Outdoor cameras are often installed in hard-to-reach places. Here’s how to deal with tricky spots.
Removing Cameras From High Places
- Use a ladder rated for your weight, and ask a friend to spot you.
- Place a non-slip mat or towel under the work area to cushion falls.
- Consider using a phone camera to check the mount before climbing.
Removing Cameras In Tight Spaces
- Use a small flashlight to see the clip or screw clearly.
- If your fingers can’t fit, try a small flathead screwdriver to press the release.
- Avoid using metal tools directly on the camera to prevent scratches.
Dealing With Stuck Or Painted Mounts
Sometimes, paint, weather, or rust can make removal tough:
- Spray a small amount of electronics-safe cleaner on the mount.
- Wait a few minutes, then try again.
- For severe rust, use a plastic pry tool instead of metal.
Many users forget to check for hidden screws or paint, leading to broken clips. Always inspect the mount before applying force.
Comparing Blink Mount Types
Not all mounts are equal in terms of removal difficulty, security, or weather resistance. Here’s a comparison to help you understand what to expect.
| Mount Type | Removal Difficulty | Typical Tools Needed | Weather Resistance |
|---|---|---|---|
| Standard Mount | Easy | None | Good |
| Wedge Mount | Easy | None | Good |
| Floodlight Mount | Moderate | Screwdriver | Excellent |
| Third-Party Swivel | Moderate | Thumb Screw/Hex Key | Varies |
If you’re choosing a new mount, consider how often you plan to remove the camera for charging or relocation.
Common Problems And Solutions
Even with careful preparation, you might run into issues. Here are solutions for the most frequent problems.
Camera Won’t Release From Mount
- Double-check for hidden screws or locking collars.
- Wiggle the camera gently while pressing the release clip.
- Try removing the camera in warmer weather—plastic expands slightly, making removal easier.
Clip Or Arm Is Broken
- Order a replacement mount from Blink or a trusted retailer.
- Don’t use glue or tape; it can block the camera sensor or damage the housing.
- If only the clip is cracked, reinforce it temporarily with a rubber band until you replace the mount.
Camera Drops During Removal
- Always support the camera with both hands.
- Use a soft mat or towel under the area, especially above concrete or tile.
- If the camera falls, check for cracks or damaged lenses before reinstalling.
Mount Base Is Loose
- Tighten wall screws using a screwdriver.
- For brick or stucco, use the correct anchors.
- If the mount is installed with adhesive and peels off, clean the surface and reapply with outdoor-rated tape.
Example: Solving A Stuck Camera
A user in a humid climate found their camera stuck due to mold growth. They sprayed the area with isopropyl alcohol, waited five minutes, and then the camera slid off easily. Regular cleaning prevents this issue.
Cleaning And Maintaining Your Blink Mount
Proper care extends the life of your camera and mount.
Cleaning Tips
- Wipe the mount and camera body with a soft, dry cloth once a month.
- For tough dirt, use a slightly damp cloth—never pour water on the camera.
- Check for spider webs, which can block the lens or sensors.
Seasonal Maintenance
- In winter, check for ice buildup around the mount.
- In summer, check for sap, pollen, or insect nests.
- After storms, inspect for loose mounts or water damage.
Replacing Worn Mounts
If the mount is cracked, faded, or loose, replace it. Blink offers replacement parts, and third-party options can improve flexibility.
When To Remove Your Blink Outdoor Camera
There are several good reasons to remove your Blink Outdoor Camera:
- Battery replacement: Blink Outdoor cameras use AA lithium batteries, which last up to two years. Removing the camera is necessary for changing batteries.
- Relocation: Moving to a new home or changing the camera’s view.
- Seasonal storage: Bringing the camera inside during extreme weather.
- Upgrading equipment: Swapping for a newer camera or different mount.
- Maintenance: Cleaning lenses, removing spider webs, or checking for damage.
Removing the camera for battery replacement is the most common reason. Beginners often try to swap batteries in place, risking falls or dropping the camera.
Reattaching Or Reinstalling Your Camera
Once you finish, you may want to put the camera back or install it somewhere else. Here’s how to do it safely.
Reattaching To The Original Mount
- Align the camera’s back groove with the mount arm.
- Slide the camera down until you hear a click.
- Test the mount by gently pulling upward—the camera should stay in place.
Installing On A New Mount
- Follow the manufacturer’s instructions for new mounts.
- For wall or ceiling installations, use the correct screws and anchors.
- Make sure the camera view is clear and free from obstructions.
Checking Camera Function
- Open the Blink app and check the live view.
- Walk in front of the camera to test motion detection.
- If you moved the camera, update its location in the app for accurate notifications.
Comparison: Blink Outdoor Camera Mounts Vs. Third-party Options
Choosing the right mount can make future removal much easier. Here’s a side-by-side comparison to help you decide.
| Feature | Blink Official Mount | Third-Party Mount |
|---|---|---|
| Removal Ease | Very Easy | Varies (some tricky) |
| Installation | Simple, few parts | May require tools |
| Adjustability | Limited angle | Usually 360° rotation |
| Weather Resistance | Good | Varies |
| Cost | Included/free | Usually $10–$20 |
If you move your camera often, a mount with a thumb screw or quick-release is best. For permanent installations, the standard Blink mount is reliable.
Advanced Tips For Power Users
If you use your Blink Outdoor Camera in complex setups—like solar power, custom mounts, or smart home integration—removal can be more involved.
Cameras With Solar Panels
- Disconnect the solar panel cable before removing the camera.
- Some solar mounts have custom clips or covers—remove these first.
Integrations With Smart Lights Or Sensors
- Turn off power to connected accessories before removal.
- Check for extra wires or connectors and detach gently.
Using Extension Arms Or Risers
- Remove extension pieces before taking off the main camera.
- Keep all screws and parts in a labeled bag for reinstallation.
Data And Privacy
- If you’re removing the camera to sell or give away, factory reset it in the Blink app.
- Delete the device from your account to protect your privacy.
Many advanced users forget to disconnect third-party accessories, leading to broken cables or lost parts.

Credit: www.reddit.com
Real-world User Experiences
Learning from others’ mistakes and successes can make your process easier.
Case Study 1: Damaged Clip Due To Cold Weather
A homeowner in Minnesota tried to remove their Blink camera during a -10°F cold snap. The plastic clip cracked, and the camera fell. Lesson: wait for warmer weather, or warm the area with a hair dryer (on low) before removal.
Case Study 2: Lost Screw On A Floodlight Mount
A user lost the tiny locking screw while removing a floodlight mount at night. Solution: use a small tray or zip bag for all screws, and work during daylight for better visibility.
Case Study 3: Spider Webs Triggering Alerts
A camera near a garden kept sending motion alerts. On removal, the owner found spider webs inside the mount. Regular cleaning with a soft brush stopped the problem.
Non-obvious insight: many users think weather is the biggest problem, but bugs and dirt cause more issues over time.
Mistakes To Avoid
Mistakes during removal can lead to broken cameras, lost mounts, or even personal injury. Here’s what to watch out for:
- Forcing the camera: If it doesn’t move, check for hidden clips or screws.
- Ignoring safety gear: Use a ladder or stool for high places—never stand on furniture.
- Rushing the process: Take your time, especially if you’re new to Blink systems.
- Losing small parts: Use a tray or bag for screws and clips.
- Skipping camera power-off: Avoid accidental alerts by disabling the camera in the app first.
A confident, calm approach makes removal much safer and easier.
Environmental Considerations
Removing and reinstalling your camera can affect your home’s security and the environment.
- If you’re taking the camera down for winter, store batteries in a cool, dry place.
- Don’t throw old mounts in the trash—recycle plastic where possible.
- Unplugging cameras during storms can prevent power surges.
Some users miss the fact that storing cameras with batteries inside can lead to leaks or damage. Remove batteries if the camera will be unused for months.
Useful Resources
If you’re unsure about your mount or have a unique setup, check Blink’s official support pages or forums. For more technical details, visit Blink Support. They provide diagrams, device-specific guides, and troubleshooting for every Blink camera model.
Credit: support.blinkforhome.com
Frequently Asked Questions
How Do I Know Which Blink Outdoor Camera Model I Have?
Check the camera’s packaging or look for a model number on the back. The Blink app also lists your device type under “Device Settings. ” Most outdoor models use similar mounts, but older or newer versions may have small differences.
Can I Remove The Blink Outdoor Camera Without Tools?
Yes, the standard and wedge mounts are designed for tool-free removal. Only floodlight and some third-party mounts require a screwdriver or hex key.
Will Removing My Camera Trigger An Alert?
If you don’t power off the camera in the Blink app, removing it may trigger a motion alert. For privacy, it’s best to disable the camera or remove it from your account before handling.
What Should I Do If My Camera Gets Damaged During Removal?
If the camera or mount breaks, contact Blink support for replacement parts. Avoid using glue or tape, as this can interfere with the camera’s sensors or mounting system.
Is It Safe To Remove My Camera In Bad Weather?
It’s best to wait for dry, mild weather. Rain, ice, or extreme cold can make the mount brittle or slippery, increasing the risk of dropping or breaking your camera.
Removing a Blink Outdoor Camera from its mount is a simple process when you know the steps and prepare properly. With the right approach, you can avoid damage, protect your investment, and keep your home secure. Whether you’re moving, upgrading, or just doing routine maintenance, these tips will help you handle your Blink Outdoor system with confidence.