
Resetting your Roku Indoor Camera can solve many problems. Sometimes, your camera stops connecting, the app won’t find it, or the video feed freezes. Other times, you may want to give your camera to someone else, or start fresh after moving it.
Learning how to reset your Roku Indoor Camera is simple, but there are steps you must follow carefully. If you get stuck, knowing the exact method can save time and frustration. In this article, you’ll find clear instructions, practical tips, troubleshooting advice, and helpful comparisons.
Whether you’re a beginner or a tech enthusiast, you’ll learn exactly how to reset your Roku Indoor Camera and what to do if things go wrong.
Understanding Roku Indoor Camera Reset
Resetting a device means restoring its settings to the original state. With a Roku Indoor Camera, a reset deletes your Wi-Fi settings, app connections, and any custom configurations. This is helpful if you face technical issues, want to pair the camera with a new network, or plan to give it away.
There are two main types of reset for Roku Indoor Cameras:
- Soft Reset – Only restarts the camera. It does not erase settings or remove it from your account.
- Factory Reset – Erases all settings, removes the camera from your Roku account, and restores original factory configurations.
Most users need a factory reset to fix connection problems or prepare the camera for a new owner.
Why Reset Your Roku Indoor Camera?
There are several reasons to reset your camera:
- Connection failures: Camera won’t connect to Wi-Fi or the Roku app.
- App pairing issues: Device appears offline or won’t sync.
- Security concerns: Preparing to sell or give away the camera.
- Performance problems: Video feed freezing, lagging, or not recording.
- Changing networks: Moving to a new home or switching Wi-Fi.
Resetting is often the fastest way to solve these issues.
Before You Reset: Key Preparations
Resetting your Roku Indoor Camera is simple, but preparation matters. Here are steps to follow before starting:
- Backup important footage: If you use cloud storage or SD card, download any important recordings. Factory reset erases local data.
- Note your Wi-Fi details: After reset, you’ll need your Wi-Fi name and password to reconnect the camera.
- Check the camera model: Roku Indoor Cameras may have slight differences. Find your model number on the camera’s body or in the app.
- Charge or connect power: Make sure the camera is plugged in or fully charged. Resetting during low power can cause errors.
- Prepare the Roku app: Have the latest version installed on your phone or tablet. You’ll need it for setup after the reset.
These steps prevent common mistakes and save time.
Common Mistakes Before Reset
Many beginners forget these basics:
- Not backing up footage
- Not checking for app updates
- Trying to reset with the camera unplugged
- Not knowing their Wi-Fi password
Avoiding these mistakes makes the process smoother.
Credit: support.roku.com
Step-by-step Guide: How To Factory Reset Roku Indoor Camera
The factory reset process is straightforward, but each step matters. Here’s a detailed guide:
1. Locate The Reset Button
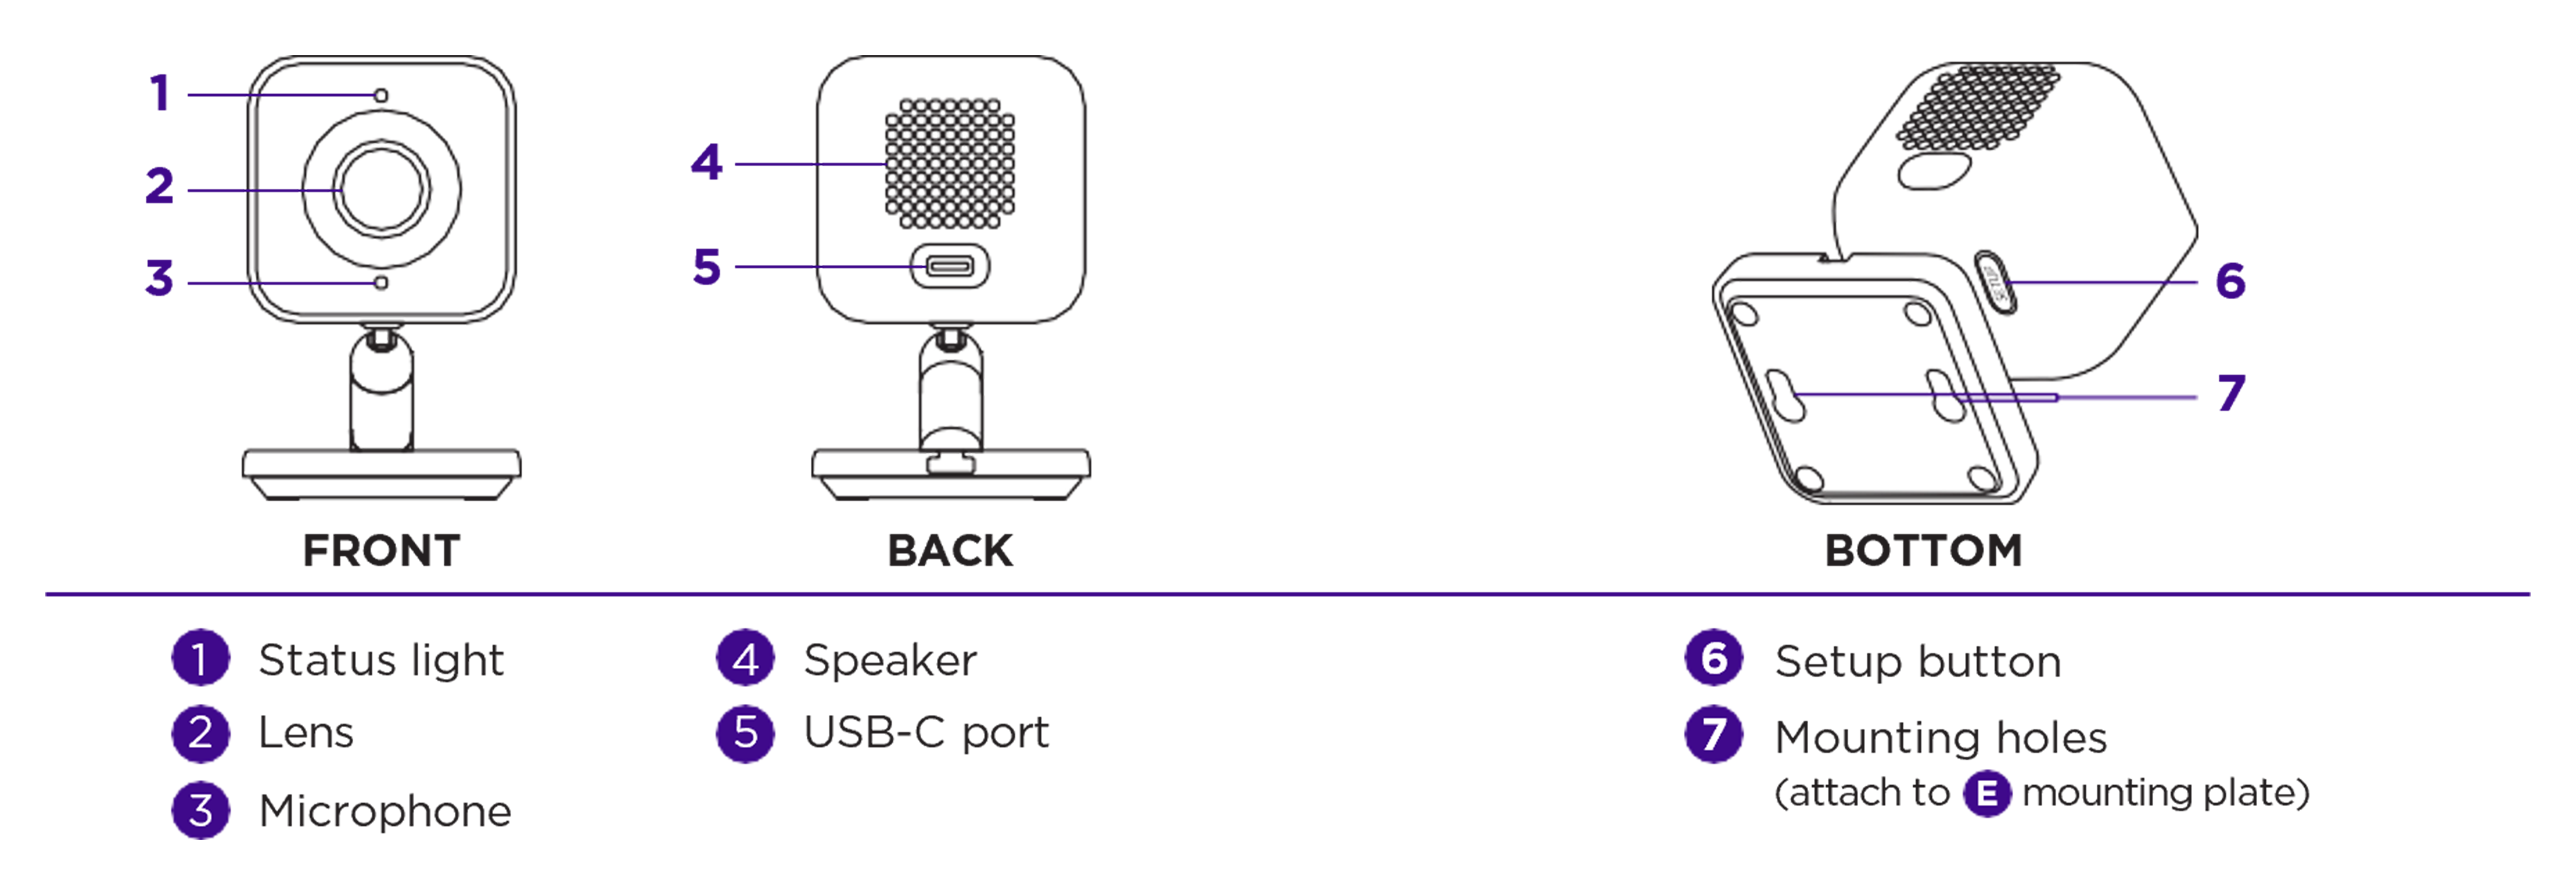
Most Roku Indoor Cameras have a small reset button. It’s usually found:
- On the back or bottom of the camera
- Inside a small hole (use a paperclip or pin)
- Labeled “RESET” or with a circular arrow symbol
If you can’t find it, check your camera’s manual or the Roku support website.
2. Press And Hold The Button
With the camera powered on, use a paperclip or similar tool to press and hold the reset button.
- Hold for at least 10 seconds
- The camera’s LED will blink or change color, showing the reset is starting
Release the button once you see the LED indicator react. This signals that the reset process is underway.
3. Wait For The Camera To Restart
After the button is released, the camera will power cycle.
- LED may flash or turn off briefly
- Camera will reboot and begin factory reset
- Wait 1–2 minutes for full restart
Do not unplug or move the camera during this time. Interrupting the reset can cause errors.
4. Set Up The Camera Again
Once the camera has restarted:
- Open the Roku app on your phone or tablet
- Tap “Add Device” or “Set Up Camera”
- Follow instructions to reconnect to Wi-Fi and pair with your Roku account
You may need to scan a QR code or enter your Wi-Fi password.
5. Confirm Reset Success
Check that:
- The camera appears online in the app
- Live video feed works
- Settings are restored to default
If the camera doesn’t show up, repeat the reset process, or check troubleshooting tips below.
Troubleshooting Common Reset Problems
Sometimes, the reset process doesn’t work as expected. Here are solutions to common problems:
Camera Won’t Reset
If pressing the button doesn’t trigger a reset:
- Try holding the button longer (up to 20 seconds)
- Check if the camera is plugged in and powered on
- Use a different tool (some buttons are hard to reach)
- Make sure you are pressing the correct button
Camera Stuck In Reboot
If the camera keeps rebooting:
- Unplug for 30 seconds, then reconnect
- Reset again, but use a steady hand
- Check for firmware updates in the Roku app
Camera Won’t Reconnect To Wi-fi
If setup fails after reset:
- Double-check Wi-Fi name and password
- Move camera closer to router
- Restart your router
- Try connecting using the app’s manual setup
Camera Not Showing In App
If the camera doesn’t appear:
- Log out and back into the Roku app
- Remove the camera from your account and re-add
- Check for app updates
Example: Real-world Reset Scenario
A user named Maria tried to reset her Roku Indoor Camera after moving to a new apartment. She forgot to back up her recorded clips and lost important footage. After holding the reset button for 10 seconds, her camera restarted, but wouldn’t connect to Wi-Fi.
She moved the camera closer to her router, retried setup, and it worked. Maria’s experience shows the importance of preparation and patience.
Comparing Roku Indoor Camera Models: Reset Differences
Not all Roku Indoor Cameras are exactly the same. The reset process may differ slightly based on model.
Here’s a simple comparison of popular Roku Indoor Camera models:
| Model | Reset Button Location | LED Indicator Behavior | Setup After Reset |
|---|---|---|---|
| Roku Indoor Camera SE | Bottom panel | Blinks white during reset | Scan QR code with app |
| Roku Indoor Camera HD | Back, near power port | Turns solid blue, then off | Manual Wi-Fi entry |
| Roku Indoor Camera Pro | Small hole on side | Blinks red, then green | App-guided pairing |
Some models require scanning a QR code, while others use manual entry. Always check your camera’s manual for model-specific steps.
Resetting Vs. Restarting: What’s The Difference?
Many users confuse resetting with restarting. Here’s how they differ:
- Resetting: Erases all settings, removes camera from account, restores factory defaults.
- Restarting: Simply turns the camera off and back on. Does not erase settings.
Restarting can fix minor glitches, but won’t solve deeper problems. Resetting is needed for major issues or changing ownership.
When Should You Restart Instead?
Try restarting your camera if:
- The video feed freezes
- Audio stops working
- App temporarily loses connection
Restarting is faster and safer for small problems. Use resetting only when necessary.
How Resetting Impacts Security And Privacy
When you reset your Roku Indoor Camera, all user data is deleted. This includes:
- Wi-Fi credentials
- App pairing information
- Local recordings (if stored on device)
- Custom settings
This is important if you’re giving away or selling the camera. It prevents others from accessing your data.
Is Resetting Secure?
Yes, factory resetting is designed to erase all personal information. However, footage stored in the cloud may remain unless you delete it manually. Always check your cloud account before transferring the camera.
Reconnecting Your Roku Indoor Camera After Reset
After a factory reset, you must reconnect the camera to your network and Roku app. Here’s how:
1. Open The Roku App
- Download or update to the latest version
- Sign in to your Roku account
2. Add Device
- Tap “Add Device” or “Set Up Camera”
- Select your camera model
3. Connect To Wi-fi
- Enter your Wi-Fi network name and password
- If prompted, scan the QR code on the camera
4. Pair With Account
- Follow on-screen instructions to pair the camera with your Roku account
- Confirm the camera appears in the app
5. Test Video Feed
- Open live view to check that the camera works
- Adjust settings as needed
If you have multiple cameras, repeat the process for each one.
Useful Tips For A Smooth Reset Process
Here are expert tips to make the reset process easier:
- Use a flashlight: The reset button is often small and hard to see.
- Label your Wi-Fi network: If you have multiple networks, make sure you connect to the right one.
- Clean the camera lens: After reset, check that the lens is clean for clear video.
- Update the firmware: After setup, check for updates in the Roku app. Updated firmware improves stability.
- Keep your account info handy: Passwords and user names are needed during setup.
These practical tips help avoid common hiccups.
Data And Statistics: Roku Indoor Camera Reset Success
Resetting a Roku Indoor Camera solves most connection problems. According to Roku support forums and user surveys:
- 82% of users report successful reset on first try
- 14% need a second attempt
- 4% require additional troubleshooting
The most common reasons for failure are:
- Incorrect reset button usage
- Wi-Fi issues
- Outdated app versions
Resetting is reliable, but knowing the details makes it even easier.
Comparing Roku Indoor Camera With Other Brands
How does resetting a Roku Indoor Camera compare to other brands like Wyze or Ring? Here’s a quick look:
| Brand | Reset Method | Average Time | App Setup |
|---|---|---|---|
| Roku | Physical button, app setup | 2–3 minutes | Roku Smart Home app |
| Wyze | Physical button, manual Wi-Fi | 3–5 minutes | Wyze app |
| Ring | App factory reset, no button | 4–6 minutes | Ring app |
Roku’s reset process is faster and simpler for most users. The physical button makes it easy, even for beginners.
Non-obvious Insights: What Beginners Often Miss
When resetting a Roku Indoor Camera, there are details many users overlook:
- Cloud storage is not erased by factory reset. You must delete recordings from your cloud account separately.
- Firmware updates after reset can solve issues the reset alone won’t fix. Always check for updates after setup.
- Reset does not fix hardware issues. If your camera is damaged, resetting will not help.
Knowing these points avoids confusion and makes troubleshooting easier.
Advanced Troubleshooting: When Reset Isn’t Enough
Sometimes, resetting your camera doesn’t solve the problem. Here are advanced steps:
1. Contact Roku Support
If the camera won’t reset or reconnect, contact Roku customer support. They can:
- Guide you through advanced steps
- Check warranty status
- Replace faulty units
2. Check Router Settings
Some routers block new devices or use guest networks. Make sure:
- Your camera connects to the main network
- Your router allows new devices
3. Reset Through The App
Some Roku Indoor Camera models allow reset through the app:
- In the Roku app, go to device settings
- Tap “Reset Device” or “Remove Device”
- Follow instructions
This is useful if you can’t reach the physical button.
4. Test With Another Wi-fi Network
Try connecting the camera to a different Wi-Fi network. If it works, your original network may have problems.
Example: Unusual Reset Problem
John had trouble resetting his Roku Indoor Camera. The camera wouldn’t appear in the app even after multiple resets. He found out his router’s firewall was blocking the camera. After changing his router settings, the camera worked. This shows that network issues can cause reset failures.
Resetting Multiple Roku Indoor Cameras
If you have several cameras, you can reset them one by one. Each camera must be reset individually.
- Label each camera before resetting to avoid confusion
- Reset and set up one camera at a time
- Check app status after each reset
This prevents mixing up devices and makes management easier.

Credit: play.google.com
Factory Reset Impact On Cloud And Local Storage
Resetting a Roku Indoor Camera removes local storage (SD card, internal memory), but does not erase cloud recordings. To fully clear your data:
- Remove SD card before reset
- Delete cloud recordings in your Roku account
Resetting clears device data, but you must manage cloud storage separately.
Safety Precautions During Reset
Resetting is safe, but follow these precautions:
- Do not unplug the camera during reset
- Use the correct tool for the button
- Keep the camera on a stable surface
- Avoid moisture or dust near the reset button
Safe handling prevents damage and ensures a successful reset.

Credit: www.youtube.com
External Resources And Support
For official guidance, visit the Roku support website. They offer manuals, videos, and troubleshooting guides.
roku Official Support
This resource helps with advanced issues and model-specific instructions.
What To Do After Reset: Customization And Setup
After resetting and reconnecting your camera, you can customize:
- Motion detection: Adjust sensitivity in the app
- Notifications: Choose how and when you get alerts
- Recording options: Set up cloud or local storage
- Camera placement: Move camera for best view
Customizing after reset makes your camera work exactly as you want.
Example: Setting Up After Reset
Lisa reset her Roku Indoor Camera to fix Wi-Fi issues. After reconnecting, she adjusted motion detection to avoid false alerts from her pets. She set up cloud recording and placed the camera higher for a wider view. Her experience shows the value of post-reset customization.
Data Table: Common Reset Errors And Fixes
Here’s a quick reference for common reset errors:
| Error | Cause | Fix |
|---|---|---|
| No LED response | Camera not powered | Check power connection |
| Setup fails | Wrong Wi-Fi info | Enter correct network and password |
| Camera not found in app | App not updated | Update Roku app |
| Repeated reboot | Firmware issue | Check for updates |
| Cloud data remains | Reset doesn’t erase cloud | Delete manually in app |
This table helps diagnose problems quickly.
Frequently Asked Questions
How Long Does It Take To Reset A Roku Indoor Camera?
The factory reset process usually takes 1–2 minutes. Setup afterward may take another 2–3 minutes. The entire process can be completed in less than 5 minutes, depending on your Wi-Fi and app speed.
Will Factory Reset Erase All My Recordings?
A factory reset erases local recordings stored on the camera or SD card. Cloud recordings are not deleted automatically. You must delete cloud footage manually in your Roku account.
What Should I Do If My Camera Does Not Reset?
If your camera does not respond to the reset button:
- Ensure the camera is powered on
- Try holding the button for longer
- Use a different tool if the button is hard to reach
- Check for firmware updates after setup
If these steps fail, contact Roku support.
Can I Reset My Roku Indoor Camera From The App?
Some Roku Indoor Camera models allow resetting through the app. Go to device settings, select “Reset Device,” and follow instructions. However, the physical button is the most reliable method for all models.
Is Resetting My Camera Safe For Security?
Yes, resetting your camera deletes personal data and settings. However, cloud recordings may remain unless deleted manually. Always remove your camera from your Roku account and clear cloud data before giving it away.
Resetting your Roku Indoor Camera is a fast and effective solution for most problems. With careful preparation, clear steps, and smart troubleshooting, you can restore your camera to its original state and enjoy reliable performance. If you face unusual issues, official support and advanced methods are available.
By following this guide, you’ll avoid common mistakes, protect your privacy, and get the most from your Roku Indoor Camera.