

Wiring a Ring Video Doorbell is one of those home upgrades that can make life both safer and more convenient. With real-time video, two-way talk, and motion alerts, you can always know who’s at your door—even when you’re miles away.
But for many homeowners and renters, the idea of installing and wiring a smart doorbell feels intimidating. What tools do you need? Are you at risk of damaging your wiring? And is it really worth the effort compared to battery-powered options?
This guide will walk you through every step to wire your Ring Video Doorbell confidently, even if you’ve never handled electrical wiring before. You’ll learn the key decisions to make, how to prepare your tools and workspace, and exactly what to do at each stage. Along the way, you’ll get practical advice, expert tips, and answers to questions that most tutorials miss. Whether you’re replacing an old chime or starting from scratch, you’ll know exactly what to expect—and how to avoid common mistakes that can cost you time or money.
Understanding Your Ring Video Doorbell Model
Before you start wiring, it’s important to know which Ring Video Doorbell model you own. Ring offers several versions, and not all are wired the same way. Wiring steps and requirements can change based on your specific device.
Common Ring Video Doorbell Models
- Ring Video Doorbell (1st and 2nd Gen): Can be wired to existing doorbell wiring or used with battery power.
- Ring Video Doorbell Pro and Pro 2: Must be hardwired; no battery option.
- Ring Video Doorbell Wired: Requires wired power; does not support battery operation.
- Ring Video Doorbell 3/3 Plus/4: Can use either battery or wired power.
- Ring Video Doorbell Elite: Uses Power over Ethernet (PoE), which is a different wiring method.
Why Model Matters
- Voltage needs: Some models need a specific voltage (16-24V AC), while others are more flexible.
- Chime compatibility: Not all models work with mechanical or digital chimes.
- Installation process: Some require extra parts like a Pro Power Kit.
Tip: Before buying or starting installation, check your model’s specs on the official Ring website or in the manual. This avoids wiring mistakes and ensures you have the right tools.
Tools And Materials You’ll Need
Installing a Ring Video Doorbell is easier when you have the right tools ready. Here’s what you’ll typically need:
- Ring Video Doorbell kit (with mounting plate, screws, anchors, and included tools)
- Phillips screwdriver
- Drill (with masonry bit for brick/concrete)
- Level (often included in the Ring kit)
- Wire stripper (for clean wire connections)
- Voltage tester (to ensure power is off)
- Electrical tape (for securing connections)
- Pencil or marker (to mark drill holes)
- Smartphone or tablet (to set up the Ring app)
- Protective gloves (optional, for safety)
- Ladder (if your doorbell is high)
Pro Insight: Many people overlook the voltage tester. Never skip this—testing for live wires is essential for safety.
Safety Precautions Before You Start
Working with home wiring is safe if you take precautions. Always:
- Turn off power at the breaker. Do not rely just on the doorbell chime switch.
- Double-check with a voltage tester at the wiring location.
- Work during daylight for better visibility.
- Avoid wet conditions and wear dry gloves if possible.
- Inform household members so they don’t turn the power back on accidentally.
Non-obvious tip: Label the breaker with a note (“DOOR BELL—DO NOT TURN ON”) while working. This extra step prevents surprises.
Step 1: Check Your Existing Doorbell Wiring
Not every home has the same wiring setup. You’ll need to know what you’re working with:
Identify Your Doorbell System
- Mechanical chime: Traditional “ding dong” sound; usually compatible with all Ring wired models.
- Digital chime: Plays a melody or tune; some Ring models require a special adapter.
- No chime: Some newer homes or apartments may not have any existing chime.
How to check: Remove your old doorbell button from the wall. You should see two wires (usually thin, low-voltage wires).
Test Voltage
Use your voltage tester or multimeter to measure the voltage at the wires with the breaker ON. Most Ring models require 16-24 volts AC. Anything less may not power the device reliably.
If you have:
- 8-12V AC: May not work for Pro or Wired models.
- 16-24V AC: Ideal for most.
- No reading: Check for loose wires, broken transformer, or no existing doorbell system.
Expert tip: If your voltage is too low, you may need to replace your doorbell transformer—a common but often-missed cause of Ring doorbell failures.
Step 2: Remove The Old Doorbell
Once you’ve confirmed the voltage and turned off the breaker:
- Unscrew the old button: Usually two screws hold it to the wall.
- Gently pull out: Expose the wires behind, keeping them attached.
- Disconnect the wires: Loosen the terminal screws or gently pull out push-in wires.
- Check wire condition: If wires are corroded, cut and strip fresh ends.
Pro insight: Take a photo of the wiring before removing anything. If you need to reconnect, this helps you remember what went where.
Step 3: Prepare The Doorbell Wires
Clean, solid wire connections are key for a reliable doorbell.
- Strip wire ends: Use your wire stripper to expose about ½ inch (1.25 cm) of copper.
- Twist wire ends: Make them neat and strong.
- If wires are too short: Use a small piece of similar gauge wire and wire nuts to extend.
Advanced tip: If you have very old wiring (solid core), bend wires into a small hook for easier mounting on the Ring terminal screws.
Step 4: Mount The Ring Doorbell Bracket
The mounting bracket holds your Ring Video Doorbell in place.
Find The Right Height
Most doorbells are installed about 48 inches (122 cm) from the ground. This height captures faces and packages well.
- Mark holes with a pencil using the bracket as a template.
- Level the bracket—use the small bubble level included.
- Drill holes (use a masonry bit for brick, stucco, or concrete).
- Insert anchors if installing on hard surfaces.
- Screw the bracket into the wall securely.
Tip: Avoid mounting the doorbell where it faces direct sunlight or heavy rain, if possible.
Step 5: Connect The Wires To Your Ring Video Doorbell
Wiring the doorbell is straightforward, but details matter.
- Loosen the terminal screws on the Ring bracket.
- Attach each wire to a screw terminal. Polarity does not matter (either wire to either terminal).
- Tighten the screws so wires are secure.
- Double-check connections—wires should not be loose or touching each other.
- Optional: Wrap a bit of electrical tape around the terminals for extra safety.
If your model requires a Pro Power Kit (for Ring Pro), install it according to the included instructions—usually inside your chime box.
Non-obvious insight: If your chime is digital, look for a sticker or label. Some Ring devices need a “chime adapter” to work with digital chimes.
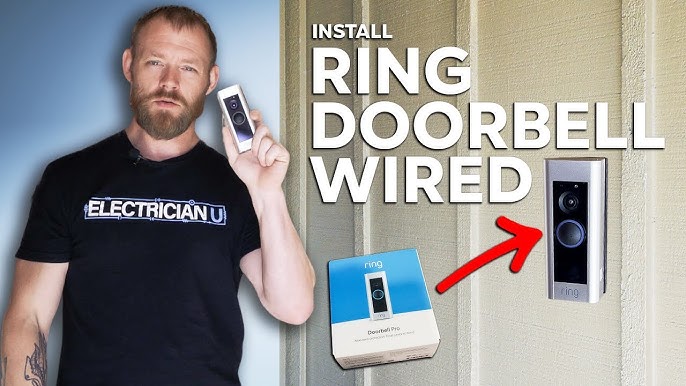
Credit: www.youtube.com
Step 6: Attach The Ring Doorbell To The Bracket
With wiring complete:
- Align the device with the bracket.
- Push gently until you hear a click.
- Insert the security screws at the bottom using the special screwdriver (included in the Ring kit).
- Check for any gaps—the device should sit flush with the wall.
Tip: Keep the special Ring screwdriver in a safe place; you’ll need it to remove the device later for charging or maintenance.
Step 7: Restore Power And Test
Turn the power back on at the breaker.
- Wait for the Ring doorbell to power up (it may take up to a minute).
- Look for a spinning white or blue light.
- Follow the Ring app instructions to connect the device to your Wi-Fi network.
- Test the doorbell by pressing the button. It should chime and send a notification to your phone.
If there’s no power: Double-check your wire connections and make sure your transformer voltage is correct.
Step 8: Setting Up The Ring App
The Ring app is your control center. Here’s how to set it up:
- Download the Ring app (iOS or Android).
- Create or log into your Ring account.
- Select “Set Up a Device” and follow the prompts.
- Scan the QR code on your Ring Video Doorbell.
- Connect to your Wi-Fi network.
- Complete setup: Name your device and adjust settings.
Important: Keep your phone close to the doorbell during setup for the best connection.
Step 9: Adjust Motion Settings And Notifications
Once installed, customize your settings:
- Adjust motion zones: Prevent unnecessary alerts from passing cars or pedestrians.
- Set notification preferences: Get alerts for doorbell rings, motion, or both.
- Test video quality: Make sure your Wi-Fi is strong enough for live streaming.
Data point: According to Ring, more than 60% of support calls are due to motion setting confusion. Spend extra time here to get it right.
Dealing With Common Installation Challenges
Even if you follow instructions, you may run into surprises. Here’s how to handle common issues.
Low Voltage Or No Power
If your Ring isn’t powering up:
- Check transformer voltage: Must be 16-24V AC for most wired models.
- Replace transformer if needed. (Many are found in basements, attics, or near the electrical panel.)
- Use a plug-in Ring transformer if you don’t have existing wiring.
No Chime Sound
If the doorbell works but you don’t hear your indoor chime:
- Check if chime is compatible: Mechanical chimes usually work; digital chimes may need an adapter.
- Install the Pro Power Kit (for Ring Pro).
- Enable chime in the app: Some models have a setting to turn the chime on or off.
Wi-fi Issues
If video is laggy or disconnects:
- Move your router closer or use a Wi-Fi extender.
- Choose the 2.4 GHz band for better range.
- Avoid mounting near metal objects that block signal.
Insight: Walls with brick, metal, or thick insulation can weaken your Wi-Fi signal—plan your device placement accordingly.
Replacing Your Doorbell Transformer
Sometimes you’ll discover your current transformer doesn’t provide enough power. Here’s what you need to know.
Signs You Need A New Transformer
- Doorbell won’t power up, or shuts off randomly.
- Voltage is below 16V AC.
- Chime buzzes or sounds weak.
How To Replace
- Turn off power at the main breaker.
- Locate the old transformer (often in a basement, attic, or near the panel).
- Disconnect the old wires (take a photo first).
- Connect the new transformer (match the wires: Usually black/white for power, two small wires for doorbell).
- Secure the new transformer and restore power.
Warning: If you’re not comfortable working with household wiring, hire a licensed electrician.
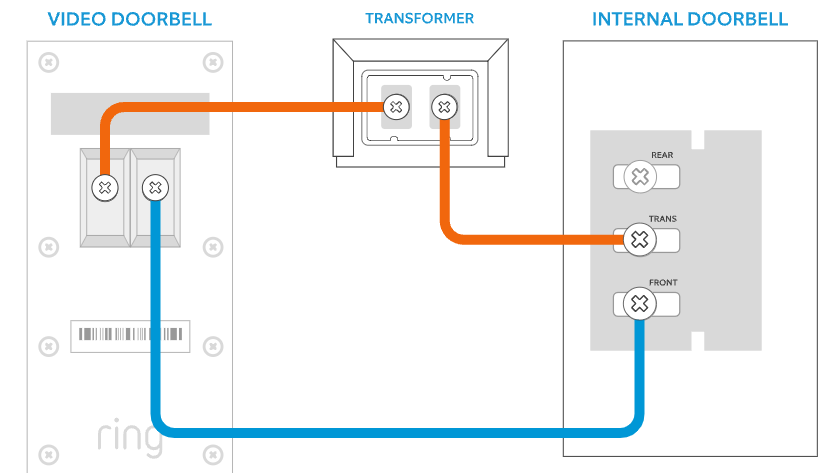
Credit: ring.com
Comparing Battery Vs. Wired Ring Doorbells
Some users wonder if they should use the battery or wired option. Here’s a quick comparison:
| Feature | Wired Doorbell | Battery Doorbell |
|---|---|---|
| Power Source | Existing doorbell wiring (16-24V AC) | Rechargeable battery pack |
| Chime Support | Yes, with existing chime | No, needs Ring Chime accessory |
| Maintenance | Low, no charging needed | Recharge every 1-6 months |
| Install Difficulty | Medium (wiring required) | Easy |
| Continuous Power | Yes | No (may lose power if not charged) |
Non-obvious insight: Wired doorbells offer faster response times and support for pre-roll video, a feature battery models often lack.
Understanding Chime Compatibility
Not all chimes work with every Ring model. Here’s what to know:
| Chime Type | Ring Wired | Ring Pro | Ring (2nd Gen) |
|---|---|---|---|
| Mechanical | Yes | Yes | Yes |
| Digital | No | Yes (with adapter) | Yes (with adapter) |
| No chime | Use Ring Chime accessory | Use Ring Chime accessory | Use Ring Chime accessory |
Pro tip: If you want custom ringtones or chimes in multiple rooms, add a Ring Chime or Chime Pro accessory.
Installing Ring Video Doorbell Without Existing Doorbell Wiring
Some homes—especially new builds or apartments—don’t have existing doorbell wires. You still have options:
Option 1: Use Plug-in Transformer
Purchase a plug-in Ring transformer and run the wires to your doorframe. Secure the wires along the wall with clips.
- Pros: No electrician needed, works with all wired models.
- Cons: Visible wires, need a nearby outlet.
Option 2: Use Battery Power
If your model supports battery operation, install without any wires.
- Pros: Easiest install, works anywhere.
- Cons: No traditional chime, must recharge battery periodically.
Option 3: Hire A Pro
For a truly seamless look, hire an electrician to run new doorbell wires.
- Pros: Cleanest install, supports all features.
- Cons: Higher cost, more time.
Insight: Many users don’t realize that plug-in transformers are a simple workaround—no need to drill through walls or ceilings.
Maintenance And Troubleshooting
Keeping your Ring Video Doorbell in top shape is easy with a few habits:
- Check for firmware updates in the Ring app regularly.
- Clean the camera lens gently with a microfiber cloth to keep video clear.
- Inspect wiring annually for corrosion or looseness.
- Test the chime and notifications every few months.
Common Troubleshooting Steps
- No video or audio: Check Wi-Fi connection and power supply.
- Delayed notifications: Improve Wi-Fi strength or adjust motion settings.
- Device offline: Restart your router, then the Ring device.
Expert tip: Power cycling (turning power off and on) fixes many minor glitches.
Real-world Example: Suburban Home Installation
Let’s say you’re installing a Ring Video Doorbell Wired on a typical suburban home with an existing mechanical chime:
- Turn off power at the breaker.
- Remove old doorbell button.
- Test voltage: Reads 18V AC—perfect.
- Mount bracket at 48 inches, drill into wood trim.
- Connect wires to the Ring bracket, tighten screws.
- Attach device, secure screws.
- Restore power, wait for lights.
- Open Ring app, complete setup.
- Press button, hear chime and get phone alert.
Time needed: About 45 minutes for a first-timer.
Data: Ring Doorbell Installation Trends
- Over 40% of U.S. homes with smart doorbells are wired, not battery-powered.
- Mechanical chimes remain the most common type in homes built before 2000.
- Average installation time for DIY is 30-60 minutes.
Source: statista
Practical Tips For A Smooth Installation
- Lay out all tools before starting—saves time.
- Label wires if you have more than two (sometimes there are extra wires for multiple chimes).
- Charge your Ring battery (if using a hybrid model) before starting, even if wiring for power.
- Test notifications with someone at the door to make sure alerts are loud enough.
- Use weatherproofing tape around the bracket if installing in a rainy area.
Mistakes To Avoid
- Forgetting to cut power: Always double-check before touching wires.
- Not testing voltage: Underpowered devices may seem to work, then fail.
- Loose connections: Can cause random disconnects or no power.
- Ignoring chime compatibility: Some digital chimes won’t work without an adapter.
- Mounting too high or low: You’ll miss faces or packages.
When To Call A Professional
While most people can install a Ring Video Doorbell themselves, there are situations where you should get help:
- Old or confusing wiring: If you’re unsure, don’t guess.
- No existing doorbell wiring: Running new wires is best left to electricians.
- Electrical panels or transformers are hard to access.
- Frequent breaker trips after installation.
Insight: Professional installation costs range from $80 to $250 in the U.S., depending on complexity.
Frequently Asked Questions
How Do I Know If My Doorbell Wiring Has Enough Voltage For Ring?
Use a voltage tester or multimeter with the power ON. Place probes on each wire; you should see 16-24 volts AC. If it’s lower, your transformer may need an upgrade.
Can I Wire A Ring Video Doorbell If I Don’t Have An Existing Doorbell?
Yes, you can use a plug-in transformer or choose a Ring model with battery power. Plug-in kits are available from Ring and home improvement stores.
Why Does My Ring Doorbell Say “low Power” Even Though It’s Wired?
This usually means your transformer is underpowered or there’s a loose wire. Measure the voltage at the device, and check all connections are tight. If needed, replace the transformer.
Will My Old Chime Still Work With Ring?
Most mechanical chimes work with wired Ring models. Digital chimes may require a special adapter. Some models (like Ring Wired) do not support chimes—use a Ring Chime accessory instead.
Is It Safe To Install A Ring Video Doorbell Myself?
If you follow instructions, turn off power, and test wires, DIY installation is safe for most people. If you’re unsure or uncomfortable, hire a licensed electrician.
Installing a Ring Video Doorbell transforms your entryway, adding security and convenience. With careful planning, the right tools, and attention to detail, even first-time DIYers can wire their device safely and successfully. Take your time, double-check each step, and enjoy the peace of mind that comes with smart home security at your fingertips.
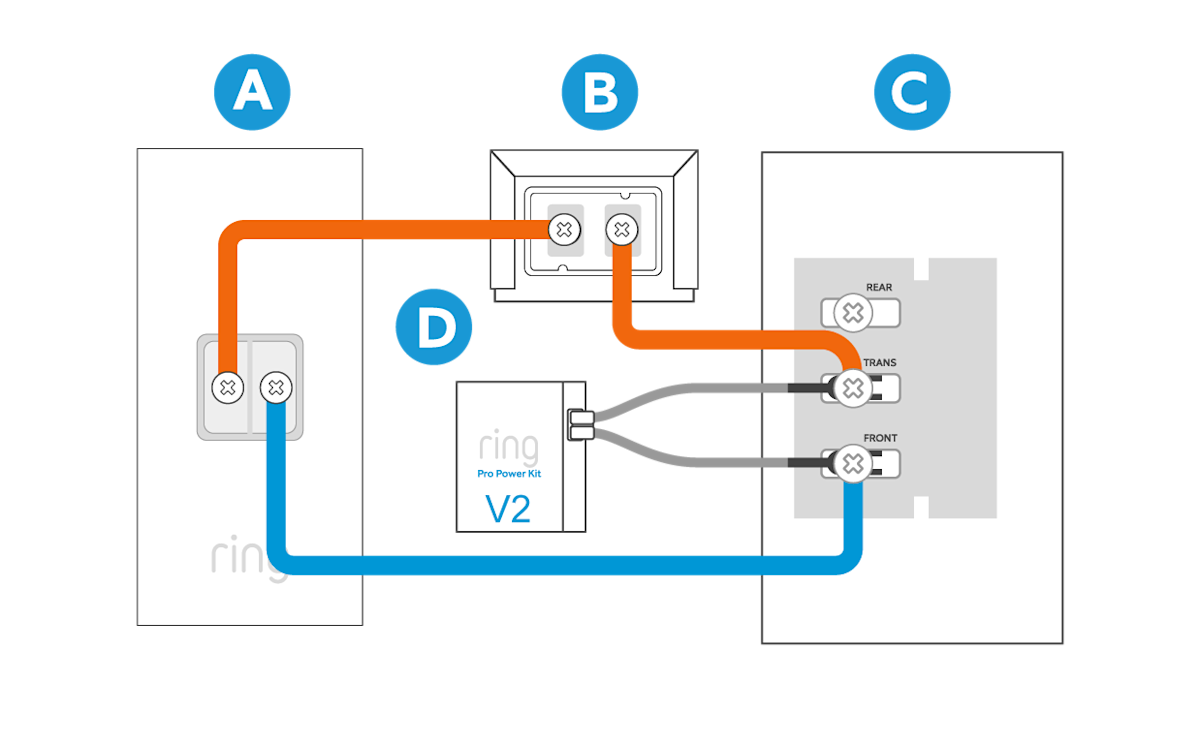
Credit: ring.com