
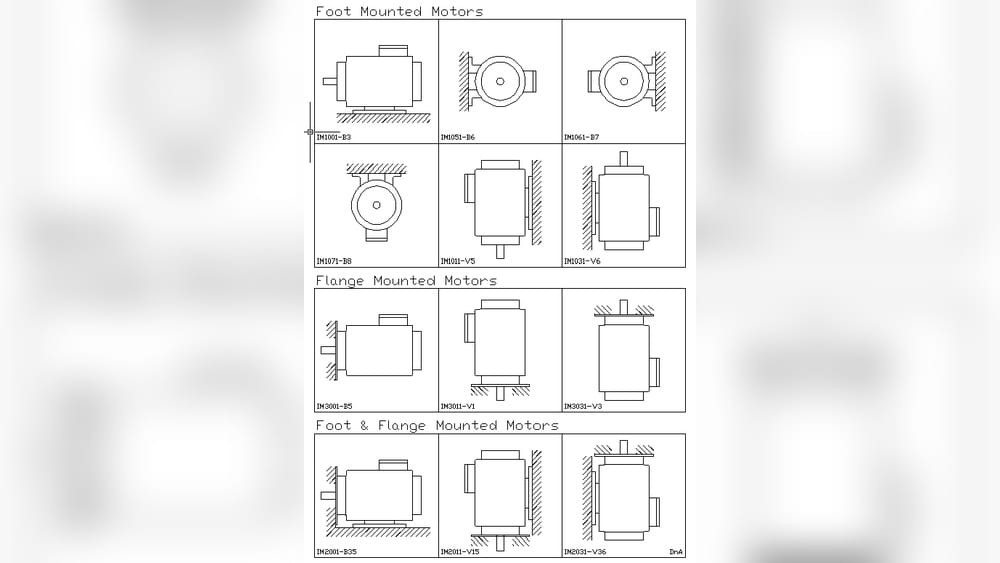
What Is Motor Mounting
Every electric motor, whether in a car, factory machine, or home appliance, needs something to hold it in place. This is where motor mounting comes in. While the motor itself does the hard work of converting electrical energy into motion, the way it is attached to its surroundings can make a big difference. Good mounting keeps the motor stable, reduces vibration, and helps the whole system last longer. Poor mounting, on the other hand, can lead to noise, damage, and even safety risks.
Most people see motors every day but rarely think about how they are installed. Yet, the details of motor mounting affect everything from how quietly your washing machine runs, to how safely a factory machine operates. For engineers, technicians, and anyone dealing with machines, understanding motor mounting is essential.
This article will explain what motor mounting means, why it matters, and how it is done in different industries. You’ll learn about types of mounting, key factors to consider, and common mistakes. By the end, you’ll see that the way a motor is fastened is just as important as the motor itself.
What Is Motor Mounting?
Motor mounting is the process of securing an electric motor to a frame, base, or machine so that it can operate safely and efficiently. It covers the design, placement, and installation of supports and fasteners that hold the motor in position. The main goal is to keep the motor stable during operation while allowing for easy maintenance and alignment.
Key Functions Of Motor Mounting
- Stability: Prevents the motor from moving or shifting under load.
- Vibration Control: Reduces vibration and noise that can damage equipment.
- Alignment: Ensures the motor shaft lines up correctly with whatever it drives (like a pump or conveyor).
- Safety: Protects people and equipment from moving parts or electrical faults.
- Serviceability: Allows for easy removal, inspection, and repair.
Without proper mounting, even the best motor can fail early or cause problems. For example, a misaligned motor can wear out bearings, while poor vibration control can loosen bolts or cause cracks.
Where Motor Mounting Is Used
Motor mounting is found everywhere:
- Automobiles: Keeps engines and fans in place.
- Factories: Secures motors that drive conveyors, pumps, or fans.
- Home Appliances: Holds the motor in your washing machine or blender.
- HVAC Systems: Supports motors for fans and compressors.
No matter the application, the basic goals are the same: stability, safety, and long life.
Types Of Motor Mounting
There are several main ways to mount a motor. The best type depends on the motor’s size, the machine, and the working environment. Below are the most common types, with examples and their advantages.
1. Foot Mounting
Foot mounting is the most popular method for industrial motors. The motor has metal “feet” or flanges with holes for bolts. These feet sit on a base plate or frame.
- Where used: Large industrial machines, pumps, compressors.
- Advantages: Easy to install and remove. Good for heavy motors.
- Drawback: Needs a strong, flat base.
2. Flange Mounting
Flange mounting uses a flat, round, or square plate (the flange) attached to one end of the motor. The flange has holes for bolts, which fix it to a wall or machine.
- Where used: Wall-mounted fans, pumps, gearboxes.
- Advantages: Saves space, good for tight areas.
- Drawback: Needs accurate alignment.
3. Face Mounting
Similar to flange mounting, but with the mounting surface at the front “face” of the motor. This is common for small motors in appliances.
- Where used: Fans, small machines.
- Advantages: Compact, neat installation.
- Drawback: Can be harder to service.
4. Base Mounting
In base mounting, the motor is secured to a solid base, often with adjustable slots for alignment. This is common in conveyor systems.
- Where used: Conveyors, belt-driven machines.
- Advantages: Easy alignment, supports belt tensioning.
- Drawback: Takes up more floor space.
5. Vertical Mounting
Here, the motor is mounted upright, with the shaft facing up or down. Used when the driven part is above or below the motor.
- Where used: Submersible pumps, vertical fans.
- Advantages: Saves horizontal space, good for vertical loads.
- Drawback: Needs strong support for vertical weight.
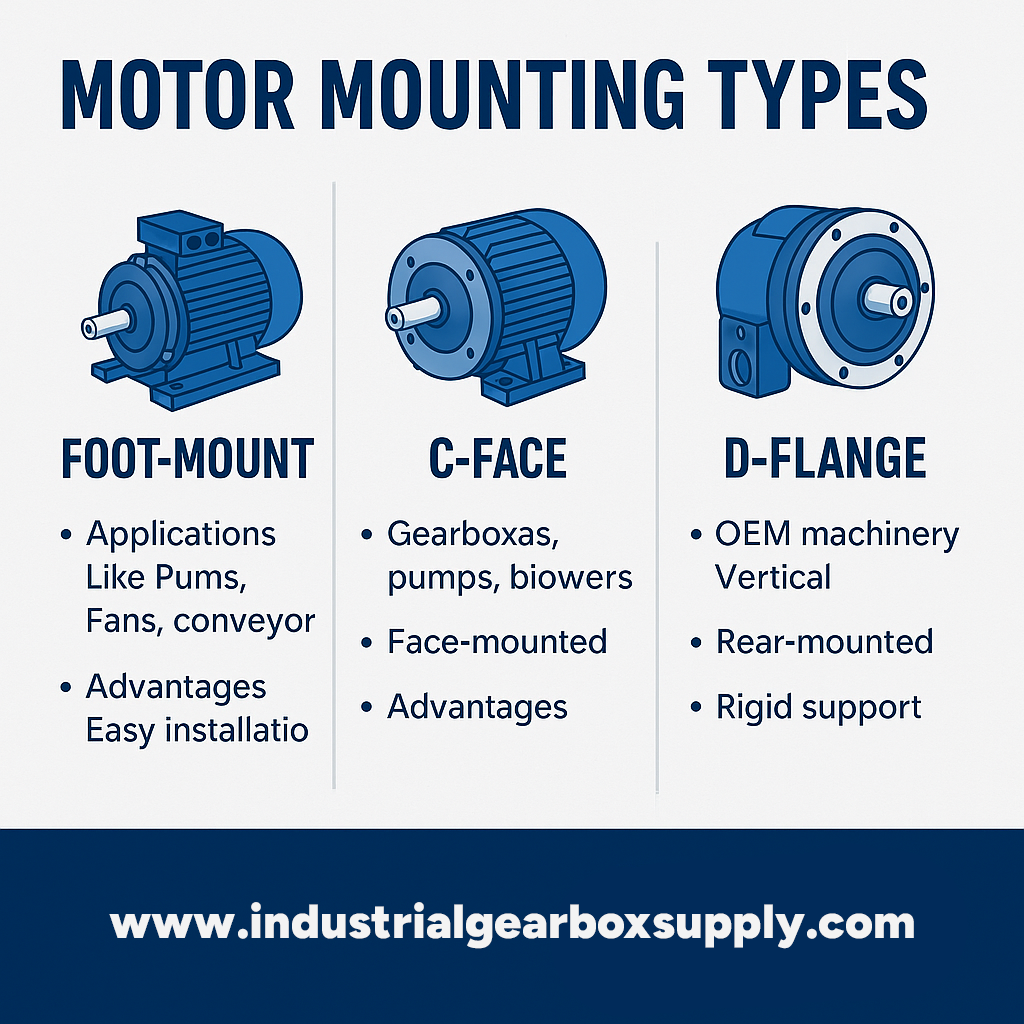
6. C-face And D-flange Mounting
Many motors use a special C-face or D-flange for precise alignment. These are common in North American standards.
- Where used: Gear reducers, pumps.
- Advantages: Accurate alignment, easy assembly.
- Drawback: Needs matching parts.
7. Custom Mounting
Some machines need a custom mounting solution. This might combine several methods or use special brackets or vibration dampers.
- Where used: Robotics, automation, special machinery.
- Advantages: Tailored to the application.
- Drawback: Higher cost, longer design time.
Comparison Of Motor Mounting Types
Here’s a quick comparison of the main mounting types:
| Mounting Type | Best For | Main Advantage | Common Drawback |
|---|---|---|---|
| Foot Mounting | Large motors, industrial use | Strong support | Needs solid base |
| Flange Mounting | Wall, pumps, gearboxes | Saves space | Precision needed |
| Face Mounting | Small appliances | Compact | Harder servicing |
| Base Mounting | Belt-driven systems | Easy alignment | More floor space |
| Vertical Mounting | Vertical loads | Saves space | Needs strong support |
Credit: industrialgearboxsupply.com
Why Motor Mounting Matters
It’s easy to see a motor as the “heart” of a machine, but the mounting is like the skeleton. Without strong bones, the heart can’t do its job properly. Bad mounting causes a chain reaction of problems.
1. Reduces Vibration And Noise
Motors create vibration when running. If this vibration is not controlled, it travels through the machine, causing noise and shaking. Over time, this can lead to:
- Loosened bolts
- Cracked welds
- Damaged bearings
- Fatigue in metal parts
Good mounting, especially with vibration dampers or isolators, stops these problems before they start.
2. Increases Motor And Machine Life
Misalignment or instability makes motors and their loads work harder. Bearings wear out, shafts bend, and electrical parts overheat. Proper mounting keeps everything in line, reducing stress and extending the life of both motor and machine.
3. Improves Safety
A loose or poorly mounted motor can be dangerous. It might move unexpectedly, drop onto someone’s foot, or even cause electrical shorts. Good mounting keeps workers safe and prevents damage to other equipment.
4. Affects Efficiency
Any energy lost to vibration, misalignment, or friction is energy not used for the job. Over time, these small losses add up to wasted electricity and higher operating costs.
5. Makes Maintenance Easier
Motors need regular service—like greasing bearings or replacing worn parts. Good mounting allows easy removal and reinstallation, saving time and reducing mistakes during maintenance.
Main Parts And Accessories In Motor Mounting
Mounting a motor is not just about bolts and frames. Many accessories and parts make the installation safer, easier, and more reliable.
Motor Base
The motor base is the platform or support on which the motor sits. It can be a simple steel plate or a complex adjustable frame. Some bases have slots to help align the motor with belts or pulleys.
Mounting Bolts And Fasteners
Strong bolts, nuts, and washers are essential for holding the motor in place. High-strength materials and proper torque are important to prevent loosening.
Vibration Isolators
Rubber pads, spring mounts, or other vibration isolators absorb shock and reduce noise. These are critical in buildings and sensitive equipment.
Alignment Shims
Thin metal or plastic shims help fine-tune the position of the motor for perfect shaft alignment.
Couplings
The coupling connects the motor shaft to the driven machine. Flexible couplings can handle small misalignments and reduce stress.
Guards And Shields
Safety guards protect people from moving parts and prevent debris from getting into the motor.
Adjustment Mechanisms
Some mounts have screws or slides for adjusting belt tension or motor position.
Wiring And Conduit Supports
Good mounting also means secure wiring. Conduit clamps or cable ties keep electrical wires safe and tidy.
Step-by-step: How Motor Mounting Is Done
Mounting a motor may sound simple, but doing it right takes skill. Here’s a general step-by-step guide used in factories and workshops.
1. Prepare The Site
- Check that the base or frame is strong, level, and clean.
- Remove dust, oil, or old paint that could weaken the connection.
- Make sure you have all parts and tools ready.
2. Position The Motor
- Place the motor on the base or mount.
- Use a crane or lift for heavy motors—never lift by hand if it’s too heavy.
- Check that the mounting holes line up.
3. Install Bolts And Fasteners
- Insert bolts into the mounting holes.
- Tighten bolts by hand first, then use a wrench.
- For vibration control, place rubber pads under the motor feet if needed.
4. Align The Motor
- Use a straightedge or laser alignment tool to line up the motor shaft with the driven load.
- Insert shims if the alignment is off.
- Tighten bolts fully when alignment is correct.
5. Connect Wiring
- Attach wires according to the wiring diagram.
- Secure cables with clamps or ties to prevent damage.
6. Install Safety Guards
- Add guards around moving parts to prevent injury.
7. Test Run
- Start the motor and listen for noise or vibration.
- Check for overheating, loose parts, or unusual movement.
- If needed, fine-tune the alignment or add more vibration damping.
8. Record And Inspect
- Make a note of the installation details for future maintenance.
- Inspect the mounting regularly for wear or damage.
Common Mistakes In Motor Mounting
Even experienced technicians can make mistakes. Here are some common ones to watch out for:
- Using the wrong size or grade of bolts
- Forgetting vibration isolators in sensitive installations
- Skipping alignment checks
- Over-tightening or under-tightening bolts
- Not following the motor manufacturer’s recommendations
Each of these can lead to problems down the line—noise, vibration, or even motor failure.
Special Mounting Considerations
Some environments and applications require extra care in mounting motors. Here are a few special cases:
High Vibration Areas
In places like factories with heavy presses or crushers, vibration can be extreme. Here, spring mounts or special rubber pads are used to protect both the motor and the building.
Outdoor Or Wet Locations
For motors exposed to rain, dust, or chemicals, the mounting must resist corrosion. Stainless steel hardware, sealed bases, and weatherproof coatings are used.
Hazardous Areas
In oil refineries or chemical plants, sparks from loose parts can cause fires. All mounting parts must be certified for safety and tightly fastened.
High-speed Motors
Motors running at high speeds need more accurate alignment and balancing. Even small mistakes can cause big problems at high RPM.
Portable Equipment
For motors on portable machines, quick-release mounts or handles may be added for easy movement.
Standards And Codes For Motor Mounting
Motor mounting is covered by several engineering standards. These help ensure safety and compatibility between motors and machines.
Nema Standards
In North America, the National Electrical Manufacturers Association (NEMA) sets standards for motor frame sizes and mounting types. A NEMA 56C frame, for example, has a specific size and flange shape.
Iec Standards
Outside North America, the International Electrotechnical Commission (IEC) provides similar standards for metric motors. IEC 71, 80, 90, and so on refer to different frame sizes and mounting codes.
Manufacturer Guidelines
Always check the motor manufacturer’s manual for specific mounting instructions. Following these ensures you don’t void the warranty.
Safety Codes
Local building and electrical codes may also specify how motors must be mounted, especially in hazardous or public areas.
How To Choose The Right Motor Mounting
Selecting the right mounting is not just about what fits. Here are the main factors to consider:
1. Motor Size And Weight
Heavy motors need stronger mounts and hardware. Check the motor’s weight and size before choosing.
2. Space Available
Is the motor going on a wall, floor, or ceiling? Tight spaces may need flange or face mounting.
3. Type Of Load
A belt-driven load might need base mounting with slots for tension adjustment. A direct-coupled pump may need a flange mount.
4. Environment
Wet or dusty places need corrosion-proof materials. High-vibration areas need extra damping.
5. Service Access
If the motor will need frequent service, choose a mount that allows easy removal.
6. Cost
Custom mounts may cost more, but they can solve tricky problems. Standard mounts are cheaper and faster to install.
Decision Guide For Motor Mounting
Here’s a quick decision guide:
| Factor | Best Mounting Choice | Why |
|---|---|---|
| Heavy motor | Foot or base mount | Strong support |
| Tight space | Flange or face mount | Saves space |
| High vibration | Base with isolators | Reduces noise |
| Frequent service | Base with easy access | Quick removal |
| Outdoor use | Corrosion-proof hardware | Longer life |

Credit: www.parkermotion.com
Real-world Examples Of Motor Mounting
Understanding motor mounting is easier with real-life examples. Here are some typical cases:
Example 1: Industrial Conveyor
A factory conveyor uses a 5 HP electric motor. The motor is foot-mounted on a steel base with rubber pads to reduce vibration. Alignment shims are used to ensure the motor and conveyor pulley are perfectly lined up. Guards cover the moving belts for safety.
This setup runs 24/7, so easy maintenance access is critical.
Example 2: Hvac Fan
A large fan in a shopping mall uses a flange-mounted motor. The motor is bolted directly to the fan housing, saving floor space. Vibration isolators are added to the mounting points to reduce noise, which is important in public spaces.
Example 3: Submersible Pump
In a water treatment plant, a vertical motor is mounted above a submersible pump. The mounting frame is stainless steel to resist rust. Special seals protect the motor from water. The vertical mounting keeps the footprint small and allows easy access to the pump for service.
Example 4: Home Appliance
A washing machine uses a small face-mounted motor. The motor is bolted to the back panel of the machine, with rubber grommets to cut down on vibration. This makes the machine quieter and less likely to “walk” during the spin cycle.
Example 5: Robotics Arm
A custom mount is used for a robot arm. The motor is held in a 3D-printed bracket with built-in vibration damping. The shape is designed to fit inside the arm without extra space, and quick-release pins allow for fast swaps.
Non-obvious Insights About Motor Mounting
Most beginners focus on just bolting the motor down, but there’s more to consider. Here are a couple of non-obvious points:
- Thermal Expansion: Motors heat up and expand during use. If the mounting is too rigid, this can cause extra stress and cracks. Using flexible pads or allowing a tiny bit of movement can prevent this problem.
- Resonance Issues: Every machine has a “natural frequency.” If the motor’s vibration matches this frequency, even small vibrations can build up and cause big problems. Skilled installers use isolators or change the mounting type to avoid resonance.
- Grounding and Electrical Safety: The mounting must also provide a good ground path for electrical safety. Insulated mounts can sometimes interfere with grounding if not designed correctly.
- Maintenance Planning: The best installations plan ahead for motor replacement. Features like sliding rails or quick-release mounts can save hours of downtime.
Maintenance And Troubleshooting Of Motor Mounting
Proper motor mounting doesn’t end with installation. Regular checks and maintenance are needed.
What To Inspect
- Bolts and Fasteners: Are they tight and free of rust?
- Vibration Isolators: Are rubber pads cracked or worn?
- Alignment: Has anything shifted? Use a straightedge or alignment tool.
- Noise and Vibration: Has anything changed? Sudden noise often means a mounting issue.
- Guards and Shields: Are they in place and undamaged?
Troubleshooting Common Problems
- Excess Vibration: Check for loose bolts, worn isolators, or misalignment.
- Motor Movement: Tighten fasteners and inspect the base for cracks.
- Unusual Noise: May signal loose parts or resonance. Add or replace vibration isolators.
- Overheating: Make sure nothing blocks the motor’s cooling, and check for proper grounding.
When To Call An Expert
If you see cracks in the base, repeated bolt loosening, or electrical faults, get help from a skilled technician or engineer.
Advances In Motor Mounting Technology
Just like motors themselves, mounting systems are always improving.
Smart Mounts
Some modern mounts have sensors that detect vibration, temperature, or movement. These send alerts if something is wrong, helping prevent downtime.
New Materials
Advanced polymers and composites are replacing steel in some mounts. These materials absorb vibration better and resist corrosion.
Modular Mounting Systems
Manufacturers now offer “modular” mounting kits that fit many motor types. This reduces inventory and speeds up replacement.
3d Printing
Custom brackets and mounts can now be printed quickly and cheaply. This is useful for prototypes or short-run production.
Remote Monitoring
In large factories, motor mounts can be checked remotely using IoT technology. This helps maintain many motors without physical inspection.

Credit: www.researchgate.net
The Role Of Motor Mounting In Sustainability
Sustainable engineering is not just about saving energy—it’s about making machines last longer and reducing waste.
- Efficient mounting reduces energy loss from vibration.
- Longer-lasting mounts mean fewer replacements and less scrap metal.
- Smart monitoring helps fix problems before they cause big failures.
Even small improvements in mounting can add up to big savings in energy, material, and labor over time.
Frequently Asked Questions
What Is The Main Purpose Of Motor Mounting?
The main purpose is to secure the motor in place, keeping it stable and aligned during operation. This reduces vibration, increases safety, and extends the life of both the motor and the machine it powers.
Can I Use Any Bolts Or Fasteners For Motor Mounting?
No, you should always use high-strength, properly sized bolts as specified by the motor manufacturer. Using the wrong type can lead to loosening, vibration, or even motor detachment.
How Often Should I Check Motor Mounting?
It’s best to inspect motor mounting at least every 6-12 months, or more often in harsh environments. Look for loose bolts, worn isolators, or shifts in alignment.
What If My Motor Is Making More Noise Than Before?
Increased noise often means a problem with the mounting, such as loose bolts, worn vibration pads, or misalignment. Check and fix these issues before the motor or machine is damaged.
Where Can I Find Official Motor Mounting Standards?
You can find official standards from organizations like the National Electrical Manufacturers Association (NEMA) or the International Electrotechnical Commission (IEC). For detailed information, visit the NEMA MG 1 Standards.
Motor mounting may seem like a small detail, but it makes a huge difference in the safety, efficiency, and life of every electric motor. Whether you’re installing a new machine or maintaining an old one, careful attention to mounting pays off for years to come.