
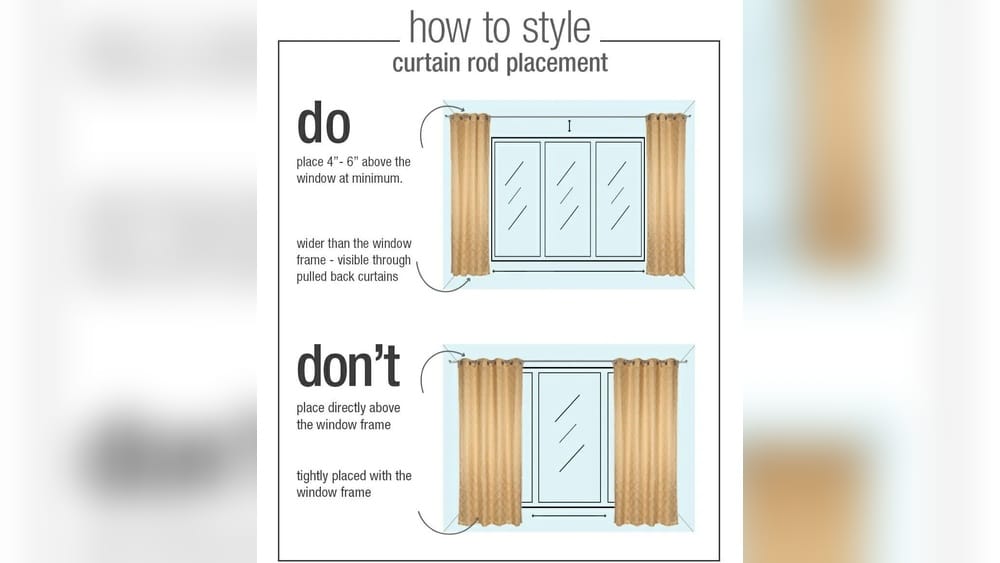
Mounting curtain rod brackets may seem simple, but the right placement can turn a room from average to impressive. Many homeowners and renters struggle with this step, unsure where to put the brackets for the best look and function. If you get it wrong, your curtains may not cover the window fully, may look awkward, or even fall off.
Getting it right means not just following instructions, but understanding the space, the window, and the design you want.
This guide gives you everything you need to confidently choose where to mount curtain rod brackets. You’ll learn how to measure, what tools to use, and what mistakes to avoid. Whether you’re hanging blackout curtains for privacy, sheer panels for style, or heavy drapes for insulation, this article helps you make smart decisions.
Understanding Curtain Rod Bracket Placement
Before drilling any holes, it’s important to understand what bracket placement affects. Proper placement impacts the look, the light control, and even how easy your curtains are to use.
Why Placement Matters
Bracket placement affects:
- Coverage: Curtains may leave gaps if brackets are too close to the window frame.
- Height illusion: Higher brackets make windows (and rooms) look taller.
- Light: Mounting wider lets more light in when curtains are open.
- Ease of use: Poor placement makes curtains harder to open or close.
Key Factors To Consider
Think about these before mounting:
- Window size and shape: Wide or tall windows need different placements.
- Curtain type: Heavy drapes need sturdier brackets, light curtains can be more flexible.
- Rod length: Longer rods often need center supports.
- Wall material: Drywall, plaster, and brick need different screws and anchors.
Many people assume brackets should always go right above the window, but this isn’t always best. You can use placement to shape how your window looks and feels.
Recommended Bracket Positions For Common Window Types
There’s no one-size-fits-all answer to bracket placement. Instead, consider your window type and the style you want.
Standard Windows
For most windows, experts recommend mounting brackets 4–6 inches above the window frame and 2–4 inches beyond each side. This allows curtains to cover the window fully and lets more light in when open.
Example
If your window is 40 inches wide, mount your brackets at least 44–48 inches apart. If the frame is 36 inches tall, place brackets at 40–42 inches from the floor.
Tall Windows
With tall windows, mount brackets closer to the ceiling if possible. This exaggerates the height and makes the space feel grand. Keep side placement the same—2–4 inches wider than the frame.
Wide Windows
For wide windows, use a center support bracket. Mount side brackets 2–4 inches past the frame, and the center bracket halfway between.
Bay Windows
Bay windows require special rods and often multiple brackets. Place brackets at each corner where the rod bends and at the ends, keeping them 2 inches beyond the frame for full coverage.
Sliding Glass Doors
Mount brackets 6–12 inches above the door frame and 4–6 inches wider than the door. This makes the door easy to use and lets curtains stack aside without blocking the view.
How High Should You Mount Curtain Rod Brackets?
Most designers suggest mounting brackets closer to the ceiling for a luxurious look, but there are practical limits.
Ceiling Height
If you have 8-foot ceilings, mount brackets 4–6 inches above the window frame. For higher ceilings, go 8–12 inches above, or even all the way to the ceiling for dramatic effect.
Curtain Length
Check curtain length before mounting brackets. If you mount too high, curtains may not reach the floor. Standard curtain lengths are 84, 96, or 108 inches. Measure from the bracket to the floor to ensure a good fit.
Example Table: Bracket Height Vs Curtain Length
| Ceiling Height | Bracket Height Above Frame | Recommended Curtain Length |
|---|---|---|
| 8 ft | 4–6 in | 84 in |
| 9 ft | 8–12 in | 96 in |
| 10 ft+ | 12 in or more | 108 in |
Insight: Many people forget to check curtain length before mounting brackets, leading to curtains that float above the floor—a common mistake.
How Far Apart Should Curtain Rod Brackets Be?
The width between brackets is just as important as height.
Standard Practice
For most windows, add 2–4 inches to each side of the window frame. This lets curtains clear the window when open, maximizing light.
Example Table: Window Width Vs Bracket Placement
| Window Width | Bracket Placement | Total Rod Length |
|---|---|---|
| 36 in | 40–44 in apart | 48 in |
| 48 in | 52–56 in apart | 60 in |
| 60 in | 64–68 in apart | 72 in |
Extra-wide Windows
For windows over 72 inches wide, use a rod with center support. The rod can sag if not supported in the middle.
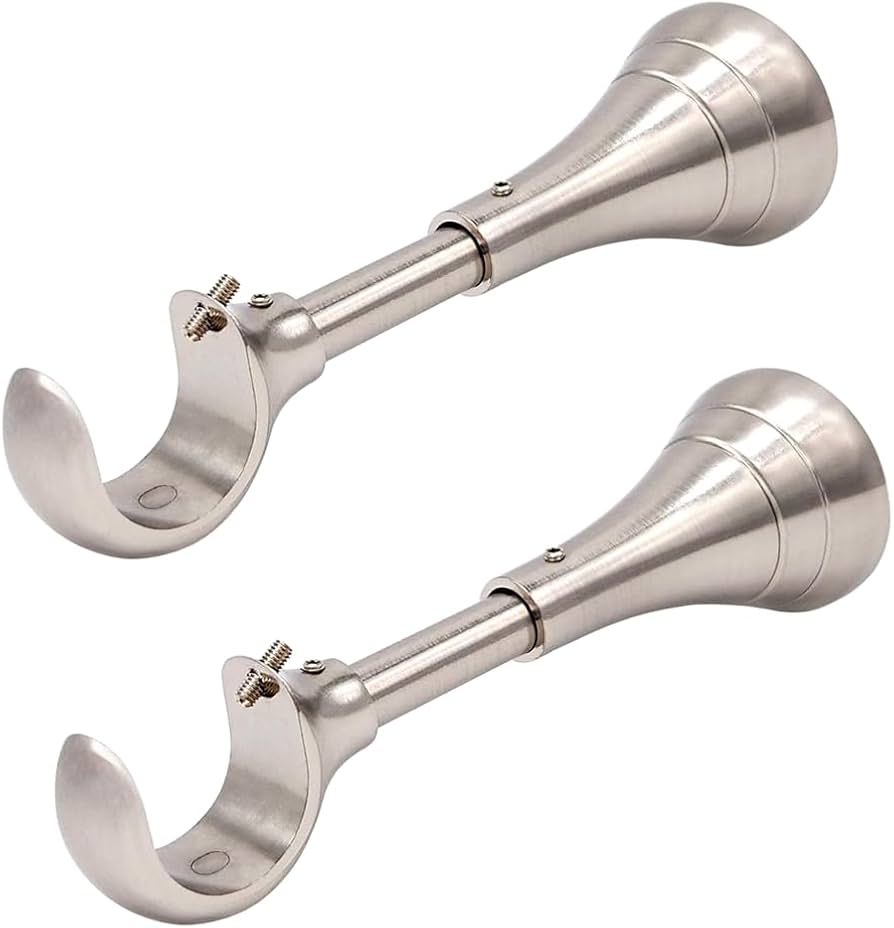
Credit: www.amazon.com
Bracket Placement For Different Curtain Styles
Curtain style affects where you mount brackets.
Grommet Curtains
Grommet curtains need brackets wide enough so the grommets don’t block the window. Mount brackets 3–4 inches beyond the window frame.
Rod Pocket Curtains
For rod pocket curtains, brackets can be slightly closer—2–3 inches beyond the frame.
Tab Top Curtains
Tab top curtains often need a bit more space, so 3–4 inches beyond is ideal.
Heavy Drapes
Heavy curtains require sturdy brackets and may need center supports. Place brackets wider for easier stacking.
Sheer Curtains
Sheer curtains are light, so brackets can be closer to the frame, but wider placement creates a fuller look.
Tools And Materials Needed
Proper bracket installation depends on having the right tools and materials.
- Curtain rod and brackets
- Measuring tape
- Pencil
- Level
- Screws and anchors
- Drill
- Screwdriver
- Ladder
Tip: Always use a level to ensure brackets are straight. Even a small tilt will be noticeable.
Step-by-step Guide To Mounting Curtain Rod Brackets
Follow these steps for a professional result.
- Measure the window: Note width and height.
- Decide on bracket placement: Choose height and width based on window and curtain style.
- Mark bracket spots: Use a pencil to mark where each bracket will go.
- Check for studs: Use a stud finder. If no studs, use wall anchors.
- Level the marks: Place the level across marks to ensure they’re straight.
- Drill holes: Drill pilot holes for screws.
- Install anchors (if needed): Push anchors into holes for added support.
- Attach brackets: Screw brackets into place.
- Check stability: Wiggle brackets to ensure they’re secure.
- Hang the rod and curtains: Place rod onto brackets and hang curtains.
Non-obvious insight: If you have drywall, always use anchors—even for light curtains. Drywall alone can crumble and fail over time.
Common Mistakes And How To Avoid Them
Many people make simple mistakes that ruin the look or function of their curtains.
Mounting Too Low
Brackets mounted too close to the window frame make the room look smaller. Always go higher unless you have architectural reasons not to.
Placing Brackets Too Narrow
If brackets are too close to the window frame, curtains block the glass even when open. Go wider for maximum light.
Not Using Center Support
For rods over 60 inches, always use a center bracket. Rods can bend or break without it.
Skipping Anchors
Drywall needs anchors. If you skip them, brackets may pull out over time.
Uneven Brackets
Always use a level. Even a small tilt is very noticeable and hard to fix.
Ignoring Curtain Length
Measure from the bracket to the floor. If you mount brackets too high, curtains may not reach.
Bracket Placement For Unusual Window Situations
Not all windows are standard. Here’s how to handle tricky cases.
Windows With No Trim
If your window has no trim, visually measure where the frame would be. Place brackets at least 4 inches above the glass and 2–4 inches beyond each side.
Windows Close To Ceiling
If the window is just inches from the ceiling, mount brackets as high as possible—right below the ceiling. Use shorter curtains or custom sizes.
Corner Windows
For windows in a corner, mount one bracket as usual and the other as far from the corner as space allows. For very tight corners, consider ceiling mount brackets.
Dormer Windows
Dormer windows are often small and tight. Use narrow rods and mount brackets as wide as possible within the space.
Ceiling Vs Wall Mount Brackets
You don’t always have to mount brackets on the wall. Ceiling mounts are a good option for some windows.
When To Use Ceiling Mounts
- Very high windows
- Windows close to ceiling
- Modern look
- No wall space
Ceiling mounts create a unique, contemporary style and make windows look taller.
Comparison Table: Ceiling Vs Wall Mount Brackets
| Mount Type | Best For | Pros | Cons |
|---|---|---|---|
| Wall | Standard windows | Easy to install, traditional look | Can limit height |
| Ceiling | High or corner windows | Makes windows look taller, modern style | Harder to install, needs strong anchors |
Mounting Brackets On Different Wall Materials
The type of wall affects how you mount brackets.
Drywall
Use wall anchors for all brackets. Drywall alone can’t hold much weight.
Plaster
Drill carefully—plaster can crack. Use anchors and avoid hammering.
Brick Or Masonry
Use masonry anchors and a masonry drill bit. Mark holes carefully, as mistakes are hard to fix.
Wood
If you hit a stud, screw directly into wood. This is the strongest option.
Non-obvious tip: Always check for wires or pipes in walls before drilling, especially in older homes.
Curtain Rod Bracket Placement For Insulation And Privacy
Curtains can help insulate rooms and provide privacy. Placement affects how well they do this.
Insulation
For the best insulation, mount brackets wider and higher. This lets curtains cover more wall, blocking drafts from the window.
Privacy
Mount brackets high and wide to prevent gaps at the top or sides. Use overlapping curtain panels for maximum privacy.
Light Blocking
If you want to block light, mount brackets wide enough for curtains to overlap the window frame. Use blackout curtains for best results.
Visual Tricks With Bracket Placement
Bracket placement can change how your room looks.
- Higher brackets: Makes ceilings look taller.
- Wider brackets: Makes windows look bigger.
- Full-length curtains: Adds drama and elegance.
- Ceiling mount: Creates a modern, sleek effect.
Example: Mounting brackets 12 inches above the window and 6 inches wider makes a small window look much larger.
Measuring For Bracket Placement: Step-by-step Example
Let’s walk through an example. You have a window that’s 48 inches wide and 36 inches tall, and 8-foot ceilings.
- Height: Choose 6 inches above the frame. So, bracket height is 42 inches from the floor.
- Width: Add 4 inches to each side. Brackets are 56 inches apart.
- Rod length: Use a 60-inch rod.
- Curtain length: Buy 84-inch curtains for floor-length.
Tip: Always measure twice before drilling. Mistakes can mean patching holes and starting over.
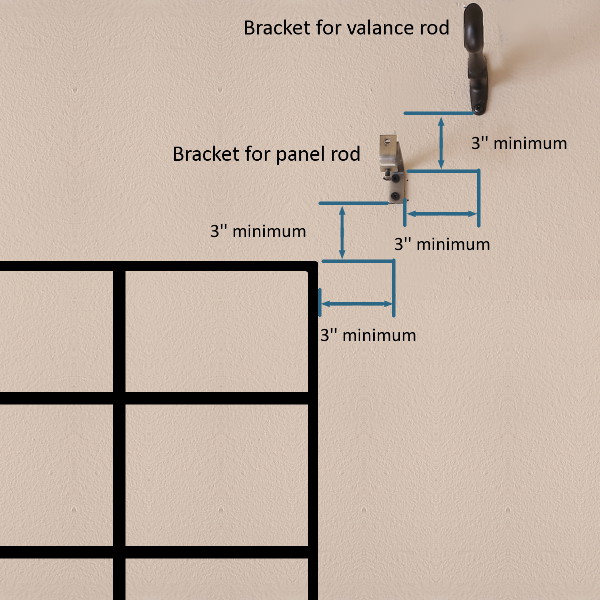
Credit: www.tecnoassistence.it
Bracket Placement For Layered Curtains
Many people use both sheer and blackout curtains on the same window. This requires double rods and special placement.
Double Rods
Mount the first bracket set for the inner rod (sheers) 2–3 inches beyond the frame. Mount the second set (outer rod, blackout curtains) 4–6 inches beyond.
Layering Tips
- Use strong brackets for heavy outer curtains.
- Make sure rods are spaced far enough apart for easy movement.
- Buy rods of different diameters for a balanced look.
Curtain Rod Bracket Placement For Different Room Types
Different rooms need different bracket placement for best function and style.
Living Room
Go high and wide for drama. Use long, heavy curtains for insulation and privacy.
Bedroom
Use blackout curtains. Mount brackets wide for full coverage.
Kitchen
Mount brackets close to the frame. Use short curtains or café style.
Bathroom
Mount brackets above window for privacy. Use moisture-resistant materials.
Office
Mount brackets wide for lots of light. Use sheers to reduce glare.
Bracket Placement For Decorative Rods And Finials
Decorative rods and finials (end caps) need extra space.
- Add at least 2 inches beyond the bracket for large finials.
- Measure the length of finials before choosing rod length.
Insight: Many people forget to include finial length in their measurement, which can cause curtains to not fit properly.
Tips For Renting Or Temporary Installations
If you’re renting, you may not want to make permanent holes.
- Use tension rods for light curtains. No drilling needed.
- Use removable adhesive brackets for temporary solutions.
- Choose lightweight curtains to avoid stress on temporary brackets.
Tip: Always check your lease before making holes. Some landlords require repairs when you move out.
Bracket Placement For Motorized Curtain Rods
Motorized rods are heavier and need strong support.
- Use heavy-duty brackets.
- Mount brackets into studs if possible.
- Keep brackets wide for easy movement.
How To Fix Bracket Placement Mistakes
If you drilled holes in the wrong spot, don’t panic.
- Patch holes with filler and sand smooth.
- Repaint if needed.
- Measure carefully and re-drill in the correct spot.
- Use a template to avoid repeating mistakes.
Non-obvious insight: Keep extra screws and anchors handy for quick fixes. Many people run out of hardware during installation.
Curtain Rod Bracket Placement For Child Safety
If you have children, placement and hardware choice matter.
- Mount brackets high and out of reach.
- Use security screws or lock brackets to prevent removal.
- Avoid rods with sharp ends.
Trends In Curtain Rod Bracket Placement
Designers are using creative placement to shape rooms.
- Extra-high brackets: Create drama and elegance.
- Wide placement: Makes windows look bigger.
- Layered rods: Add depth and texture.
Example: In modern homes, brackets are often mounted right at the ceiling for a bold look.

Credit: atlasfinest.com
Smart Home Integration
More homes use smart curtains and rods.
- Mount brackets wide for easy motor movement.
- Use strong hardware for heavy rods.
- Plan wiring and power outlets for motorized rods.
Frequently Asked Questions
What Height Should I Mount Curtain Rod Brackets?
Mount brackets 4–6 inches above the window frame for standard windows. For high ceilings, go 8–12 inches above or right up to the ceiling for a dramatic look.
How Far From The Window Frame Should Brackets Be Placed?
Brackets should be 2–4 inches beyond each side of the window frame. For wide windows, go wider and use center support.
Can I Mount Curtain Rod Brackets On The Ceiling?
Yes, ceiling mount brackets are common for modern looks or for windows close to the ceiling. Use strong anchors and check ceiling material before installing.
Do I Need Wall Anchors For Curtain Rod Brackets?
If you’re mounting on drywall or plaster, always use wall anchors. For wood studs, you can screw directly. Masonry walls need masonry anchors.
What If My Curtain Rod Sags In The Middle?
For rods over 60 inches, use a center support bracket to prevent sagging. Make sure the rod is strong enough for the weight of your curtains.
Mounting curtain rod brackets is more than following instructions—it’s about understanding your space and making choices that fit your style and needs. With the right placement, you control light, privacy, and the look of your room. Use the tips and data in this guide to make sure your curtains hang perfectly, every time. For more detailed information on curtain hardware and installation, visit Home Depot. With careful planning and the right tools, you’ll enjoy beautiful, functional curtains that make your home feel just right.