
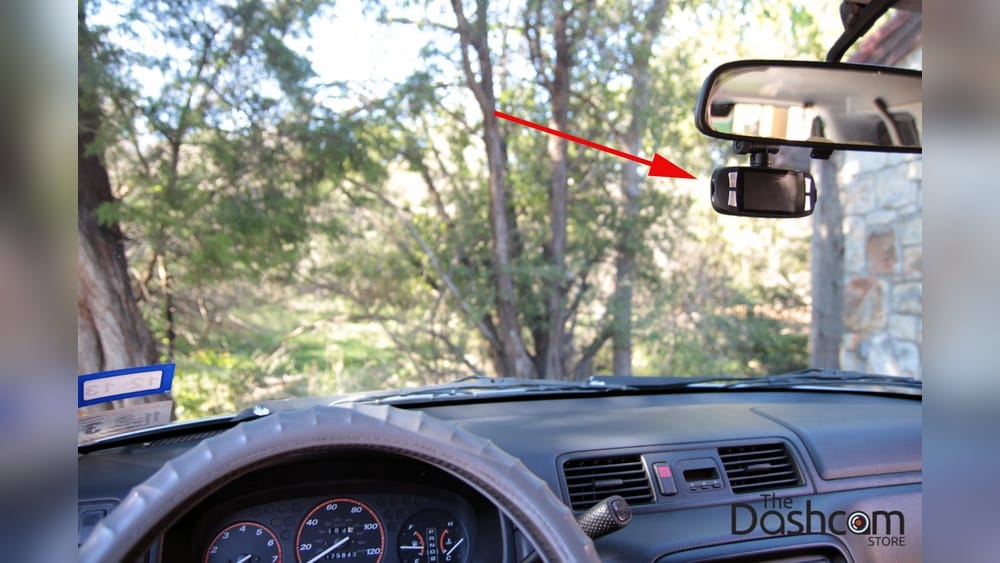
Mounting a dash cam seems simple at first. But if you choose the wrong spot, your camera may miss important footage, break local rules, or even become a distraction. Whether you want to protect yourself after an accident, record your road trips, or lower your insurance costs, the right dash cam location matters more than most drivers realize.
In this guide, you’ll learn where to mount a dash cam for the best view, safety, and compliance, plus advanced tips that even many experienced users miss.
Why Dash Cam Placement Is Critical
Many people think any spot on the windshield is good enough. But dash cam placement affects:
- Video quality: A poor angle can block your view or miss key details.
- Legal compliance: Some states have strict rules about where you can place devices on your windshield.
- Driver safety: Bad placement can distract you or block your vision.
- Device lifespan: Too much sun, heat, or vibration can damage your dash cam.
According to the Insurance Institute for Highway Safety, video evidence from dash cams can reduce accident disputes by up to 40%. But only if the footage is clear and covers the right areas. Mounting your dash cam correctly is not just about convenience — it can protect you from costly mistakes.
Most Common Dash Cam Mounting Locations
There are several places you can mount a dash cam, but each has its pros and cons. Let’s look at the most popular options.
Windshield (upper Center)
Mounting your dash cam high in the center, just below the rearview mirror, is the most common method.
Pros:
- Wide view of the road ahead
- Less likely to block driver vision
- Easy to hide wires along the headliner
Cons:
- May violate windshield obstruction laws in some states
- Harder to reach for manual controls
Windshield (lower Center)
Some people prefer mounting low, near the dashboard.
Pros:
- Easier to reach
- Often legal in more states
- Good for capturing traffic lights and license plates
Cons:
- Can block part of the road view
- More visible to thieves
Windshield (side)
Mounting on the far left or right is less common but sometimes used.
Pros:
- Can avoid rearview mirror obstruction
- Useful for capturing specific areas (e.g., crosswalks)
Cons:
- Narrower field of view
- May block driver vision
- May not cover the road center
Rearview Mirror Attachment
Some dash cams attach directly to the rearview mirror.
Pros:
- Blends in, less noticeable
- Central road coverage
- Keeps windshield clear
Cons:
- May shake with mirror movement
- Harder to remove or adjust
Dashboard Mount
Some dash cams can sit directly on the dashboard.
Pros:
- Easy installation
- No windshield obstruction
Cons:
- Limited road coverage
- More prone to sun glare
- Often visible to thieves
Rear Window Mount (for Rear-facing Cams)
Rear-facing dash cams are usually placed on the back window.
Pros:
- Records accidents from behind
- Useful for parking incidents
Cons:
- Needs long wires
- Can be blocked by rear headrests
Legal Considerations For Dash Cam Mounting
Before installing, check your local laws. In the US, windshield obstruction rules vary by state.
- California: Devices must be mounted in a 7-inch square area in the lower corner of the windshield or a 5-inch area near the rearview mirror.
- New York: Windshield obstruction is prohibited; devices must not block the driver’s view.
- Texas: No specific dash cam laws, but cannot block visibility.
Always check your state’s Department of Motor Vehicles website for up-to-date info. Penalties for violating these rules can range from $50 to $200, and in some cases, you may be forced to remove the device on the spot.
How To Choose The Best Dash Cam Mounting Spot
Choosing the right spot depends on your vehicle, dash cam model, and what you want to record.
Factors To Consider
- Field of View
- Make sure the camera sees the whole road, traffic signals, and license plates.
- Driver Visibility
- Avoid blocking your view. Even a small device can distract you.
- Legal Compliance
- Mount within legal boundaries for your state or country.
- Device Access
- Consider how often you’ll need to reach the dash cam (to adjust, remove, or change settings).
- Sunlight and Heat
- Keep the camera away from direct sunlight when possible; excessive heat can damage electronics.
- Wire Management
- Hide cables to avoid a messy look and prevent distraction.
- Protection from Theft
- Mounting in a less visible spot can reduce the risk of theft.
Practical Example
Suppose you drive a sedan in California and want to record both the road and traffic lights. Mounting your dash cam just below the rearview mirror, inside the legal 5-inch square area, gives you a wide view and follows state law.
Hide wires along the headliner for a clean look. If you need to reach the controls often, consider a model with remote access.
Types Of Dash Cam Mounts
The way you attach your dash cam matters for stability and ease of installation.
Suction Cup Mount
Pros: Easy to install and remove, flexible placement
Cons: May lose grip in extreme heat or cold, more visible
Adhesive Mount
Pros: Strong hold, low profile
Cons: Harder to remove, can damage glass
Rearview Mirror Clip
Pros: Blends in, stable
Cons: May not fit all mirrors, harder to adjust
Dashboard Stand
Pros: Simple, no glass contact
Cons: Limited placement options, less stable
Comparison Table
Here’s a quick comparison of popular mount types:
| Mount Type | Ease of Install | Visibility | Stability | Removal Difficulty |
|---|---|---|---|---|
| Suction Cup | Easy | High | Medium | Easy |
| Adhesive | Moderate | Low | High | Hard |
| Mirror Clip | Easy | Low | High | Medium |
| Dashboard Stand | Easy | High | Low | Easy |
Step-by-step Guide To Mounting Your Dash Cam
If you want a clean, legal, and effective dash cam setup, follow these steps.
1. Read Dash Cam And Vehicle Manuals
Always check your dash cam instructions and your car’s manual. Some vehicles have special features (like rain sensors) that you don’t want to block.
2. Clean The Mounting Area
Use glass cleaner and a lint-free cloth. Dust or oil can make suction cups and adhesives fail.
3. Test Placement
Hold the dash cam in your chosen spot and check the view from both inside and outside the car. Make sure it covers the road and doesn’t block your vision.
4. Install The Mount
Attach your mount (suction, adhesive, or clip) as directed. Press firmly, but don’t use excessive force.
5. Attach The Dash Cam
Slide or click the dash cam onto the mount. Adjust the angle so it points slightly downward, capturing both the road and your hood.
6. Route The Cables
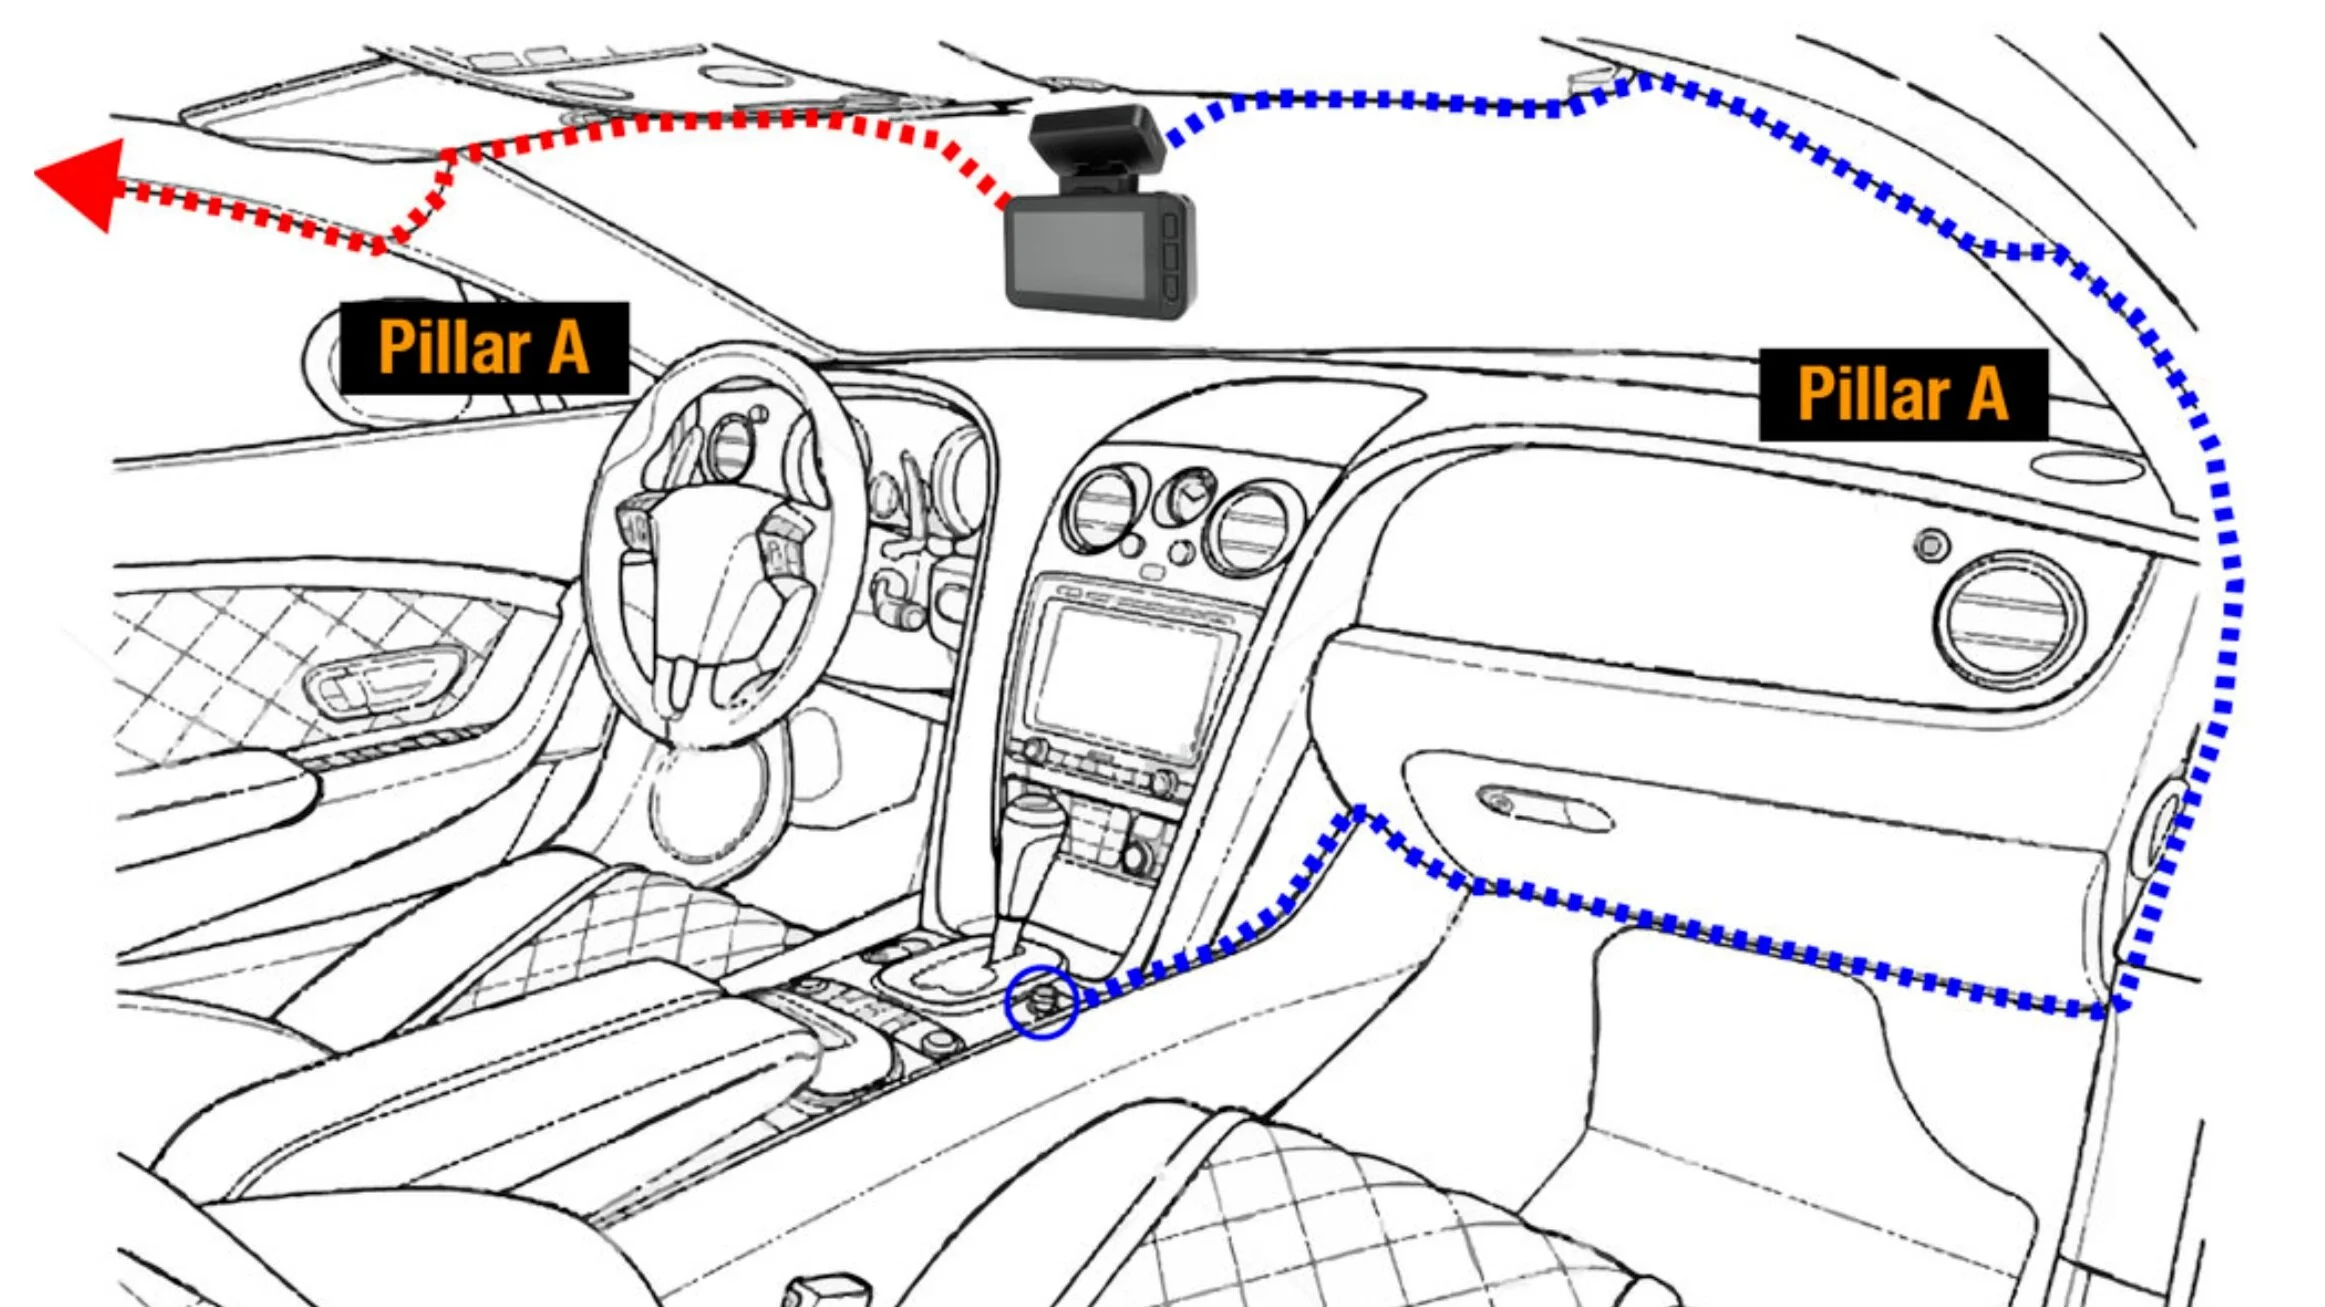
Tuck wires along the headliner, behind trim panels, or under carpets. Use cable clips if needed. Avoid running wires where airbags deploy.
7. Check The Video
Turn on the dash cam and watch a live preview. Adjust until you see the entire road, including traffic lights and crosswalks.
8. Secure Loose Wires
Loose wires can cause distraction or interfere with controls. Use zip ties or clips to keep everything tidy.
9. Test For Glare And Reflection
Check the footage during the day and at night. If you see glare, adjust the angle or use a polarizing filter.
10. Confirm Legal Compliance
Double-check that your dash cam is within legal limits and doesn’t block any part of your view.
11. Set Up Parking Mode (if Available)
Some dash cams record while parked. Make sure the camera can see the areas you want to monitor.
Advanced Tips For Dash Cam Mounting
Even experienced users miss some details that can improve dash cam performance.
Use A Polarizing Filter
A polarizing filter reduces windshield glare and reflections. Many dash cams offer screw-on filters. This makes footage clearer, especially on sunny days.
Consider Dual Cameras
Some dash cams have a second camera for the rear or cabin. Mount the rear camera high on the back window for the best view. Cabin cameras should face passengers without blocking driver vision.
Avoid Airbag Zones
Don’t run wires or mount the dash cam where airbags deploy. In an accident, a loose device can cause injury.
Hide Wires For Theft Prevention
Thieves often spot dash cams by their wires. Hiding cables behind trim panels can make your setup less noticeable.
Use Parking Mode With Care
Parking mode can drain your battery if not installed correctly. Some dash cams use a hardwire kit to turn off when the battery is low.
Mount For Easy Removal
If you park in risky areas, consider a suction cup mount so you can quickly remove the dash cam.
Check For Sun Visor Interference
Mount high enough so the sun visor doesn’t hit the camera.
Comparison: Field Of View By Mount Position
To understand how mounting position affects coverage, see this table:
| Mount Position | Field of View | License Plate Capture | Traffic Light Capture |
|---|---|---|---|
| Upper Center | Wide | Good | Excellent |
| Lower Center | Medium | Excellent | Good |
| Side | Narrow | Fair | Fair |
| Dashboard | Medium | Good | Poor |
Dash Cam Mounting For Different Vehicle Types
Each vehicle shape affects dash cam placement.
Sedans
Mounting just below the rearview mirror is best for sedans. Side windows are far from the road center, so avoid side mounts.
Suvs
SUVs have higher windshields. Mount centrally, but check for rain sensors or camera systems near the mirror.
Trucks
Trucks have large, vertical windshields. The upper center works well, but make sure the camera doesn’t block commercial stickers.
Vans
Mount close to the top, but avoid blocking the large sun visors.
Motorcycles
Some dash cams are made for motorcycles. Mount on the handlebars, helmet, or fairing. Make sure it’s waterproof.
Comparison: Mounting Challenges By Vehicle Type
| Vehicle Type | Mounting Challenge | Best Mount Position | Notes |
|---|---|---|---|
| Sedan | Limited space behind mirror | Upper center | Avoid sun visor area |
| SUV | Rain sensors | Upper center | Check for built-in electronics |
| Truck | Commercial stickers | Upper center | Keep stickers visible |
| Van | Large visors | Upper center | Mount higher |
| Motorcycle | Vibration | Handlebar | Use vibration dampener |

Credit: www.youtube.com
Common Mistakes To Avoid
Many dash cam users make mistakes that reduce video quality or break the law.
- Blocking Driver’s View: Even a small dash cam can block part of your vision.
- Ignoring Legal Limits: Mounting outside allowed areas can result in fines.
- Poor Wire Management: Loose wires look messy and can distract you.
- Wrong Angle: Pointing too high misses license plates; too low misses traffic lights.
- Mounting Over Sensors: Blocking rain sensors or cameras can disable vehicle features.
- Using Cheap Mounts: Low-quality mounts can fall off in heat or vibration.
- Not Testing Night Footage: Some positions cause glare or reflections at night.
How Dash Cam Position Impacts Insurance And Evidence
Many insurance companies accept dash cam footage, but only if it’s clear and complete. In 2021, a survey by AAA showed that 32% of drivers who submitted dash cam evidence had their claims processed faster. Mounting your dash cam correctly ensures your footage is usable.
Some insurance providers even offer discounts for drivers with dash cams, but only if the camera is mounted legally and covers the road well. If your footage is blocked, blurry, or incomplete, it may not be accepted in court.
How Weather And Environment Affect Dash Cam Mounting
Weather can impact both installation and performance.
- Extreme Heat: Adhesive mounts can melt or lose grip. Park in shade or use heat-resistant mounts.
- Cold Weather: Suction cups may lose grip. Warm up the glass before installing.
- Rain: Water spots on the windshield can blur footage. Clean glass regularly.
- Sunlight: Direct sun can cause lens flare. Use a filter or adjust angle.
If you live in a hot climate, consider a dash cam with a capacitor instead of a battery. Capacitors handle heat better and last longer.
Dash Cam Mounting For Ride-sharing And Commercial Vehicles
Drivers for companies like Uber, Lyft, and delivery services often need both road and cabin cameras.
- Road Camera: Mount centrally for the best coverage.
- Cabin Camera: Place on the windshield, facing passengers, but not blocking driver vision.
- Rear Camera: Mount high on the rear window.
Some ride-sharing companies require dash cams to be visible to passengers. Always check company policies and local laws.
Should You Install Yourself Or Use A Professional?
DIY installation works for most people, but professional installers can help with tricky setups.
DIY Pros:
- Cheaper
- Flexible
- Quick
DIY Cons:
- May miss hidden wires
- Risk of blocking sensors
Professional Pros:
- Expert wire hiding
- Legal compliance
- Warranty
Professional Cons:
- Cost ($50–$200)
- Scheduling needed
If your car has advanced electronics, consider professional installation.
How To Remove Or Relocate A Dash Cam
Sometimes you need to change your dash cam’s position.
- Suction Cup: Pull tab or twist to release.
- Adhesive: Use dental floss or a plastic tool to gently pry off. Clean residue with alcohol.
- Mirror Clip: Unclip and slide off.
Always unplug wires before removing. After relocating, test the new position for coverage and glare.
Maintenance Tips After Mounting
- Clean the lens and windshield regularly.
- Check the mount for looseness every month.
- Update dash cam firmware for best performance.
- Review footage after accidents or incidents.
- Replace mounts if they lose grip.
Non-obvious Insights Most Beginners Miss
- Mount height affects night glare: If your dash cam is too low, headlights from other cars cause glare. Mounting higher reduces this effect.
- Camera rotation matters: Some dash cams allow you to rotate the lens. Adjusting the rotation can help center the horizon and improve evidence quality.
- State inspection stickers: In some states, windshield stickers are mandatory. Never cover these with your dash cam or wires.
Is Wireless Dash Cam Mounting Possible?
Some new dash cams use wireless power or batteries. You can mount these anywhere, but they need regular charging. Wireless cams are best for short trips or rental cars, but not for long-term use.
Selecting The Best Dash Cam For Your Mount Position
Not every dash cam fits all mount positions. When choosing, look for:
- Wide-angle lens: Covers more of the road.
- Adjustable mount: Lets you change angle easily.
- Low profile: Less visible to thieves.
- Polarizing filter option: Reduces glare.
- Capacitor power: Handles heat better.
Credit: apxenergy.com
Dash Cam Mounting And Privacy Concerns
Recording in public is usually legal, but filming inside the cabin may require passenger consent. Some states have strict privacy laws. Always check before recording inside your vehicle.
Real-world Example: Solving A Mounting Problem
A driver in Texas mounted their dash cam low on the windshield, but found it blocked their view and caused glare at night. After relocating the camera just below the rearview mirror and adding a polarizing filter, night footage improved by 60%.
This helped them win an insurance claim after a minor accident.

Credit: www.artisticd.com
Frequently Asked Questions
What Is The Best Spot To Mount A Dash Cam?
The best spot is usually just below the rearview mirror, centered high on the windshield. This gives a wide road view and is legal in most states. Always check your local laws for specific rules.
Can I Mount A Dash Cam Anywhere On My Windshield?
No. Most states have laws about windshield obstruction. You must mount your dash cam in allowed areas, usually near the mirror or in a corner. Check your state’s regulations before installing.
How Do I Hide Dash Cam Wires?
Use the headliner and trim panels to tuck wires out of sight. Cable clips and zip ties help keep things tidy. Avoid running wires where airbags deploy.
Does Dash Cam Mounting Affect Insurance Claims?
Yes. If your footage is clear and covers the road, it can help with insurance claims. Poor mounting can block important details and make your footage unusable.
Can I Install A Dash Cam Myself?
Most dash cams are easy to install. Follow the instructions, clean the glass, and test the view. For advanced setups or hidden wires, consider professional installation.
Mounting your dash cam may seem like a small task, but the right spot can make all the difference. The ideal position balances road coverage, legal compliance, safety, and convenience. By following the tips in this guide, you’ll get the most from your dash cam, protect yourself on the road, and avoid mistakes that cost time or money. For more details on dash cam laws and best practices, see the National Highway Traffic Safety Administration.