
If your security camera won’t connect to your WiFi, it’s more than a minor inconvenience—it can leave your home or office unprotected and cause stress. This is a frustrating problem for many, especially if you’re not a tech expert. The good news?
Most WiFi connection issues have clear solutions. Understanding the possible causes will help you fix the problem faster and keep your security system running smoothly. Let’s explore why your security camera won’t connect to WiFi and how you can solve this issue confidently.
How Security Cameras Connect To Wifi
To fix a connection problem, you first need to know how these cameras use WiFi. Most modern security cameras connect to your wireless router the same way your phone or laptop does. They need:
- A stable WiFi signal from your router
- A compatible WiFi frequency (usually 2.4 GHz or 5 GHz)
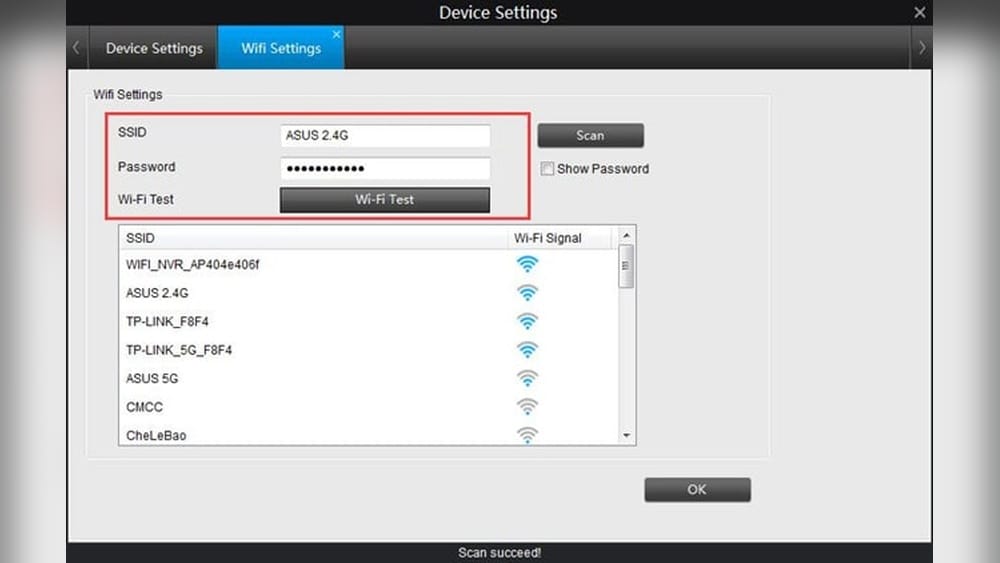
- Correct network name (SSID) and password
- Proper power supply
Some cameras also need a companion app to finish setup. If any part of this process fails, the camera can’t talk to your network.
Common Reasons Why Security Cameras Won’t Connect To Wifi
There isn’t just one reason for WiFi trouble. Below are the most frequent causes, with tips to help you identify them quickly.
1. Weak Wifi Signal
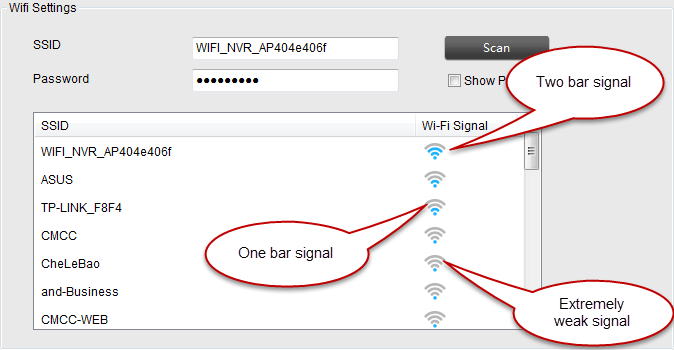
If your camera is far from the router, the signal may be too weak. Walls, thick doors, or metal objects can block WiFi. Outdoor cameras often struggle if your router is inside.
Tip: Use your phone to check the signal strength at the camera’s location. If you see just one bar or the connection drops, your camera will likely have problems, too.
2. Incorrect Wifi Password
This is more common than you think. If you mistype your password during setup, the camera can’t connect. Some devices don’t show an error message, which makes it confusing.
Tip: Double-check for capital letters, numbers, or special symbols. If you recently changed your WiFi password, update it on your camera as well.
3. Network Name (ssid) Issues
Some cameras can’t see WiFi networks with special characters or very long names. Others have trouble if your network is hidden (not broadcasting its SSID).
Tip: Try renaming your WiFi to use only letters and numbers. Make sure your network is visible during setup.
4. Incompatible Wifi Frequency
Most cameras only support 2.4 GHz WiFi. If your router uses only 5 GHz or a mixed mode, the camera may not find the network.
Tip: Check your camera’s manual. If it only works on 2.4 GHz, make sure your router broadcasts a 2.4 GHz signal.
5. Router Settings Or Limits
Some routers have settings that block new devices, such as MAC address filtering or firewall rules. Others limit the number of connected devices, which can block your camera.
Tip: Log in to your router’s admin page and check device limits or security settings. Turn off MAC filtering during setup.
6. Power Issues
If your camera isn’t getting enough power, it might turn on but not connect properly.
Tip: Use the power adapter that came with your camera. For battery-powered models, check if the battery is fully charged.
7. Outdated Firmware Or App
Security cameras rely on software (firmware) to work correctly. An old version can cause bugs or prevent WiFi connection.
Tip: Update your camera’s firmware using the app or manufacturer’s website. Update the mobile app as well.
8. Interference From Other Devices
Microwaves, cordless phones, and other WiFi networks can cause interference. This is more common in crowded apartment buildings.
Tip: Move your camera and router away from other electronics. Change the WiFi channel in your router settings if possible.
9. Camera Already Connected Elsewhere
If you set up your camera before (maybe at a different house), it may still try to connect to the old network.
Tip: Reset your camera to factory settings before trying again.
10. App Or Setup Errors
Sometimes, the setup app crashes or doesn’t finish the process. This can leave the camera stuck.
Tip: Restart the app, close other apps, and try setup again. If possible, use a different phone or tablet.
Credit: www.smonet.com
Diagnosing The Problem: Step-by-step
To save time, follow a logical process. This helps avoid guessing and unnecessary stress.
Step 1: Check Camera Power And Status Lights
Most cameras have LED lights to show their status. For example, a blinking blue or green light usually means the camera is trying to connect. No light or a red light often means a power or hardware problem.
Practical tip: If the camera doesn’t show any lights, unplug and replug it. Try a different outlet or power adapter.
Step 2: Test The Wifi Signal
Use your smartphone at the camera’s location. If you can’t connect to WiFi or the signal is weak, move the camera or router closer together.
Non-obvious insight: Even if your phone connects, cameras sometimes need a stronger signal because they have weaker antennas.
Step 3: Confirm Network Settings
- Is your WiFi network visible?
- Are you using the correct password?
- Is the SSID simple and short?
If you have a dual-band router, check if both 2.4 GHz and 5 GHz networks are available. Match the right one for your camera.
Step 4: Review Router Settings
Log into your router’s admin page (usually by typing 192.168.1.1 or similar in a browser). Check:
- Device limits
- MAC address filtering
- Parental controls or firewalls
Disable any feature that might block new devices.
Step 5: Update Firmware And Apps
Check for updates for both the camera and the setup app. Sometimes, a new update fixes WiFi bugs.
Non-obvious insight: Some updates must be installed with the camera connected by cable (Ethernet) before WiFi will work.
Step 6: Perform A Factory Reset
If nothing works, reset your camera to factory settings. Usually, there’s a small reset button you hold for 10–20 seconds.
Comparing Wifi Frequencies And Camera Compatibility
Many users are surprised to learn that most WiFi cameras only work on one frequency. Here’s a quick comparison:
| Feature | 2.4 GHz WiFi | 5 GHz WiFi |
|---|---|---|
| Range | Greater distance (through walls) | Shorter range (best for open rooms) |
| Speed | Slower | Faster |
| Camera Support | Almost all cameras | Few cameras |
| Interference | More (crowded frequency) | Less (fewer devices use it) |
Key takeaway: If your router only offers 5 GHz, your camera probably won’t connect. Make sure the 2.4 GHz band is enabled in your router settings.
Credit: reolink.com
How To Fix Security Camera Wifi Connection Problems
Now, let’s get practical. Here’s a clear path to fixing most issues, step by step.
1. Move The Camera Closer To The Router
Start simple. If possible, plug in your camera near the router for setup. Once connected, you can move it farther away and test the signal.
2. Check The Power Supply
Use the original power adapter. For battery cameras, charge fully. A low battery can cause weak signals or frequent disconnects.
3. Simplify Your Wifi Network Name And Password
Use only letters and numbers for both. Avoid spaces, symbols, or very long names. Some cameras can’t handle “!” or “$” in passwords.
4. Enable The 2.4 Ghz Band On Your Router
Log into your router and make sure the 2.4 GHz WiFi is broadcasting. Name it clearly so you can select it during setup.
5. Reduce Network Traffic
Disconnect some devices temporarily during setup. High traffic can delay or block new connections.
6. Temporarily Disable Security Features
Turn off MAC filtering, parental controls, or guest networks during setup. Re-enable them after the camera connects.
7. Update Everything
Check for firmware updates for your camera. Update your router firmware, too. Manufacturers often release fixes for WiFi bugs.
8. Reset Your Camera
Hold the reset button for 10–20 seconds. This clears old network settings and lets you start fresh.
9. Try A Wired Connection First
If your camera has an Ethernet port, connect it to your router directly. Set up WiFi from the app, then unplug the cable.
10. Contact Support
If you’ve tried all steps, contact the camera’s manufacturer. Provide your model, router brand, and a description of what you’ve tried. Some cameras have known issues with certain routers, and support can guide you.
Comparing Wired Vs. Wireless Camera Setup
Some users wonder if a wired connection is better. Here’s a quick comparison:
| Feature | Wired Connection | Wireless Connection |
|---|---|---|
| Reliability | Very high | Can drop with weak signal |
| Setup Difficulty | Harder (needs cables) | Easier, flexible placement |
| Interference Risk | Very low | Higher (WiFi interference) |
| Mobility | Fixed location | Can be moved easily |
Insight: Wired connections avoid WiFi problems but need more installation work. If you need rock-solid reliability, consider a wired camera for key areas.
When To Upgrade Your Router Or Camera
Sometimes, the problem isn’t your fault. Old routers and cameras may not support the latest WiFi standards. Here’s how to know when to upgrade:
Signs You Need A New Router
- Your router is more than 5 years old
- Frequent disconnects, even for phones or laptops
- No support for dual-band (2.4 GHz and 5 GHz)
- No firmware updates available
Signs You Need A New Camera
- Camera only supports very old WiFi standards (like 802.11b)
- No firmware updates for years
- Not compatible with your current router
Pro tip: If upgrading, choose a camera that supports both 2.4 GHz and 5 GHz for better future compatibility.
Impact Of Too Many Devices On Your Network
Most homes now have many connected devices: phones, laptops, TVs, smart plugs, and more. Each device uses some of your router’s capacity. If your router is overloaded, new connections may fail.
How Many Devices Is Too Many?
Basic routers can support 10–20 devices well. Advanced models handle 30–50. If you have smart bulbs, sensors, and several cameras, you may hit this limit.
Example: If your router supports 16 devices, but you have 4 phones, 2 TVs, 3 laptops, 2 tablets, 5 smart plugs, and 2 cameras—some devices may struggle to connect.
What Can You Do?
- Disconnect unused devices
- Upgrade to a router with higher capacity
- Use a mesh WiFi system for large homes
The Role Of Distance And Obstacles
Distance and physical barriers are a major cause of WiFi trouble for security cameras.
How Far Is Too Far?
Most 2. 4 GHz routers have a range of 150 feet indoors, less with walls. 5 GHz is much less—often only 30–50 feet. Metal, concrete, or thick walls cut the range even more.
Practical Example
If you place an outdoor camera on your garage, but your router is in the basement, the WiFi signal may not reach. Try moving the router upstairs or adding a WiFi extender.
Using Wifi Extenders Or Mesh Systems
If your camera is far from the router, a WiFi extender or mesh system can help.
What’s The Difference?
| Feature | WiFi Extender | Mesh WiFi System |
|---|---|---|
| How it works | Repeats your main WiFi signal | Multiple units create one large network |
| Setup | Simple, but separate network name | Smooth, single network name |
| Best for | Small areas or one dead zone | Large homes, many devices |
| Cost | Lower | Higher |
Tip: For just one camera, a WiFi extender may be enough. For many cameras or a large house, consider mesh WiFi.

Credit: www.youtube.com
Security Settings That Can Block Cameras
Security features on your router are important, but they can sometimes block new cameras.
Common Features That Cause Problems
- MAC address filtering: Only allows devices on a pre-approved list
- Guest network: Isolated from your main devices
- Parental controls: Can block camera traffic
- WPA3 encryption: Not all cameras support the latest security
How To Fix
Temporarily turn off these features during setup. Once your camera is connected, you can re-enable them. If your camera doesn’t support WPA3, use WPA2 security instead.
Firmware And Software Updates: Why They Matter
Manufacturers often release updates to fix bugs and improve connectivity. Skipping these updates leaves your camera open to problems and even security risks.
How To Update
- Use the camera’s app to check for updates
- Visit the manufacturer’s website for firmware files
- Follow instructions carefully (don’t turn off power during updates)
Common Mistake
Many users skip updates, thinking it’s not important. Outdated firmware is a leading cause of connection problems.
Real-world Example: Troubleshooting A Wifi Camera
Let’s walk through a real example. Suppose you bought a popular brand camera and it won’t connect. Here’s a step-by-step fix:
- You try to set up the camera using the app. It won’t find your WiFi network.
- You notice your WiFi name has “!” and “@” in it. You change it to “HomeNetwork24”.
- You try again. Still no luck.
- You move the camera closer to the router and restart both devices.
- The camera’s status light blinks green—now it finds the network.
- You enter the WiFi password. It still won’t connect.
- You realize your router is set to 5 GHz only. You enable 2.4 GHz.
- The camera connects instantly.
Lesson: Small changes make a big difference. Always check the basics—name, password, frequency, and signal strength.
When To Seek Professional Help
If you’ve tried all the above steps and your camera still won’t connect, it may be time to call an expert.
Signs You Need Help
- Status lights show errors you can’t fix (like constant red light)
- The camera won’t reset or power on
- Your router crashes or other devices lose WiFi when you connect the camera
Tip: Keep your camera’s box, receipt, and manual. Support teams often ask for serial numbers or order details.
Security Risks: Why Proper Setup Matters
A poorly connected camera is not just annoying—it can be risky. If your camera is only partly connected, it may not record or send alerts. Worse, insecure setup can expose your network to hackers.
Safety Tips
- Always use a strong, unique password for your WiFi
- Change default camera passwords immediately
- Keep firmware up to date
- Don’t share your camera’s access with untrusted people
For more on WiFi security, see this government guide.
Frequently Asked Questions
Why Does My Security Camera Say “incorrect Password” Even When I Enter The Right One?
This often happens if your WiFi password has special characters or spaces. Some cameras don’t support these symbols. Try using a simple password with only letters and numbers. Double-check for accidental spaces at the beginning or end.
Can I Connect My Camera To A 5 Ghz Wifi Network?
Most security cameras only support 2.4 GHz WiFi. Check your camera’s specifications. If it doesn’t support 5 GHz, enable the 2.4 GHz band on your router and use that network.
My Camera Works Near The Router But Not Outside. Why?
This means the WiFi signal is too weak where you want to install the camera. Walls, floors, and distance reduce signal strength. Try a WiFi extender or mesh system to boost coverage, or move the router closer.
Do I Need To Update My Camera’s Firmware?
Yes, keeping your camera’s firmware up to date is important. Updates fix bugs, improve connection, and close security holes. Check for updates regularly in the camera’s app or on the manufacturer’s website.
What Should I Do If My Camera Still Won’t Connect After Trying Everything?
If you’ve checked power, WiFi settings, password, and updated firmware, contact the camera’s support team. There could be a hardware fault or compatibility issue with your router. Have your model and details ready for faster help.
Getting your security camera connected to WiFi can be challenging, but it’s usually possible with patience and careful troubleshooting. Start with the basics—power, distance, and correct settings. Don’t be afraid to reset or update your devices. Most connection problems have simple solutions once you know what to look for.
Your peace of mind is worth the effort.